Body Part Replacement and Mesh/Mask Boundary Troubleshooting
Custom Torso Geometry
Female Torso Template
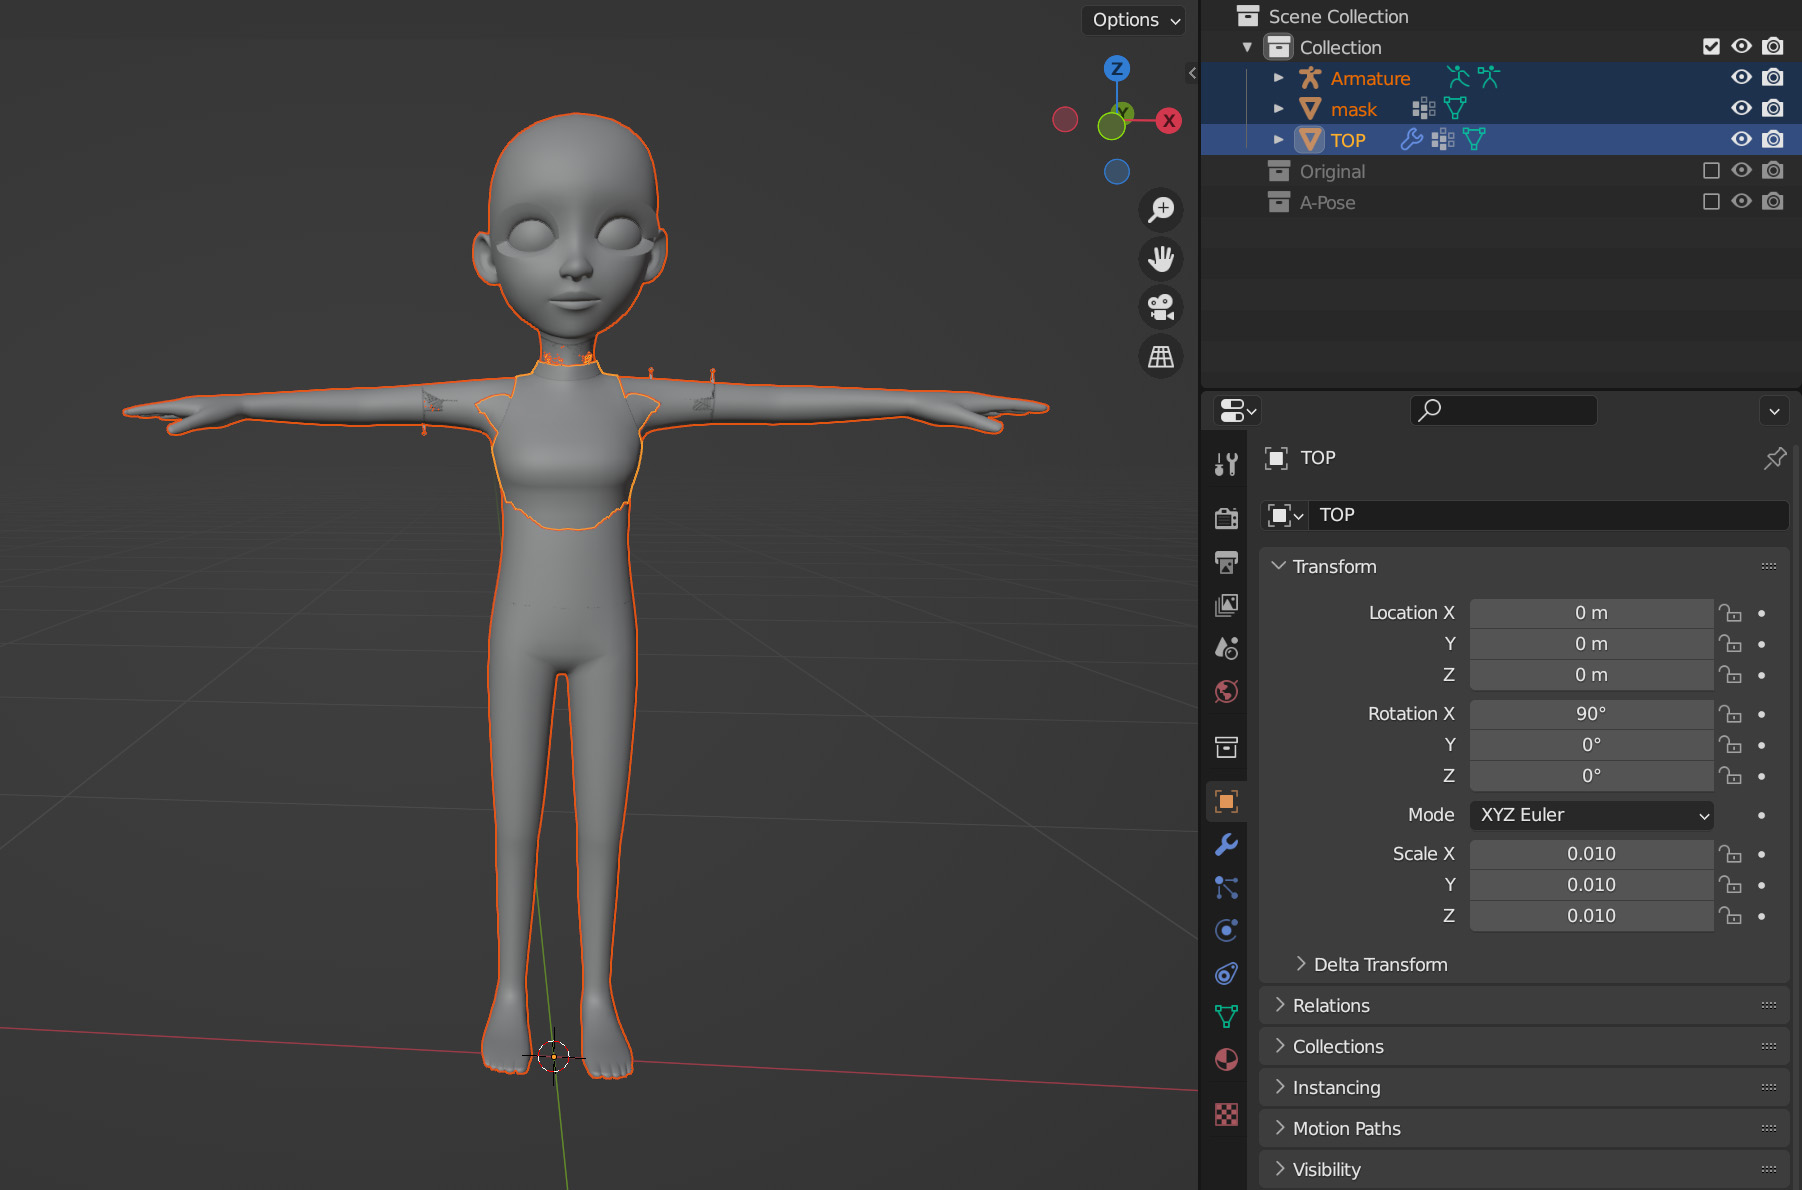
The default ZEPETO base body has a generally neutral to masculine shape. For a more distinct female torso, a mesh element that replaces the base body should be used. For an example or starting point, download the Female_Torso.fbx (Download) file.
This file can be loaded into Blender and will contain two mesh objects:
- Female_Torso_V
- guide_mannequin
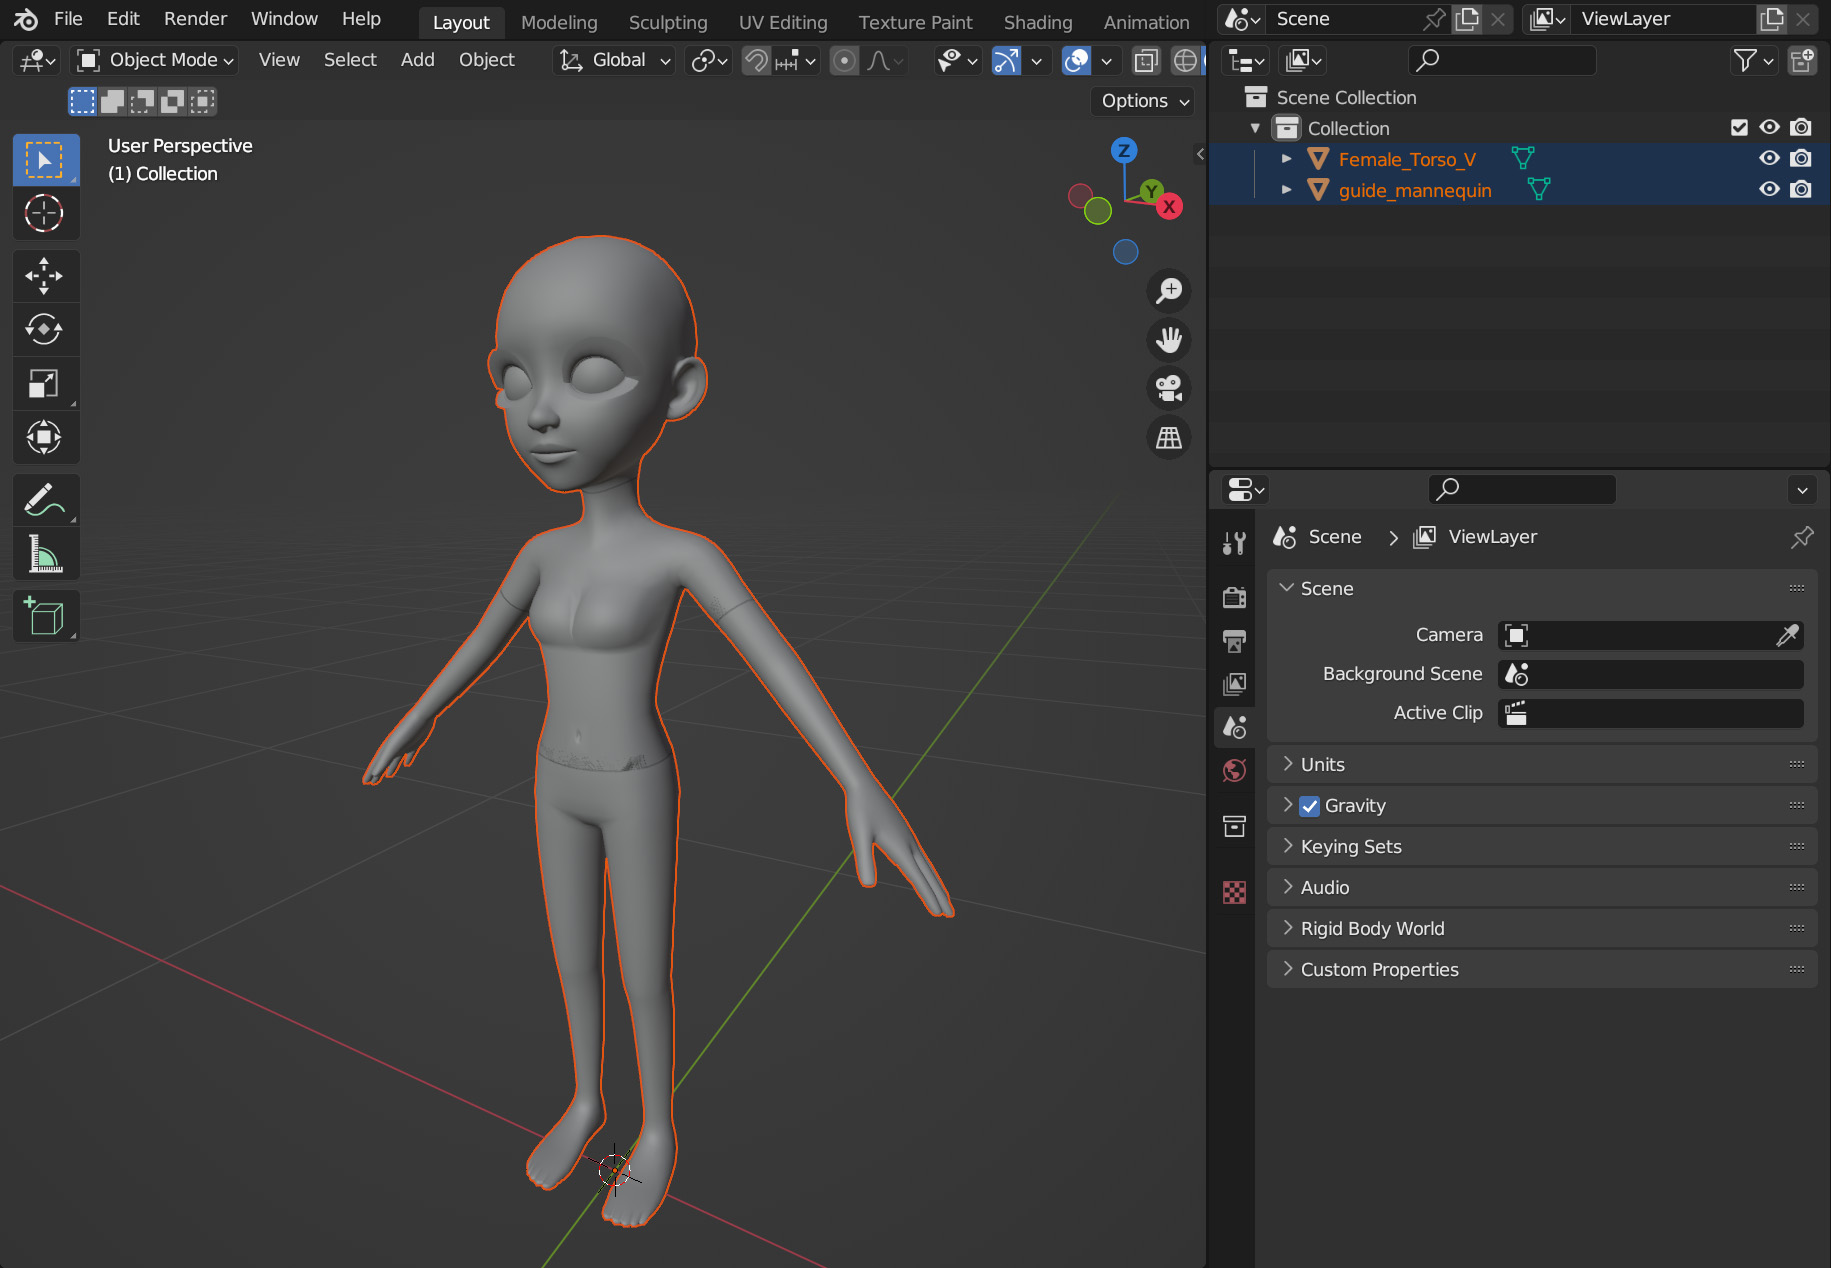
Both the Female_Torso_V object and guide_mannequin object are UV mapped to the same specifications as the mask. The Female_Torso_V object also has a material on it named “skin.” This material naming is necessary to tell the app to use the skin textures from the avatar.
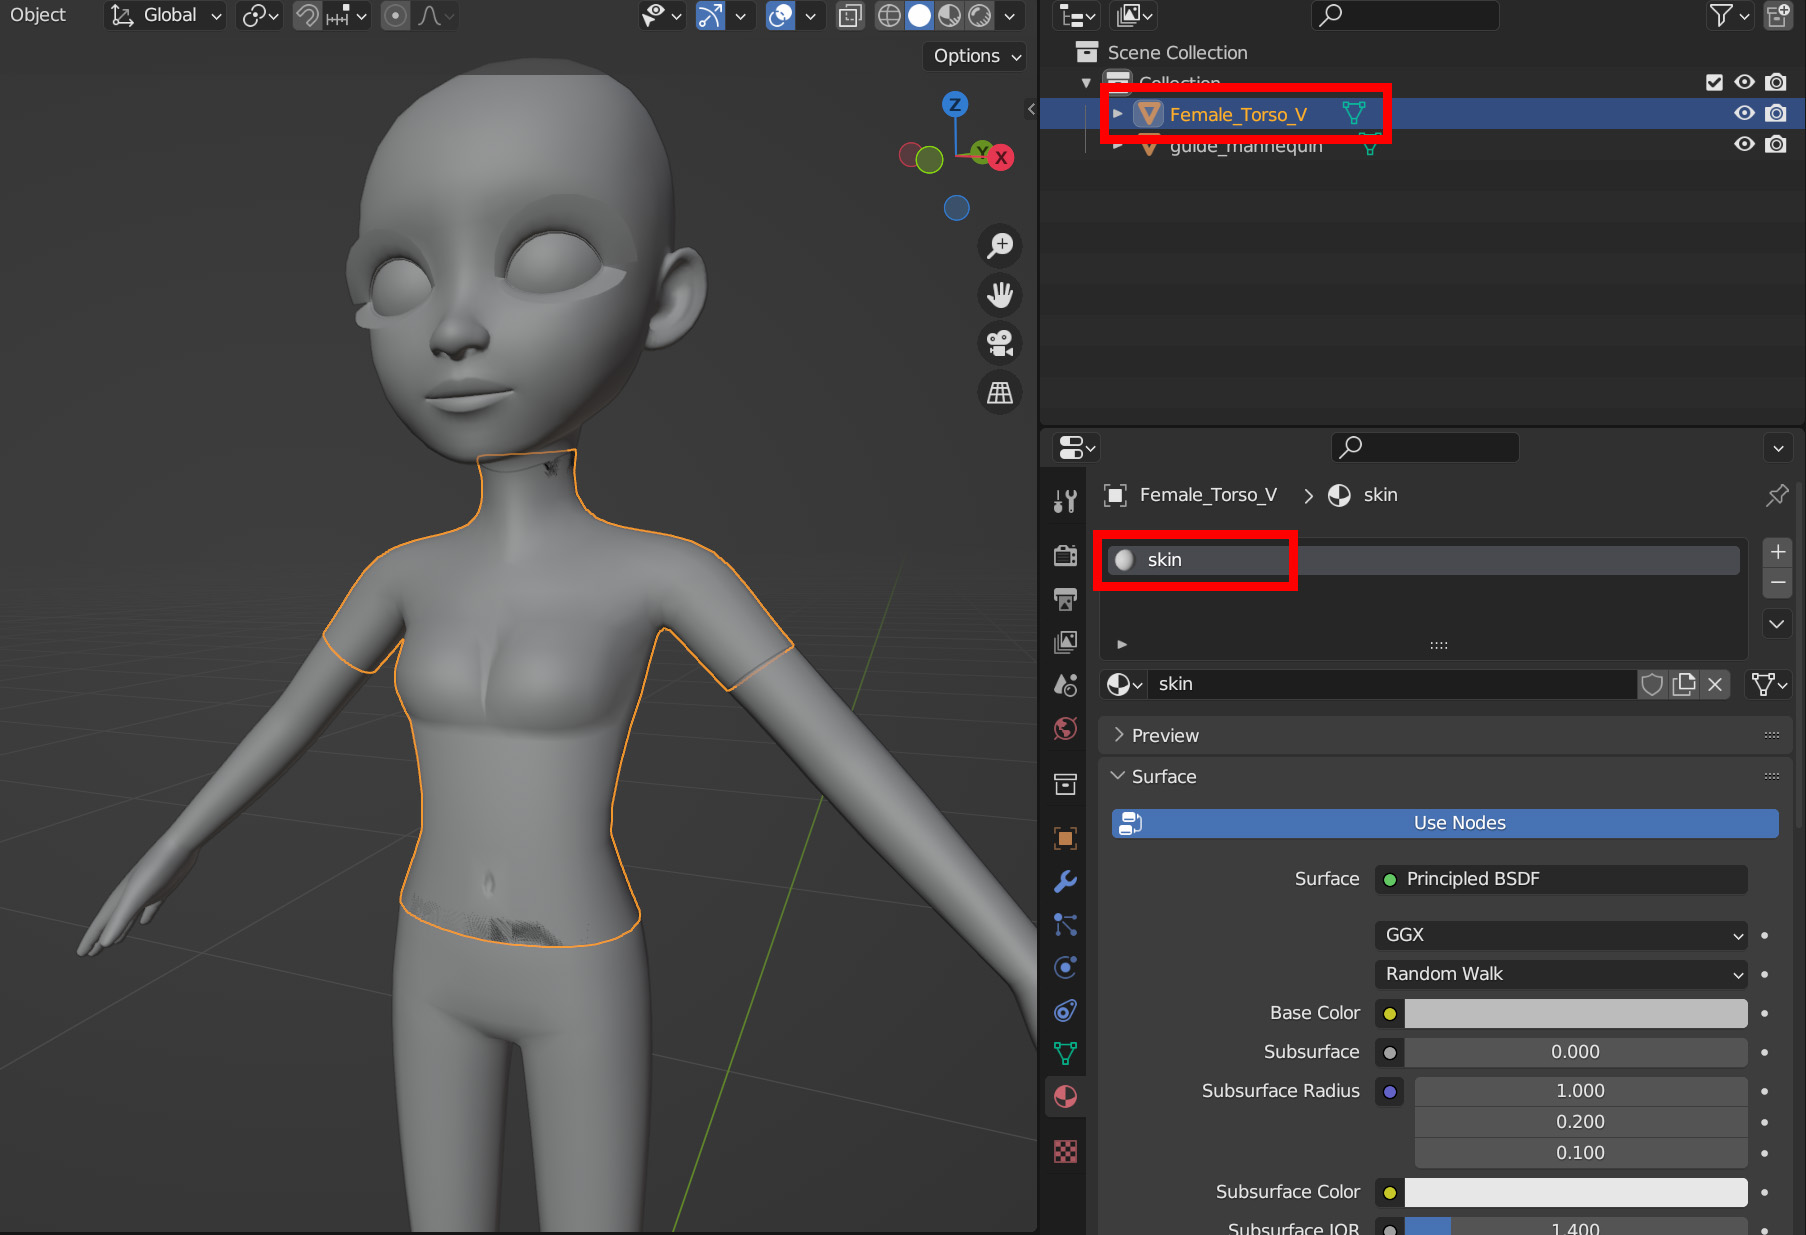
This torso is placed in a relaxed A-Pose, and will require some extra work to fit with the standard expected T-pose. See the Rigging Guide for more details on A to T-pose conversion.
To get a skeleton to rig and work to, import the creator_base_set file into the scene. Put the creator base set skeleton into the standard A-Pose. Notice that the hips, arms, and neck of the Female_Torso_V mesh object all end in loops that match up to the default mask. This is to make sure there are no visual breaks in the base body when paired with other items.
This torso can be used to shape a top item to a female form, or to provide a ready-made portion of torso to use for exposed skin for a top item.
The female torso has no weights included. For weight painting, use a weight transfer operation from an appropriately posed/weighted mask object from the Creator Base Set. This should provide the torso with properly distributed weights.
When including portions of the torso in a top object, ensure that the Torso and Top objects are combined into one object. This can be easily accomplished by selecting the torso and top meshes and going to Object > Join.
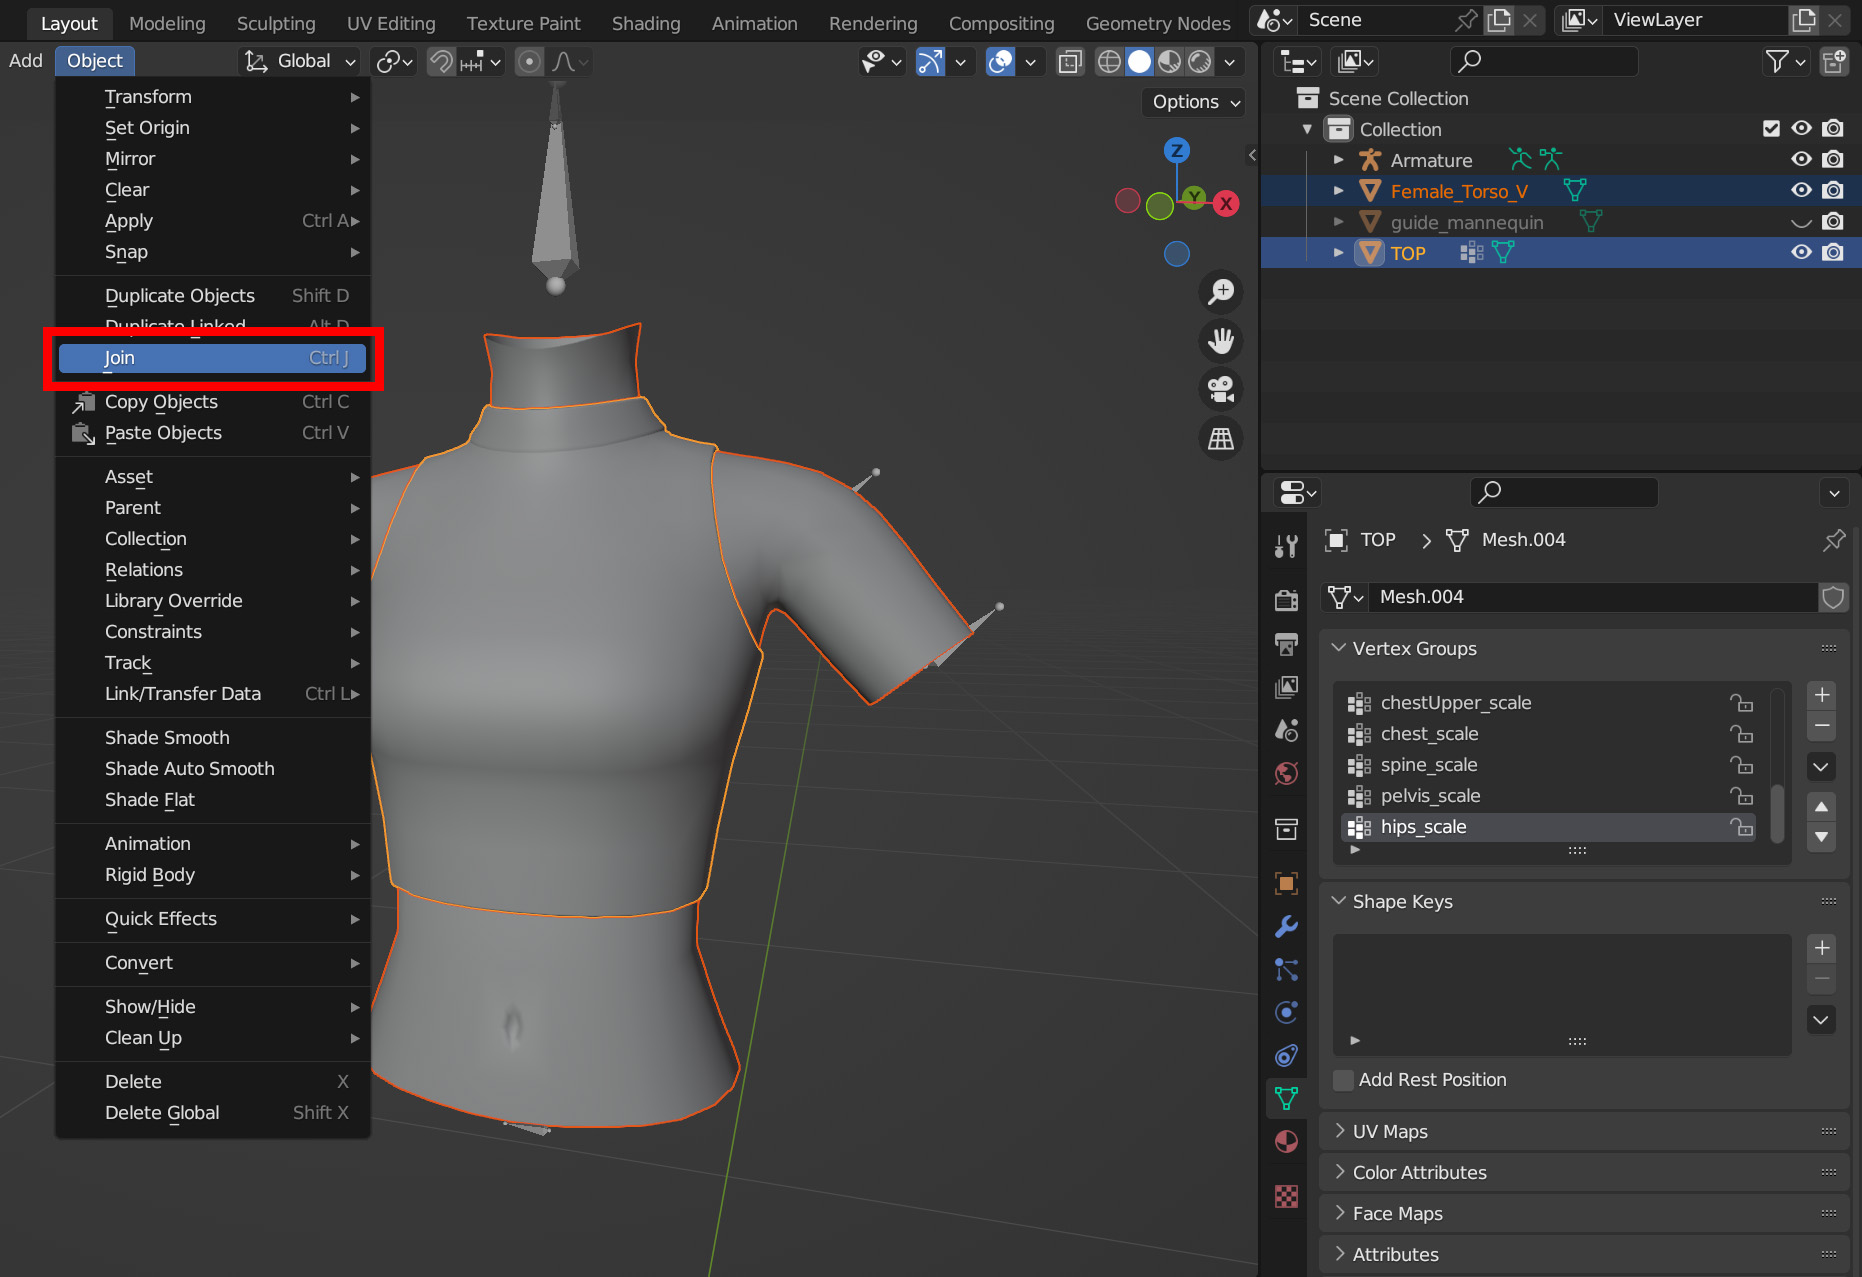
Weight settings for each component of the item will be preserved per-mesh when joining mesh objects together, so make sure to bind both the top and torso objects before combining them to make your life easier.
As part of the finishing process, delete areas of the torso mesh that are covered by the top and will not be seen. It will help prevent clipping issues between the top and torso objects.
Custom Torsos
You can customize your own torso to use in the app as well! If creating or customizing your own torso the mesh needs to follow a few requirements.
- The torso mesh must align with the base mask object at the hips, neck, and arms
- The torso mesh should follow a similar UV layout to the mask
- The torso mesh should have a material assigned to it named “skin”
Masking
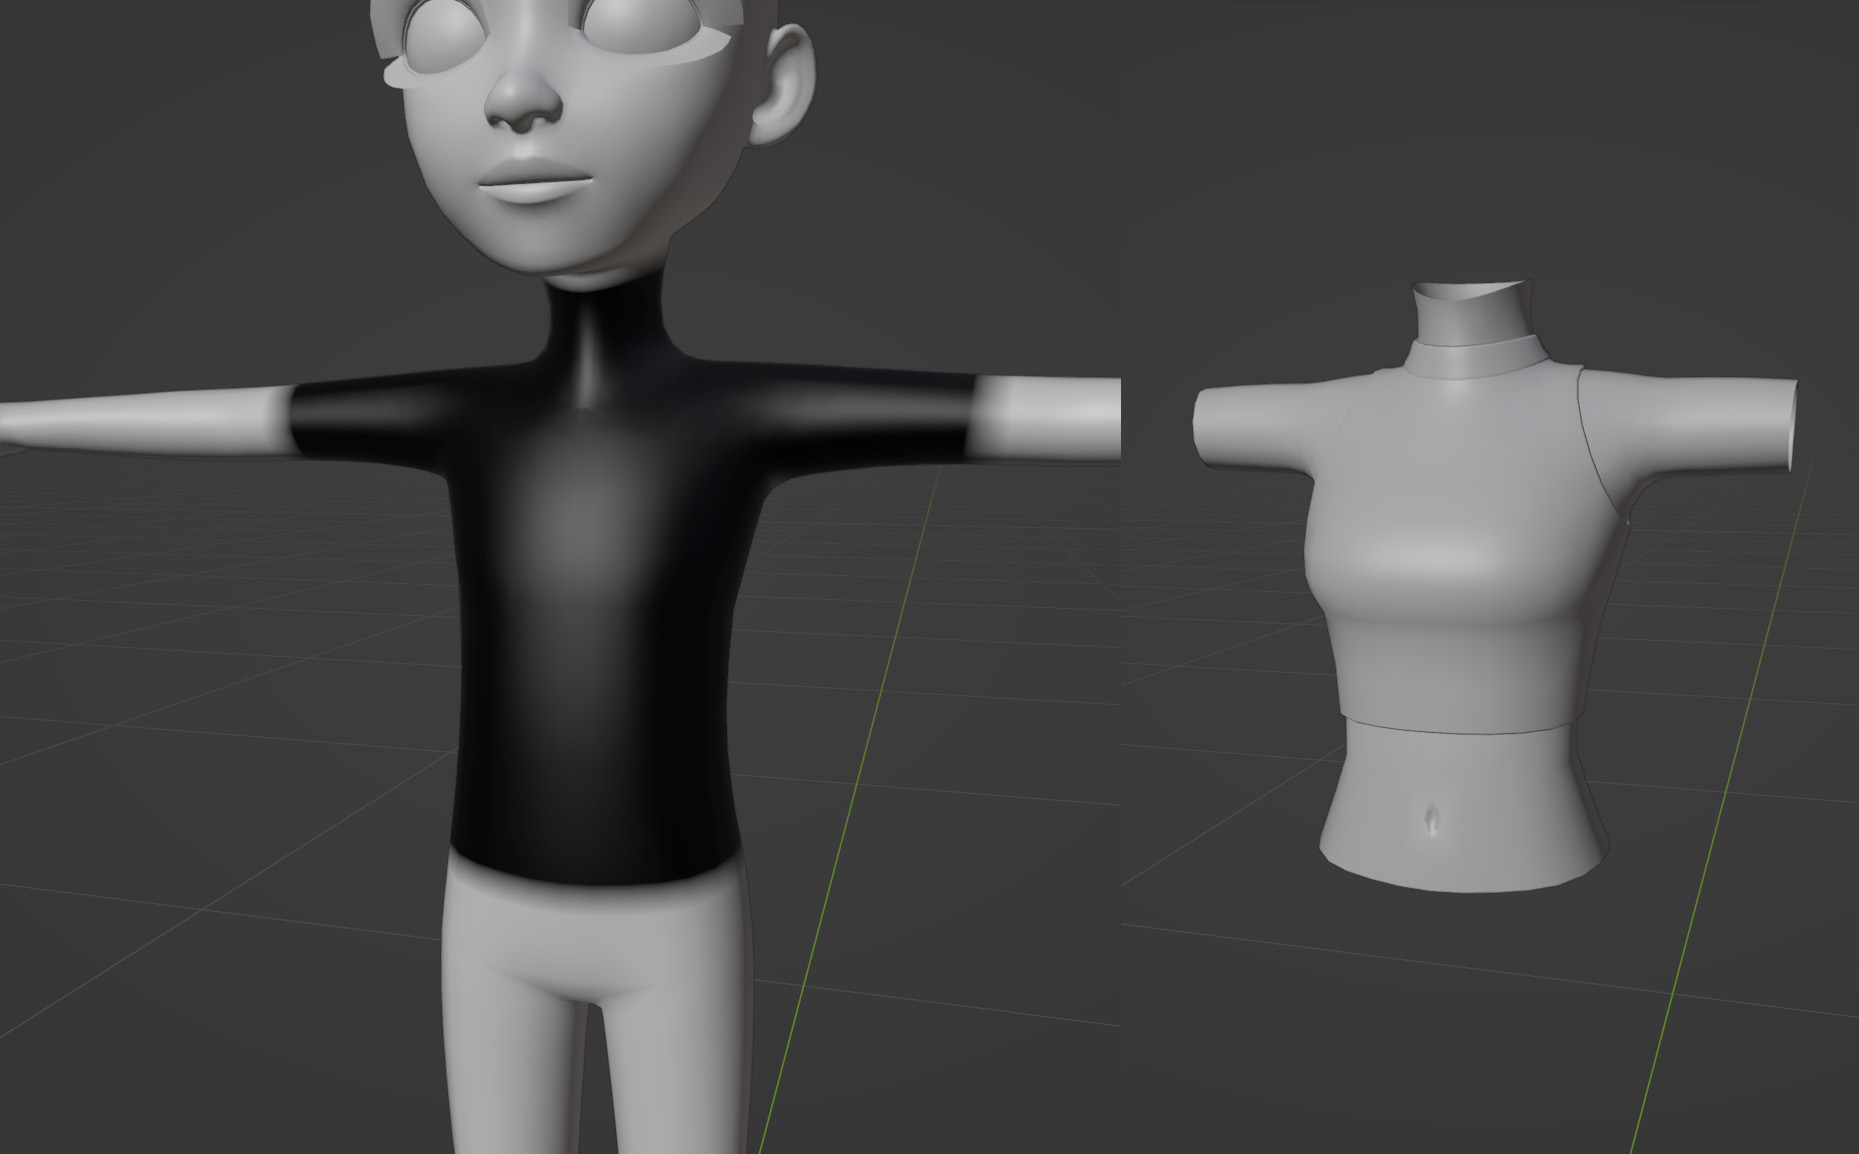
For masking, the custom torso element will replace the torso of the base avatar’s body. For more on the general masking process, refer to the Masking Guide. Paint black the areas of the torso on the mask that are covered by the custom torso up to the end points of the custom torso. Ideally, this will hide the base torso and allow for the custom torso to be displayed without errors.
Unity Testing
Make the necessary preparations to export to Unity as illustrated in the Exporting to Unity section of the guide. Export the torso item, armature, and mask to an fbx for testing in Unity.
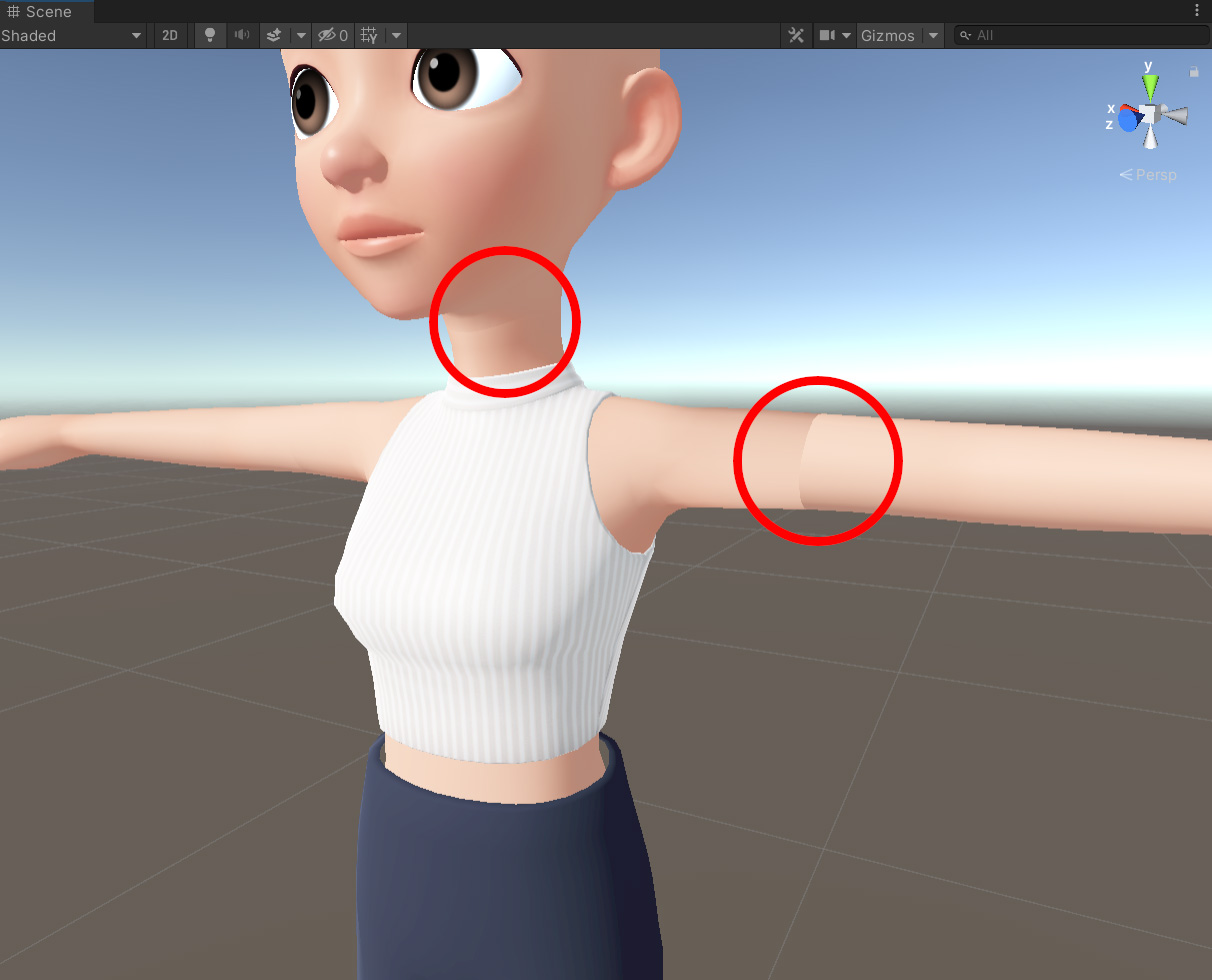
Import the item and test in the ZEPETO Studio Unity project. For a torso replacement, your item will be a top or a dress/suit.
- Check to see if there are any obvious breaks in the mesh between the base avatar body and your custom torso. If you spot any, go back into Blender to fix the issue.
- Check the avatar with the animated poses to ensure that the weights were distributed properly, especially along the borders of the torso. If any issues are spotted here, go back into Blender and fix the weight paint issues.
- Check the seam lines between the custom torso and base avatar to see if there are any issues with normals continuity between the custom torso and base avatar. If there are issues here, they’ll have to be changed in Blender.
If there are no issues in Unity, export the prefab to a .zepeto file. Upload and double check the item in the ZEPETO Studio. If there are no additional issues, you can submit the item for review.
Troubleshooting Issues
Misaligned Normals
If the mesh is properly aligned, but a line appears on the border of the custom body part and the base avatar body with the break appearing to be a change in lighting, the normals of the custom body part may not be aligning with the base avatar body.
You can check the vertex normal alignment by selecting the item with the custom body part and the mask object, going to edit mode, and in the Viewport Overlays Menu in the top right, select the “Display Split Normals” button. Pink lines will appear from the mesh at each vertex. These lines represent the tangent direction of the vertex normals.
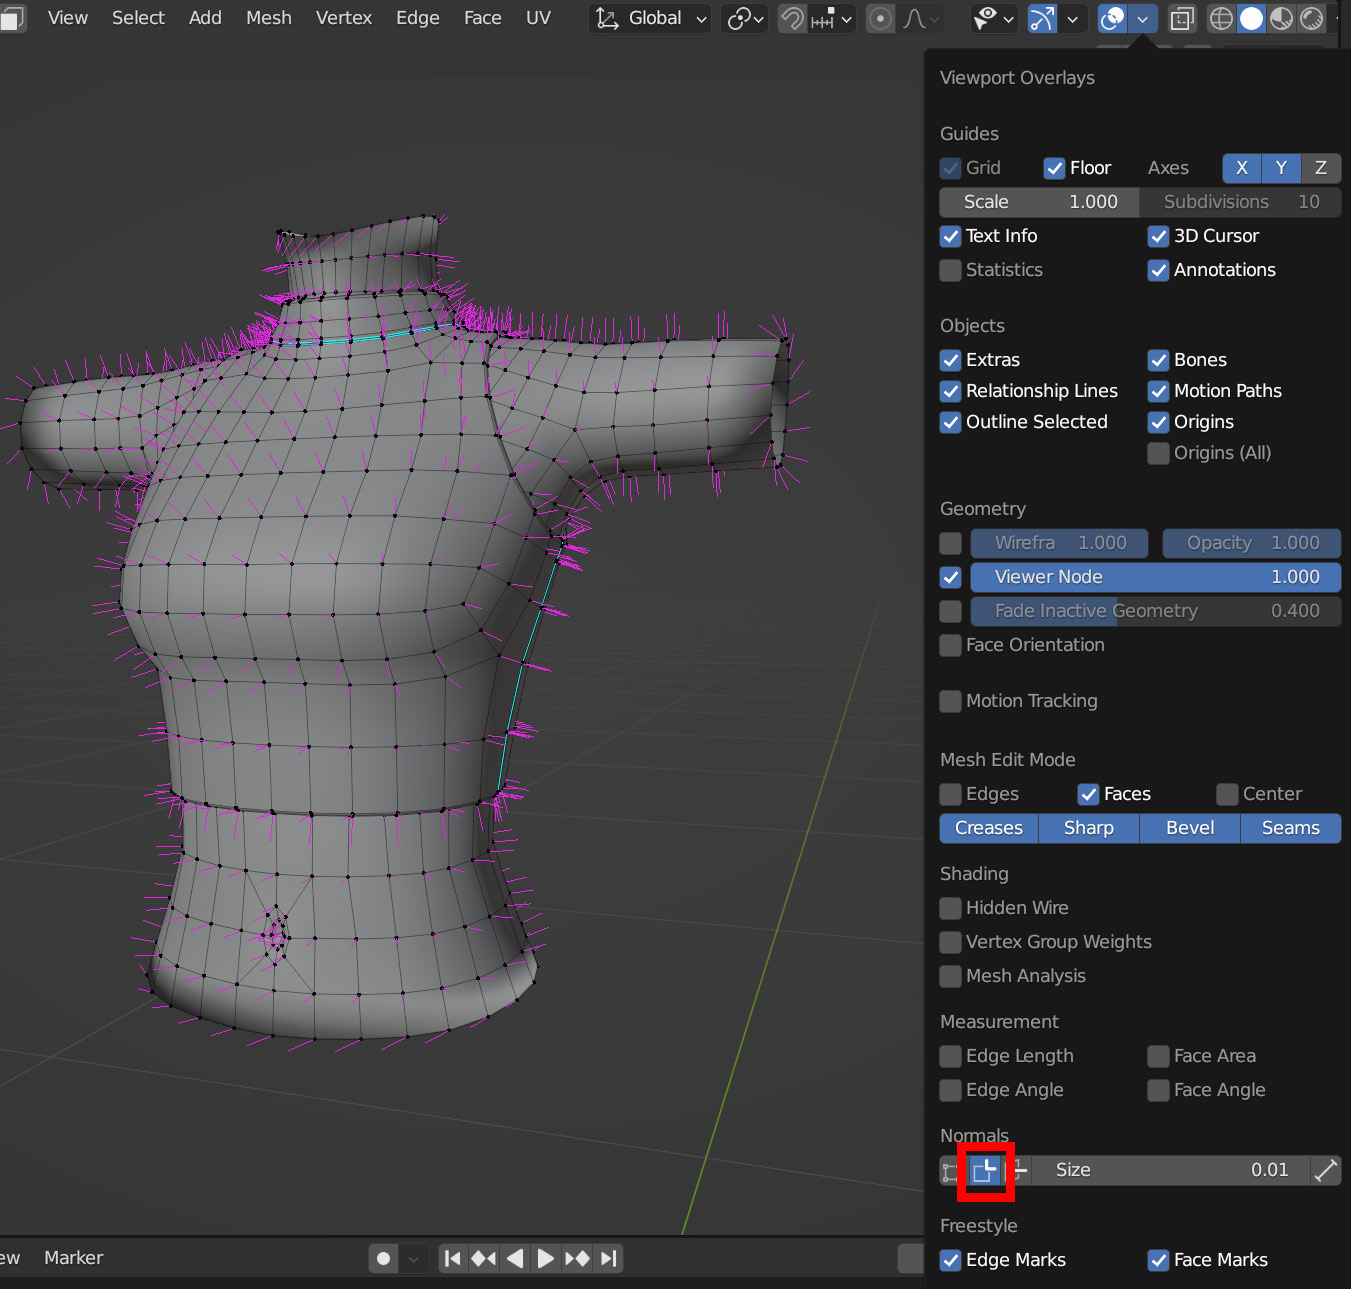
If the pink lines do not line up at the border, we may need to transfer normals data from the mesh to the custom body part.
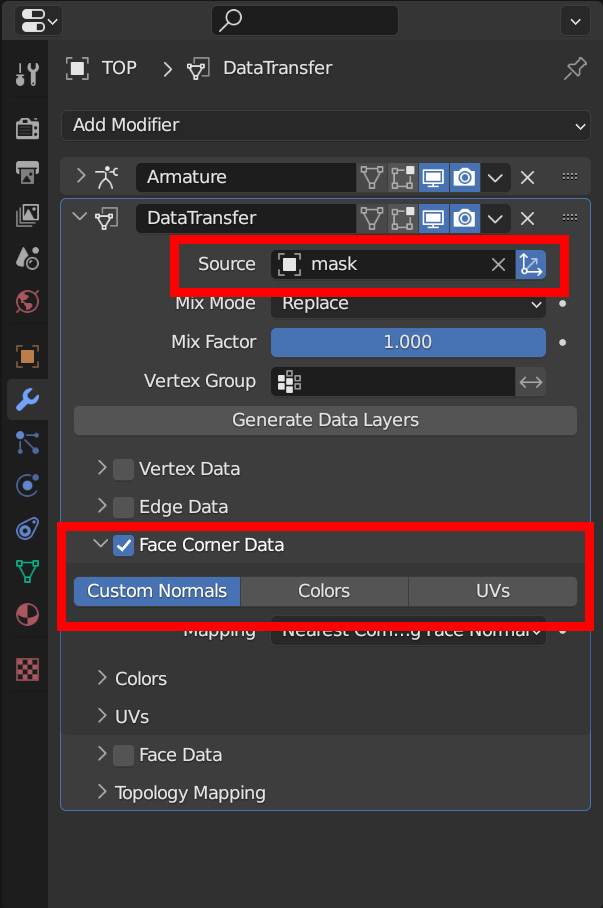
To transfer the normals data from the mask mesh to the item mesh, start by selecting the item and adding a “Data Transfer” modifier to the item mesh object.
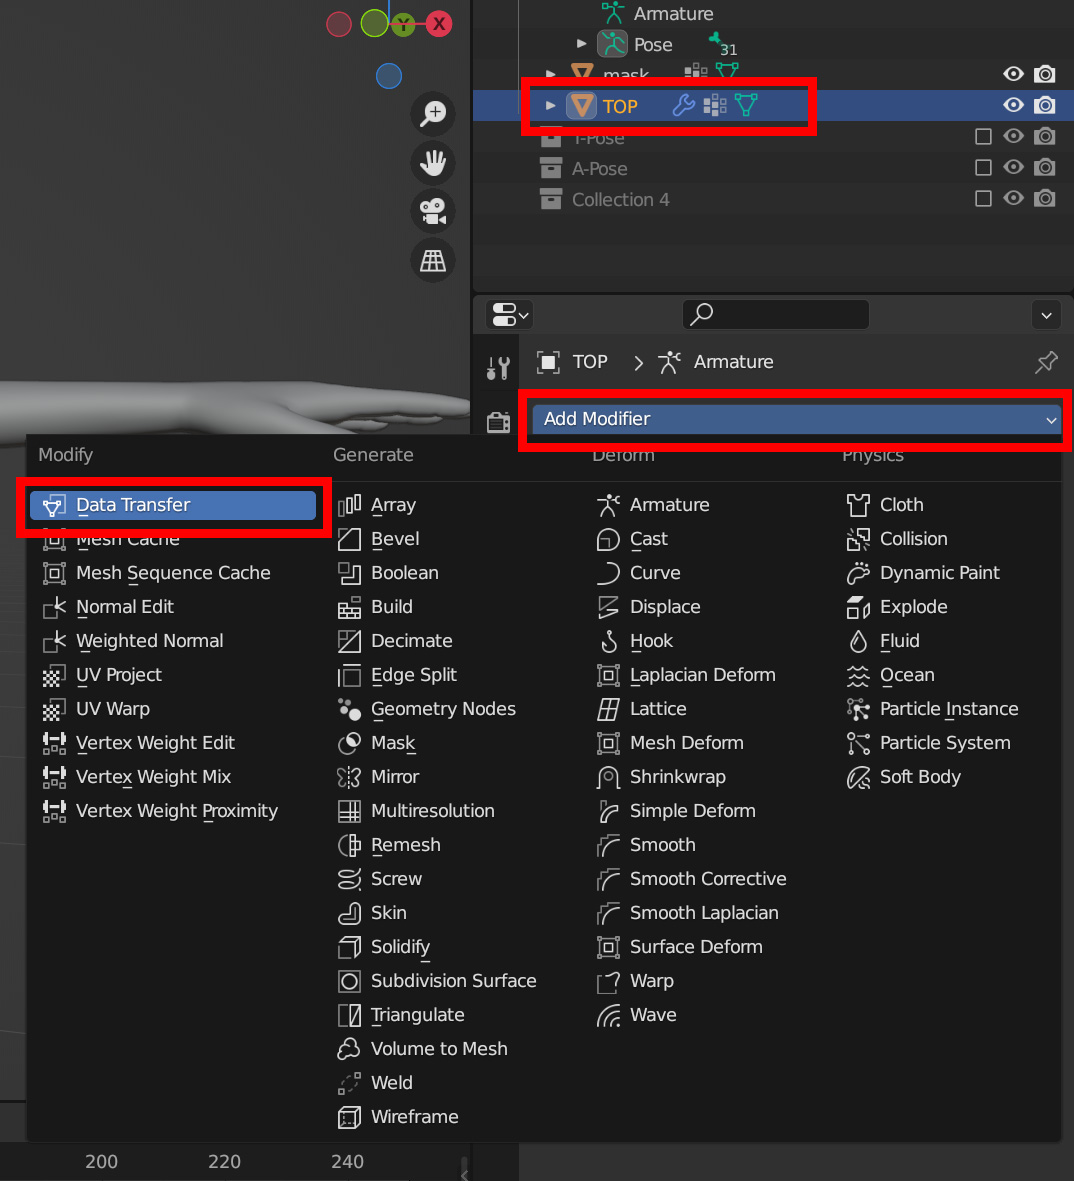
We want to transfer “Custom Normals” under “Face Corner Data.” We want to add the mask as the “Source” object so we can grab the normals information from the mask.
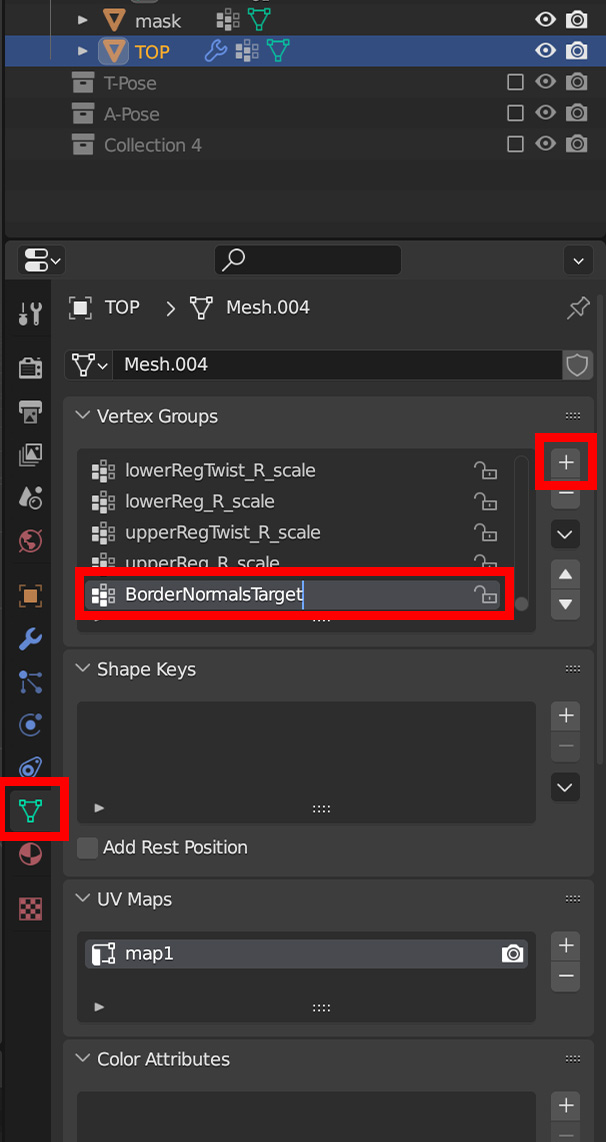
To limit the transfer to the normals information on the border, we’ll have to create a new vertex group for the modifier to target. In edit mode with the custom torso item, go to the Object Data Properties tab and create a new vertex group with the ‘+’ button. For organizational purposes, name this vertex group something descriptive, like “Border Normals Target.”
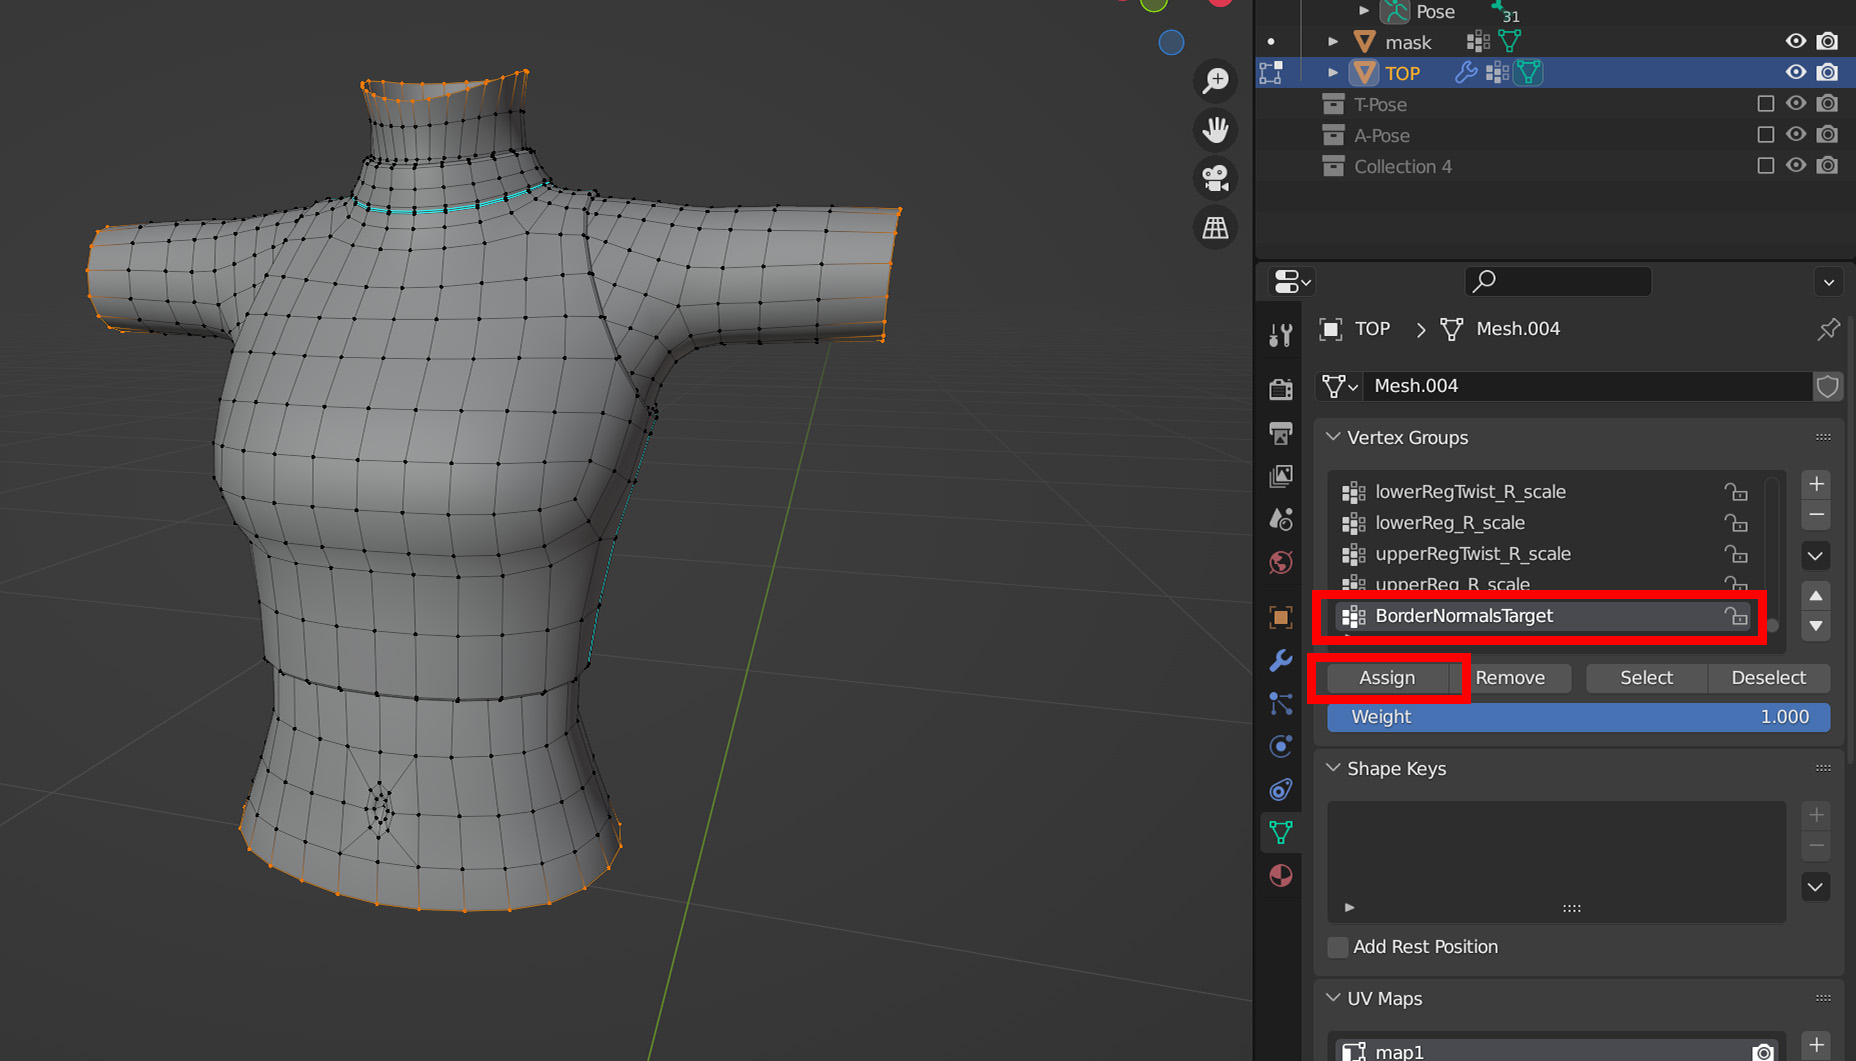
With all other mesh elements deselected, select the border edge loops and use the “Assign” button to assign the selected mesh components to the vertex group.
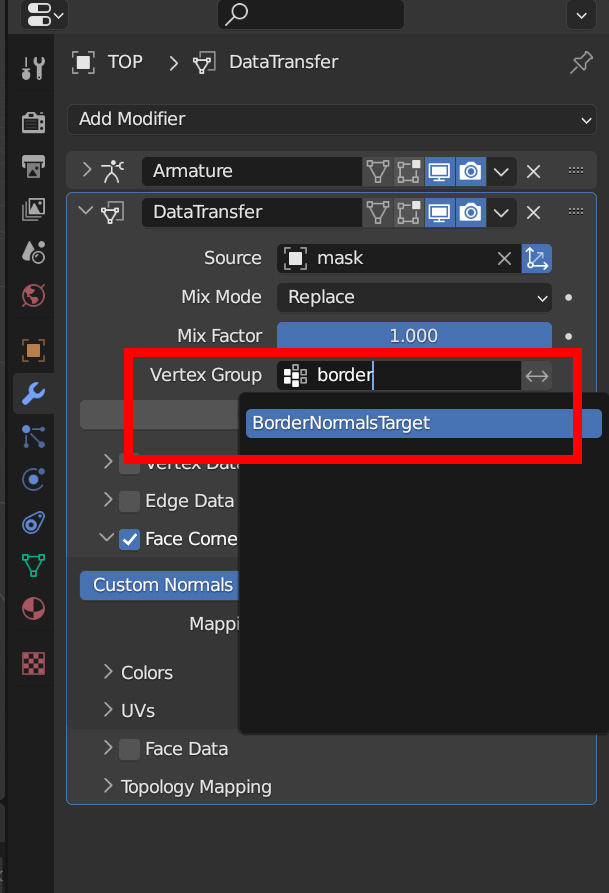
Back in the modifier tab, in the Data Transfer Modifier, find and select the border target vertex group in the Vertex Group box. Now, the mesh normals of the border region have their normals copied from the mask mesh normals.
Apply the normals to the mesh by applying the modifier.
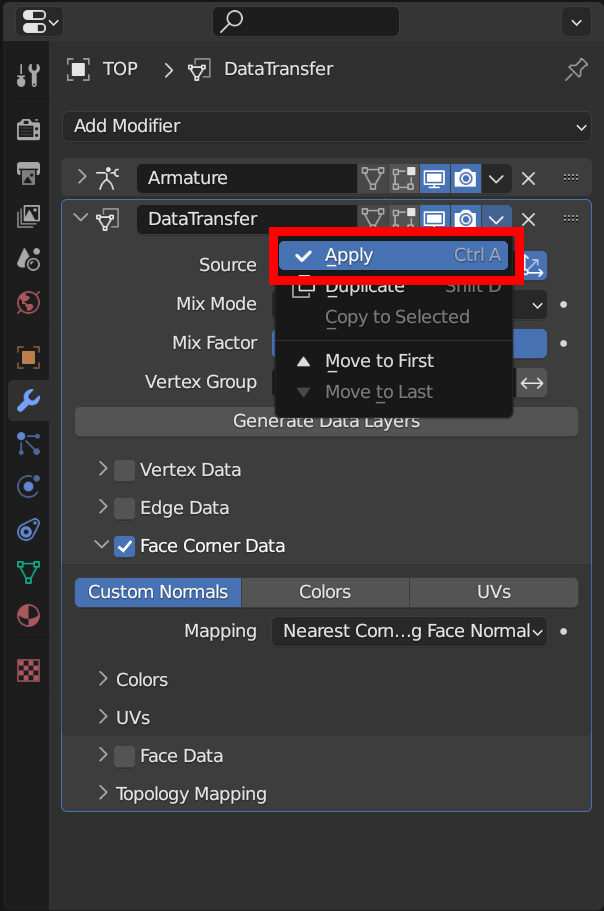
Double check whether the normals are properly aligned with the normals overlay. If everything works, continue to export and test your item in Unity.
UV Mismatch
If the mesh is properly aligned, but a change in base color tone appears on the boundary between the custom body part and the base avatar body, the UV map of the custom body part and the UV map of the mask may not match up.
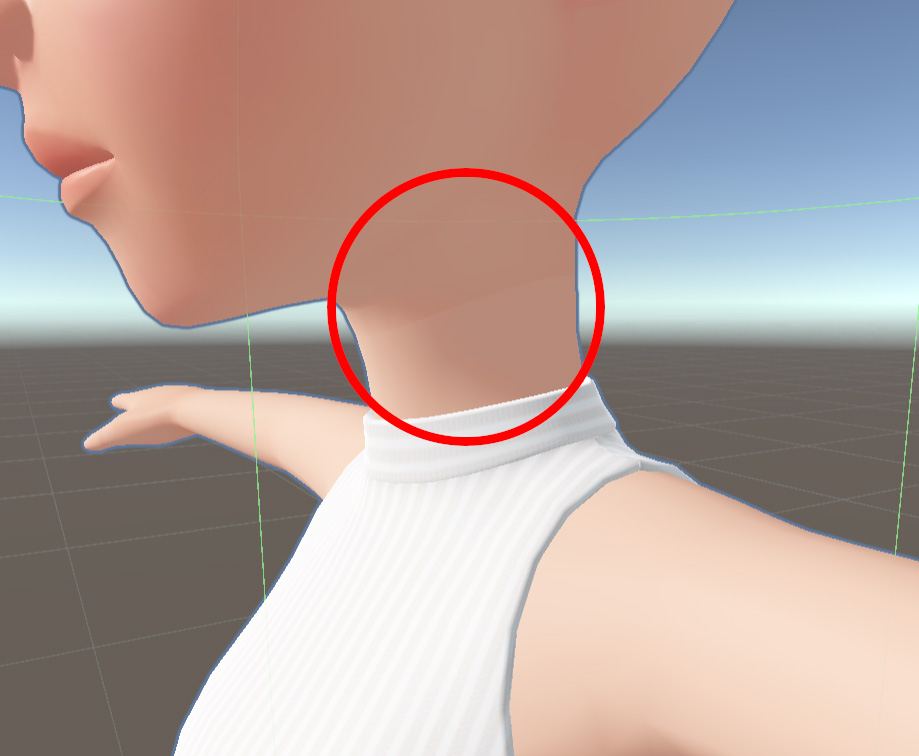
Using the skin material requires having the custom body part’s UVs align with the UVs of the mask.
We can transfer UV data from the mask to the custom torso by using the Transfer Mesh Data tools in Blender. Start by separating the custom body part geometry from the item mesh.
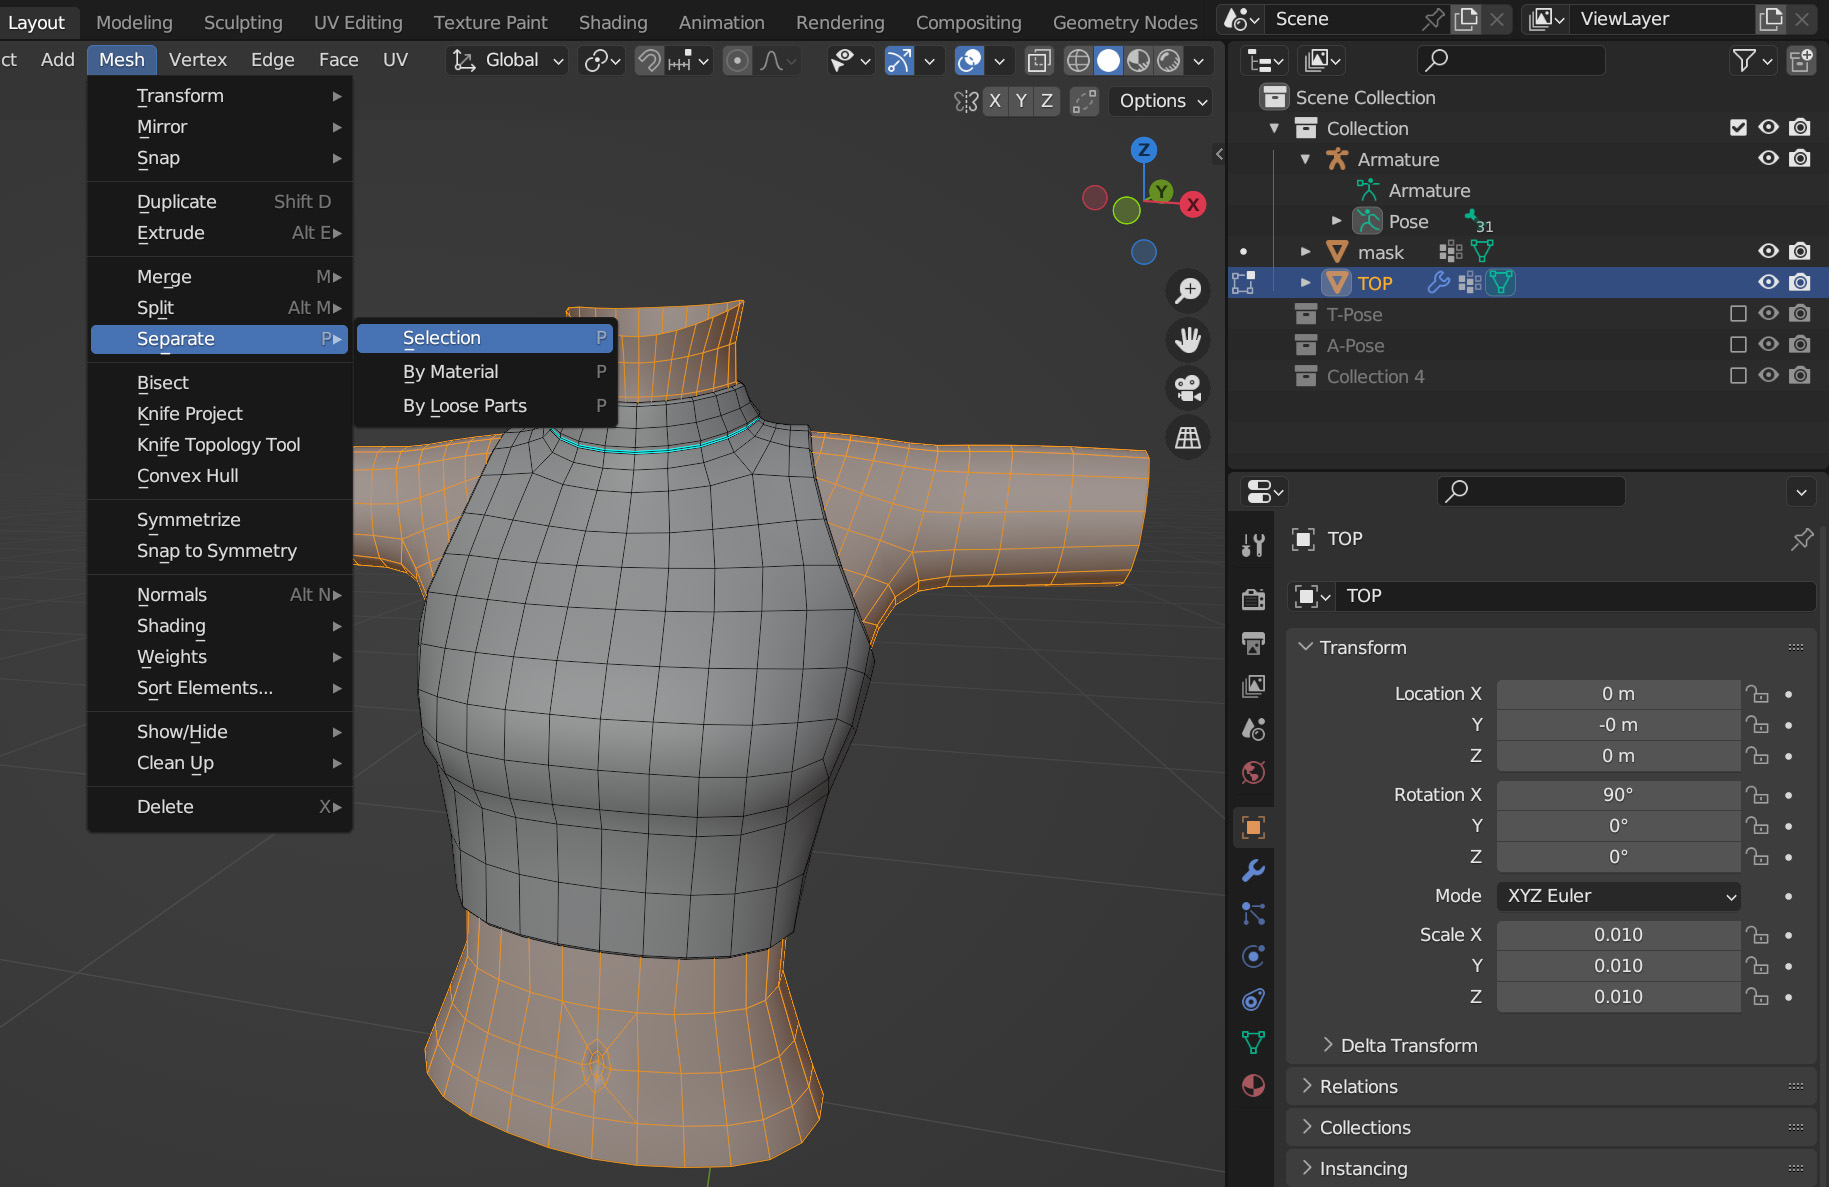
In Object mode, select the custom body part, then shift/add select the mask object, so that the mask object is the active selection.
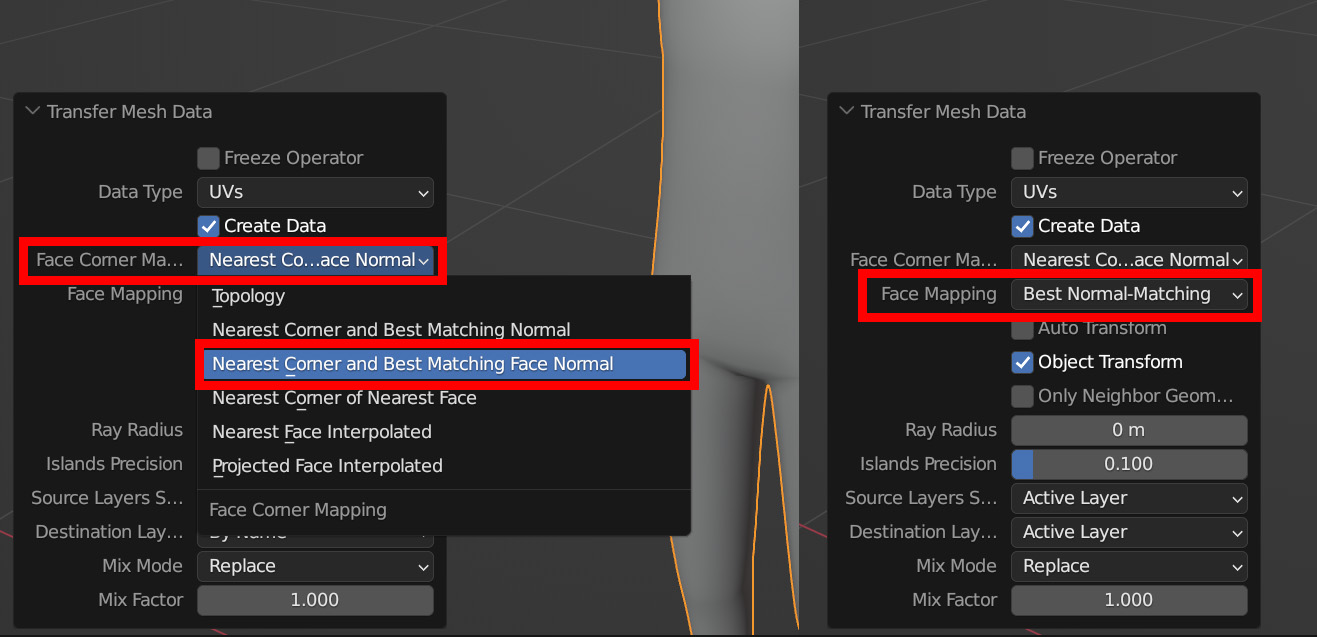
Go to the Object menu > Link/Transfer Data > Transfer Mesh Data, and select “UV” in the resulting pop-up.
- Ensure the “Data Type” is set to “UVs”
- Change “Face Corner Mapping” to “Nearest Corner and Best Matching Normal”
- Change “Face Mapping” to “Best Normal-Matching”
- All other settings can remain at their default settings
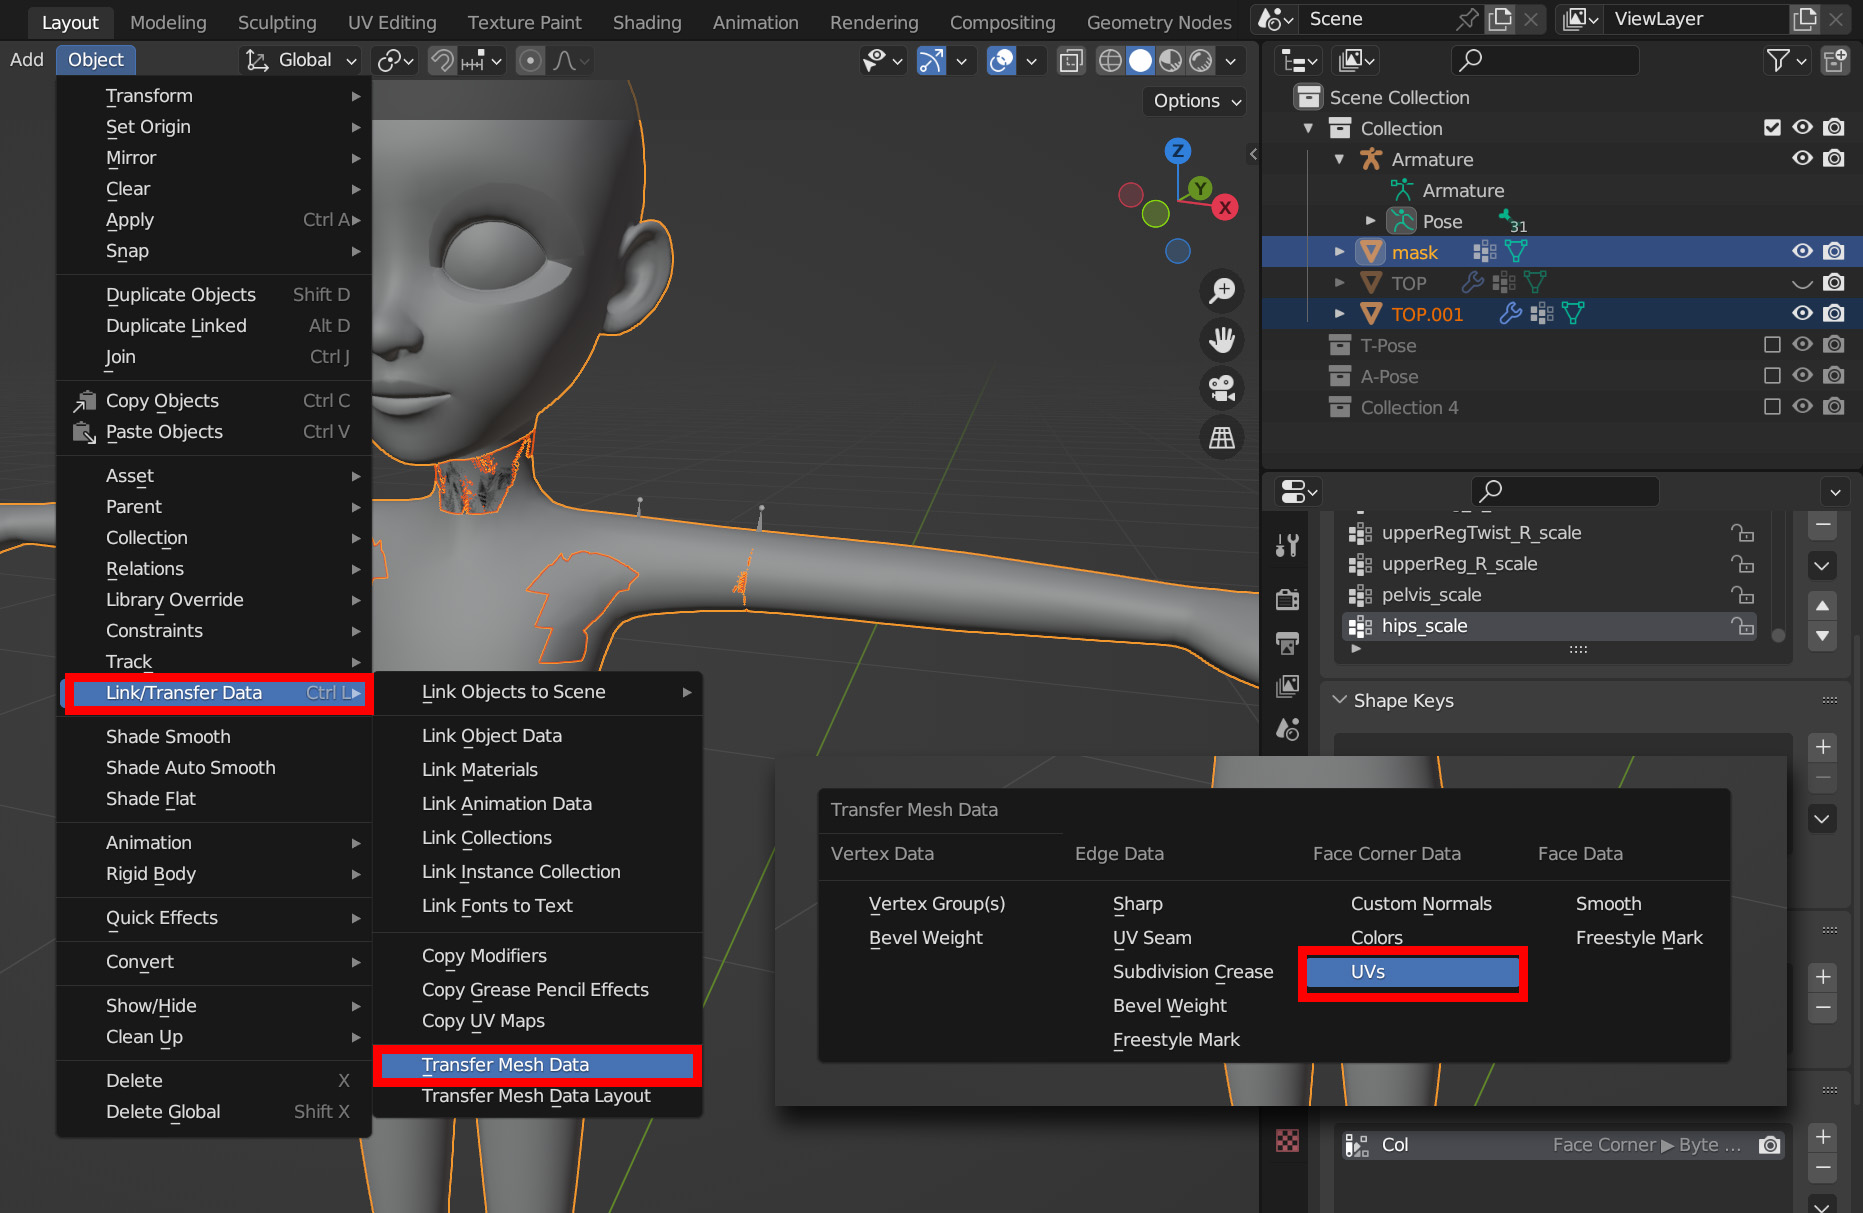
The UV map data on the custom body part should now have a similar layout to the mask. Check the UV map of the custom body part to verify its layout is similar to the mask.
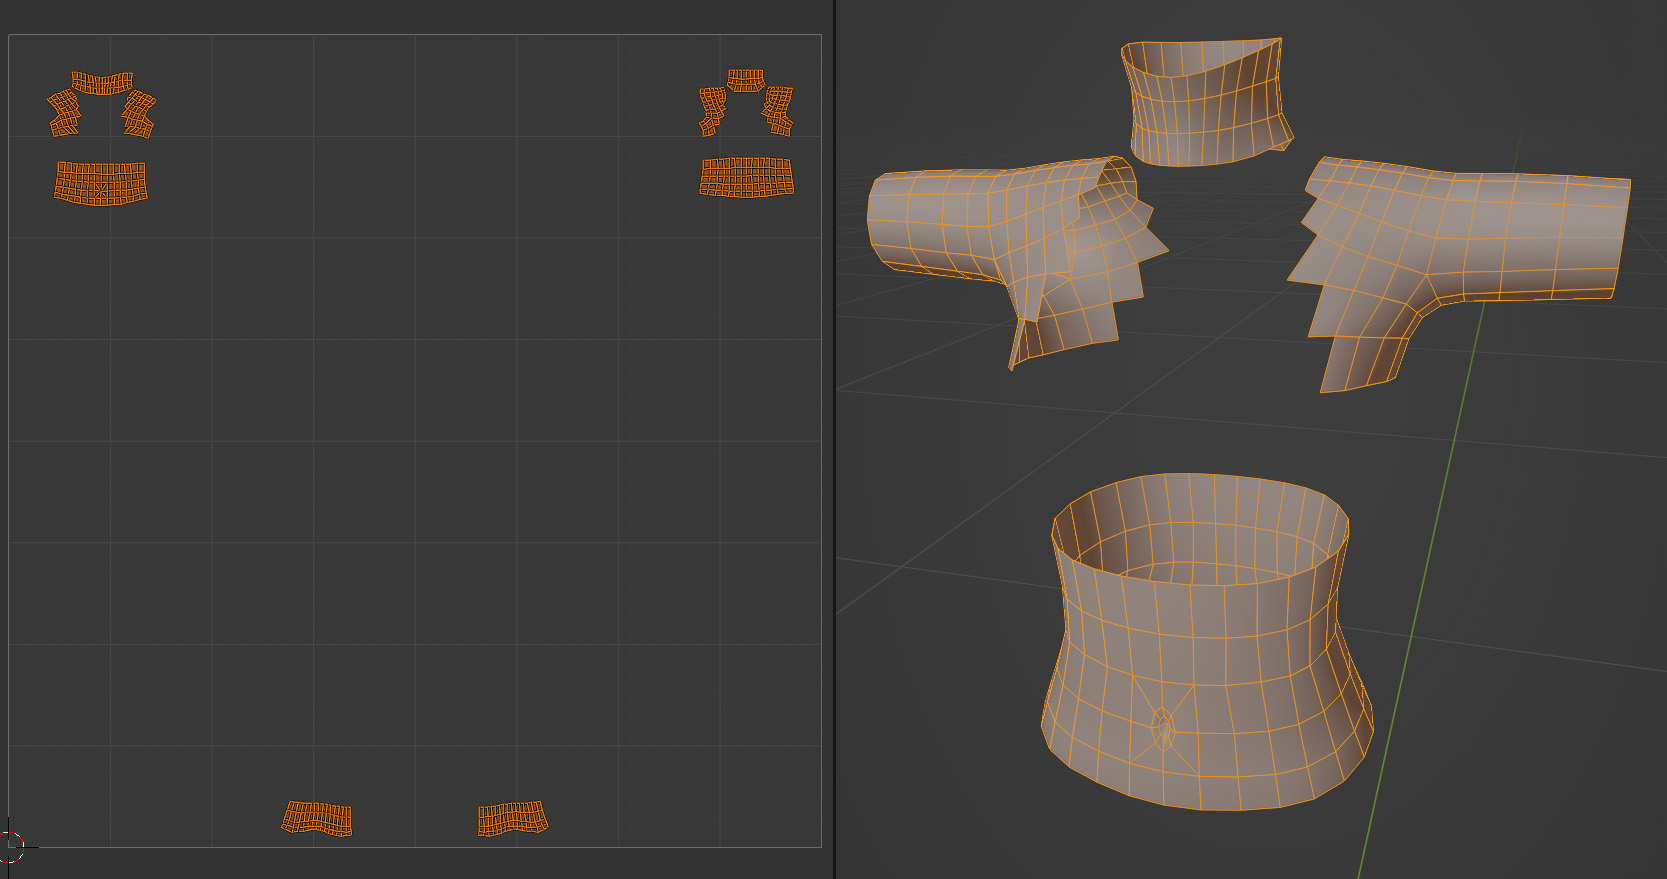
If everything checks out, join the custom body part back with the item and continue to export and test your item in Unity.
Unsynced Weighting
If the custom body parts are not following the expected movements of the base avatar body, there is likely an error in the custom body part’s weight distribution. To solve this problem, transfer weights from a good source, like the mask, to the custom body part.
Start by separating the custom body part geometry from the item mesh. Select the mask, then shift/add select the custom body part mesh. Go into Weight Paint mode. Go to Weights > Transfer Weights. In the expanded options, ensure the “Source Layers Selected” is set to “By Name.” For “Destination Layers,” the “All Layers” option can be selected if you want to transfer all weights. Select a specific vertex group if you only need to transfer specific weights, like the weights around the custom body part’s mesh boundary lines. Test and correct any weighting errors, then rejoin the custom body part to the item. Export and test the item in Unity.
Updated about 1 month ago
