3D Modeling -Clothes
Start modeling with a plan! It's easier to model with some reference materials. Grab some pictures! Make a sketch!
This section of the guide assumes you are familiar with interacting with the interface in Blender.
Blender Modeling Tools
In Blender, mesh editing is done inside of a mesh object in “Edit Mode.” In edit mode, the viewport window changes to fit an environment for 3D modeling. The toolbar on the left of the toolbar expands to include more modeling specific tools, and the top menu bar expands to include more functions for various components.
You can select between vertex, edge, and face selection in the option bar in the top left of the viewport.
The hotkey for the select all operation is the A key. This differs from the typical control/command + A key combination for various other programs. The deselect all operation is accomplished with the hotkey combo alt/option + A.
Moving Objects and Components
Selected components and objects can be moved around the viewport. This can be accomplished with tools in the toolbar located on the left of the 3D viewport, or with the corresponding hotkeys.
- Translation - (G)
- Rotation - (R)
- Scale - (S)
With hotkeys, movement can be constrained to X, Y, or Z axes by typing the desired axis of movement after activating the hotkey. Using the toolbar, axis constraints are accomplished by clicking and dragging on the gizmo axes. With the toolbar gizmos, particularly for translation and scale, the boxes between axes can be used to move an object between two axes. With hotkeys, this action can be performed by pressing the shift key and the axis to be excluded after activating the hotkey.
Moving objects and components form one half of the core of 3D modeling. The other half is creating detail in the 3D mesh.
Extruding
One method of creating detail is to extrude parts of the mesh into or out of the model. To extrude components, there are viewport tools in the toolbar. Selected components can be extruded through these tools, by clicking on the desired component to be extruded and dragging the gizmo. Extrusion tools can also be accessed by hotkey with the E key. Simply select the desired components to be extruded, type E, and move the mouse to control extrusion distance.
Dividing the Mesh
Another method of creating additional detail is to make new edges within the mesh object. We can accomplish this with loop cuts. Loop cuts can be created with the loop cut tools in the toolbar and with the hotkey alt/option + R. Using the toolbar tool, a new edge will be highlighted on the mesh as the mouse is hovered over faces. Clicking the mouse will confirm the new edge loop. The hotkey combination will grant a similar interface for making the cuts, but with the additional options that the hotkey provides.
For a more freeform cut, the knife tool can be used. You can access the cut tool from the toolbar on the left, or using the hotkey K. A cut is projected in a straight line from the perspective of the camera. Every click on the mesh while the tool is active will confirm an endpoint. The knife tool projects a straight line between two clicks, and every edge that this new cut line will cross will gain a new endpoint. Pressing the spacebar will confirm the new edges on the mesh.
3D Modeling Tips
Modeling with joint considerations
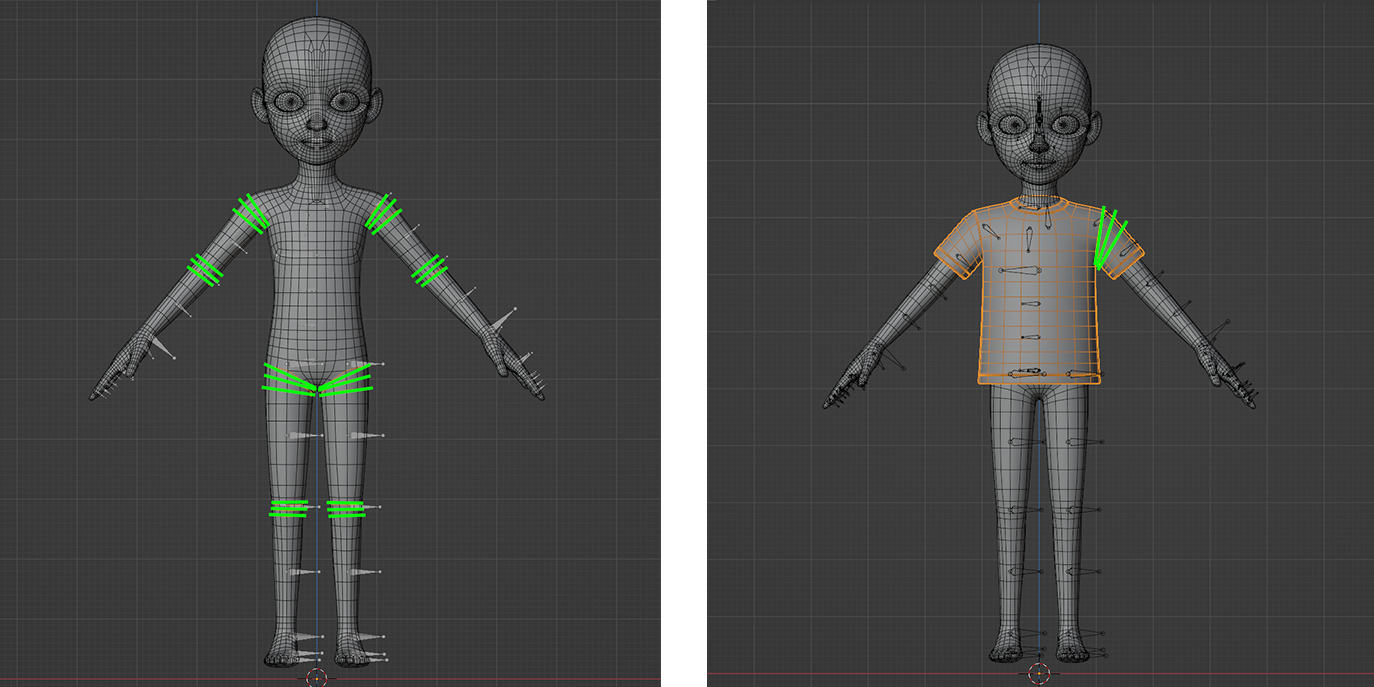
In areas that are expected to bend a lot like the shoulders, elbows, knees, and pelvic area, the mesh will need more geometric detail to allow for natural-looking bends. Generally, three edge loops around the bone area strike a good balance between visual bend quality and item performance in-app.

Shoulders can be a challenge to work with while working on the model. Due to the shoulder area having a wide range of deformation, a denser set of 3 loops is recommended to reduce what may look like stretching on the final product.
For a general guide on the polygon density of an item, use the mask's polygon density as a guideline.
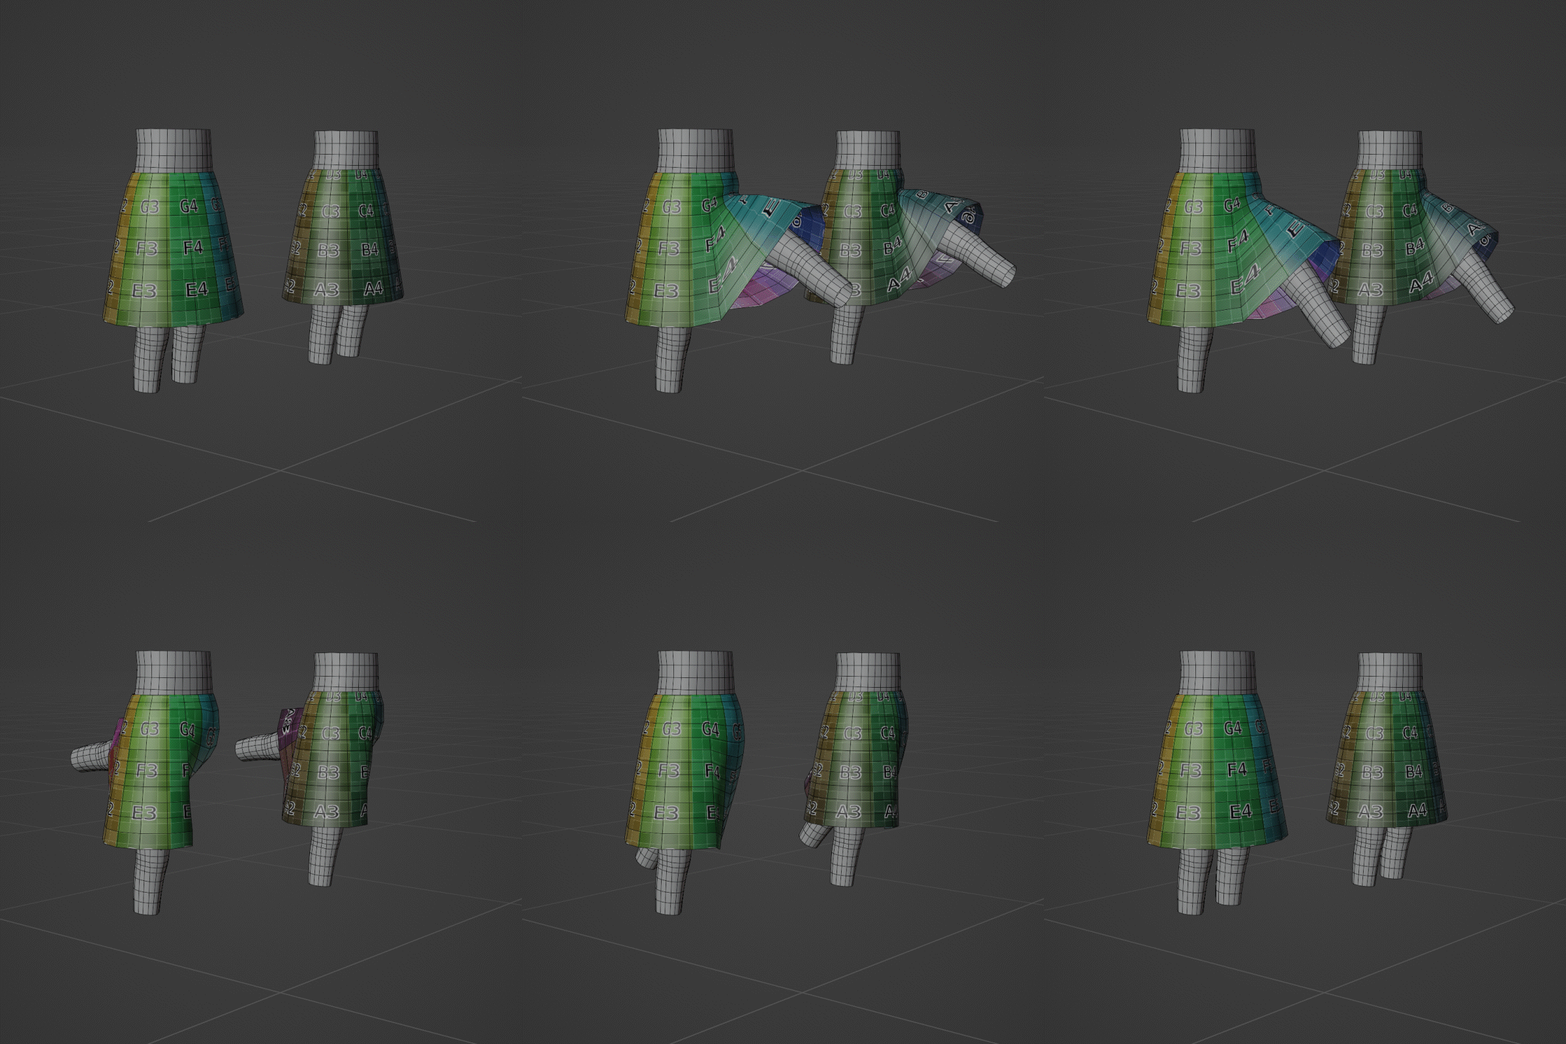
Skirt edge loops
The pelvis area will require a denser set of loops for natural-looking bends.
The vertical center line of the skirt needs to have a set of 3 vertical loops in close-proximity for better deformations between the legs of the character.

Polygon Count
For performance reasons, items have strict triangle count limits. Check the third section in Item Guidelines for a full list of triangle count limits per item.
To check the triangle count of your item in Blender, use the "Statistics" option in the Viewport Overlays menu. Please note that Blender's triangle count covers all objects visible in the scene. Isolate your item so that your item's triangle count is accurate.
Updated about 1 month ago
