
ZEPETO Mannequin is a mannequin API package that supports the ability to try on/sell clothes.
- You will be able to sell the clothing items you've made in the World.
- You can create a mannequin wearing a designated costume of a ZEPETO character NPC.
- You can purchase clothing items by interacting with mannequins or objects.
STEP 1 : Install
Window → Package Manager → and install ZEPETO.World Package 1.21.15 or higher first.
After that, please install the ZEPETO.Module 1.0.8 package.

Caution
- As part of performance improvement, the standalone package has been integrated into ZEPETO.Module 1.0.8 and later version packages.
- Please delete any previously installed ZEPETO.Mannequin packages.
- After removing existing packages, please install the ZEPETO.Module package version 1.0.8 or newer.
STEP 2 : Check item ID to set on mannequin
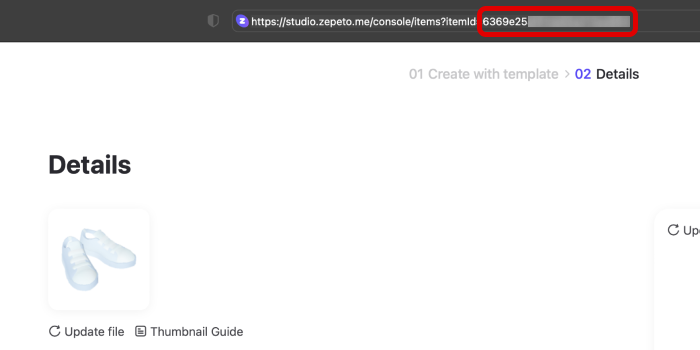
How to verify item ID
- You can check the URL that pops up when you click on the item product in ZEPETO Studio.
- Copy the item ID in the form of a random number, paste it into the Unity Editor, and paste 'CR_' in front of it.
If it's your first time making an item, please refer to the following guide. [Create Your Item]
STEP 3 : Setting Up the Mannequin
Mannequin objects can be produced in a total of three ways.
Caution
- Only the items you've made and released can be set and sold in World with ZEPETO Mannequin.
- Items that have been rejected in the review cannot be sold.
- Therefore, you must be logged in to Unity in order to use the feature.
- When you publish a package with mannequin function, you must also be logged in as an editor.
- When using the ZEPETO Template and ZEPETO Model Type mannequins, the resources consumed are equivalent to the number of ZEPETO characters entering, which may impact optimization.
- If you need to place many ZEPETO character-shaped mannequins within the world, it is recommended to select the Simple Type mannequin, and then utilize the ZEPETO BaseModel as an object.
STEP 3-1 : Simple Type

Example of using Simple Type Mannequin
It's the most basic. Specific objects can be added as Mannequin children to set the appearance.
-
Adds an object to interact with.
-
Collider must be added in order to interact with the object.
- isTrigger must be checked. If not checked, it is automatically processed to recognize it as a trigger.
- When you try to add a mannequin component without adding a collider, a warning window will appear as shown below.

-
Add mannequin components to the object.
-
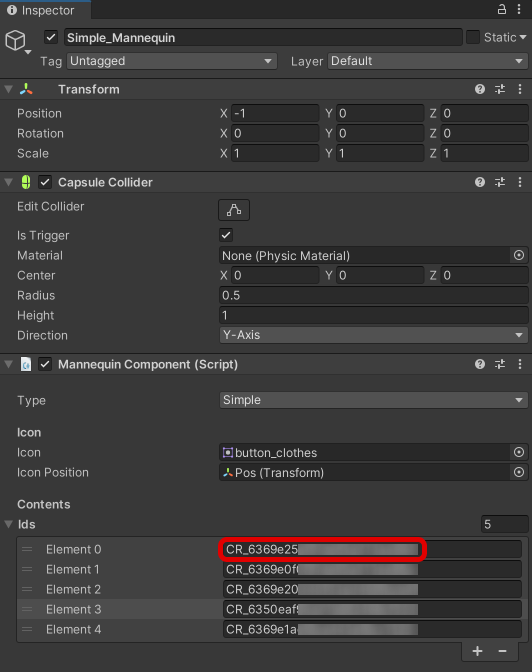
Please set the following in the inspector.
- icon: The hanger icon is displayed by default. You can change it to a custom icon.
- icon position: If not present, the icon appears in the object position with the mannequin component by default.
- Input the value after adding position object to make it appear on the desired location.
- ids: Please fill out the item ID of the clothing item you want to sell.

-
Add an Empty Object and write the object name as MannequinScript.
-
Add ZEPETO > Typescript and write the script name as MannequinScript.
-
Fill it out as below.
import { ZepetoScriptBehaviour } from 'ZEPETO.Script';
import { ZepetoPlayers, SpawnInfo } from 'ZEPETO.Character.Controller';
import { WorldService } from 'ZEPETO.World';
import { ItemContentsRequest, Mannequin, MannequinComponent, MannequinInteractable, MannequinPreviewer } from 'ZEPETO.Mannequin';
import { Object } from 'UnityEngine';

export default class MannequinScript extends ZepetoScriptBehaviour {

    private _previewer: MannequinPreviewer;

    Start() {
        // Code that creates a ZEPETO character based on the logged in ID
        // ZepetoPlayers.instance.CreatePlayerWithUserId(WorldService.userId, SpawnInfo.Default, true);

        ZepetoPlayers.instance.OnAddedLocalPlayer.AddListener(() => {
            const character = ZepetoPlayers.instance.LocalPlayer.zepetoPlayer.character;
            // Add Mannequin Interactable Component
            character.gameObject.AddComponent<MannequinInteractable>();
        });

        // Find all Mannequin components
        const mannequins = Object.FindObjectsOfType<MannequinComponent>();

        mannequins.forEach(m => {
            // Enter the Collider
            m.onActive.AddListener(contents => {
                Mannequin.OpenUI(contents);
                const zepetoContext = ZepetoPlayers.instance.LocalPlayer.zepetoPlayer.character.Context;
                this._previewer = new MannequinPreviewer(zepetoContext, contents);
                this._previewer.PreviewContents();
            });

            // Exit the Collider
            m.onCancel.AddListener(() => {
                Mannequin.CloseUI();
                this._previewer?.ResetContents();
            });
        });
    }
}
- After adding the script to the object, press the [▶︎(play)] button to run it.

STEP 3-2 : ZEPETO Model Type

Example of using ZEPETO Model Type Mannequin
You can set the appearance of a mannequin by adding an item ID to the ZEPETO character NPC.
-
Create an Empty Object and name it as Mannequin.
-
Collider must be added in order to interact with the object.
- isTrigger must be checked. If not checked, it is automatically processed to recognize it as a trigger.
-
Add mannequin components to the object.
-
Please set the following in the inspector.
- icon: The hanger icon is displayed by default. You can change it to a custom icon.
- icon position: If not present, the icon appears in the object position with the mannequin component by default.
- Input the value after adding position object to make it appear on the desired location.
- ids: Please fill out the item ID of the clothing item you want to sell.
- pose: You can choose a pose and set it up.
- In the future, we will provide the pose you want in the form of a pose id.

If you already have a mannequin script in your scene, you can skip the later steps.
-
Add an Empty Object and write the object name as MannequinScript.
-
Add ZEPETO > Typescript and write the script name as MannequinScript.
-
Fill it out as below.
import { ZepetoScriptBehaviour } from 'ZEPETO.Script';
import { ZepetoPlayers, SpawnInfo } from 'ZEPETO.Character.Controller';
import { WorldService } from 'ZEPETO.World';
import { ItemContentsRequest, Mannequin, MannequinComponent, MannequinInteractable, MannequinPreviewer } from 'ZEPETO.Mannequin';
import { Object } from 'UnityEngine';

export default class MannequinScript extends ZepetoScriptBehaviour {

    private _previewer: MannequinPreviewer;

    Start() {
        // Code that creates a ZEPETO character based on the logged in ID
        // ZepetoPlayers.instance.CreatePlayerWithUserId(WorldService.userId, SpawnInfo.Default, true);

        ZepetoPlayers.instance.OnAddedLocalPlayer.AddListener(() => {
            const character = ZepetoPlayers.instance.LocalPlayer.zepetoPlayer.character;
            // Add Mannequin Interactable Component
            character.gameObject.AddComponent<MannequinInteractable>();
        });

        // Find all Mannequin components
        const mannequins = Object.FindObjectsOfType<MannequinComponent>();

        mannequins.forEach(m => {
            // Enter the Collider
            m.onActive.AddListener(contents => {
                Mannequin.OpenUI(contents);
                const zepetoContext = ZepetoPlayers.instance.LocalPlayer.zepetoPlayer.character.Context;
                this._previewer = new MannequinPreviewer(zepetoContext, contents);
                this._previewer.PreviewContents();
            });

            // Exit the Collider
            m.onCancel.AddListener(() => {
                Mannequin.CloseUI();
                this._previewer?.ResetContents();
            });
        });
    }
}
- After adding the script to the object, press the [▶︎(play)] button to run it.
STEP 3-3 : ZEPETO Template Type

Example of using ZEPETO Template Type Mannequin
If you input a ZEPETO id, the clothes that the person is wearing will appear as mannequin. However, if it is not the clothes you made, the clothes will not be shown.
-
Create an Empty Object and name it as Mannequin.
-
Collider must be added in order to interact with the object.
- isTrigger must be checked. If not checked, it is automatically processed to recognize it as a trigger.
-
Add mannequin components to the object.
-
Please set the following in the inspector.
- icon: The hanger icon is displayed by default. You can change it to a custom icon.
- icon position: If not present, the icon appears in the object position with the mannequin component by default.
- Input the value after adding position object to make it appear on the desired location.
- zepeto id: Please enter a ZEPETO id.
- pose: You can choose a pose and set it up.
- In the future, we will provide the pose you want in the form of a pose id.

If you already have a mannequin script in your scene, you can skip the later steps.
-
Add an Empty Object and write the object name as MannequinScript.
-
Add ZEPETO > Typescript and write the script name as MannequinScript.
-
Fill it out as below.
import { ZepetoScriptBehaviour } from 'ZEPETO.Script';
import { ZepetoPlayers, SpawnInfo } from 'ZEPETO.Character.Controller';
import { WorldService } from 'ZEPETO.World';
import { ItemContentsRequest, Mannequin, MannequinComponent, MannequinInteractable, MannequinPreviewer } from 'ZEPETO.Mannequin';
import { Object } from 'UnityEngine';

export default class MannequinScript extends ZepetoScriptBehaviour {

    private _previewer: MannequinPreviewer;

    Start() {
        // Code that creates a ZEPETO character based on the logged in ID
        // ZepetoPlayers.instance.CreatePlayerWithUserId(WorldService.userId, SpawnInfo.Default, true);

        ZepetoPlayers.instance.OnAddedLocalPlayer.AddListener(() => {
            const character = ZepetoPlayers.instance.LocalPlayer.zepetoPlayer.character;
            // Add Mannequin Interactable Component
            character.gameObject.AddComponent<MannequinInteractable>();
        });

        // Find all Mannequin components
        const mannequins = Object.FindObjectsOfType<MannequinComponent>();

        mannequins.forEach(m => {
            // Enter the Collider
            m.onActive.AddListener(contents => {
                Mannequin.OpenUI(contents);
                const zepetoContext = ZepetoPlayers.instance.LocalPlayer.zepetoPlayer.character.Context;
                this._previewer = new MannequinPreviewer(zepetoContext, contents);
                this._previewer.PreviewContents();
            });

            // Exit the Collider
            m.onCancel.AddListener(() => {
                Mannequin.CloseUI();
                this._previewer?.ResetContents();
            });
        });
    }
}
- After adding the script to the object, press the [▶︎(play)] button to run it.
STEP 4 : Using Mannequin Purchases
If you have completed the mannequin setting correctly, an icon will appear for interaction when you enter the Collider area of the mannequin object.
When you click the icon, the purchase window will appear along with the item you set in the mannequin.

You can try it on by clicking on the item.
- Items that you already own will be marked with a check mark instead of a price.
When you leave the Collider area of the mannequin object, the trying on will be canceled and you will return to your original outfit.

The following is how the purchase process works according to the test scenario.
| Test Environment | Purchase Process |
|---|---|
| Purchasing from Unity Editor | During Play, the outfit will be changed if the purchase is successful. However, when the Play is finished, it will return to its original state. |
| Purchasing in QR code mobile test environment | The outfit will change if purchase is successful during QR test access, but if you connect again after disconnecting, it will return to its original state. |
| Purchasing after registering the package at ZEPETO Studio and connecting through the test link | Because you are logging into the actual server to test, clothes will be changed when the purchase is successful and the changed clothes will be maintained when you leave the World. Also, if the purchase is successful, the item will be purchased from the actual server, so the Zems held by the real account will be deducted and you will have the costume item. Purchased clothes cannot be discarded or deleted arbitrarily, so please purchase carefully when testing. |
STEP 5 : Mannequin Multiplayer Sync
Multiplayer requires synchronizing the costumes worn by other players using the mannequin function.
Basic multiplayer setup should be completed before working on the contents below.
-
Add a client script. Add ZEPETO > Typescript and write the script name as MannequinController.
-
Fill out as shown below.
import { ZepetoScriptBehaviour } from 'ZEPETO.Script';
import { Room } from 'ZEPETO.Multiplay';
import { ClothesPreviewer, ItemContent, ItemContentsRequest, Mannequin, MannequinComponent, MannequinInteractable, MannequinPreviewer } from 'ZEPETO.Mannequin';
import { ZepetoContext } from 'Zepeto';
import { ZepetoPlayer, ZepetoPlayers } from 'ZEPETO.Character.Controller';
import { GameObject, Object, Canvas, WaitForSecondsRealtime, LayerMask } from 'UnityEngine';
import { Player } from 'ZEPETO.Multiplay.Schema';
import { ZepetoWorldMultiplay } from 'ZEPETO.World';

class CharacterItem {
    property: string;
    id: string;
}

class ChangedItem {
    sessionId: string;
    characterItems: CharacterItem[];
}

export default class MannequinController extends ZepetoScriptBehaviour {
    private MESSAGE_TYPE = {
        OnChangedItem: "OnChangedItem",
        SyncChangedItem: "SyncChangedItem",
        CheckChangedItem: "CheckChangedItem"
    }

    private multiplay: ZepetoWorldMultiplay;
    private _room: Room;
    private _previewer: MannequinPreviewer
    private _context: ZepetoContext

    private _userZepetoContexts: Map<string, ZepetoContext> = new Map<string, ZepetoContext>();
    private _currentMannequinComponent: MannequinComponent = null;
    private _selectMannequinComponent: MannequinComponent = null;
    private _isOpenMannequinUI: boolean = false;

    private _basicClothString = "basicCloth" as const;

    Start() {
        this.multiplay = Object.FindObjectOfType<ZepetoWorldMultiplay>();

        Mannequin.OnOpenedShopUI.AddListener((item) => {
            // When you click OpenShopButton
            this.OpenedShopUI(item)
        });
        Mannequin.OnClosedShopUI.AddListener(() => {
            // When you click CloseShopButton
            this.ClosedShopUI()
        });
        Mannequin.OnSelectedItem.AddListener((itemcontent: ItemContent, select: boolean) => {
            // Action when item is selected
        });

        ZepetoPlayers.instance.OnAddedLocalPlayer.AddListener(() => {
            const myPlayer = ZepetoPlayers.instance.LocalPlayer.zepetoPlayer;

            // Mannequin
            const character = myPlayer.character;
            character.gameObject.AddComponent<MannequinInteractable>();

            console.log("local _context set");
            this._context = character.Context;

            const mannequins = Object.FindObjectsOfType<MannequinComponent>()
            mannequins.forEach(mannequin => {
                // When you enter mannequin collider
                mannequin.onActive.AddListener(contents => {
                    if (this._currentMannequinComponent != null && this._currentMannequinComponent == mannequin) {
                        return;
                    }

                    if (contents == null || contents.length == 0) {
                        console.log("No mannequin data");
                        return;
                    }

                    if (this._isOpenMannequinUI) {
                        this.BreakMannequin();
                    }

                    this._selectMannequinComponent = mannequin;
                    Mannequin.OpenUI(contents);
                    console.log("onActive");
                });

                // [Option] When you leave mannequin collider
                mannequin.onCancel.AddListener( () => {
                    if (this._currentMannequinComponent == null || this._currentMannequinComponent != mannequin) {
                        return;
                    }

                    this.BreakMannequin();
                    console.log("onCancel");
                });

                let iconCanvas = mannequin.gameObject.GetComponentInChildren<Canvas>(true);
                if (iconCanvas != null) {
                    iconCanvas.gameObject.layer = LayerMask.NameToLayer("UI");
                }
            });
        });

        ZepetoPlayers.instance.OnAddedPlayer.AddListener((sessionId: string) => {
            if (ZepetoPlayers.instance.GetPlayer(sessionId).isLocalPlayer) {
                return;
            }
            const userContext = ZepetoPlayers.instance.GetPlayer(sessionId).character.Context;
            this._userZepetoContexts.set(sessionId, userContext);
            this._room.Send(this.MESSAGE_TYPE.CheckChangedItem, sessionId);
        });
        this.multiplay.RoomJoined += (room: Room) => {
            this._room = room;
            this.AddMessageHandler();
        };
    }

    private AddMessageHandler() {
        // [Option] Synchronize each player's clothes
        this._room.AddMessageHandler<ChangedItem>(this.MESSAGE_TYPE.SyncChangedItem, message => {
            console.log("syncChangedItem");
            if (message == null) {
                return;
            }

            if (false == this._userZepetoContexts.has(message.sessionId)) {
                return;
            }

            let itemContents: ItemContent[] = [];

            for (const characterItem of message.characterItems) {
                let itemContent: ItemContent = new ItemContent();
                itemContent.id = characterItem.id;
                itemContent.property = parseInt(characterItem.property);

                if (itemContent.id == this._basicClothString) {
                    itemContent.id = "";
                }

                itemContents.push(itemContent);
            }
            let clothesPreviewer:ClothesPreviewer = new ClothesPreviewer(this._userZepetoContexts.get(message.sessionId),itemContents);
            clothesPreviewer.PreviewContents();
        });
    }

    private ClosedShopUI() {
        this._currentMannequinComponent = null;
        this._isOpenMannequinUI = false;
    }

    private OpenedShopUI(items: ItemContent[]) {
        this._isOpenMannequinUI = true;
        this._currentMannequinComponent = this._selectMannequinComponent;

        this._previewer = new MannequinPreviewer(this._context, items);
        this._previewer.OnChanged.AddListener((changeValues) => {
            let characterItems: CharacterItem[] = [];

            for (const changeValue of changeValues) {
                let characterItem: CharacterItem = new CharacterItem();
                characterItem.id = changeValue.id;
                characterItem.property = changeValue.property.toString();

                if (characterItem.id == "") {
                    characterItem.id = this._basicClothString;
                }
                characterItems.push(characterItem);
            }
            this._room.Send(this.MESSAGE_TYPE.OnChangedItem, characterItems);
        });

        this._previewer.PreviewContents();
    }

    public BreakMannequin() {
        Mannequin.CloseUI();
        if (this._previewer) {
            this._previewer.ResetContents();
            this._previewer = null;
        }

        this._currentMannequinComponent = null;
        this._isOpenMannequinUI = false;
    }

}
-
Create Hierarchy > Empty Object and name it Mannequin Controller.
-
Add the script you just wrote to the Mannequin Controller.

- Next, write the server code by referring to the contents below in World.Multiplay > index.ts.
import { Sandbox, SandboxOptions, SandboxPlayer } from 'ZEPETO.Multiplay';
import { Player, Transform, Vector3 } from 'ZEPETO.Multiplay.Schema';

class CharacterItem {
    property: string;
    id: string;
}

class ChangedItem {
    sessionId: string;
    characterItems: CharacterItem[];
}

enum Cloth {
    TOP = "19",
    BOTTOM = "20" ,
    DRESS = "22"
}

export default class extends Sandbox {
    private MESSAGE_TYPE = {
        OnChangedItem: "OnChangedItem",
        SyncChangedItem: "SyncChangedItem",
        CheckChangedItem: "CheckChangedItem"
    }

    // Map<sessionId, Map<CharacterItem.property, CharacterItem.id>>
    private ChangedItems: Map<string, Map<string, string>>;

    onCreate(options: SandboxOptions) {
        // Called when the Room object is created.
        // Handle the state or data initialization of the Room object.
        this.onMessage("onChangedTransform", (client, message) => {
            const player = this.state.players.get(client.sessionId);

            const transform = new Transform();
            transform.position = new Vector3();
            transform.position.x = message.position.x;
            transform.position.y = message.position.y;
            transform.position.z = message.position.z;

            transform.rotation = new Vector3();
            transform.rotation.x = message.rotation.x;
            transform.rotation.y = message.rotation.y;
            transform.rotation.z = message.rotation.z;

            player.transform = transform;
        });
        this.onMessage("onChangedState", (client, message) => {
            const player = this.state.players.get(client.sessionId);
            player.state = message.state;
            player.subState = message.subState; // Character Controller V2
        });

        // Mannequin server code
        this.ChangedItems = new Map<string, Map<string, string>>();

        this.onMessage<CharacterItem[]>(this.MESSAGE_TYPE.OnChangedItem, (client, message) => {
            // Overwrite clothes and set new parts
            if (this.ChangedItems.has(client.userId)) {
                const changedItemMap = this.ChangedItems.get(client.userId);
                for (const characterItem of message) {
                    if (characterItem.property == Cloth.DRESS) {
                        // In the case of a dress (22), remove the top (19) and bottom (20)
                        if (changedItemMap.has(Cloth.TOP)) {
                            changedItemMap.delete(Cloth.TOP);
                        }
                        if (changedItemMap.has(Cloth.BOTTOM)) {
                            changedItemMap.delete(Cloth.BOTTOM);
                        }
                    } else if (characterItem.property == Cloth.TOP || characterItem.property == Cloth.BOTTOM) {
                        // Remove the dress if it is a top (19) or bottom (20)
                        if (changedItemMap.has(Cloth.DRESS)) {
                            changedItemMap.delete(Cloth.DRESS);
                        }
                    }

                    changedItemMap.set(characterItem.property,characterItem.id);
                    console.log(`OnChangedItem old ${client.userId} : ${characterItem.property} // ${characterItem.id}`);
                }
            } else {
                // Initial registration
                let changedItemMap: Map<string,string> = new Map<string, string>();
                for (const characterItem of message) {
                    changedItemMap.set(characterItem.property,characterItem.id);
                }
                this.ChangedItems.set(client.sessionId,changedItemMap);
            }

            let changedItem: ChangedItem = new ChangedItem();
            changedItem.sessionId = client.sessionId;
            changedItem.characterItems = message;

            console.log(`OnChangedItem : ${changedItem.sessionId}`);
            for (const characterItem of changedItem.characterItems) {
                console.log(` ::: ${characterItem.property} - ${characterItem.id} `);
            }
            this.broadcast(this.MESSAGE_TYPE.SyncChangedItem, changedItem, {except: client});
        });

        this.onMessage<string>(this.MESSAGE_TYPE.CheckChangedItem,(client, message) => {
            if (false == this.ChangedItems.has(message)) {
                return;
            }

            let changedItem: ChangedItem = new ChangedItem();
            changedItem.sessionId = client.sessionId;
            changedItem.characterItems = [];

            for (const property of this.ChangedItems.get(message).keys()) {
                let characterItem: CharacterItem = new CharacterItem();
                characterItem.property = property;
                characterItem.id = this.ChangedItems.get(message).get(property);

                changedItem.characterItems.push(characterItem);
            }

            client.send<ChangedItem>(this.MESSAGE_TYPE.SyncChangedItem, changedItem );
        });

    }

    onJoin(client: SandboxPlayer) {

        // Create the player object defined in schemas.json and set the initial value.
        console.log(`[OnJoin] sessionId : ${client.sessionId}, HashCode : ${client.hashCode}, userId : ${client.userId}`)

        const player = new Player();
        player.sessionId = client.sessionId;

        if (client.userId) {
            player.zepetoUserId = client.userId;
        }

        // Manage the Player object using sessionId, a unique key value of the client object.
        // The client can check the information about the player object added by set by adding the add_OnAdd event to the players object.
        this.state.players.set(client.sessionId, player);
    }

    async onLeave(client: SandboxPlayer, consented?: boolean) {

        // By setting allowReconnection, it is possible to maintain connection for the circuit, but clean up immediately in the basic guide.
        // The client can check the information about the deleted player object by adding the add_OnRemove event to the players object.
        this.state.players.delete(client.sessionId);
        if (this.ChangedItems.has(client.sessionId)) {
            this.ChangedItems.delete(client.sessionId);
        }
    }
}
- Turn on the multiplayer server and test it.
Event Function
The event function is available from ZEPETO Mannequin 1.1.0.
ZEPETO.Mannequin.Mannequin
| Function | Description |
|---|---|
| public static OnSelectedItem: UnityEngine_Events.UnityEvent$2<ItemContent, boolean>; | Called when a specific item is selected in the mannequin costume purchase window, and the ItemContent of selected item information and item selection are transferred to the boolean value. |
| public static OnSucceededPurchaseItems: UnityEngine_Events.UnityEvent$1<ItemContent[]>; | Called when the clothing purchase is completed, and the ItemContent list of purchased item information is brought over. |
| public static OnFailedPurchaseItems: UnityEngine_Events.UnityEvent$1<ItemContent[]>; | Called when the purchase of a clothing has failed, and the ItemContent list of failed item's information is brought over. |
| public static OnAppliedItems: UnityEngine_Events.UnityEvent$1<ItemContent[]>; | Called when you choose to wear the item you purchased after the successful purchase of the clothing, and the ItemContent list of the item information you have worn will be brought over. |
| public static OnOpenedShopUI: UnityEngine_Events.UnityEvent$1<ItemContent[]>; | Called when the mannequin costume purchase window is opened, and the ItemContent list of item information in the purchase window is brought over. |
| public static OnClosedShopUI: UnityEngine_Events.UnityEvent; | Called when the mannequin costume purchase window is closed. |
ZEPETO.Mannequin.BasePreviewer
| Function | Description |
|---|---|
| public OnChanged: UnityEngine_Events.UnityEvent$1<ZEPETO_Mannequin_BasePreviewer.ChangedValue[]>; | It is always called when the equipped item information is changed by pressing the mannequin, and the OnChagedValue list is brought over. |
The member variable information for the OnChagedValue class is as follows:
| public property : ZepetoPropertyFlag | Clothing Part Information |
| public id : string | item ID |
Mannequin.WorldCamera
If Mannequin.WorldCamera is not set, the camera for the mannequin interaction icon will be set as a camera with low Depth.
If you wish to set a specific camera, you can use Mannequin.WorldCamera to designate one.
| Variable | Description |
|---|---|
| Mannequin.WorldCamera | A variable that allows you to manually set the camera for the mannequin interaction icon. |
Below is an example setting of Mannequin.WorldCamera on an existing MannequinScript.
import { ZepetoScriptBehaviour } from 'ZEPETO.Script';
import { ZepetoPlayers, SpawnInfo } from 'ZEPETO.Character.Controller';
import { WorldService } from 'ZEPETO.World';
import { ItemContentsRequest, Mannequin, MannequinComponent, MannequinInteractable, MannequinPreviewer } from 'ZEPETO.Mannequin';
import { Object } from 'UnityEngine';

export default class MannequinScript extends ZepetoScriptBehaviour {

    private _previewer: MannequinPreviewer;

    Start() {
        // Code that creates a ZEPETO character based on the logged in ID
        // ZepetoPlayers.instance.CreatePlayerWithUserId(WorldService.userId, SpawnInfo.Default, true);

        ZepetoPlayers.instance.OnAddedLocalPlayer.AddListener(() => {
            const character = ZepetoPlayers.instance.LocalPlayer.zepetoPlayer.character;
            // Add Mannequin Interactable Component
            character.gameObject.AddComponent<MannequinInteractable>();

            // Code to set up the Mannequin Icon World Canvas Camera as the ZEPETO Camera
            Mannequin.WorldCamera = ZepetoPlayers.instance.LocalPlayer.zepetoCamera.camera;
        });

        // Find all Mannequin components
        const mannequins = Object.FindObjectsOfType<MannequinComponent>();

        mannequins.forEach(m => {
            // Enter the Collider
            m.onActive.AddListener(contents => {
                Mannequin.OpenUI(contents);
                const zepetoContext = ZepetoPlayers.instance.LocalPlayer.zepetoPlayer.character.Context;
                this._previewer = new MannequinPreviewer(zepetoContext, contents);
                this._previewer.PreviewContents();
            });

            // Exit the Collider
            m.onCancel.AddListener(() => {
                Mannequin.CloseUI();
                this._previewer?.ResetContents();
            });
        });
    }
}