使用语音聊天功能
Zepeto.Voice.Chat 预览版本包启用世界中的语音聊天。
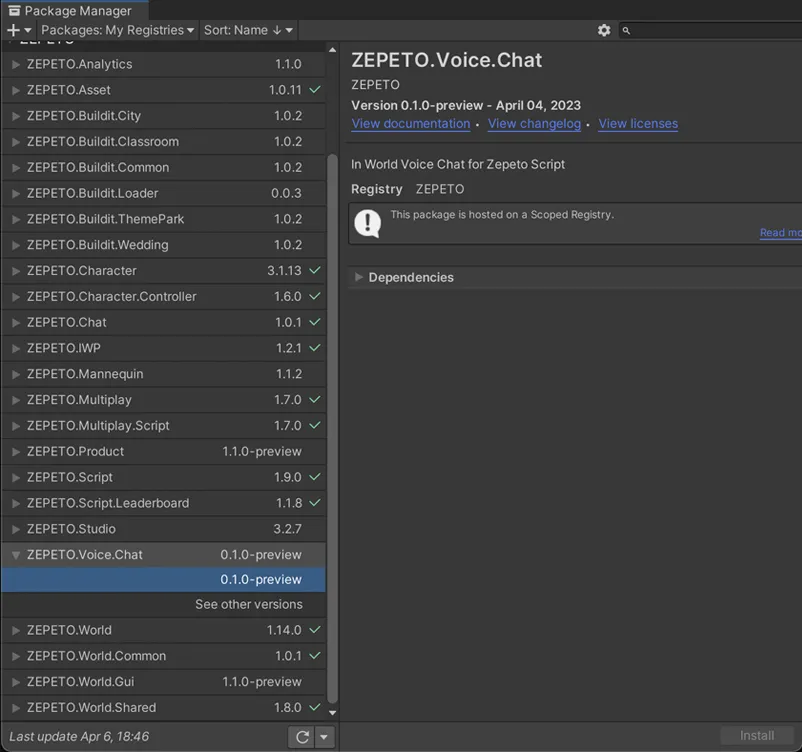
安装 ZEPETO.Voice.Chat 并设置模式
1) 安装 Window → 包管理器 → ZEPETO.Voice.Chat。
- 此功能在实现了多人元素的世界中可用。
- 测试仅在移动测试中可用,而不在编辑器测试中可用。
- 由于 iOS 政策,在启用语音聊天的世界中,打开麦克风时设备音量不会降至零。 关闭麦克风时,设备音量将降至零。
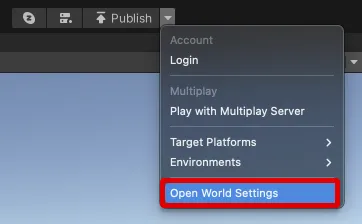
2) 点击正在开发的 Unity 项目屏幕中间菜单的 [▼] 按钮。 在弹出菜单中点击 [打开世界设置] 按钮。
3) 如果正确安装了 ZEPETO.Voice.Chat 包,您将看到添加的语音聊天模式选项。
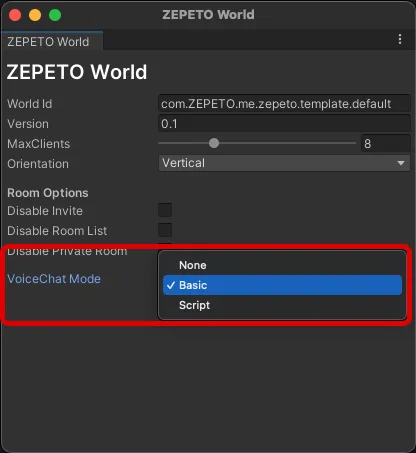
4) 在语音聊天模式中,请设置所需的模式。
- 基本:使用默认提供的语音聊天功能。
- 脚本:通过实现语音聊天 API 使用语音聊天功能。
- 您可以在运行时处理语音聊天的房间访问进出。
- 为不同团队实现语音聊天(例如,红队语音聊天和蓝队语音聊天)
- 检测当前说话的用户
基本模式:使用语音聊天功能
一个拥有基本模式语音聊天的世界看起来是这样的。
您还可以使用语音调制功能创建更有趣的语音聊天。
进入具有语音聊天功能的世界时,语音聊天会自动启用。
👍 第一次在ZEPETO中使用语音聊天功能时,会出现关于麦克风访问的弹出窗口。 您必须允许访问才能使用语音聊天功能。
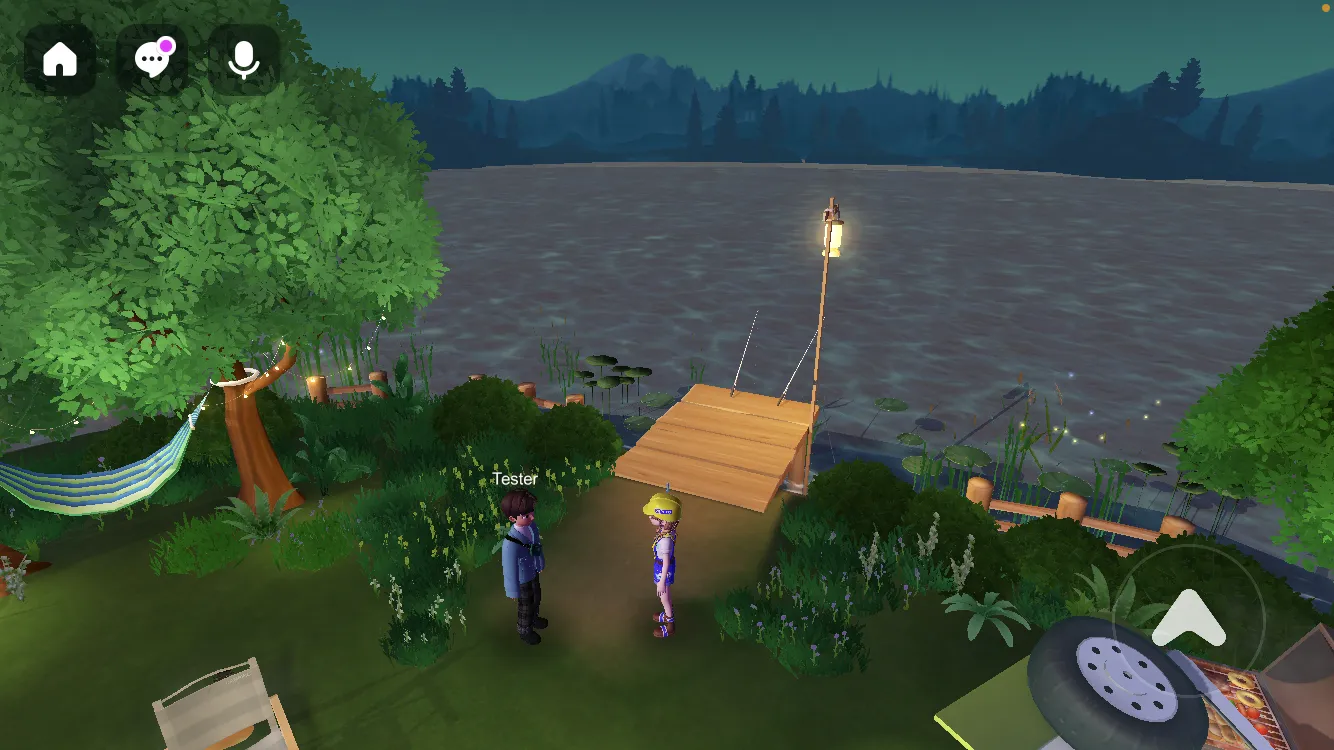
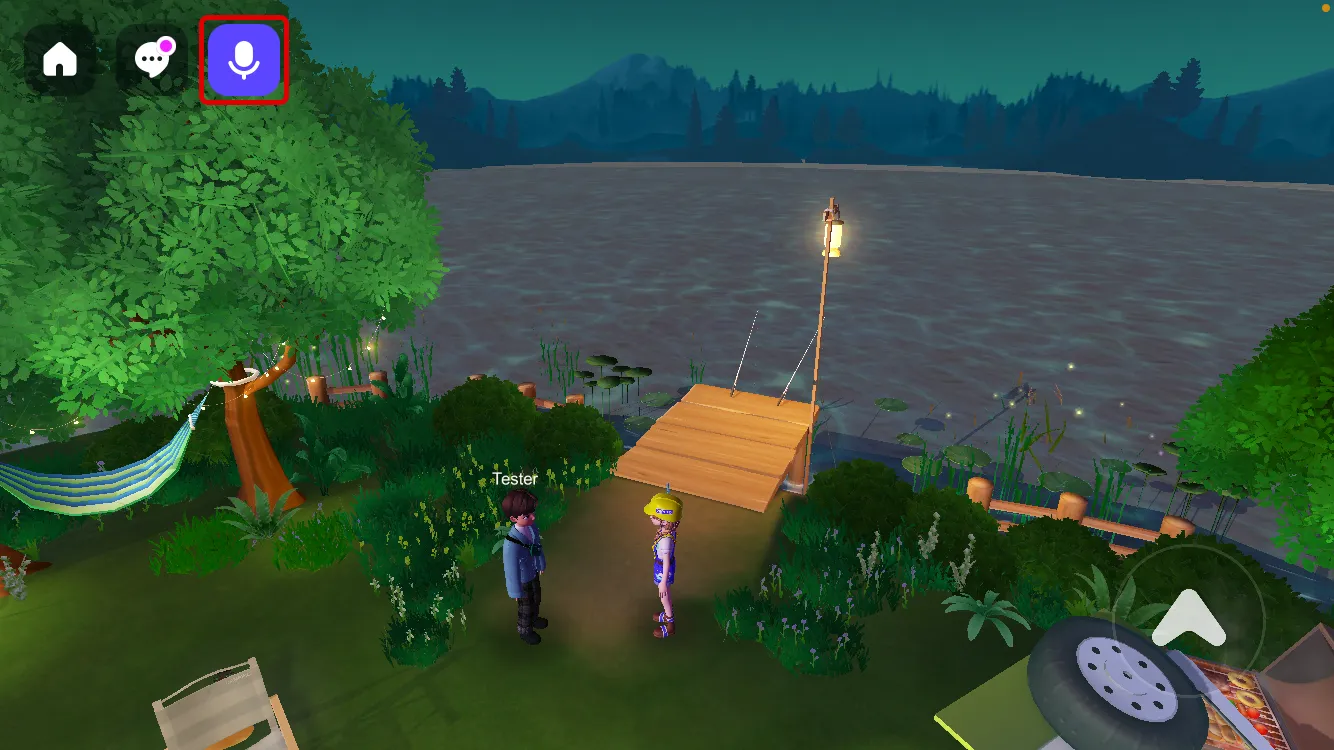
- 在 ZEPETO 应用程序 3.26.000 及以上版本中,语音聊天扬声器图标不显示。
- 如果您想让语音图标显示,请切换到脚本模式并按照指南编写自己的代码。
脚本模式:使用 VoiceChat API
脚本模式在团队分隔的频道中启用语音聊天。
请参考下面的功能描述和示例来实现该功能。
API | 描述 |
|---|---|
OnInitializedEvent | 在初始化事件中,当发生True事件时,语音聊天API可用。 如果此事件为True,则语音聊天可用;如果为False,则语音聊天不可用。 |
EnterRoom(RoomProperty roomProperty) | 进入语音聊天房间的功能 - 成功进入语音聊天房间后,语音聊天按钮将出现 |
ExitRoom() | 离开语音聊天房间的功能 |
OnRoomConnectedEvent | 检查进入语音聊天房间状态的事件。 如果此事件为真,则用户已进入语音聊天房间;如果为假,则用户已离开语音聊天房间。 |
OnSpeechDetectedEvent<string, boolean> | 检测当前在语音聊天中说话的用户的事件。 - string是说话用户的userId - boolean在发言开始时为true,在发言结束时为false |
ChangeTeamID(number teamid) | 更改语音聊天房间中使用的TeamId的功能 - 只能设置为1或更大的整数值 |
房间属性类
API | 描述 |
|---|---|
SetAudioMode | 在语音聊天中使用的音频模式 - AudioMode.Omnidirectional: 语音聊天模式,不基于距离进行语音衰减 (您可以与或不与ZEPETO角色一起使用) - AudioMode.Directional: 语音聊天模式,基于距离进行语音衰减 (ZEPETO角色必须存在于场景中,因为此模式基于ZEPETO角色的位置) |
SetTeamID | 在语音聊天中使用的TeamId,以启用具有相同TeamId的用户之间的语音聊天。 - 只能设置为1或更高的整数值 |
特定团队语音聊天实现示例
这里有一些示例代码来尝试语音聊天API。
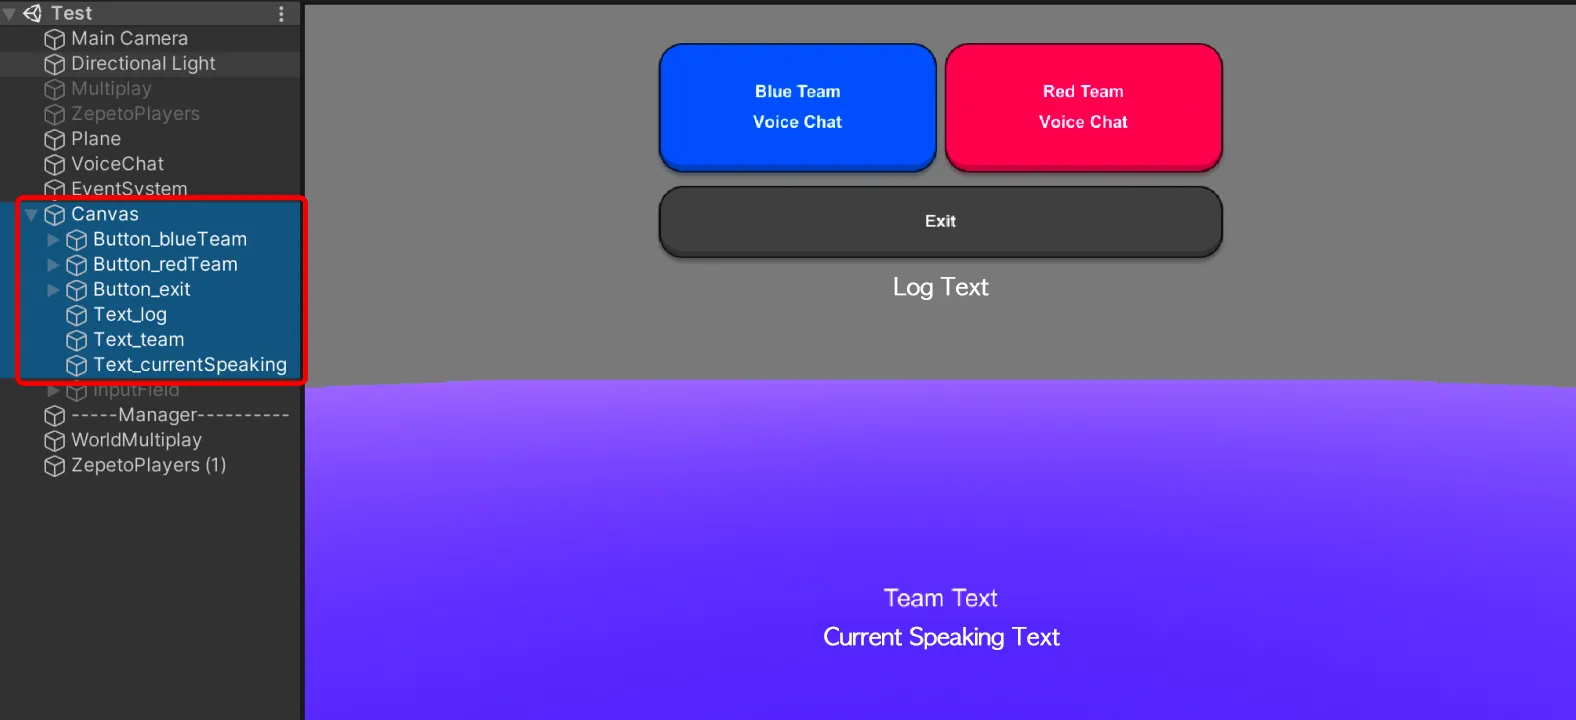
1) 添加一个按钮并将文本记录到画布上,如下图所示,以进入语音聊天团队频道并显示状态日志。
- 按钮
- 按钮_蓝队 : 蓝队语音聊天入口按钮
- 按钮_红队 : 红队语音聊天入口按钮
- 按钮_退出 : 退出语音聊天按钮
- 文本
- 文本_日志 : 显示聊天日志的文本
- 文本_团队 : 显示同一语音聊天团队频道成员列表的文本
- 文本_当前发言 : 显示当前在语音聊天中发言的用户ID的文本。
2) 创建项目 > 创建 > ZEPETO > TypeScript 并将其重命名为 VoiceChatTest。
3) 编写如下示例脚本。
import { Button, InputField, Text } from 'UnityEngine.UI';
import { ZepetoScriptBehaviour } from 'ZEPETO.Script'
import { AudioMode, RoomProperty, VoiceChatController } from 'ZEPETO.Voice.Chat'

export default class VoiceChatTest extends ZepetoScriptBehaviour {

    // 声明 UI 组件为公共成员
    public BlueTeamButton: Button;
    public RedTeamButton: Button;
    public exitRoomButton: Button;
    public logText: Text;
    public currentTeamIDText: Text;
    public currentSpeakingUserIDsText: Text;

    // 声明私有成员以存储说话用户 ID 和团队 ID 输入字段
    private currentSpeakingUserIDs: string[];
    private teamIDInputField: InputField;

    Start() {
        this.currentSpeakingUserIDs = new Array();

        // 为按钮点击添加事件监听器
        this.BlueTeamButton.onClick.AddListener(()=>{
            this.EnterBlueTeam();
        });
        this.RedTeamButton.onClick.AddListener(()=>{
            this.EnterRedTeam();
        });
        this.exitRoomButton.onClick.AddListener(()=>{
            this.ExitVoiceChatRoom();
        });

        // 为语音聊天控制器添加事件监听器
        VoiceChatController.OnInitializedEvent.AddListener(init => this.OnInitialized(init));
        VoiceChatController.OnRoomConnectedEvent.AddListener(connected => this.OnRoomConnected(connected));
        VoiceChatController.OnSpeechDetectedEvent.AddListener((userId, speechDetected) => this.OnSpeechDetected(userId, speechDetected));

        this.logText.text = "[VoiceChat] VoiceChatTest 开始";
    }

    // 当脚本被销毁时调用的 OnDestroy 方法
    OnDestroy() {
        VoiceChatController.OnInitializedEvent.RemoveAllListeners();
        VoiceChatController.OnRoomConnectedEvent.RemoveAllListeners();
        VoiceChatController.OnSpeechDetectedEvent.RemoveAllListeners();
    }

    // 当语音聊天系统初始化时调用的方法
    private OnInitialized(initialized: boolean) {
        this.logText.text = "[VoiceChat] OnInitialized: " + initialized;
    }

     // 当语音聊天房间连接时调用的方法
    private OnRoomConnected(connected: boolean) {
        this.logText.text = "[VoiceChat] OnRoomConnected: " + connected;
    }

    // 当检测到用户的语音或未检测到时调用的方法
    private OnSpeechDetected(userId: string, speechDetected: boolean) {
        this.logText.text = "[VoiceChat] OnSpeechDetected: " + userId + ", " + speechDetected;

        if (speechDetected) {
            this.currentSpeakingUserIDs.push(userId);
        }
        else {
            let index = this.currentSpeakingUserIDs.indexOf(userId);
            this.currentSpeakingUserIDs.splice(index, 1);
        }

        let userIds = "[当前说话用户 IDs]\n";
        for (let i = 0; i < this.currentSpeakingUserIDs.length; i++) {
            userIds += this.currentSpeakingUserIDs[i];
            userIds += "\n";
        }

        this.currentSpeakingUserIDsText.text = userIds;
    }

    // 进入蓝队的语音聊天房间的方法
    public EnterBlueTeam(){
        this.EnterVoiceChatRoom(2);
    }

    // 进入红队的语音聊天房间的方法
    public EnterRedTeam(){
        this.EnterVoiceChatRoom(3);
    }

    // 根据给定的团队索引进入语音聊天房间的方法
    private EnterVoiceChatRoom(teamIndex: number) {
        console.log("[VoiceChat] 进入语音聊天房间");

        // 创建一个新的 RoomProperty 对象并设置其属性
        let roomProperty = new RoomProperty();
        roomProperty.SetAudioMode(AudioMode.Omnidirectional);
        roomProperty.SetTeamID(teamIndex);
        VoiceChatController.EnterRoom(roomProperty);
        this.currentTeamIDText.text = "团队 ID: " + roomProperty.TeamId.toString();
    }

    // 退出语音聊天房间的方法
    public ExitVoiceChatRoom() {
        this.logText.text = "[VoiceChat] 退出语音聊天房间";
        VoiceChatController.ExitRoom();
    }

    // 更改当前用户的团队 ID 的方法
    public ChangeTeamID() {
        // 从输入字段获取新的团队 ID 并将其解析为整数
        let teamID = parseInt(this.teamIDInputField.text);
        this.logText.text = "[VoiceChat] 更改团队 ID: " + teamID;
        this.currentTeamIDText.text = "团队 ID: " + teamID.toString();
        // 在语音聊天系统中更改团队 ID
        VoiceChatController.ChangeTeamID(teamID);
    }

}
- 代码描述
- 当脚本运行时,它将在 Start() 函数中为每个按钮注册一个事件,并在 VoiceChatController 上注册 OnInitialized、OnRoomConnected 和 OnSpeechDetected 事件。
- 当点击蓝队按钮或红队按钮时,将执行 EnterVoiceChatRoom() 函数,用户通过输入指定的 RoomProperty 进入语音聊天房间。示例中的房间属性如下。
- roomProperty.SetAudioMode : AudioMode.Omnidirectional。Omnidirectional 音频模式是一个无论玩家位置如何音量都相同的模式。相比之下,Directional 模式是一个 3D 声音模式,这意味着音量会根据角色的位置而有所不同,因此角色离得越远,音量就会越小。
- roomProperty.SetTeamID : 蓝队为频道 2,红队为频道 3。SetTeamID 在语音聊天中充当频道。进入频道 2 的团队只能与频道 2 中的玩家进行语音聊天,而进入频道 3 的团队只能与频道 3 中的玩家进行语音聊天。
- ExitVoiceChatRoom() 将退出当前的语音聊天团队频道。
- OnSpeechDetected() 将输出当前在团队频道中使用语音聊天的玩家 ID 到日志文本中。
4) 完成脚本后,在检查器中分配步骤 1 中创建的按钮和文本。
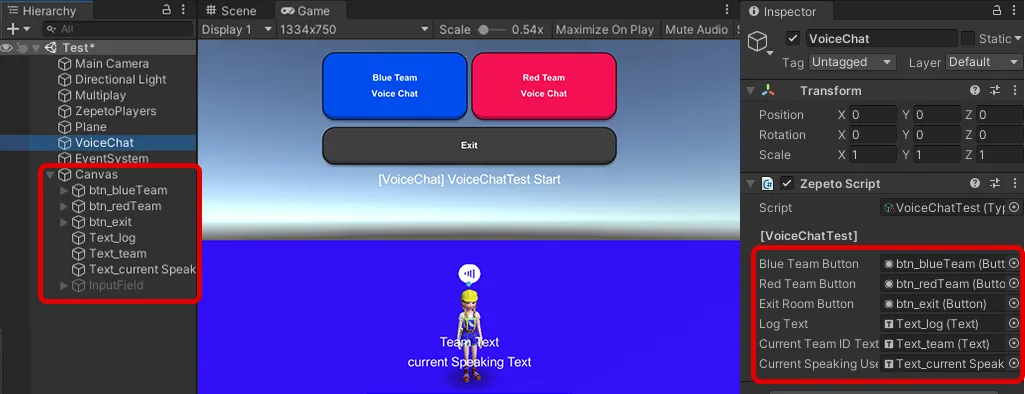
5) 通过二维码或测试链接在移动设备上运行测试,您可以看到在按下“进入团队”按钮时创建了语音聊天激活按钮,并且每当玩家说话时,日志会显示哪个玩家在语音聊天中,如下屏幕所示。
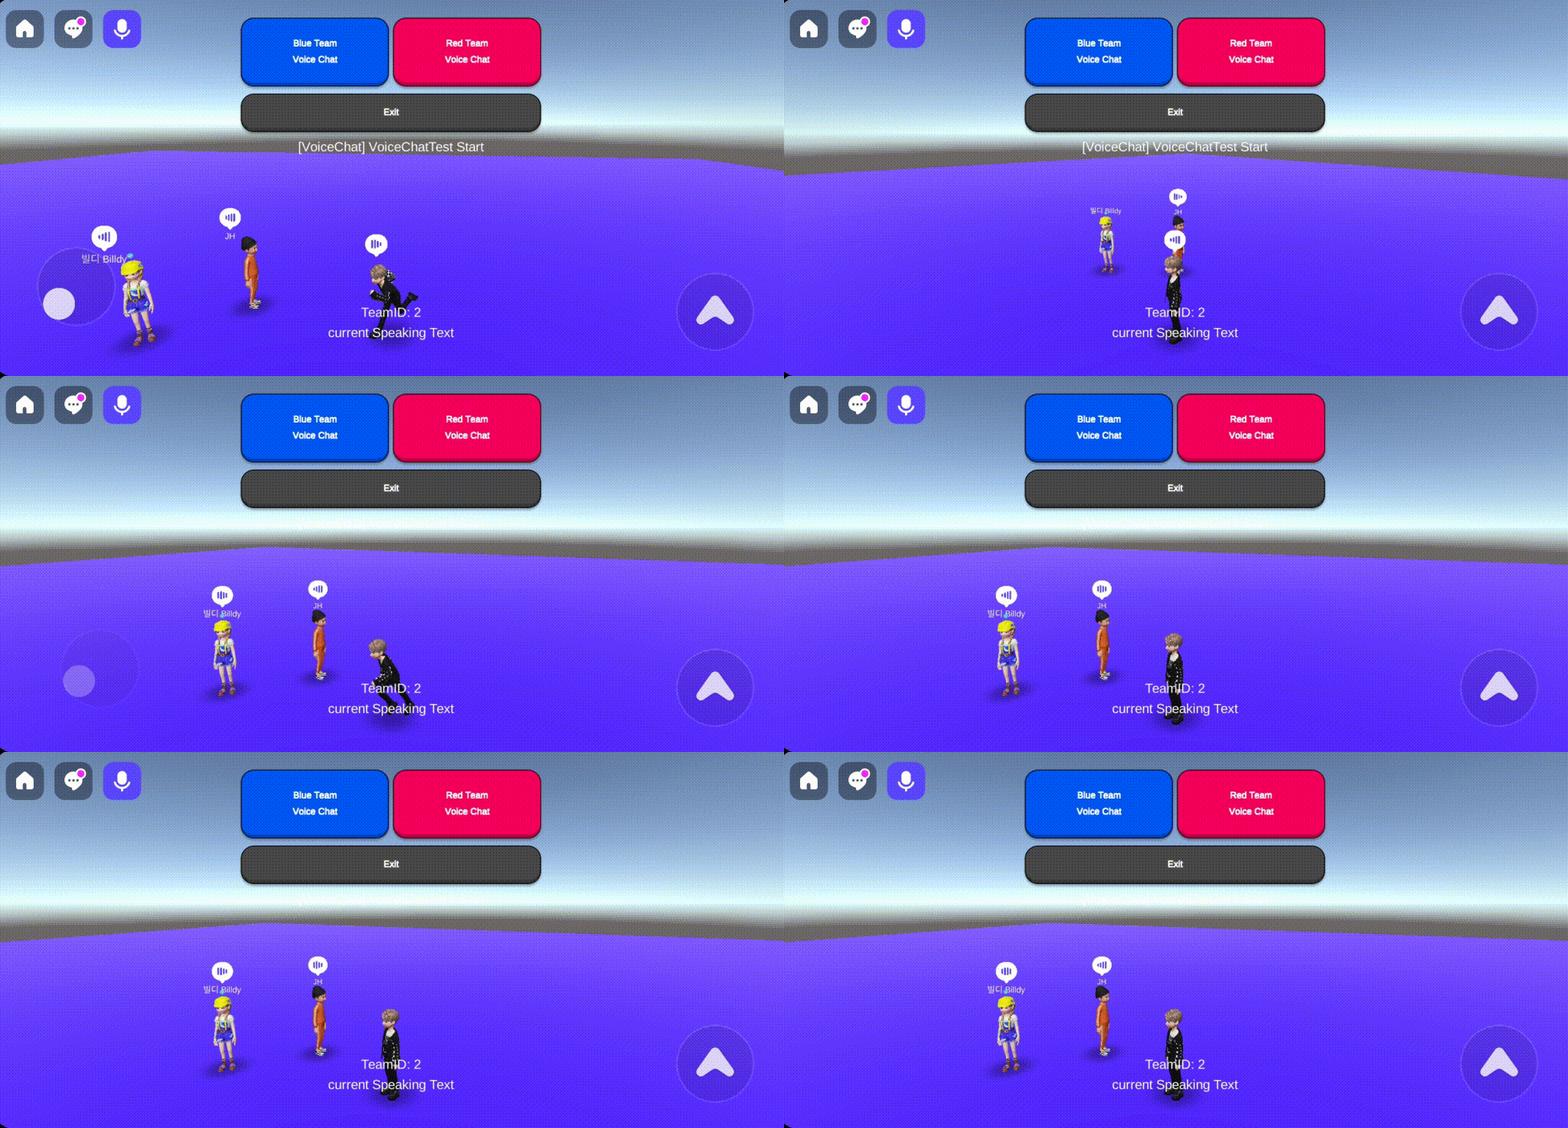
显示语音聊天气泡图像的示例
在ZEPETO App 3.26.000及更高版本中,语音聊天发言图标不显示。 如果您想处理发言图标的显示,请遵循指南并编写自己的代码。
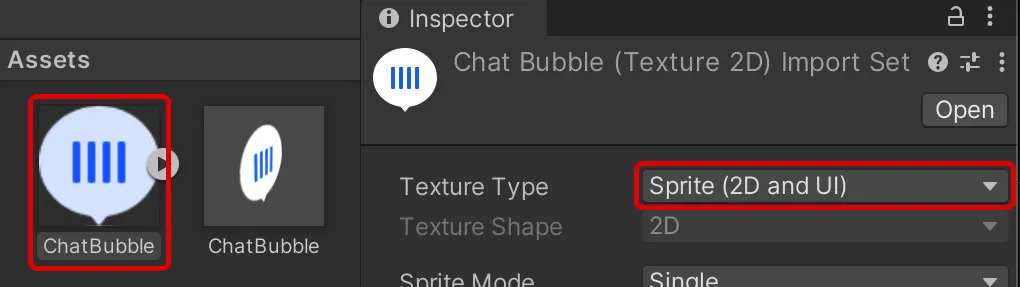
1) 当玩家在语音聊天中时,要在角色头上显示气泡,您需要创建一个使用气泡图像的预制件。导入您想使用的气泡PNG图像,如下所示,并将其纹理类型更改为Sprite。
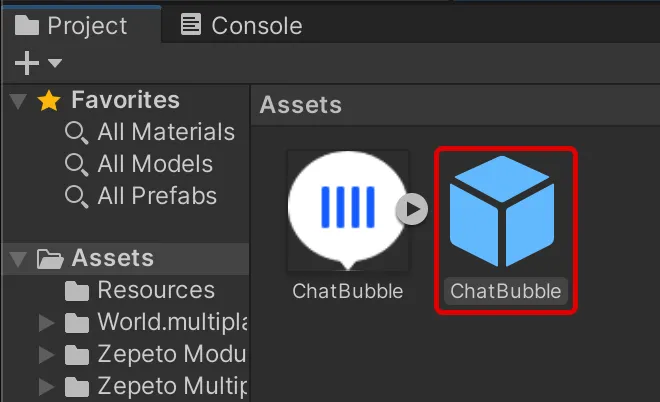
2) 项目 > 创建 > 预制件,并将其重命名为ChatBubble。
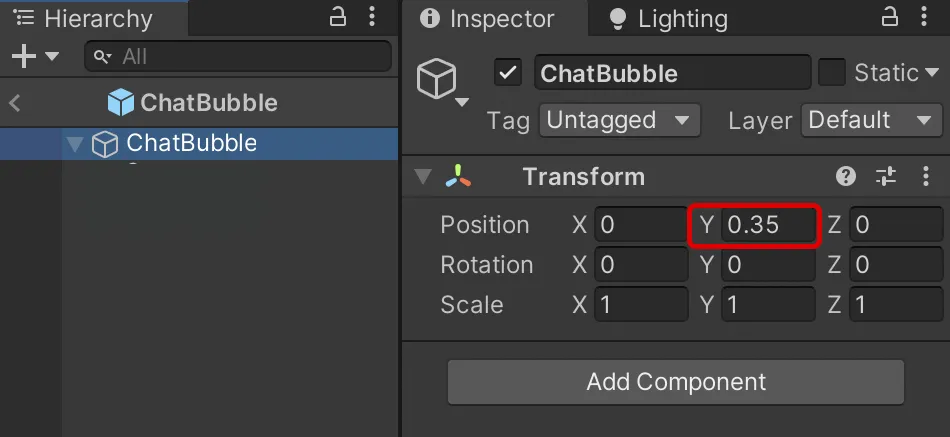
3) 双击ChatBubble预制件以进入预制件编辑模式。选择ChatBubble预制件并选择变换 > 位置 > 将Y值更改为0.35。
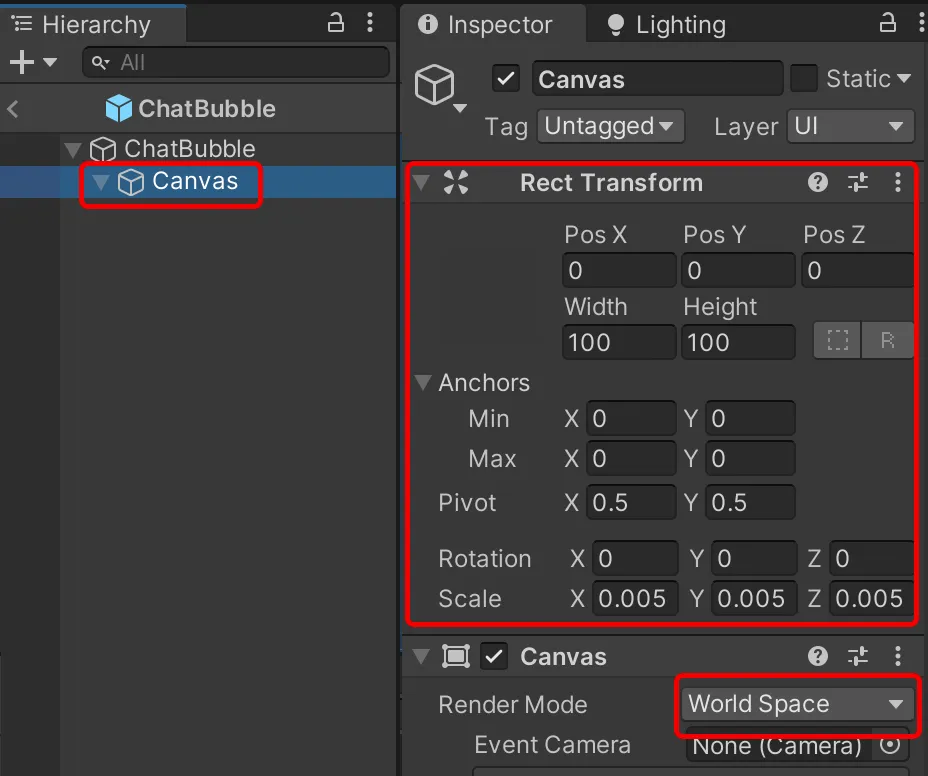
4) 在预制对象内创建一个画布。
- 双击 ChatBubble 预制件以进入预制编辑模式,然后添加层级 > UI > 画布。
- 将画布的 RectTransform 组件的值更改为以下内容
- PosX: 0 , posY: 0
- 宽度: 100, 高度: 100
- 缩放X: 0.005, 缩放Y: 0.005, 缩放Z: 0.005
- 将画布组件的 RenderMove 更改为世界空间。
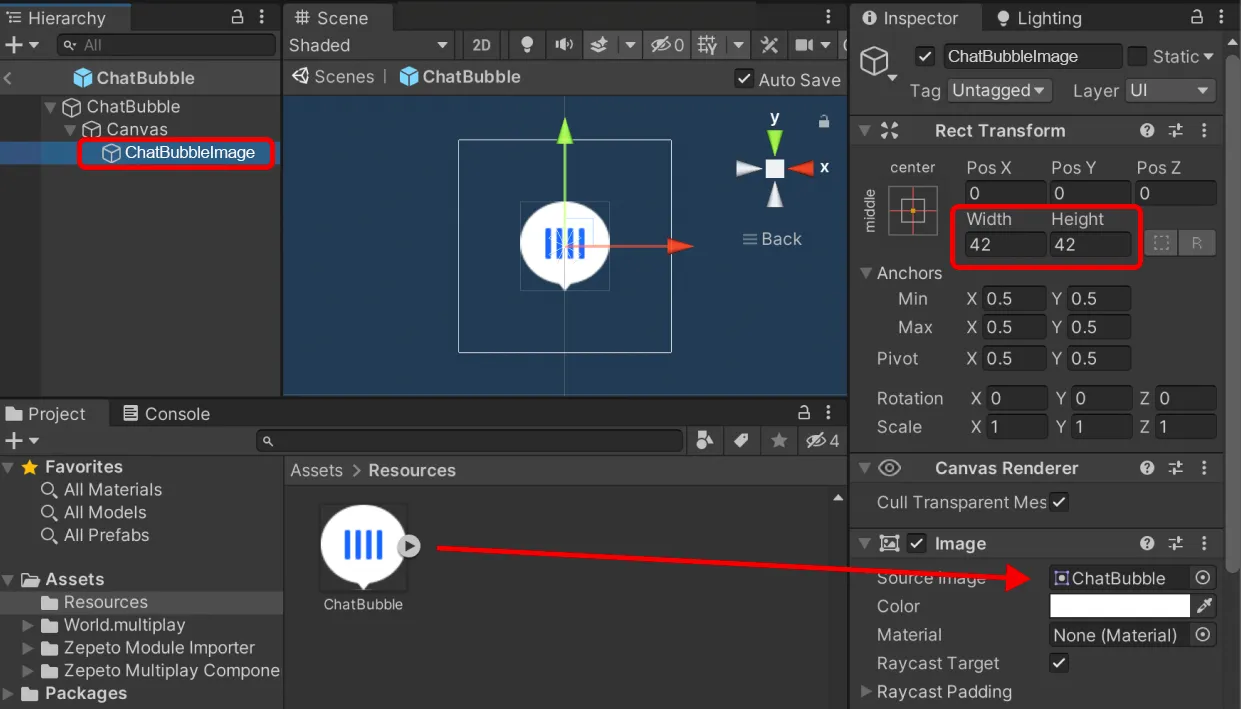
5) 在画布内创建一个对话气泡图像。
- 将层级 > UI > 图像添加为画布的子项,并将其重命名为 ChatBubbleImage。
- 将 ChatBubbleImage 的 RectTransform 组件的值更改为以下内容
- 宽度 42, 高度:42
- 将您在第 1 步中导入的图像精灵注册为图像组件中的源图像。
👍 提示
- 您还可以为气泡图像精灵添加动画效果。
- 您还可以为不同的团队使用单独的气泡图像。
6) 项目 > 创建 > ZEPETO > 创建一个 TypeScript 并将其重命名为 VoiceChatBubbleController。
7) 编写如下所示的示例脚本。
import { GameObject, Object } from 'UnityEngine';
import { KnowSockets, ZepetoPlayers } from 'ZEPETO.Character.Controller'
import { ZepetoScriptBehaviour } from 'ZEPETO.Script'
import { AudioMode, RoomProperty, VoiceChatController } from 'ZEPETO.Voice.Chat';

export default class VoiceChatBubbleController extends ZepetoScriptBehaviour {

    // 公共 GameObject 变量用于存储语音聊天气泡预制件
    public voiceChatPrefab: GameObject;

    // 私有映射用于存储与用户 ID 相关的 GameObjects
    private _voiceBubbleMap: Map<string, GameObject> = new Map<string, GameObject>();

    Start() {
        // 为语音聊天控制器添加事件监听器
        VoiceChatController.OnInitializedEvent.AddListener(init => this.OnInitialized(init));
        VoiceChatController.OnRoomConnectedEvent.AddListener(connected => this.OnRoomConnected(connected));
        VoiceChatController.OnSpeechDetectedEvent.AddListener((userId, speechDetected) => this.OnSpeechDetected(userId, speechDetected));
    }

    // 当语音聊天系统初始化时调用的方法
    private OnInitialized(initialized: boolean) {
        console.log("[VoiceChat] OnInitialized: ");
        this.EnterVoiceChatRoom(1);
    }

    // 当语音聊天房间连接时调用的方法
    private OnRoomConnected(connected: boolean) {
        console.log("[VoiceChat] OnRoomConnected: ");
    }

    // 根据给定的团队索引进入语音聊天房间的方法
    private EnterVoiceChatRoom(teamIndex: number) {
        console.log("[VoiceChat] EnterVoiceChatRoom");

        // 创建一个新的 RoomProperty 对象并设置其属性
        let roomProperty = new RoomProperty();
        roomProperty.SetAudioMode(AudioMode.Omnidirectional);
        VoiceChatController.EnterRoom(roomProperty);
    }

    // 当检测到或未检测到用户的语音时调用的方法
    private OnSpeechDetected(userId: string, speechDetected: boolean) {
        console.log("[VoiceChat] OnSpeechDetected: " + userId + ", " + speechDetected);

        // 检查用户 ID 是否不在语音气泡映射中,如果不在则创建一个语音气泡
        if (!this._voiceBubbleMap.has(userId)) {
            this.CreateVoiceBubble(userId);
        }

        this.SetVoiceBubble(userId, speechDetected);
    }

    // 设置给定用户 ID 的语音气泡的活动状态的方法
    private SetVoiceBubble(userId: string, speechDetected: boolean) {
        const chatBubble = this._voiceBubbleMap.get(userId);
        chatBubble.SetActive(speechDetected);
    }

    // 为给定用户 ID 创建语音气泡的方法
    private CreateVoiceBubble(userId: string) {

        // 获取用户角色的头部插槽
        const headSocket = ZepetoPlayers.instance.GetPlayerWithUserId(userId).character.GetSocket(KnowSockets.HEAD_UPPER);

        // 在头部插槽位置实例化语音聊天气泡预制件
        const instanceBubble = Object.Instantiate(this.voiceChatPrefab, headSocket) as GameObject;

        // 将实例化的气泡添加到语音气泡映射中
        this._voiceBubbleMap.set(userId, instanceBubble);
        instanceBubble.SetActive(false);
    }

    LateUpdate() {

        // 检查语音气泡映射是否为空,如果为空则返回
        if (this._voiceBubbleMap.size === 0) {
            return;
        }

        // 遍历语音气泡映射并更新每个气泡 GameObject 的旋转
        this._voiceBubbleMap.forEach((bubbleObject: GameObject) => {
            // 设置气泡对象的旋转以匹配相机的父变换旋转
            bubbleObject.transform.rotation = ZepetoPlayers.instance.ZepetoCamera.cameraParent.transform.rotation;
        });

    }

}
- 代码描述
- 当脚本执行时,它将在Start()函数中注册每个按钮的事件,并在VoiceChatController的OnInitialized、OnRoomConnected和OnSpeechDetected事件中注册事件。
- 在OnInitialized()之后,当玩家进入世界时,语音聊天按钮将显示在玩家的屏幕上,当他们按下按钮时,将执行EnterVoiceChatRoom()以进入语音聊天房间。
- 每当玩家激活语音聊天并说话时,OnSpeechDetected()将被执行,如果speechDetected为true,则启用BubbleChat对象,如果为false,则禁用它。
- 第一次激活OnSpeechDetected()函数时,CreateVoiceBubble()将实例化一个voiceChatPrefab游戏对象,漂浮在玩家的头顶,并将其注册为_map数据。
- 我们使用LateUpdate()每帧更新语音聊天气泡的旋转,以匹配ZEPETO世界的CameraParent。这确保了气泡图像始终面向相机。它首先检查_voiceBubbleMap是否为空,否则更新气泡图像预制件的旋转。
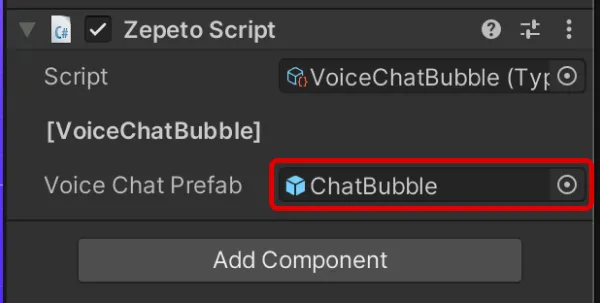
8) 完成脚本编写后,在检查器中将VoiceChatPrefab条目分配为您在步骤1中创建的气泡预制件。
9) 通过二维码或测试链接在移动设备上运行,您应该会看到每当玩家使用语音聊天时,气泡图像出现在角色的头顶。
语音调制
从语音聊天版本 0.2.1-preview 开始,您可以在脚本模式下调节语音聊天的声音。
使用 API 指南和示例代码尝试语音调制。
语音类型 (枚举) | 值 | 描述 |
|---|---|---|
类型00 | 0 | 原始 |
类型01 | 1 | 小松鼠 |
类型02 | 2 | 叔叔 |
类型03 | 3 | 回声 |
类型04 | 4 | 低音 |
类型05 | 5 | 机器人 |
类型06 | 6 | 方言 |
类型07 | 7 | 扩音器 |
类型08 | 8 | 野兽 |
类型09 | 9 | 机器 |
类型10 | 10 | 强流 |
类型11 | 11 | 孩子 |
类型12 | 12 | 刺猬 |
这是一个声音调节的示例脚本。
import { Button } from 'UnityEngine.UI';
import { ZepetoScriptBehaviour } from 'ZEPETO.Script';
import { RoomProperty, VoiceChatController, VoiceType } from 'ZEPETO.Voice.Chat';

export default class VoiceModulationManager extends ZepetoScriptBehaviour {

    // 设置不同语音类型的按钮
    public buttons: Button[];

    Start() {
        const voiceTypes = [
            VoiceType.Type00,
            VoiceType.Type01,
            VoiceType.Type05,
            VoiceType.Type03,
        ];

        for (const [index, button] of this.buttons.entries()) {
            button.onClick.AddListener(() => {
                // 设置与点击按钮索引对应的语音类型
                VoiceChatController.SetVoiceType(voiceTypes[index]);
            });
        };

        // 当语音聊天系统初始化时调用的方法
        VoiceChatController.OnInitializedEvent.AddListener(
            init => {
                VoiceChatController.EnterRoom(new RoomProperty());;
            }
        );

        // 当语音聊天房间连接时调用的方法
        VoiceChatController.OnRoomConnectedEvent.AddListener(
            connected => {
                // 设置初始语音类型并激活回音
                VoiceChatController.SetVoiceType(voiceTypes[0]);
                VoiceChatController.EnableLoopback(true);
            }
        );
    }

    // 退出语音聊天房间的方法
    OnDestroy() {
        VoiceChatController.OnInitializedEvent.RemoveAllListeners();
        VoiceChatController.OnRoomConnectedEvent.RemoveAllListeners();
    }
}- 代码描述:
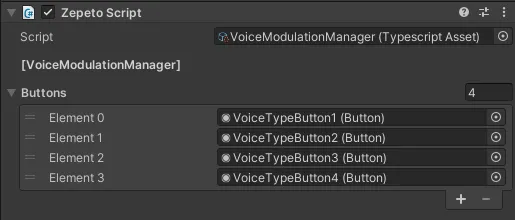
- 为每个按钮添加一个 onClick 监听器,以设置不同的语音调制类型。
- 相同索引的元素在按钮数组和语音类型数组中是匹配的。
- 进入世界时,VoiceChatController 被初始化,并且房间连接会自动建立。
- 初始语音调制类型设置为Type00,并启用回音以听到自己的声音。
- 请注意,调用SetVoiceType 和EnableLoopback时,需要房间连接。因此,初始设置在OnRoomConnectedEvent的监听器中处理。
更改本地玩家的音频播放位置
您可以使用 VoiceChatController.SetLocalPlayerTransform().
使用此功能,您可以通过将您的位置设置为特定空间或物体位置来创建各种场景,在语音聊天中进行交流。
📘 提示 语音聊天的变换与本地玩家的ZEPETO角色变换相关联。
因此,如果本地玩家的ZEPETO角色尚未在世界中创建,您的声音可能无法传输。
在这种情况下,您可以通过在当前场景中设置语音播放位置来使用语音聊天,使用 SetLocalPlayerTransform().
API | 描述 |
|---|---|
public static SetLocalPlayerTransform($transform: UnityEngine.Transform):void | 更改本地玩家音频播放位置的功能 |
❗️ 注意 SetLocalPlayerTransform() 必须在语音聊天初始化后某个时间调用 VoiceChatController.OnInitializedEvent(true)。
1) 以下是语音位置更改功能的示例脚本。
import { GameObject, Transform, Vector3 } from 'UnityEngine';
import { Button } from 'UnityEngine.UI';
import { ZepetoScriptBehaviour } from 'ZEPETO.Script';
import { AudioMode, RoomProperty, VoiceChatController } from 'ZEPETO.Voice.Chat';

export default class VoiceTransformSample extends ZepetoScriptBehaviour {

    // 设置语音变换为近的按钮
    public buttonCloserTransform: Button;

    // 设置语音变换为远的按钮
    public buttonFartherTransform: Button;

    // 语音位置的变换
    private voiceTransform: Transform;

    Start() {

        // 创建新的 GameObject 并分配变换以存储语音变换对象
        const voiceTransformObject = new GameObject;
        this.voiceTransform = voiceTransformObject.transform;

        // 当语音聊天系统初始化时调用的方法
        VoiceChatController.OnInitializedEvent.AddListener(
            init => {
                let roomProperty = new RoomProperty();

                // 将音频模式设置为定向 3D 空间音频
                roomProperty.SetAudioMode(AudioMode.Directional);
                VoiceChatController.EnterRoom(roomProperty);

                // 为本地玩家的语音设置语音聊天变换
                VoiceChatController.SetLocalPlayerTransform(this.voiceTransform);
            }
        );

        // 当点击 'buttonCloseTransform' 时将语音变换位置设置为 (0,0,0)
        this.buttonCloserTransform.onClick.AddListener(()=>{
            this.voiceTransform.position = Vector3.zero;
        })

        // 当点击 'buttonFarTransform' 时将语音变换位置设置为远点
        this.buttonFartherTransform.onClick.AddListener(()=>{
            this.voiceTransform.position = new Vector3(0,0,-10);
        })

    }

    // 退出语音聊天房间的方法
    OnDestroy() {
        VoiceChatController.OnInitializedEvent.RemoveAllListeners();
        VoiceChatController.OnRoomConnectedEvent.RemoveAllListeners();
    }

}
代码描述
- 当场景开始时,在 Start() 函数中创建一个名为 voiceTransformObject 的游戏对象,并在 voiceTransform 中注册 Transform。
- 当语音聊天 OnInitialized 监听器被调用时,请应用以下设置:
- 通过 SetAudioMode(AudioMode.Directional) 将语音聊天设置为 3D 空间音频模式。
- 通过 VoiceChatController.SetLocalPlayerTransform() 将本地玩家的语音聊天位置设置为 voiceTransform。
- buttonCloserTransform 在按钮被点击时将 voiceTransform 的位置设置为原点 (0, 0, 0)。
- buttonFartherTransform 在按钮被点击时将 voiceTransform 的位置设置为 (10, 0, 0)。
2) 将场景中的 Canvas 上的按钮注册到 VoiceTransformSample 组件的 buttonCloserTransform 和 buttonFartherTransform。
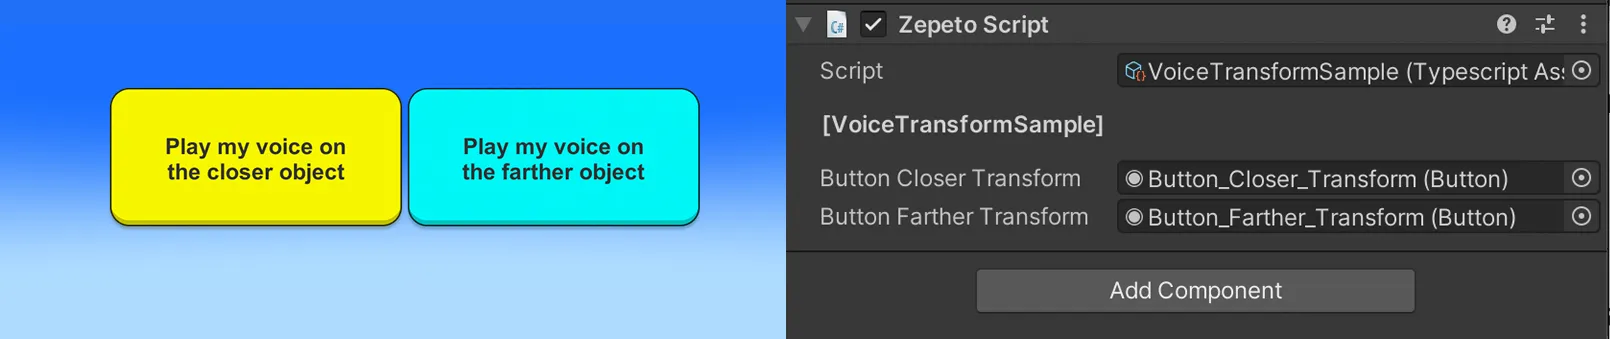
3) 如果您使用二维码或测试链接在手机上运行它,您可以检查以下内容。
- 当您按下更近按钮时,您的声音会听起来更接近其他人。
- 当您按下更远按钮时,您的声音会被听到得离其他人很远。