创建一个NPC
学习如何从ZEPETO角色创建NPC。
应用为每个功能提供的示例脚本,将您选择的NPC添加到您的世界中。
使用ZEPETO ID创建NPC。
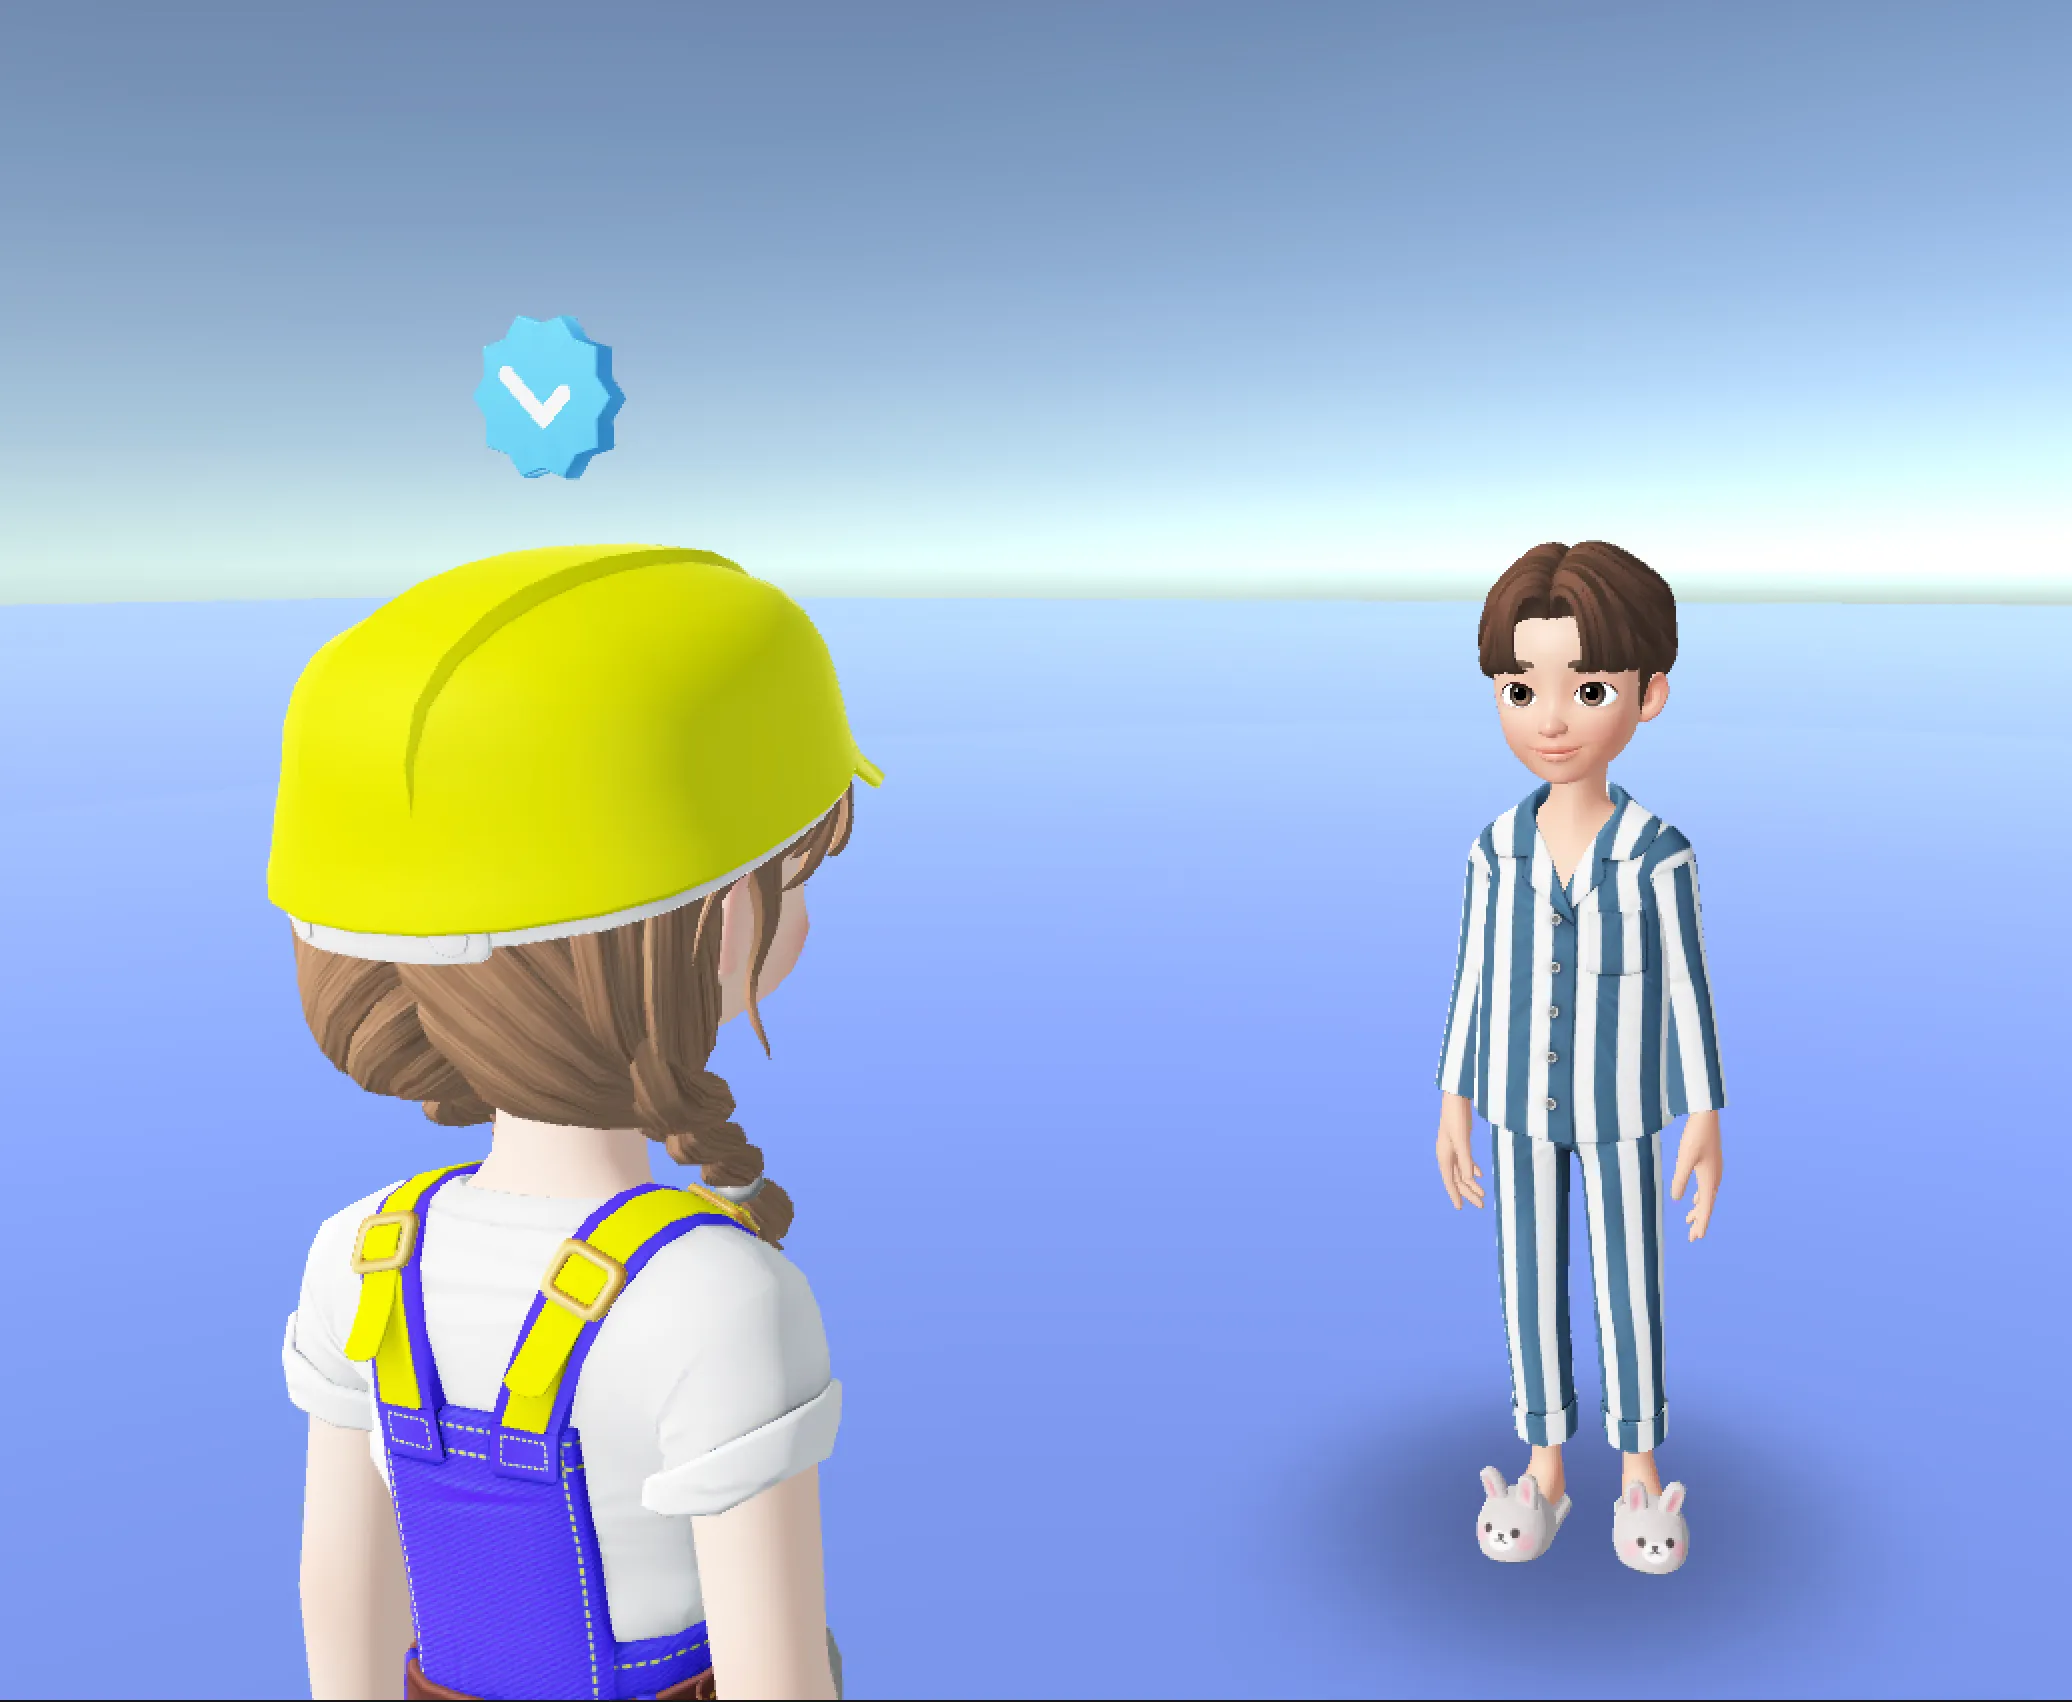
- NPC的外观和穿着的物品将与输入的ZEPETO ID相同。
- 建议您在创建NPC之前,先设置具有特定外观的ZEPETO角色。
设置NPC将要创建的位置对象
- 在您的场景中默认实现ZEPETO角色创建代码。
📘 请参考以下指南。[创建ZEPETO角色]
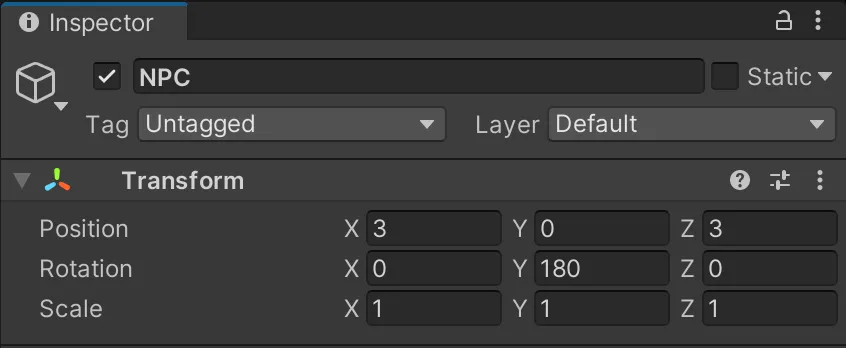
- 创建层级 > 创建空对象并将其重命名为NPC。
- 一个用于存储NPC将要创建的位置的对象。
- 设置位置、旋转。
编写NPC创建脚本
1) 创建项目 > 创建 > ZEPETO > TypeScript 并将其重命名为NPCCreator。
2) 编写如下示例脚本。
import { ZepetoScriptBehaviour } from 'ZEPETO.Script';
import { SpawnInfo, ZepetoCharacter, ZepetoCharacterCreator } from 'ZEPETO.Character.Controller';

export default class NPCCreator extends ZepetoScriptBehaviour {

    // NPC的ZEPETO ID
    public zepetoId: string;
    // NPC角色对象
    private _npc: ZepetoCharacter;

    Start() {
        // 创建SpawnInfo的新实例,并根据对象的变换设置其位置和旋转
        const spawnInfo = new SpawnInfo();
        spawnInfo.position = this.transform.position;
        spawnInfo.rotation = this.transform.rotation;

        // 使用ZepetoCharacterCreator通过Zepeto ID创建新角色,并将其分配给_npc变量
        ZepetoCharacterCreator.CreateByZepetoId(this.zepetoId, spawnInfo, (character: ZepetoCharacter) => {
            this._npc = character;
        })
    }

}
脚本的流程如下:
- Start()
- 使用ZepetoCharacterCreator.CreateByZepetoId()函数在NPC对象位置创建NPC,并将其保存在_npc中。
3) 完成脚本编写后,将脚本添加到NPC对象中。
4) 在检查器中分配 Zepeto ID。
- Zepeto ID : NPC 的 ZEPETO ID。
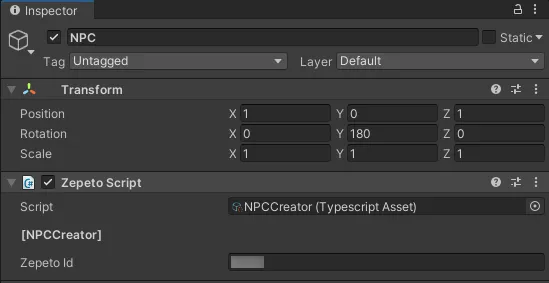
5) 按下播放按钮以执行,NPC 将被创建。
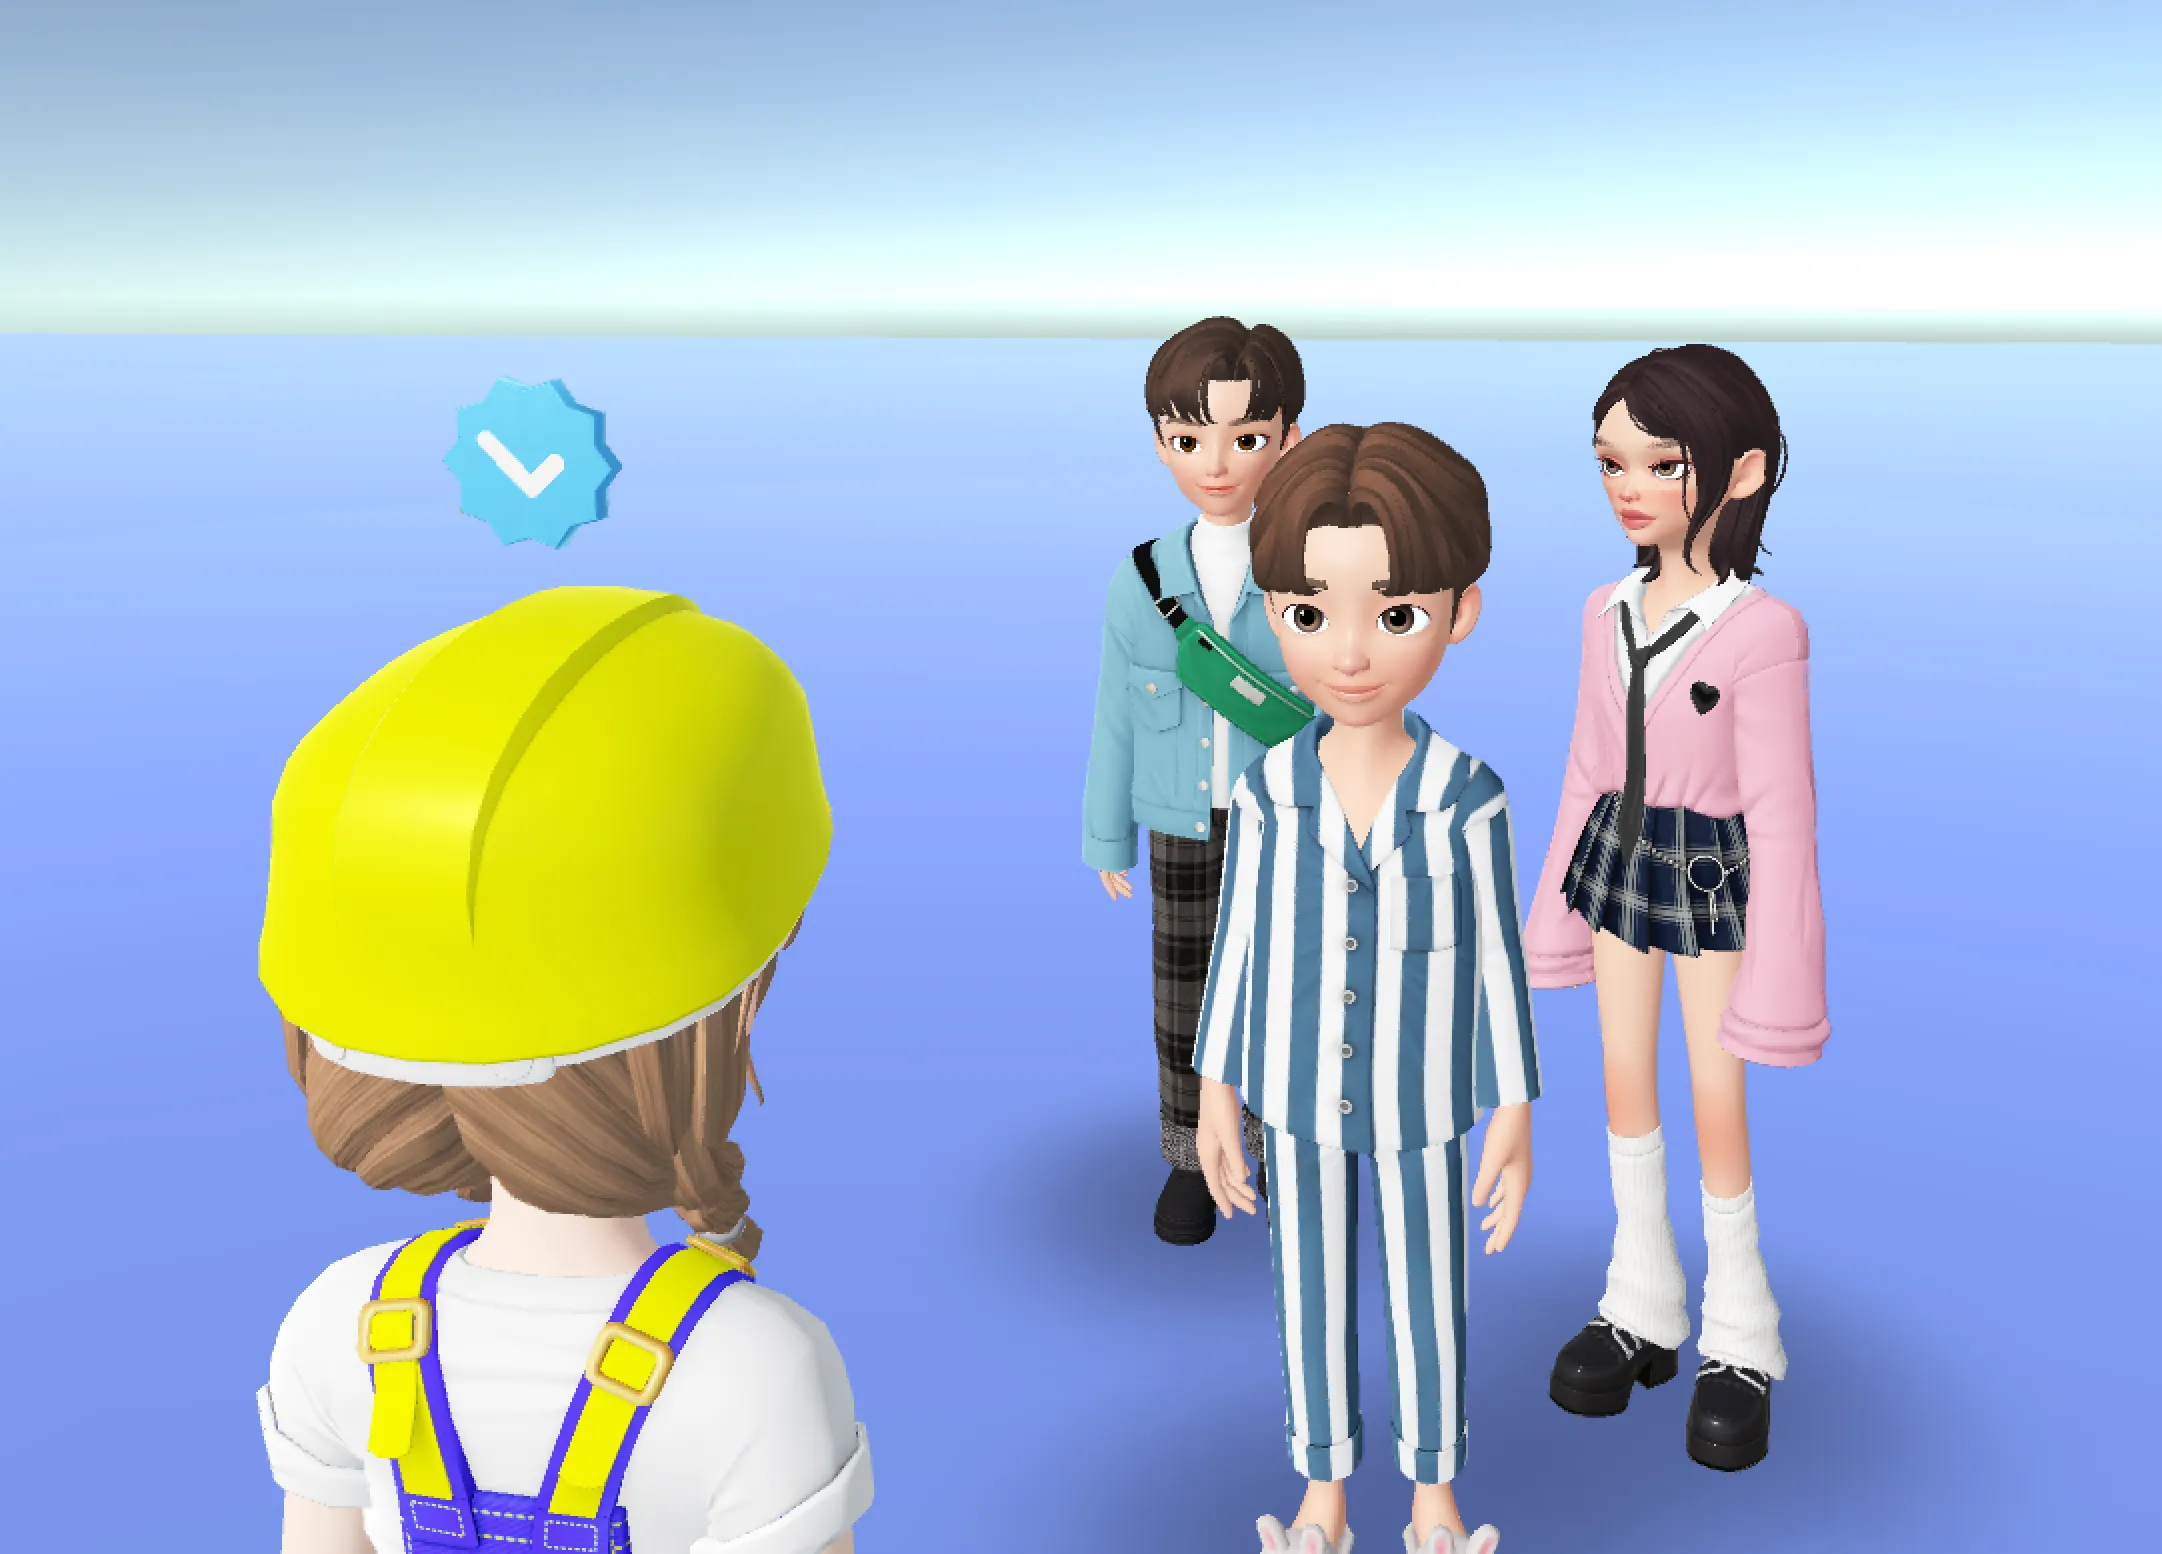
6) 以相同的方式添加 NPC 位置对象,并添加 NPC 脚本以轻松创建多个 NPC。
标记 NPC
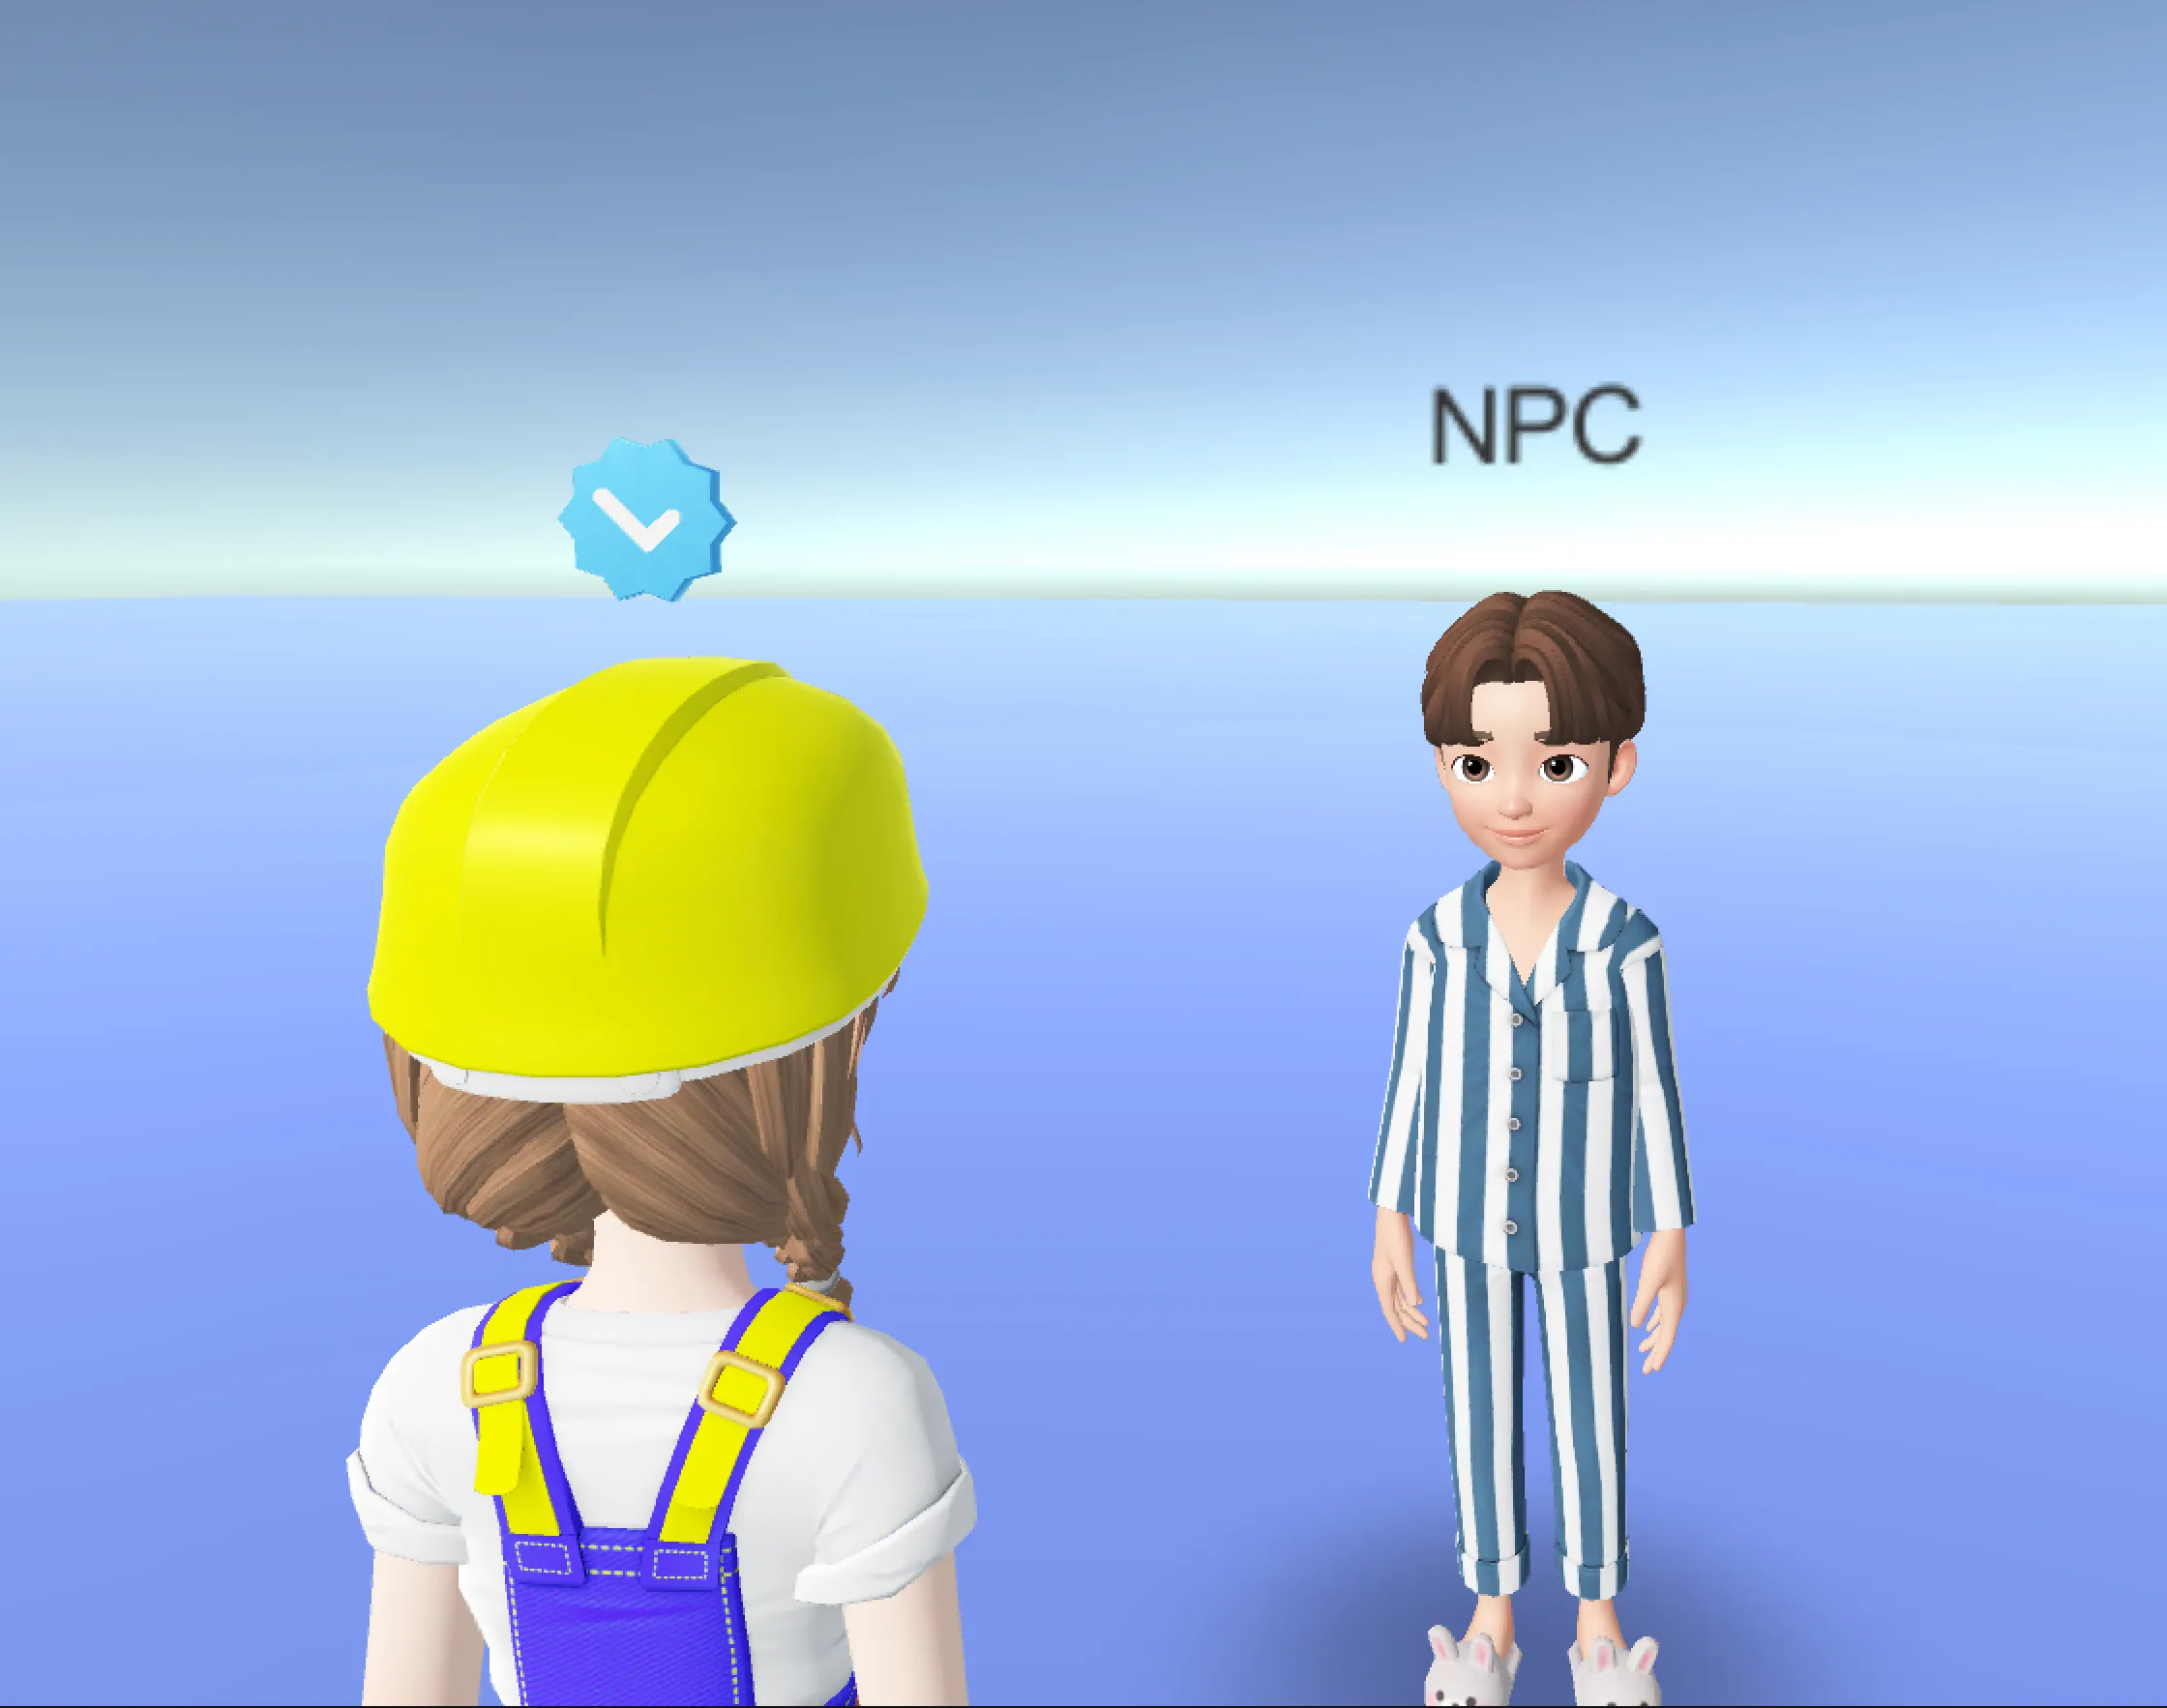
您可以使用名称标签标记您的 NPC,以将其与玩家区分开。
创建名称标签画布预制件
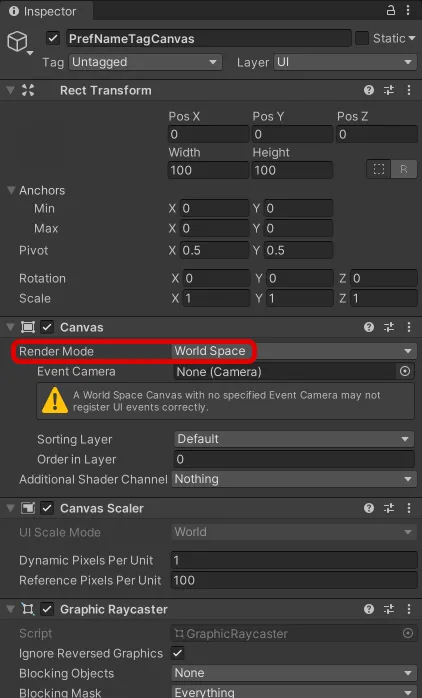
1) 创建层级 > UI > 画布,并将其重命名为 PrefNameTagCanvas。
- 将渲染模式设置为世界空间。
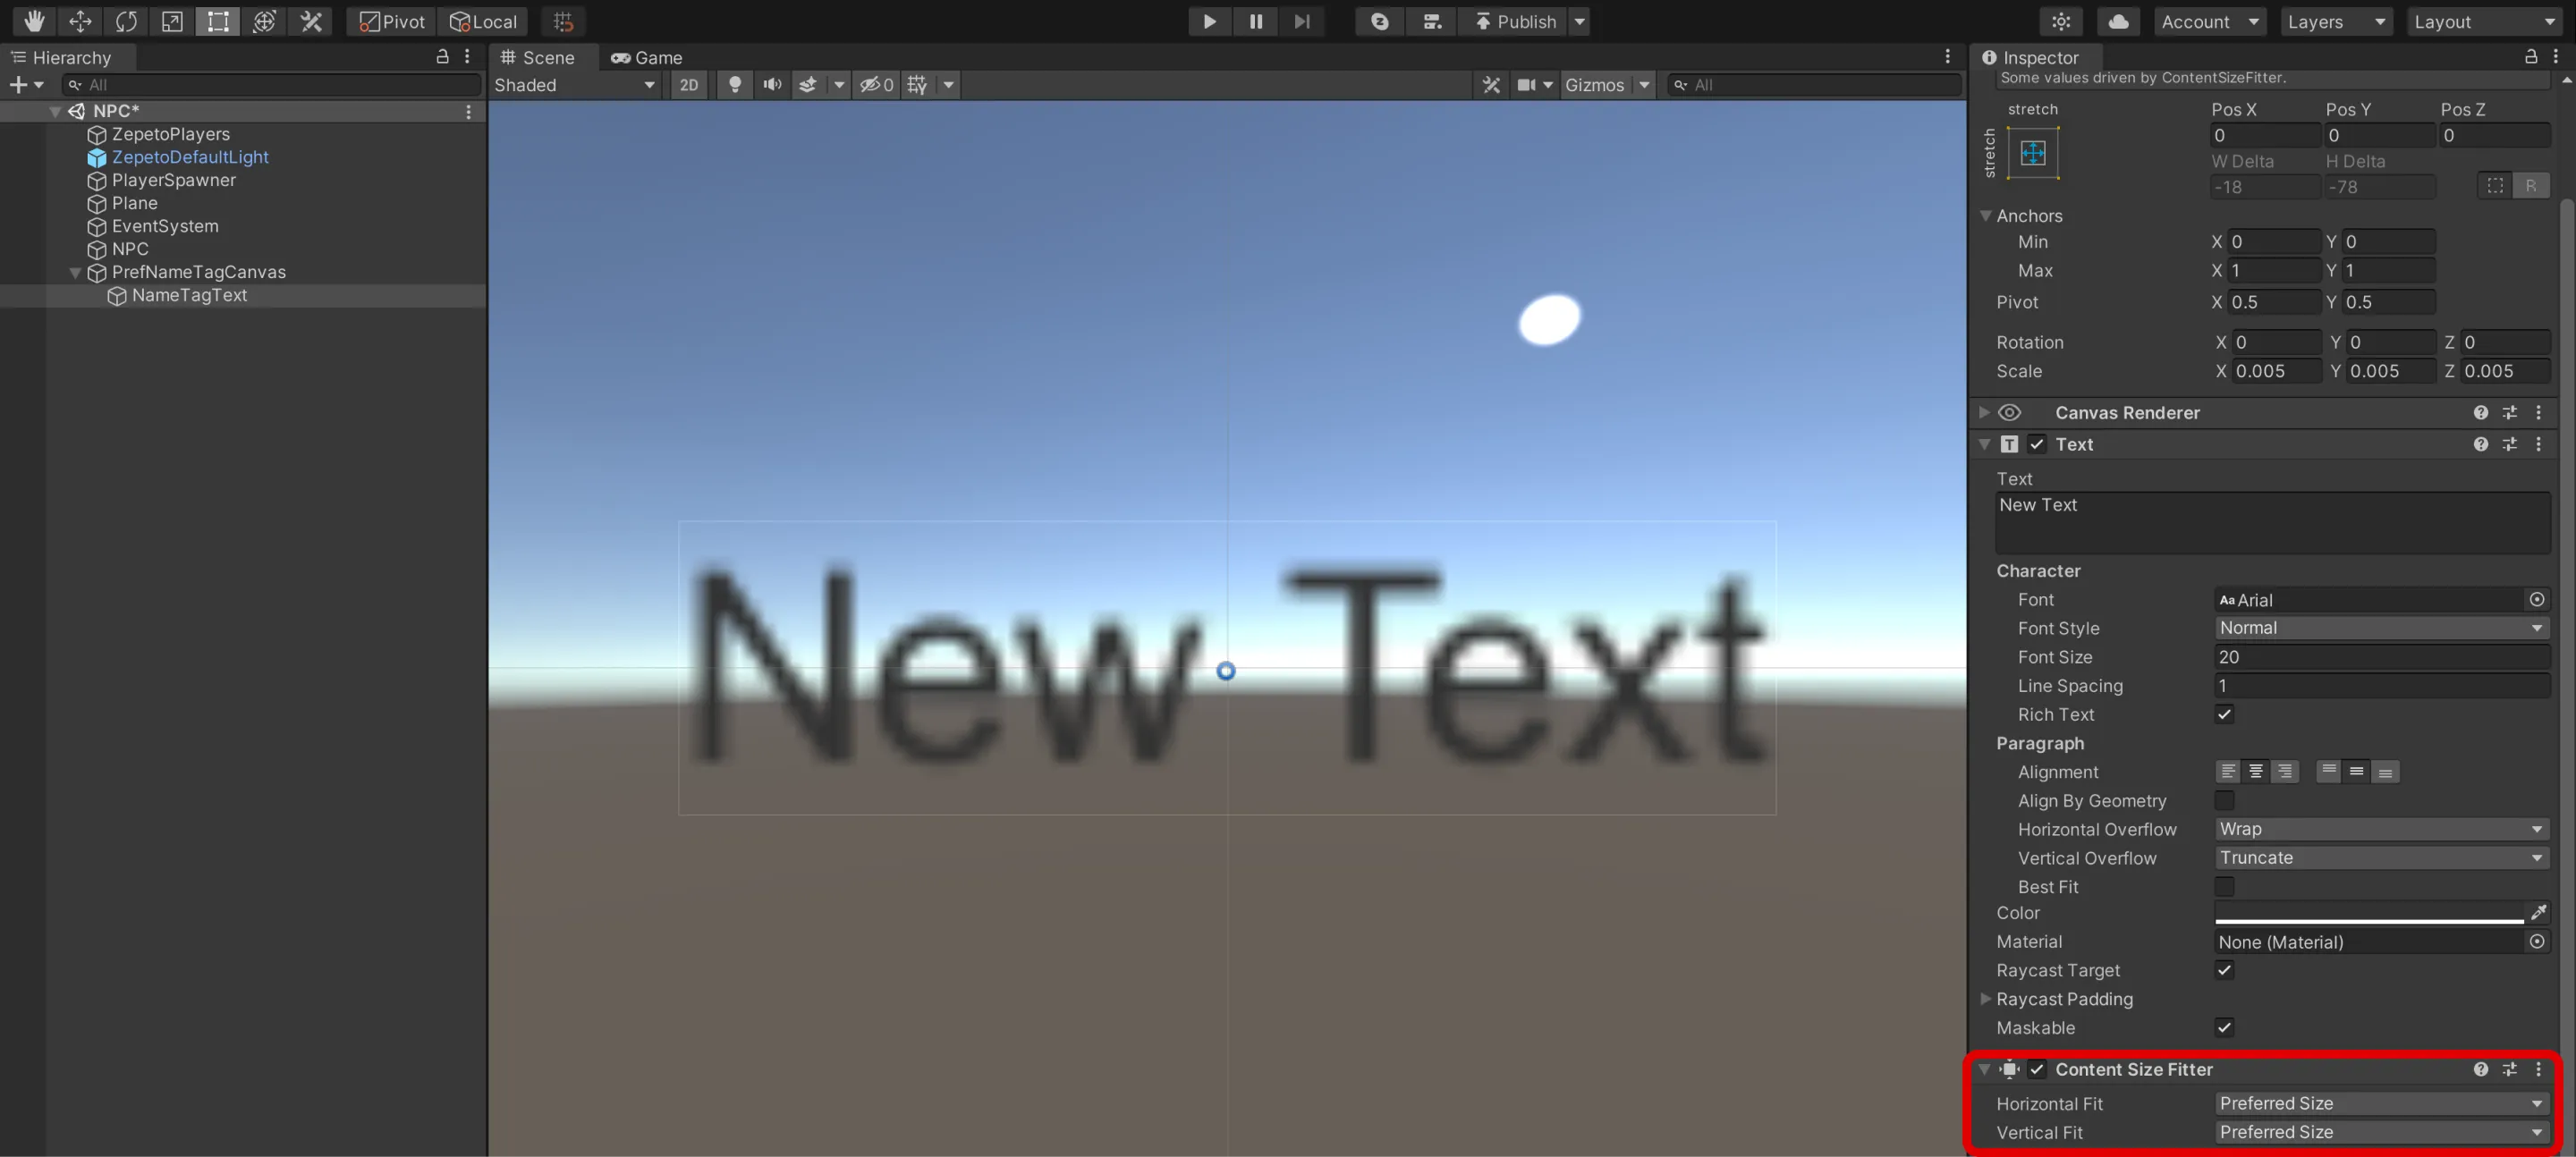
2) 创建层级 > UI > 文本,作为 PrefNameTagCanvas 的子项,并将其重命名为 NameTagText。
- 表示名称的文本。
- 添加一个内容大小适配器组件,使文本大小合适。
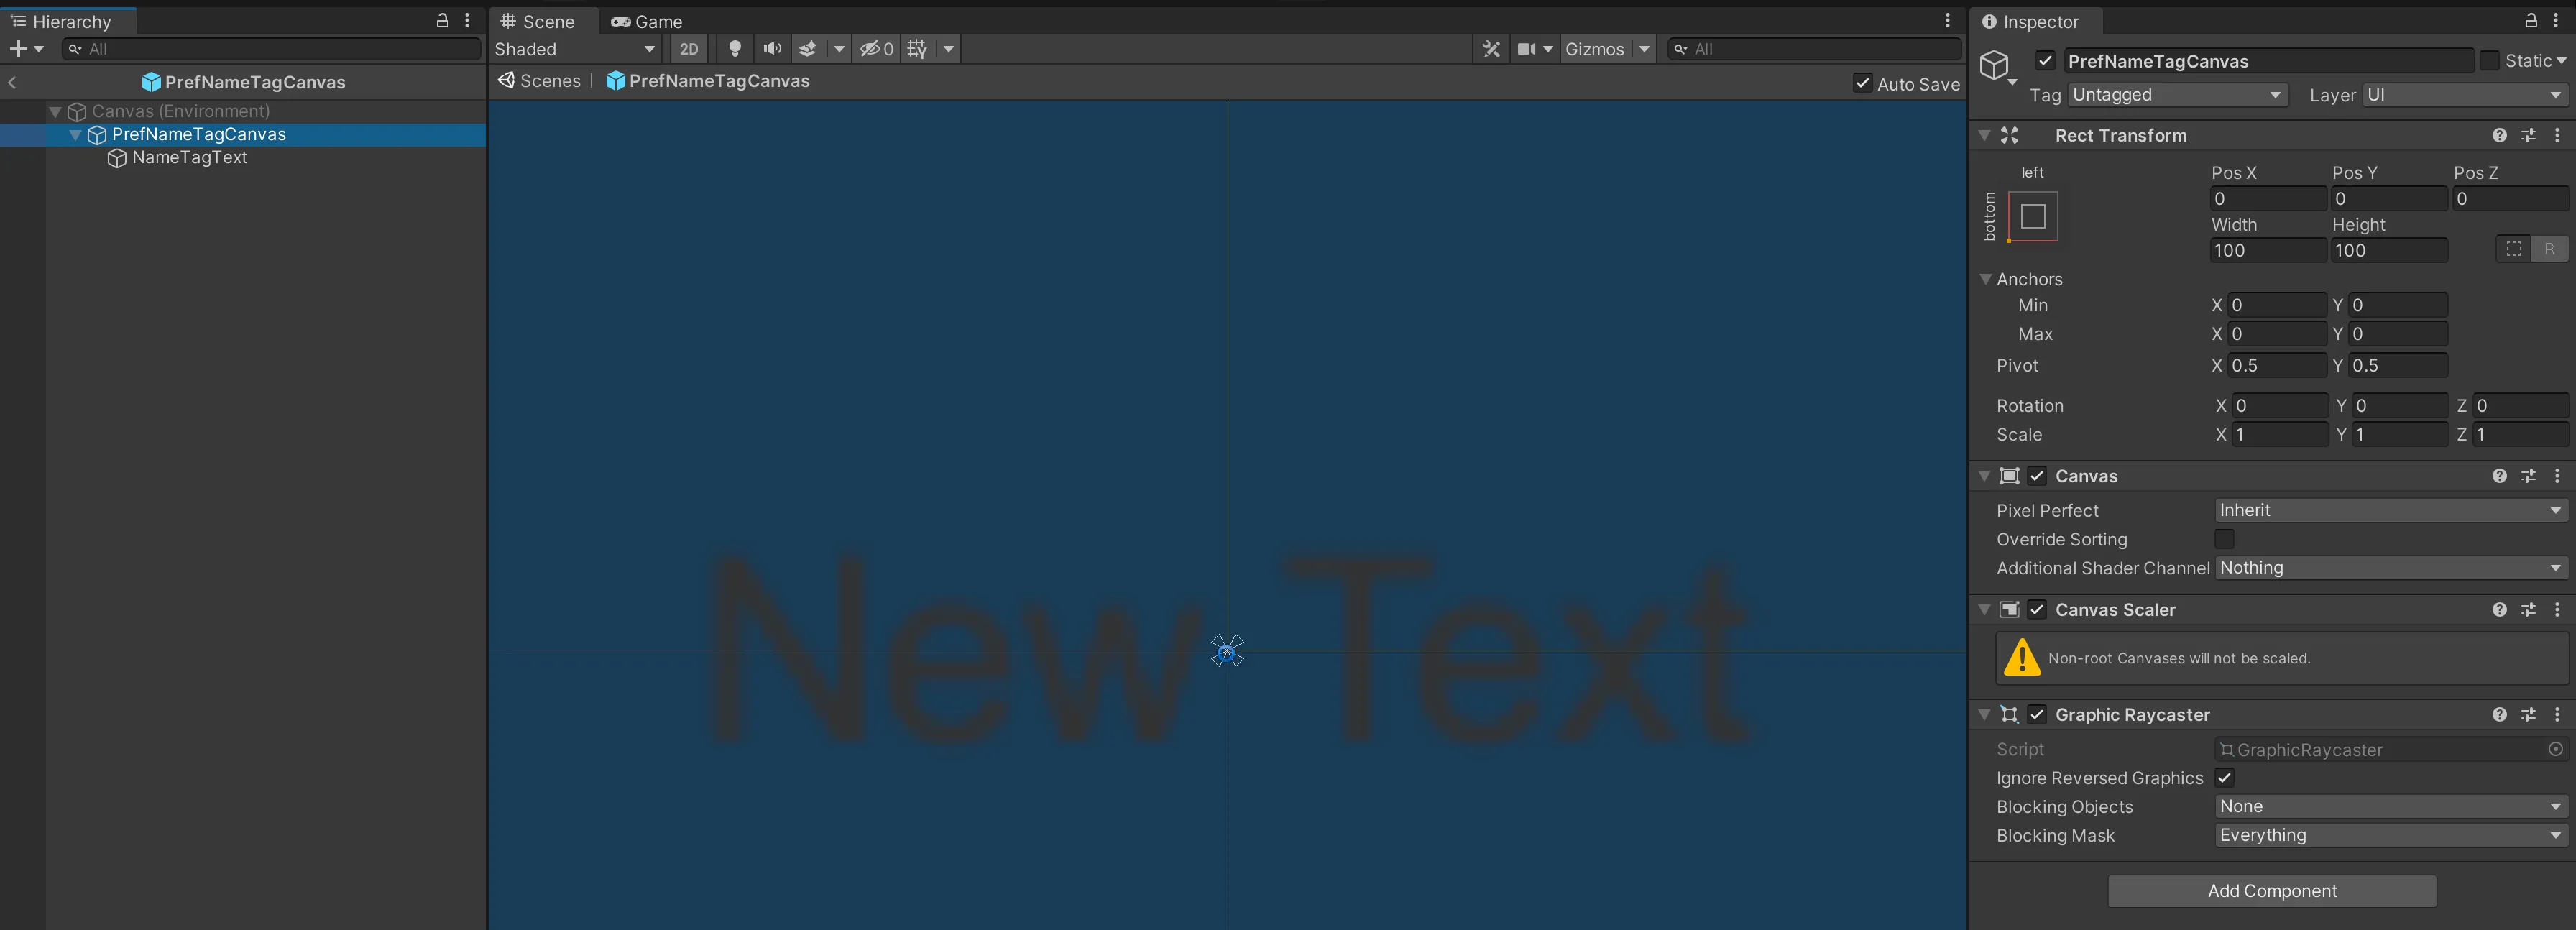
3) 完成后,将其拖到项目窗口以使其成为预制件,然后删除仍在高亮显示的 PrefNameTagCanvas。
创建 NPC 名称标签脚本
1) 创建一个项目 > 创建 > ZEPETO > TypeScript,并将其重命名为 NPCCreatorWithNameTag。
2) 编写如下所示的示例脚本。
import { ZepetoScriptBehaviour } from 'ZEPETO.Script';
import { KnowSockets, SpawnInfo, ZepetoCharacter, ZepetoCharacterCreator } from 'ZEPETO.Character.Controller';
import { Canvas, Camera, Vector3, Object, GameObject } from 'UnityEngine';
import { Text } from 'UnityEngine.UI';

export default class NPCCreatorWithNameTag extends ZepetoScriptBehaviour {

    // NPC的ZEPETO ID
    public zepetoId: string;
    // 在名字标签中显示的名称
    public nameTag: string;
    // 名字标签画布游戏对象的预制件
    public nameTagPrefab: GameObject;
    // 名字标签画布游戏对象的Y轴偏移值
    public nameTagYOffset: number;

    // NPC角色对象
    private _npc: ZepetoCharacter;
    // 名字标签画布游戏对象
    private _npcNameTagObject: GameObject;
    // 名字标签画布游戏对象中的文本
    private _npcNameTagText: Text;
    // 名字标签画布
    private _canvas: Canvas;
    // 世界相机
    private _cachedWorldCamera: Camera;

    Start() {
        // 创建SpawnInfo的新实例,并根据对象的变换设置其位置和旋转
        const spawnInfo = new SpawnInfo();
        spawnInfo.position = this.transform.position;
        spawnInfo.rotation = this.transform.rotation;

        // 使用ZepetoCharacterCreator通过ZEPETO ID创建新角色并将其分配给_npc变量
        ZepetoCharacterCreator.CreateByZepetoId(this.zepetoId, spawnInfo, (character: ZepetoCharacter) => {
            this._npc = character;

            // 设置名字标签
            this.SetNameTag();
        })
    }

    // 设置名字标签
    SetNameTag() {
        // 动态创建名字标签画布游戏对象
        this._npcNameTagObject = Object.Instantiate(this.nameTagPrefab) as GameObject;

        // 将名字标签画布游戏对象的父级变换设置为NPC变换。
        this._npcNameTagObject.transform.SetParent(this._npc.transform);

        // 将名字标签画布游戏对象的位置设置在NPC的头顶上方
        this._npcNameTagObject.transform.position = Vector3.op_Addition(this._npc.GetSocket(KnowSockets.HEAD_UPPER).position, new Vector3(0, this.nameTagYOffset,0));

        // 设置名字标签中的文本
        this._npcNameTagText = this._npcNameTagObject.GetComponentInChildren<Text>();
        this._npcNameTagText.text = this.nameTag;

        this._canvas = this._npcNameTagObject.GetComponent<Canvas>();
        this._cachedWorldCamera = Object.FindObjectOfType<Camera>();
        this._canvas.worldCamera = this._cachedWorldCamera;
    }

    private Update() {
        if (this._canvas != null) {
            this.UpdateCanvasRotation();
        }
    }

    // 更新名字标签画布的旋转以面向相机
    private UpdateCanvasRotation() {
        this._canvas.transform.LookAt(this._cachedWorldCamera.transform);
        this._canvas.transform.Rotate(0, 180, 0);
    }

}
脚本的流程如下:
- 开始()
- 调用 SetNameTag() 自定义函数。
- SetNameTag()
- 动态生成 NPC 的名称标签,并调整生成的名称标签在 NPC 头顶的位置
- 设置名称标签内的文本。
- 更新()
- 调用 UpdateCanvasRotation() 自定义函数以旋转画布以匹配相机。
3) 完成脚本编写后,将其添加到 NPC 对象。
4) 在检查器中,分配 Zepeto Id、名称标签、名称标签预制件和名称标签 Y 偏移量。
- 名称标签:将在 NPC 的名称标签上显示的名称。
- 名称标签预制件:名称标签画布预制件。
- 名称标签 Y 偏移量:存储名称标签画布对象的 y 轴偏移值的变量。当您将名称标签放置在角色头顶时,可以调整角色与名称标签之间的距离。
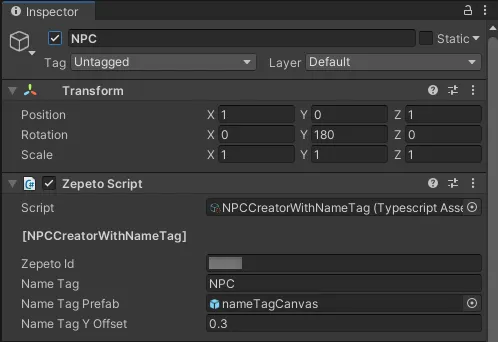
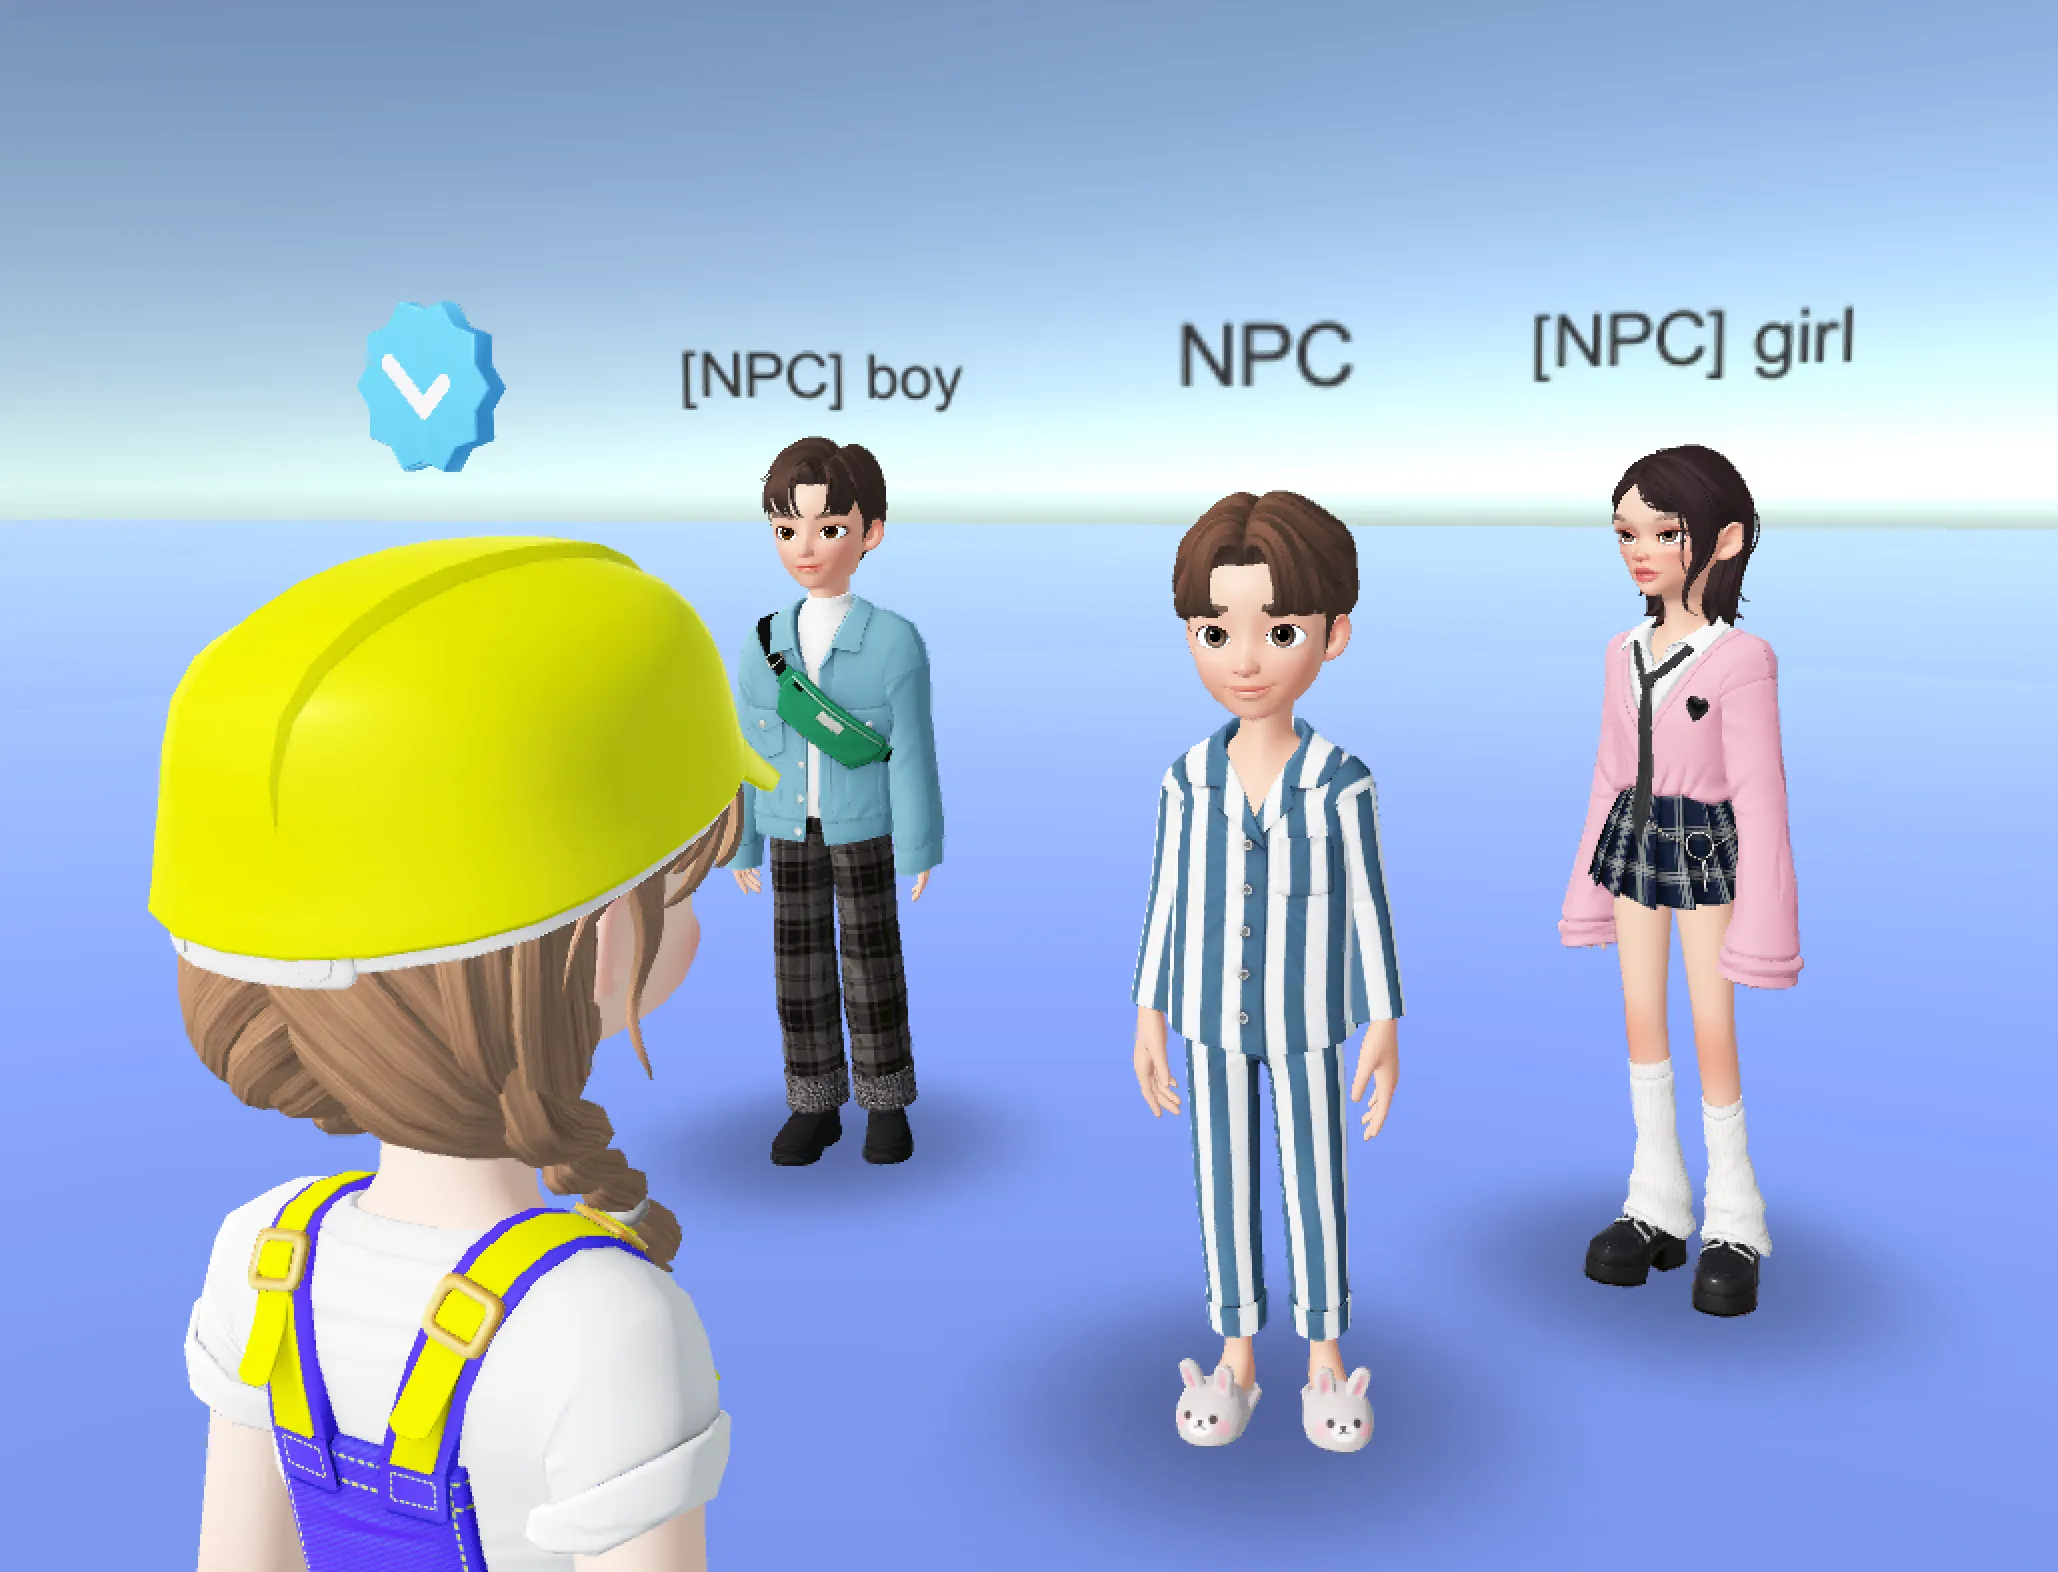
5) 按下播放按钮以执行,将创建带有名称标签的NPC。
控制NPC行为
您可以控制NPC的动作。
跳跃

使用ZEPETO角色API使NPC跳跃。
您可以使用 ZEPETO 角色 API 来实现更广泛的行为。
📘 请参考以下指南。 [ZEPETO角色]
创建 NPC 跳跃脚本
1) 转到项目 > 创建 > ZEPETO > 创建 TypeScript 并将其重命名为 NPCJump。
2) 编写如下示例脚本。
import { ZepetoScriptBehaviour } from 'ZEPETO.Script';
import { SpawnInfo, ZepetoCharacter, ZepetoCharacterCreator } from 'ZEPETO.Character.Controller';
import { WaitForSeconds } from 'UnityEngine';

export default class NPCJump extends ZepetoScriptBehaviour {

    // NPC 的 ZEPETO ID
    public zepetoId: string;
    // NPC 角色对象
    private _npc: ZepetoCharacter;

    Start() {
        // 创建 SpawnInfo 的新实例,并根据对象的变换设置其位置和旋转
        const spawnInfo = new SpawnInfo();
        spawnInfo.position = this.transform.position;
        spawnInfo.rotation = this.transform.rotation;

        // 使用 ZepetoCharacterCreator 通过 ZEPETO ID 创建新角色,并将其分配给 _npc 变量
        ZepetoCharacterCreator.CreateByZepetoId(this.zepetoId, spawnInfo, (character: ZepetoCharacter) => {
            this._npc = character;

            this.StartCoroutine(this.JumpCoroutine());
        });
    }

    *JumpCoroutine() {
        // 无限循环以持续
        while (true) {
            // 调用 ZepetoCharacter 的 Jump() 方法使其跳跃
            this._npc.Jump();

            // 等待 5 秒
            yield new WaitForSeconds(5);
        }
    }
}
脚本的流程如下:
- 开始()
- 调用 JumpCoroutine() 协程。
- JumpCoroutine()
- 调用 Jump() 方法使 NPC 角色每 5 秒跳一次。
3) 完成脚本编写后,将脚本添加到 NPC 对象。
4) 按下播放按钮,NPC 将会跳跃。
手势

使用动画控制器为NPC实现手势。
您可以使用动画控制器实现更广泛的行为。
准备您的动画剪辑
- 使用以下指南准备NPC执行的手势动画剪辑。
📘 请参考以下指南。
创建动画师
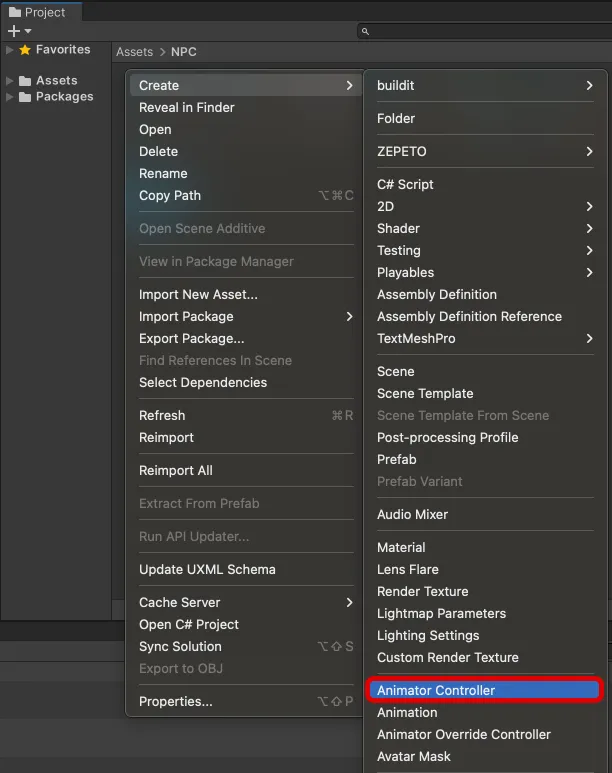
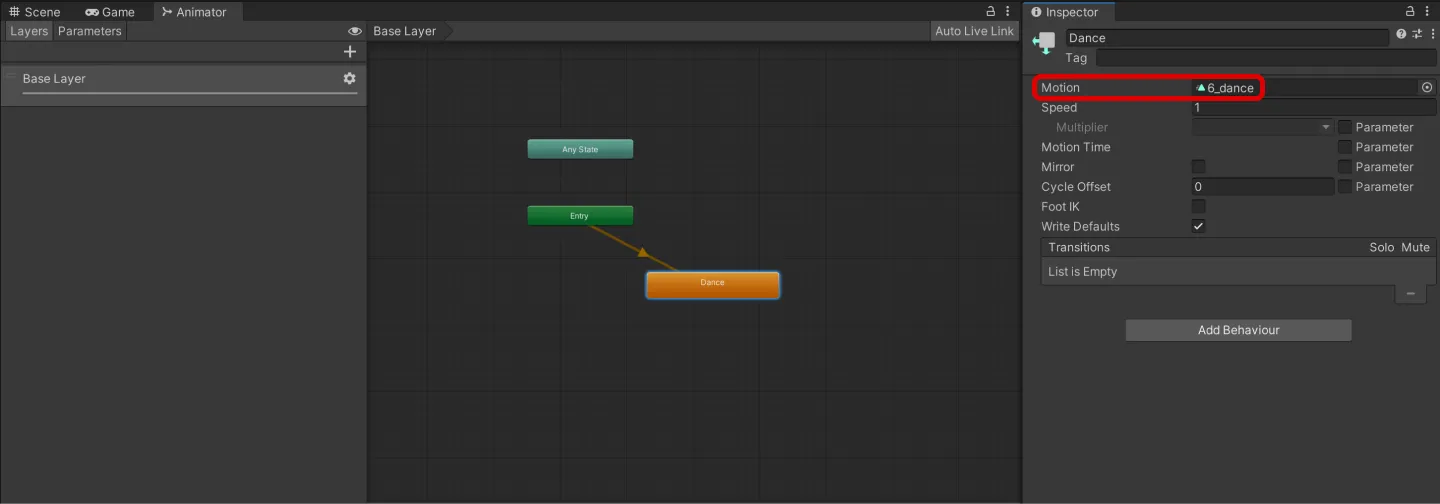
1) 项目 > 创建 > 创建动画控制器并将其重命名为NPCAnimatorController。
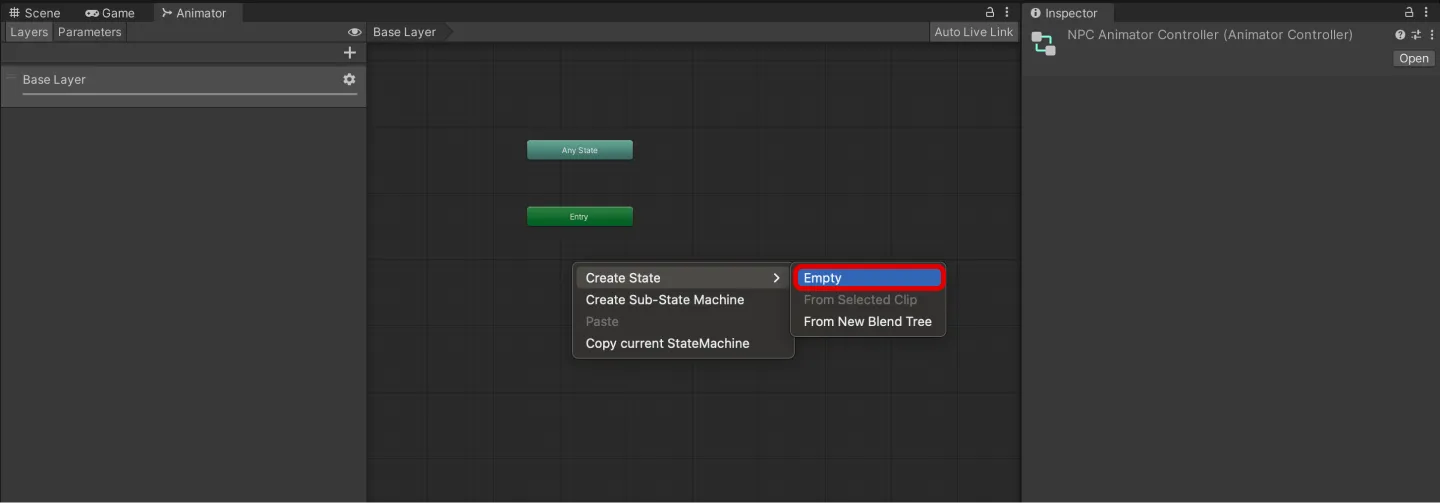
2) 在动画师标签上,创建状态 > 空。
3) 在检查器中,适当地重命名并将动画剪辑分配给运动。
创建NPC手势脚本
1) 创建一个项目 > 创建 > ZEPETO > TypeScript 并将其重命名为 NPCGesture。
2) 编写如下示例脚本。
import { ZepetoScriptBehaviour } from 'ZEPETO.Script';
import { SpawnInfo, ZepetoCharacter, ZepetoCharacterCreator } from 'ZEPETO.Character.Controller';
import { Animator, RuntimeAnimatorController } from 'UnityEngine';

export default class NPCGesture extends ZepetoScriptBehaviour {

    // NPC 的 ZEPETO ID
    public zepetoId: string;
    // NPC 的 Animator Controller
    public npcAnimator: RuntimeAnimatorController;

    // NPC 角色对象
    private _npc: ZepetoCharacter;

    Start() {

        // 创建 SpawnInfo 的新实例,并根据对象的变换设置其位置和旋转
        const spawnInfo = new SpawnInfo();
        spawnInfo.position = this.transform.position;
        spawnInfo.rotation = this.transform.rotation;

        // 使用 ZepetoCharacterCreator 根据 ZEPETO ID 创建新角色,并将其分配给 _npc 变量
        ZepetoCharacterCreator.CreateByZepetoId(this.zepetoId, spawnInfo, (character: ZepetoCharacter) => {
            this._npc = character;

            // 从 NPC 角色获取 Animator 组件,并将其 runtimeAnimatorController 设置为 npcAnimator
            this._npc.GetComponentInChildren<Animator>().runtimeAnimatorController = this.npcAnimator;
        });
    }
}
脚本的流程如下:
- Start()
- 获取 NPC 对象的 Animator 组件,并将其设置为由 npcAnimator 变量指定的 Animator Controller。
3) 在您完成编写脚本后,将其添加到将要创建 NPC 的位置对象中。
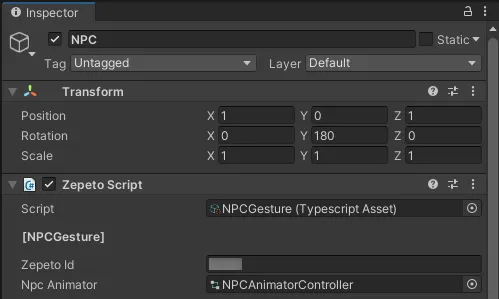
4) 在检查器中,分配 Zepeto Id,Npc 动画师。
- Npc 动画师:NPC 的动画控制器。
5) 按下播放按钮以运行它,您将看到 NPC 做出手势。
6) 你可以应用这个来创建除了手势和跳跃之外还可以执行更多动作的NPC。
NPC上方的对话气泡
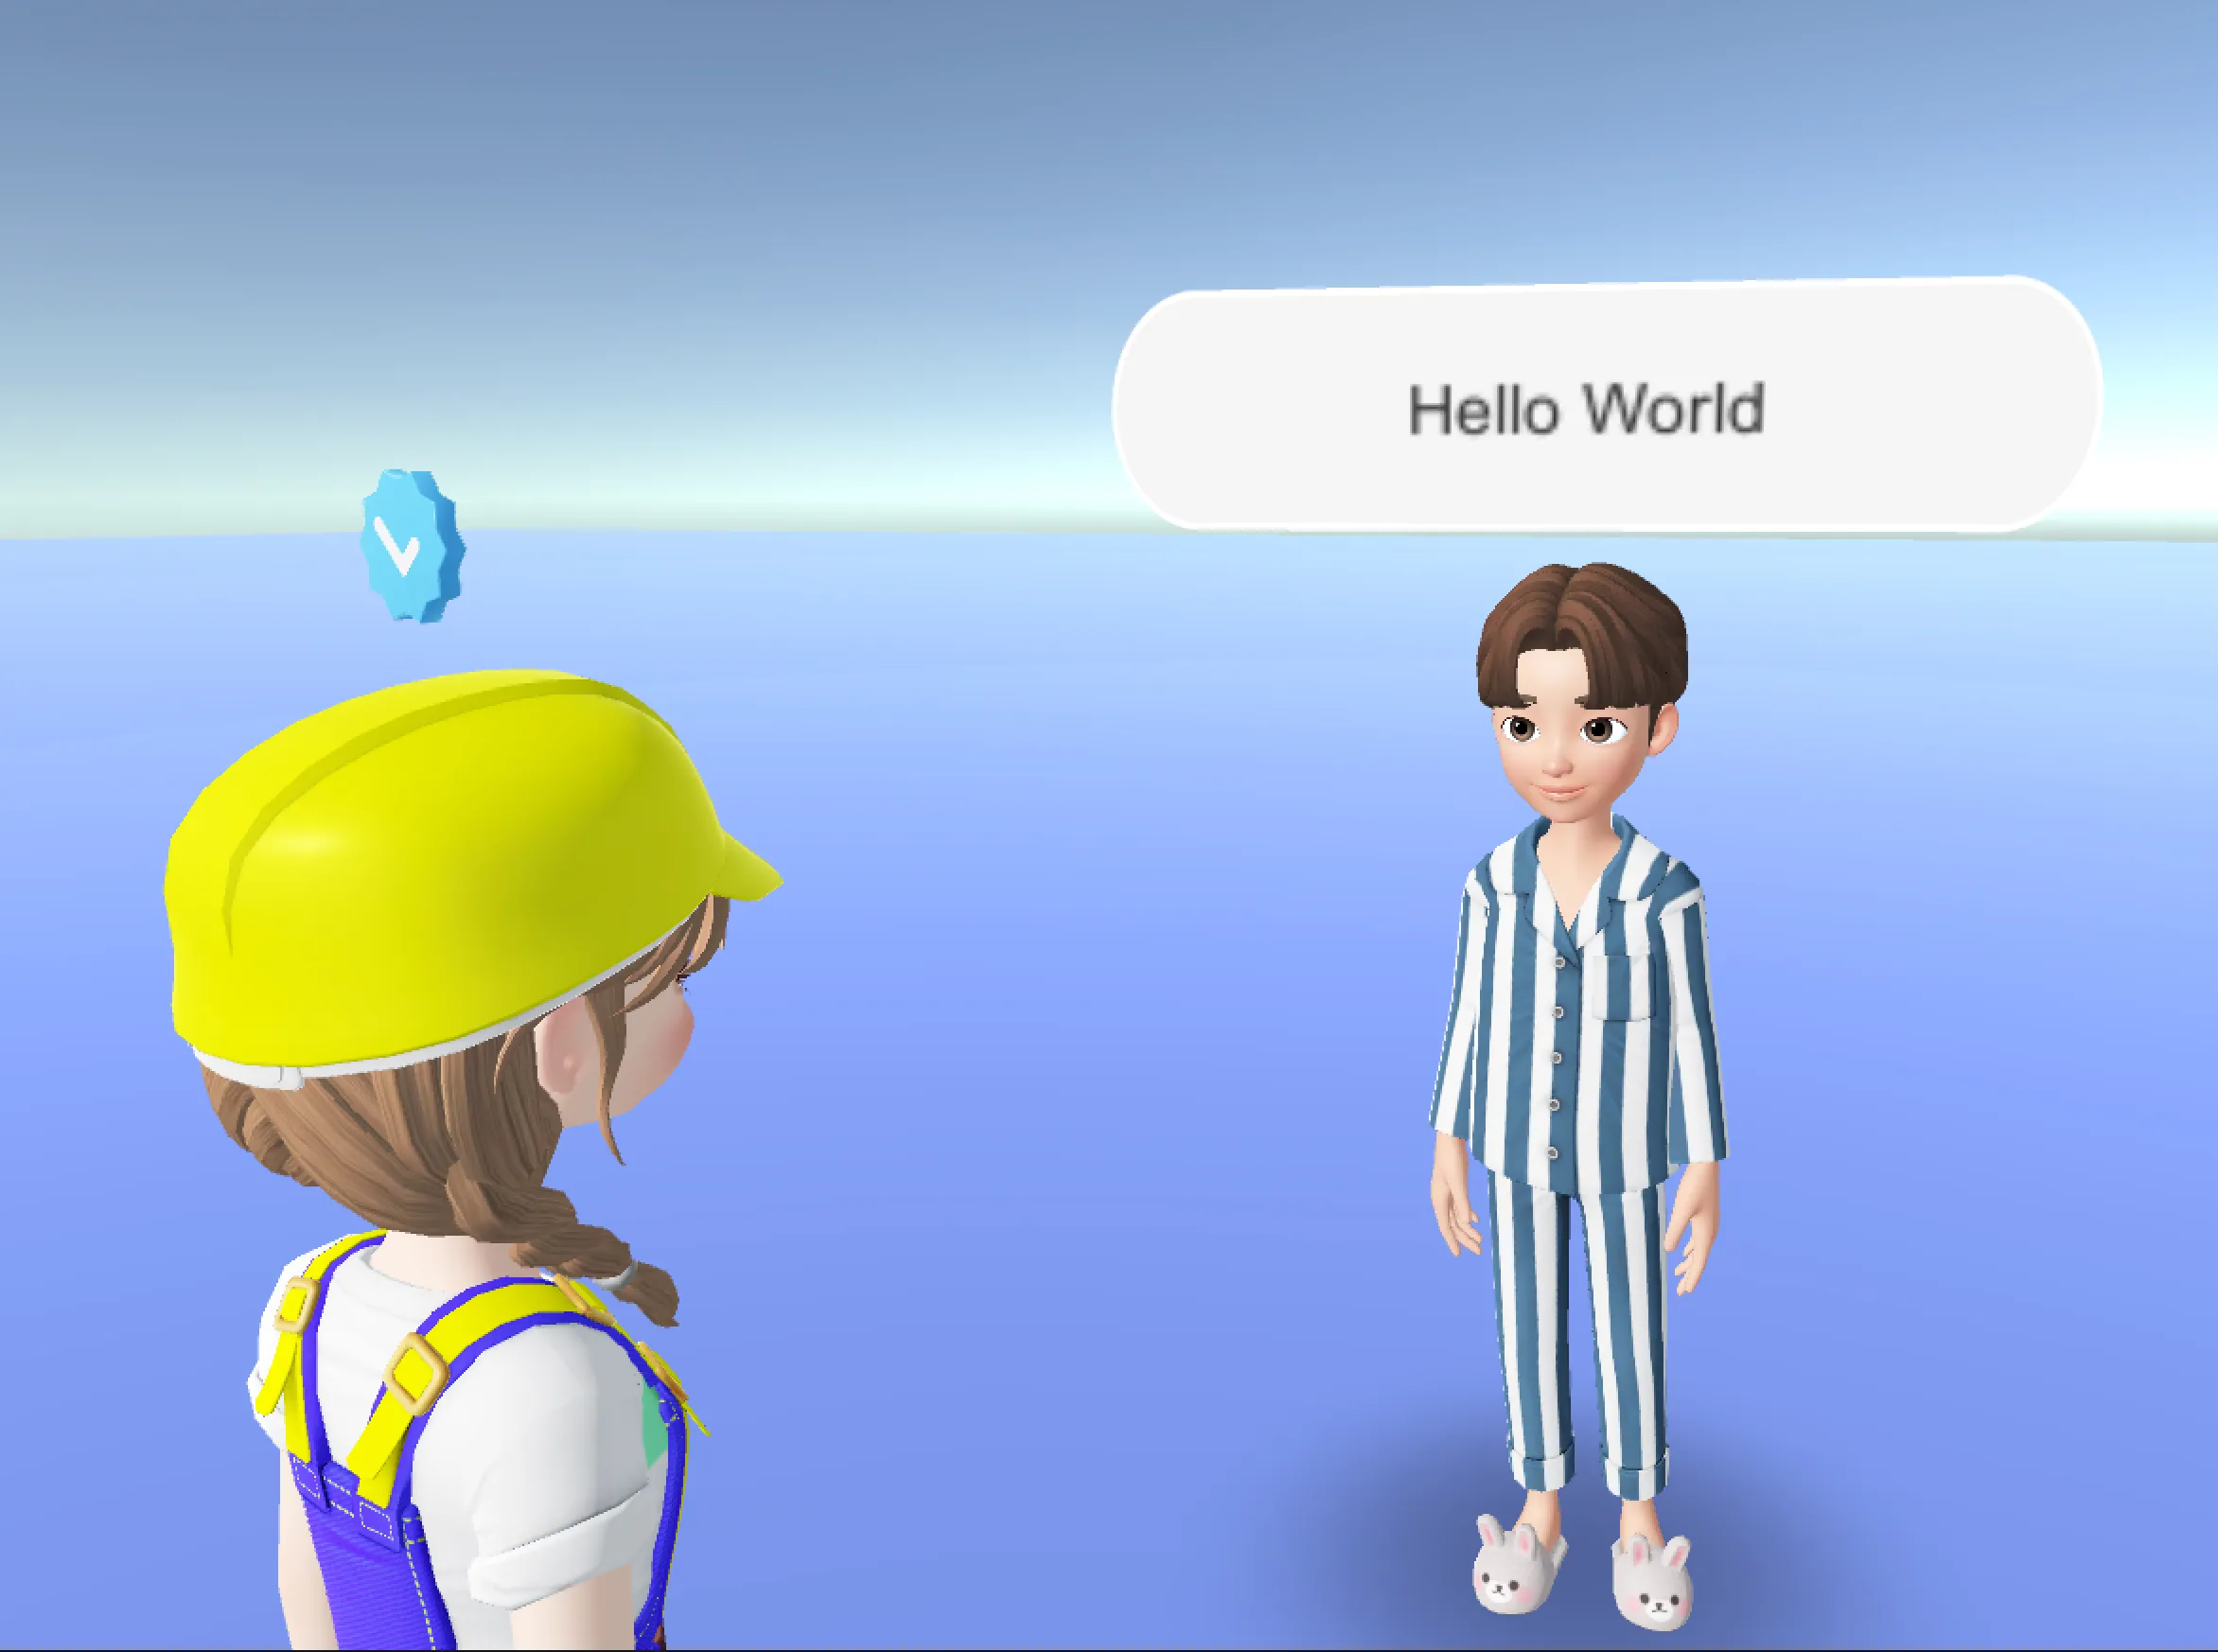
你可以在NPC的头上创建一个画布,显示图像或文本,并使其呈气泡状。
创建对话气泡画布预制件
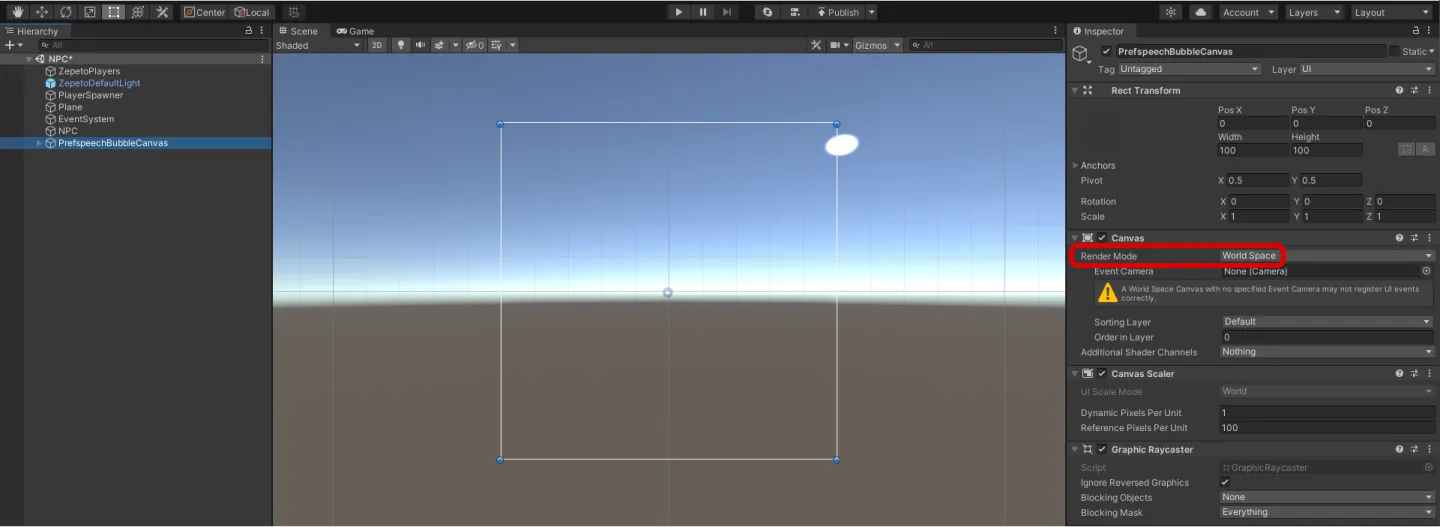
1) 创建一个层级 > UI > 画布,并将其重命名为 PrefSpeechBubbleCanvas。
- 将渲染模式设置为世界空间。
2) 创建一个层级 > UI > 图像,作为 PrefSpeechBubbleCanvas 的子项,并将其重命名为 SpeechBubbleImage。
- 这是将作为对话气泡背景的图像。
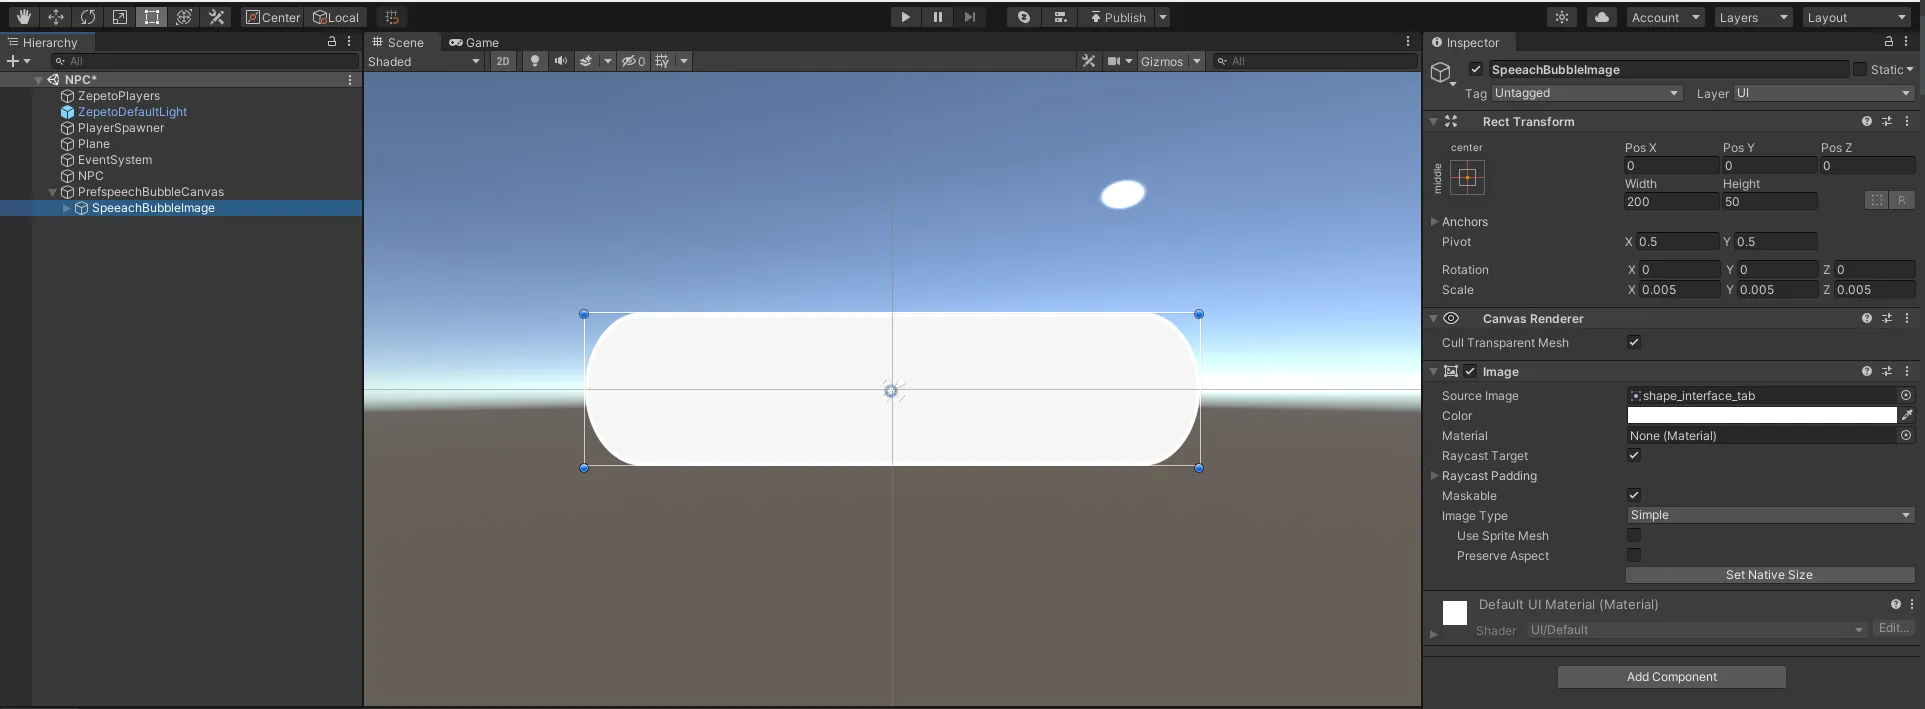
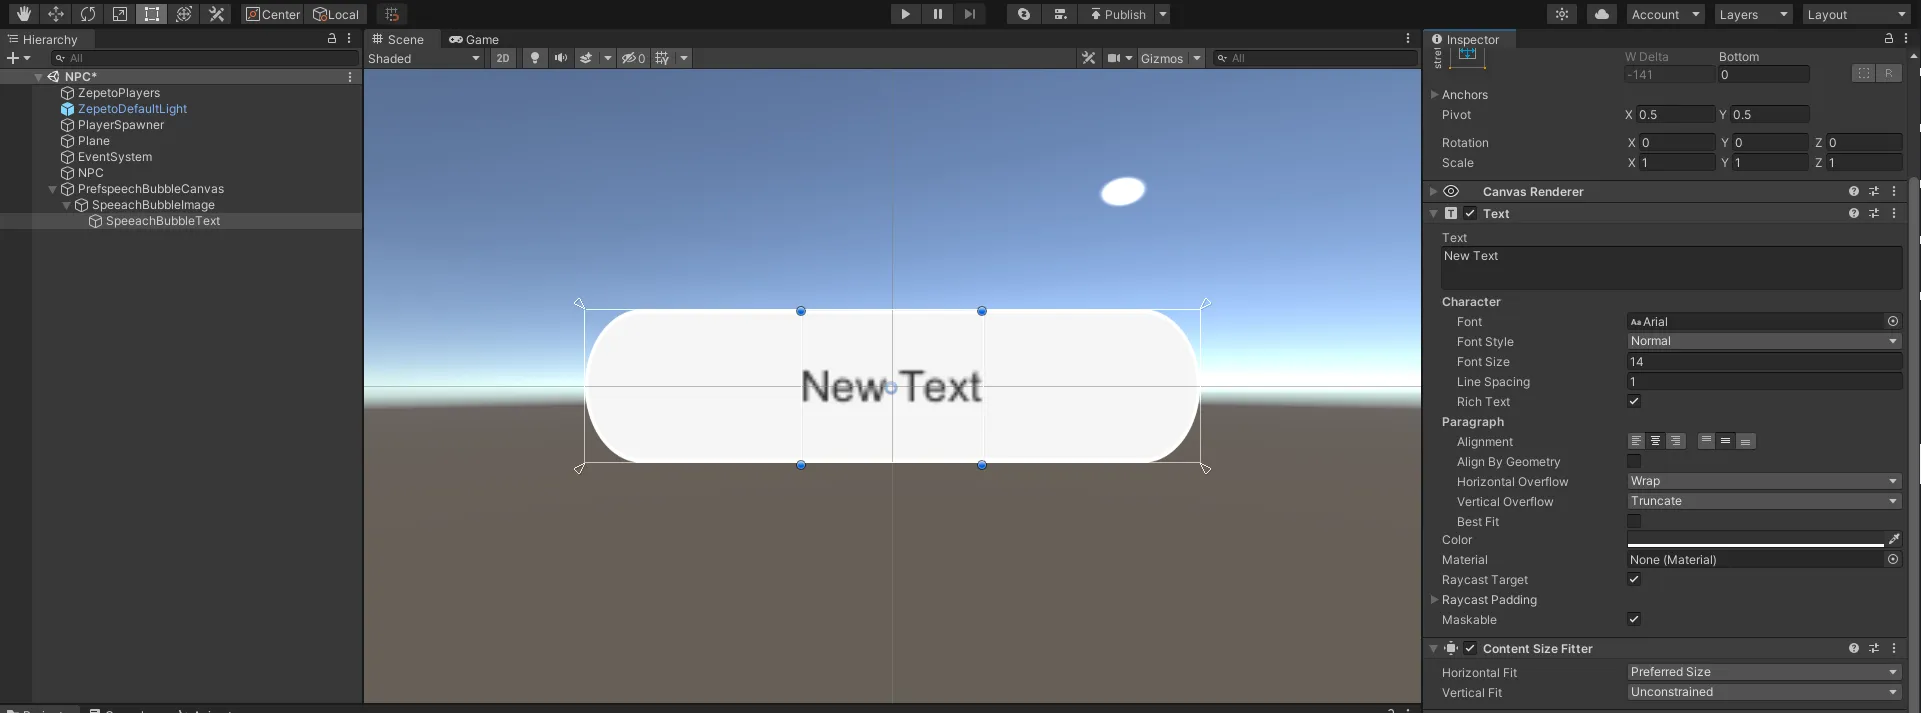
3) 创建层次结构 > UI > 将文本作为对话气泡图像的子项,并将其重命名为对话气泡文本。
- 这是对话气泡内的文本。
- 添加一个内容大小适配器组件,使文本大小合适。
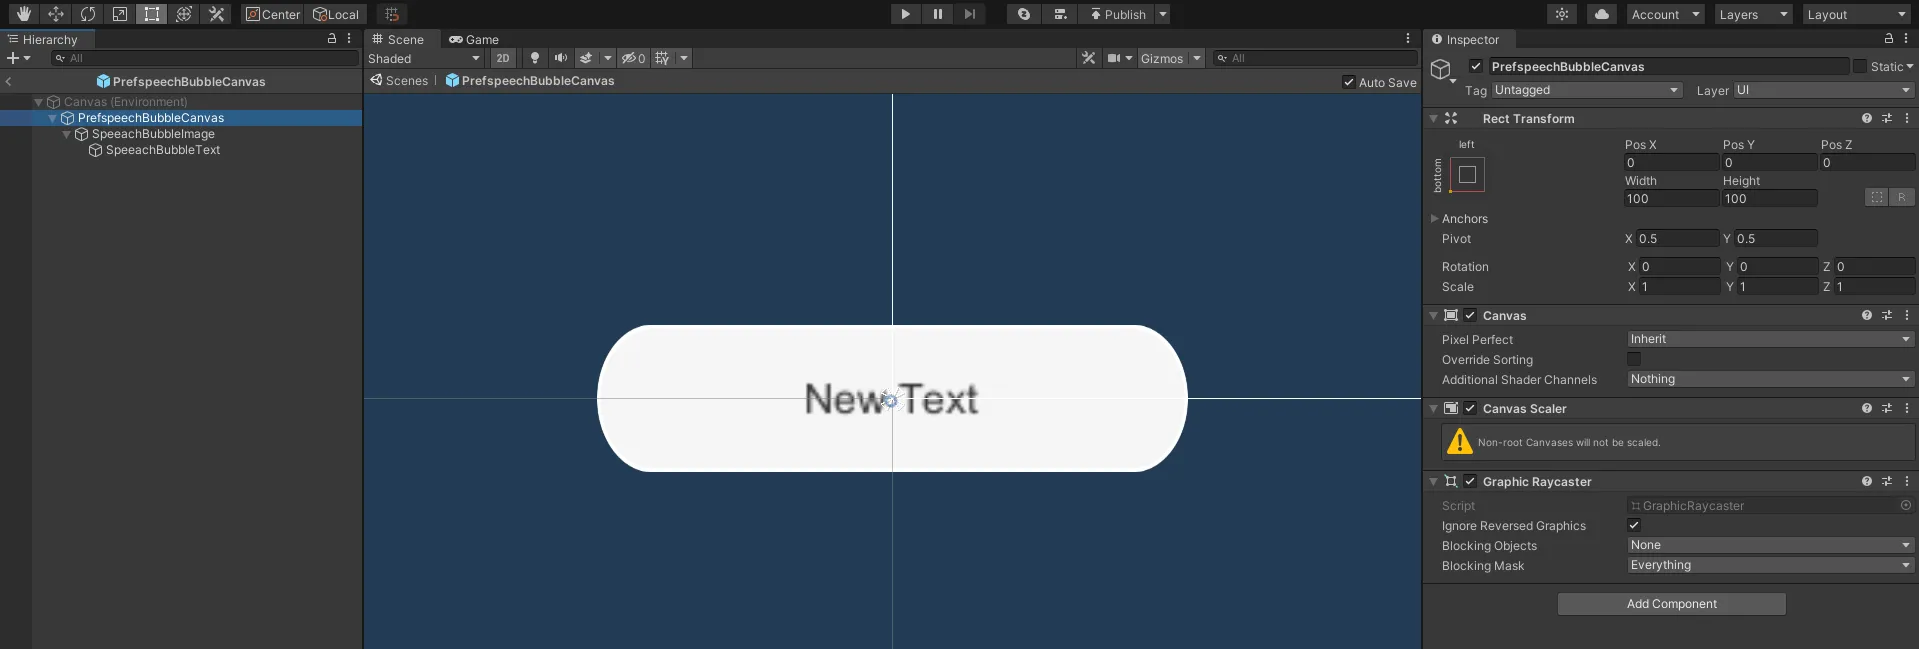
4) 完成后,将其拖到项目窗口以使其成为预制件,然后删除仍在高亮显示的PrefSpeechBubbleCanvas。
创建NPC对话气泡脚本
1) 创建一个项目 > 创建 > ZEPETO > TypeScript,并将其重命名为NPC对话气泡。
2) 编写如下示例脚本。
import { ZepetoScriptBehaviour } from 'ZEPETO.Script';
import { KnowSockets, SpawnInfo, ZepetoCharacter, ZepetoCharacterCreator } from 'ZEPETO.Character.Controller';
import { Canvas, Camera, Vector3, Object, GameObject } from 'UnityEngine';
import { Text } from 'UnityEngine.UI';

export default class NPCSpeechBubble extends ZepetoScriptBehaviour {

    // NPC 的 ZEPETO ID
    public zepetoId: string;
    // 要在对话框中显示的对话内容
    public speechBubbleText: string;
    // 对话框画布游戏对象的预制件
    public speechBubblePrefab: GameObject;
    // 对话框画布游戏对象的 Y 轴偏移值
    public speechBubbleYOffset: number;

    // NPC 角色对象
    private _npc: ZepetoCharacter;
    // 对话框画布游戏对象
    private _speechBubbleObject: GameObject;
    // 对话框画布游戏对象中的文本
    private _speechBubbleText: Text;
    // 对话框画布
    private _canvas: Canvas;
    // 世界相机
    private _cachedWorldCamera: Camera;

    Start() {
        // 创建 SpawnInfo 的新实例,并根据对象的变换设置其位置和旋转
        const spawnInfo = new SpawnInfo();
        spawnInfo.position = this.transform.position;
        spawnInfo.rotation = this.transform.rotation;

        // 使用 ZepetoCharacterCreator 根据 ZEPETO ID 创建新角色,并将其分配给 _npc 变量
        ZepetoCharacterCreator.CreateByZepetoId(this.zepetoId, spawnInfo, (character: ZepetoCharacter) => {
            this._npc = character;

            // 设置对话框
            this.SetBubble();
        })
    }

    // 设置对话框
    SetBubble() {
        // 动态创建对话框画布游戏对象
        this._speechBubbleObject = Object.Instantiate(this.speechBubblePrefab) as GameObject;

        // 将对话框画布游戏对象的父级变换设置为 NPC 的变换。
        this._speechBubbleObject.transform.SetParent(this._npc.transform);

        // 设置对话框画布游戏对象在 NPC 头部上方的位置
        this._speechBubbleObject.transform.position = Vector3.op_Addition(this._npc.GetSocket(KnowSockets.HEAD_UPPER).position, new Vector3(0, this.speechBubbleYOffset,0));

        // 设置对话框中的文本
        this._speechBubbleText = this._speechBubbleObject.GetComponentInChildren<Text>();
        this.SetBubbleText(this.speechBubbleText);

        this._canvas = this._speechBubbleObject.GetComponent<Canvas>();
        this._cachedWorldCamera = Object.FindObjectOfType<Camera>();
        this._canvas.worldCamera = this._cachedWorldCamera;
    }

    // 打开对话框画布并设置文本
    SetBubbleText(bubbleText: string) {
        this._speechBubbleObject.SetActive(true);
        this._speechBubbleText.text = bubbleText;
    }

    private Update() {
        if (this._canvas != null) {
            this.UpdateCanvasRotation();
        }
    }

    // 更新对话框画布的旋转以面向相机
    private UpdateCanvasRotation() {
        this._canvas.transform.LookAt(this._cachedWorldCamera.transform);
        this._canvas.transform.Rotate(0, 180, 0);
    }

}
脚本的流程如下:
- 开始()
- 调用 SetBubble() 自定义函数。
- SetBubble()
- 创建一个对话气泡画布 (speechBubblePrefab),并将创建的对话气泡放置在 NPC 的头上
- 调用 SetBubbleText() 自定义函数以设置对话气泡内的文本。
- SetBubbleText()
- 激活 NPC 的对话气泡画布 (_speechBubbleObject)。
- 在对话气泡内显示作为参数给定的字符串 (bubbleText)。
- 更新()
- 调用 UpdateCanvasRotation() 自定义函数以旋转画布以匹配相机。
3) 在您完成编写脚本后,将其添加到 NPC 将要创建的位置对象中。
4) 在检查器中,分配 Zepeto Id、对话框文本、对话框预制件和对话框 Y 偏移量。
- 对话框文本:此变量存储 NPC 角色在对话框中将要说的对话。在我们的示例中,我们存储以下对话:"你好,世界"。
- 对话框预制件:此变量存储对话框画布游戏对象的预制件。
- 对话框 Y 偏移量:此变量存储对话框画布游戏对象的 y 轴偏移值。这允许您在将对话框放置在角色头上时调整角色与对话框之间的距离。
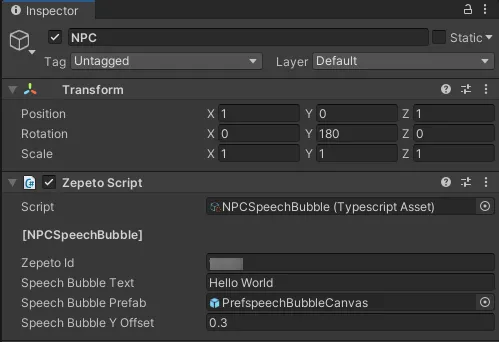
5) 按下播放按钮以执行,您将看到一个对话框漂浮在 NPC 的头上。
与 NPC 互动
通过与NPC互动,您可以实现许多有趣的内容。
在本指南中,我们将使用一个示例来实现一个在接近NPC时会变化的对话框。

设置碰撞体
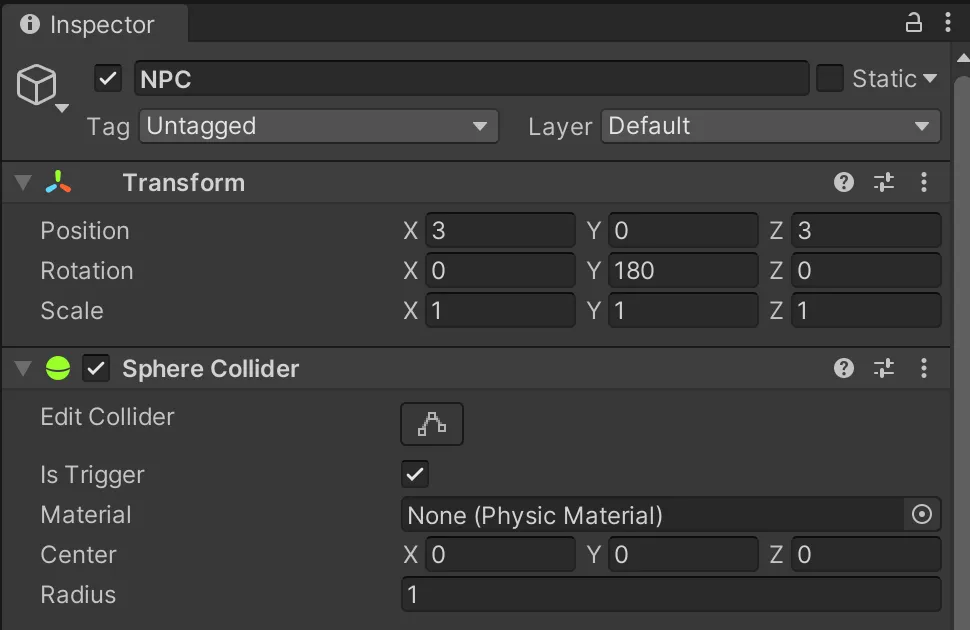
1) 为您的对象添加一个碰撞体组件,以便与NPC互动并检查isTrigger。
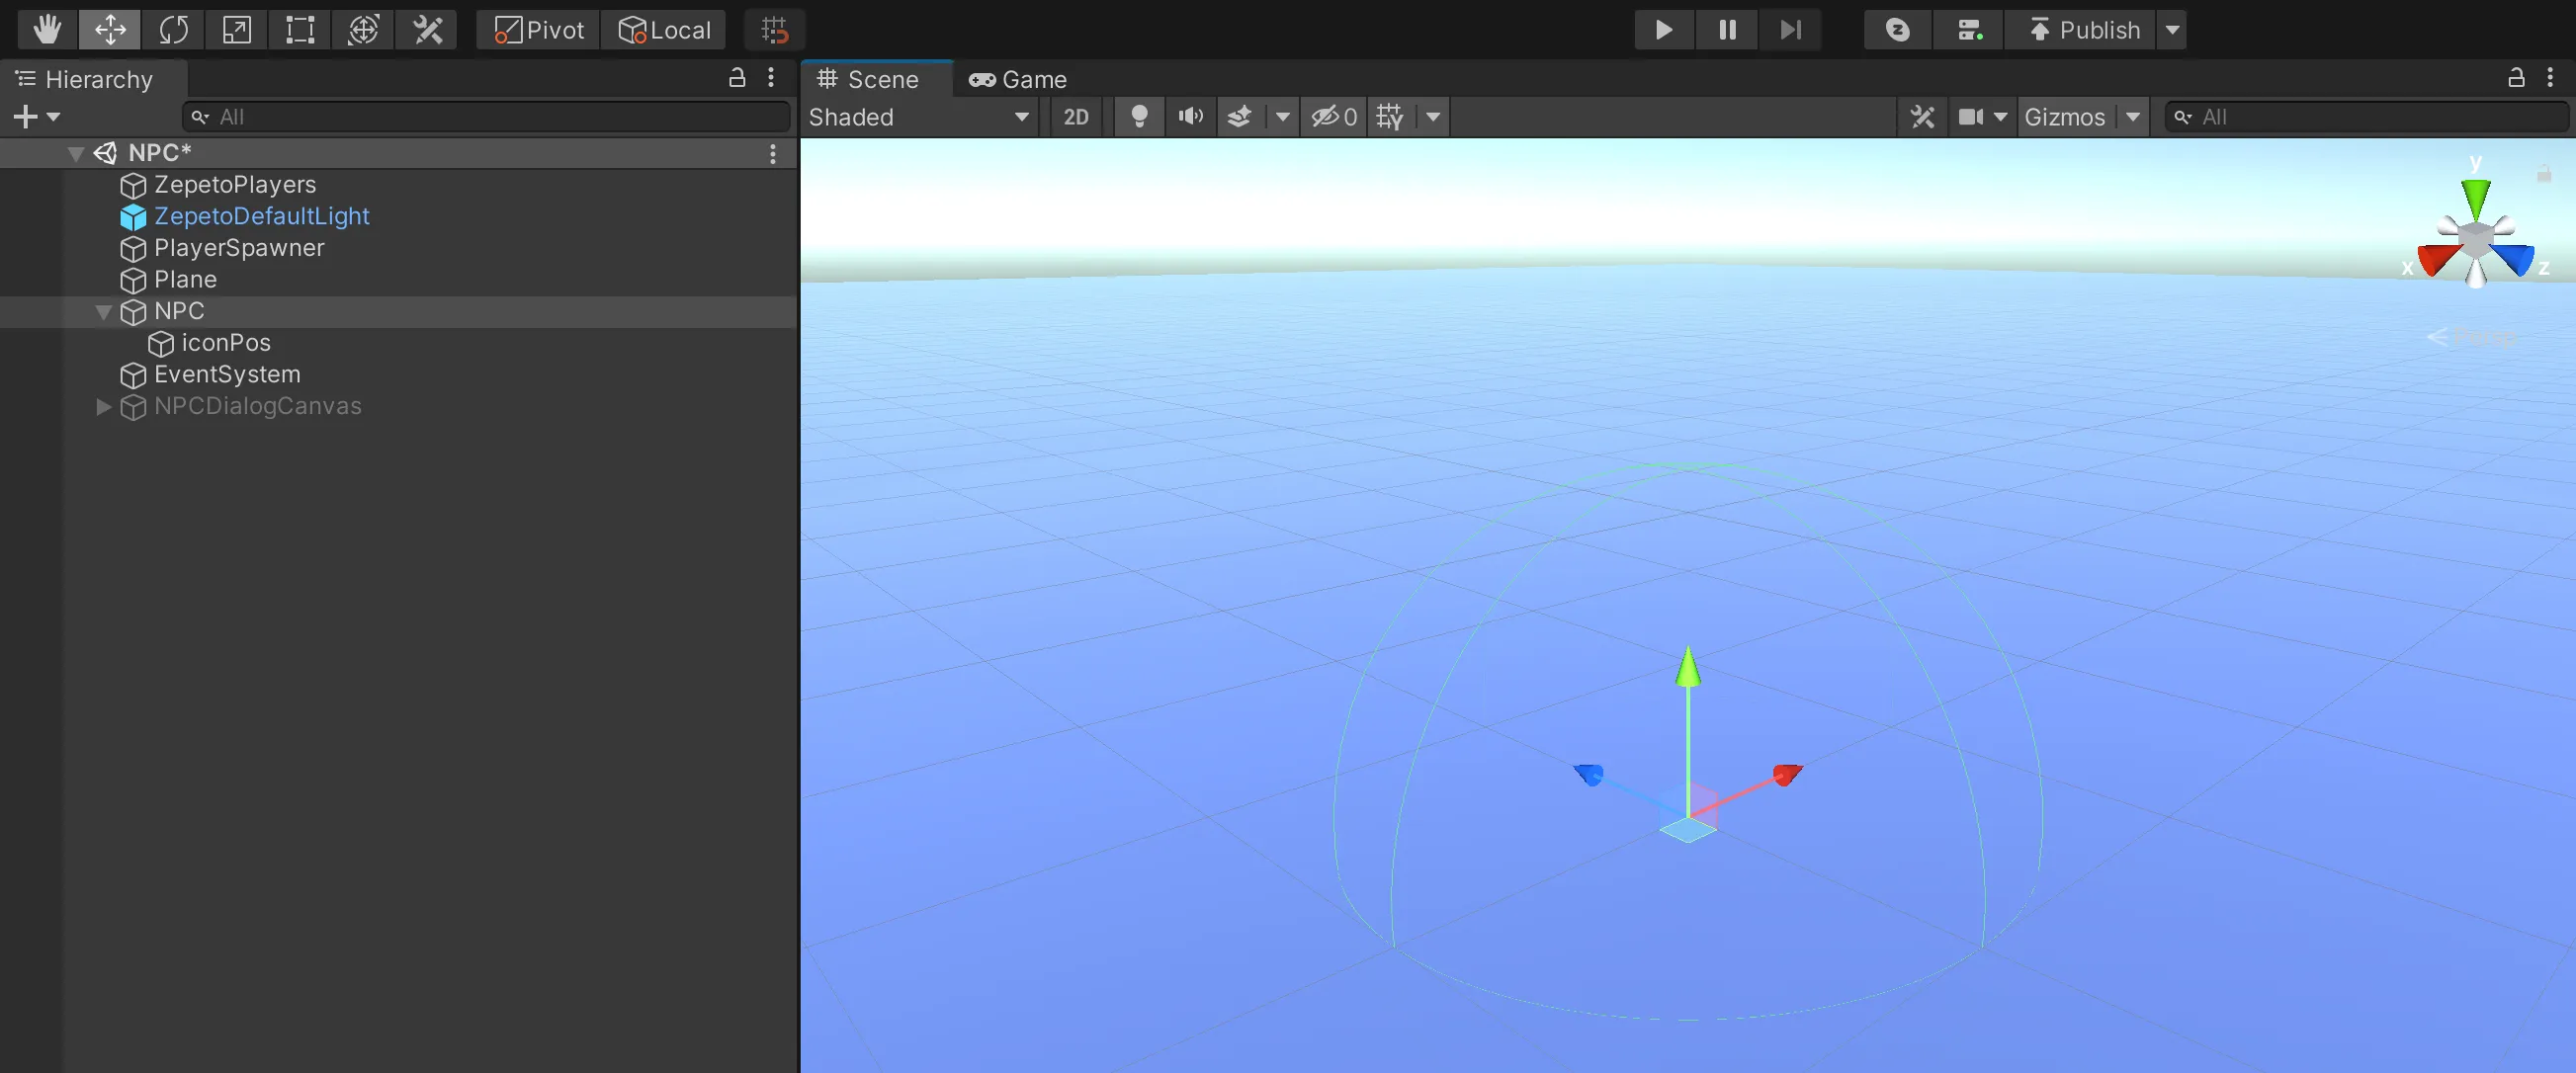
2) 调整碰撞体的大小,以便玩家可以与NPC互动。
创建 NPC 交互脚本
1) 创建项目 > 创建 > ZEPETO > TypeScript,并将其重命名为 NPCInteraction。
2) 编写如下示例脚本。
import { ZepetoScriptBehaviour } from 'ZEPETO.Script';
import { KnowSockets, SpawnInfo, ZepetoCharacter, ZepetoCharacterCreator, ZepetoPlayers } from 'ZEPETO.Character.Controller';
import { Canvas, Camera, Vector3, Object, GameObject, Collider } from 'UnityEngine';
import { Text } from 'UnityEngine.UI';

export default class NPCInteraction extends ZepetoScriptBehaviour {

    // NPC的ZEPETO ID
    public zepetoId: string;
    // 在对话框中显示的对话内容
    public speechBubbleText: string;

    public changedSpeechBubbleText: string;
    // 对话框画布游戏对象的预制件
    public speechBubblePrefab: GameObject;
    // 对话框画布游戏对象的y轴偏移值
    public speechBubbleYOffset: number;

    // 本地角色对象
    private _zepetoCharacter: ZepetoCharacter;
    // NPC角色对象
    private _npc: ZepetoCharacter;
    // 对话框画布游戏对象
    private _speechBubbleObject: GameObject;
    // 对话框画布游戏对象中的文本
    private _speechBubbleText: Text;
    // 对话框画布
    private _canvas: Canvas;
    // 世界相机
    private _cachedWorldCamera: Camera;

    Start() {
        // 创建SpawnInfo的新实例,并根据对象的变换设置其位置和旋转
        const spawnInfo = new SpawnInfo();
        spawnInfo.position = this.transform.position;
        spawnInfo.rotation = this.transform.rotation;

        // 使用ZepetoCharacterCreator通过ZEPETO ID创建新角色,并将其分配给_npc变量
        ZepetoCharacterCreator.CreateByZepetoId(this.zepetoId, spawnInfo, (character: ZepetoCharacter) => {
            this._npc = character;

            // 设置对话框
            this.SetBubble();
        })

        ZepetoPlayers.instance.OnAddedLocalPlayer.AddListener(() => {
            this._zepetoCharacter = ZepetoPlayers.instance.LocalPlayer.zepetoPlayer.character;
        });
    }

    // 检查玩家角色是否进入碰撞体
    OnTriggerEnter(collider: Collider) {
        if (this._zepetoCharacter == null || collider.gameObject != this._zepetoCharacter.gameObject) {
            return;
        }
        this.SetBubbleText(this.changedSpeechBubbleText);
    }

    OnTriggerExit(collider: Collider) {
        if (this._zepetoCharacter == null || collider.gameObject != this._zepetoCharacter.gameObject) {
            return;
        }
        this.SetBubbleText(this.speechBubbleText);
    }


    // 设置对话框
    SetBubble() {
        // 动态创建对话框画布游戏对象
        this._speechBubbleObject = Object.Instantiate(this.speechBubblePrefab) as GameObject;

        // 将对话框画布游戏对象的父级变换设置为NPC的变换。
        this._speechBubbleObject.transform.SetParent(this._npc.transform);

        // 设置对话框画布游戏对象在NPC头部上方的位置
        this._speechBubbleObject.transform.position = Vector3.op_Addition(this._npc.GetSocket(KnowSockets.HEAD_UPPER).position, new Vector3(0, this.speechBubbleYOffset,0));

        // 设置对话框中的文本
        this._speechBubbleText = this._speechBubbleObject.GetComponentInChildren<Text>();
        this.SetBubbleText(this.speechBubbleText);

        this._canvas = this._speechBubbleObject.GetComponent<Canvas>();
        this._cachedWorldCamera = Object.FindObjectOfType<Camera>();
        this._canvas.worldCamera = this._cachedWorldCamera;
    }

    // 打开对话框画布并设置文本
    SetBubbleText(bubbleText: string) {
        this._speechBubbleObject.SetActive(true);
        this._speechBubbleText.text = bubbleText;
    }

    private Update() {
        if (this._canvas != null) {
            this.UpdateCanvasRotation();
        }
    }

    // 更新对话框画布的旋转以面向相机
    private UpdateCanvasRotation() {
        this._canvas.transform.LookAt(this._cachedWorldCamera.transform);
        this._canvas.transform.Rotate(0, 180, 0);
    }

}
脚本的流程如下:
- OnTriggerEnter(), OnTriggerExit()
- 当触发器通过进入碰撞体区域被检测到时,调用 SetBubbleText() 自定义函数将对话框内的文本设置为 changedSpeechBubbleText。
- 当它离开碰撞体区域时,调用 SetBubbleText() 自定义函数将对话框内的文本设置为 speechBubbleText。
3) 在您完成编写脚本后,将其添加到 NPC 将要创建的位置对象中。
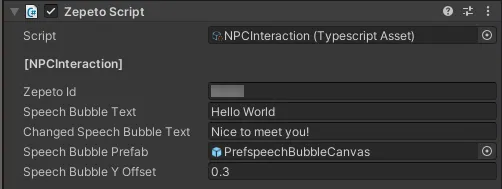
4) 在检查器中,分配 Zepeto Id、对话框文本、对话框预制件、对话框 Y 偏移量和更改后的对话框。
- 对话框文本:此变量存储 NPC 角色将在对话框中说的对话。在我们的示例中,我们存储以下对话:"你好,世界"。
- 对话框预制件:此变量存储对话框画布游戏对象的预制件。
- 对话框 Y 偏移量:此变量存储对话框画布游戏对象的 y 轴偏移值。这使您可以在角色头上放置对话框时调整角色与对话框之间的距离。
- 更改后的对话框:存储当玩家进入 NPC 的碰撞体时将在 NPC 的对话框中显示的对话。
5) 按下播放以执行,当玩家接近NPC时,气泡中的文本将会改变。
应用NPC交互
要创建对话格式,请使用面板创建UI。
以下是一个由面板和按钮组成的简单对话示例。
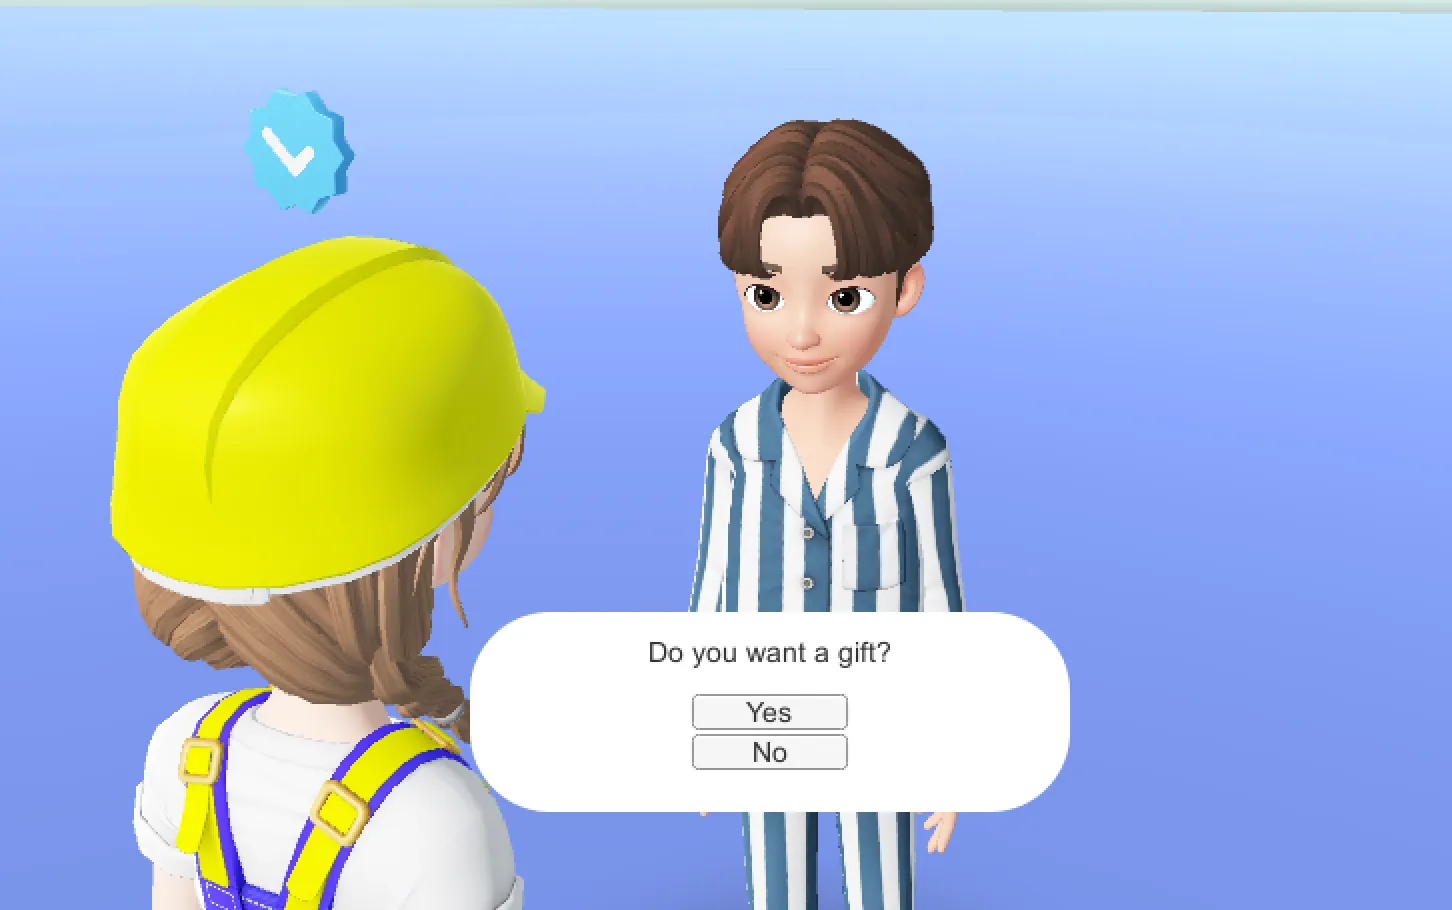
这是一个示例脚本,当与NPC交互时打开对话框,并在每个按钮被按下时处理它们。
应用此内容以实现有趣的内容。
import { GameObject, HumanBodyBones, Object, Collider } from 'UnityEngine';
import { ZepetoScriptBehaviour } from 'ZEPETO.Script';
import { Button } from 'UnityEngine.UI';
import { ZepetoCharacter, ZepetoPlayers } from "ZEPETO.Character.Controller";

export default class NPCDialogInteraction extends ZepetoScriptBehaviour {

    public npcDialogCanvas: GameObject;
    public yesButton: Button;
    public noButton: Button;

    private _zepetoCharacter: ZepetoCharacter;

    Start() {

        ZepetoPlayers.instance.OnAddedLocalPlayer.AddListener(()=>{
            this._zepetoCharacter = ZepetoPlayers.instance.LocalPlayer.zepetoPlayer.character;
        });

        // 对话 - 选择是
        this.yesButton.onClick.AddListener(() => {
            console.log("是")
            this.npcDialogCanvas.SetActive(false);
        });

        // 对话 - 选择否
        this.noButton.onClick.AddListener(() => {
            console.log("否")
            this.npcDialogCanvas.SetActive(false);
        });

    }

    // 检查玩家角色是否进入碰撞体
    OnTriggerEnter(collider: Collider) {
        if (this._zepetoCharacter == null || collider.gameObject != this._zepetoCharacter.gameObject) {
            return;
        }
        this.npcDialogCanvas.SetActive(true);
    }

    OnTriggerExit(collider: Collider) {
        if (this._zepetoCharacter == null || collider.gameObject != this._zepetoCharacter.gameObject) {
            return;
        }
        this.npcDialogCanvas.SetActive(false);
    }

}