การสร้างและการควบคุม NPC
ศึกษาวิธีสร้าง NPC ตัวละคร ZEPETO
นำสคริปต์ตัวอย่างแต่ละฟังก์ชันที่มีให้มาใช้ในการเพิ่ม NPC ที่ต้องการลงในเวิลด์
สร้าง NPC
ใช้ ZEPETO ID ในการสร้าง NPC
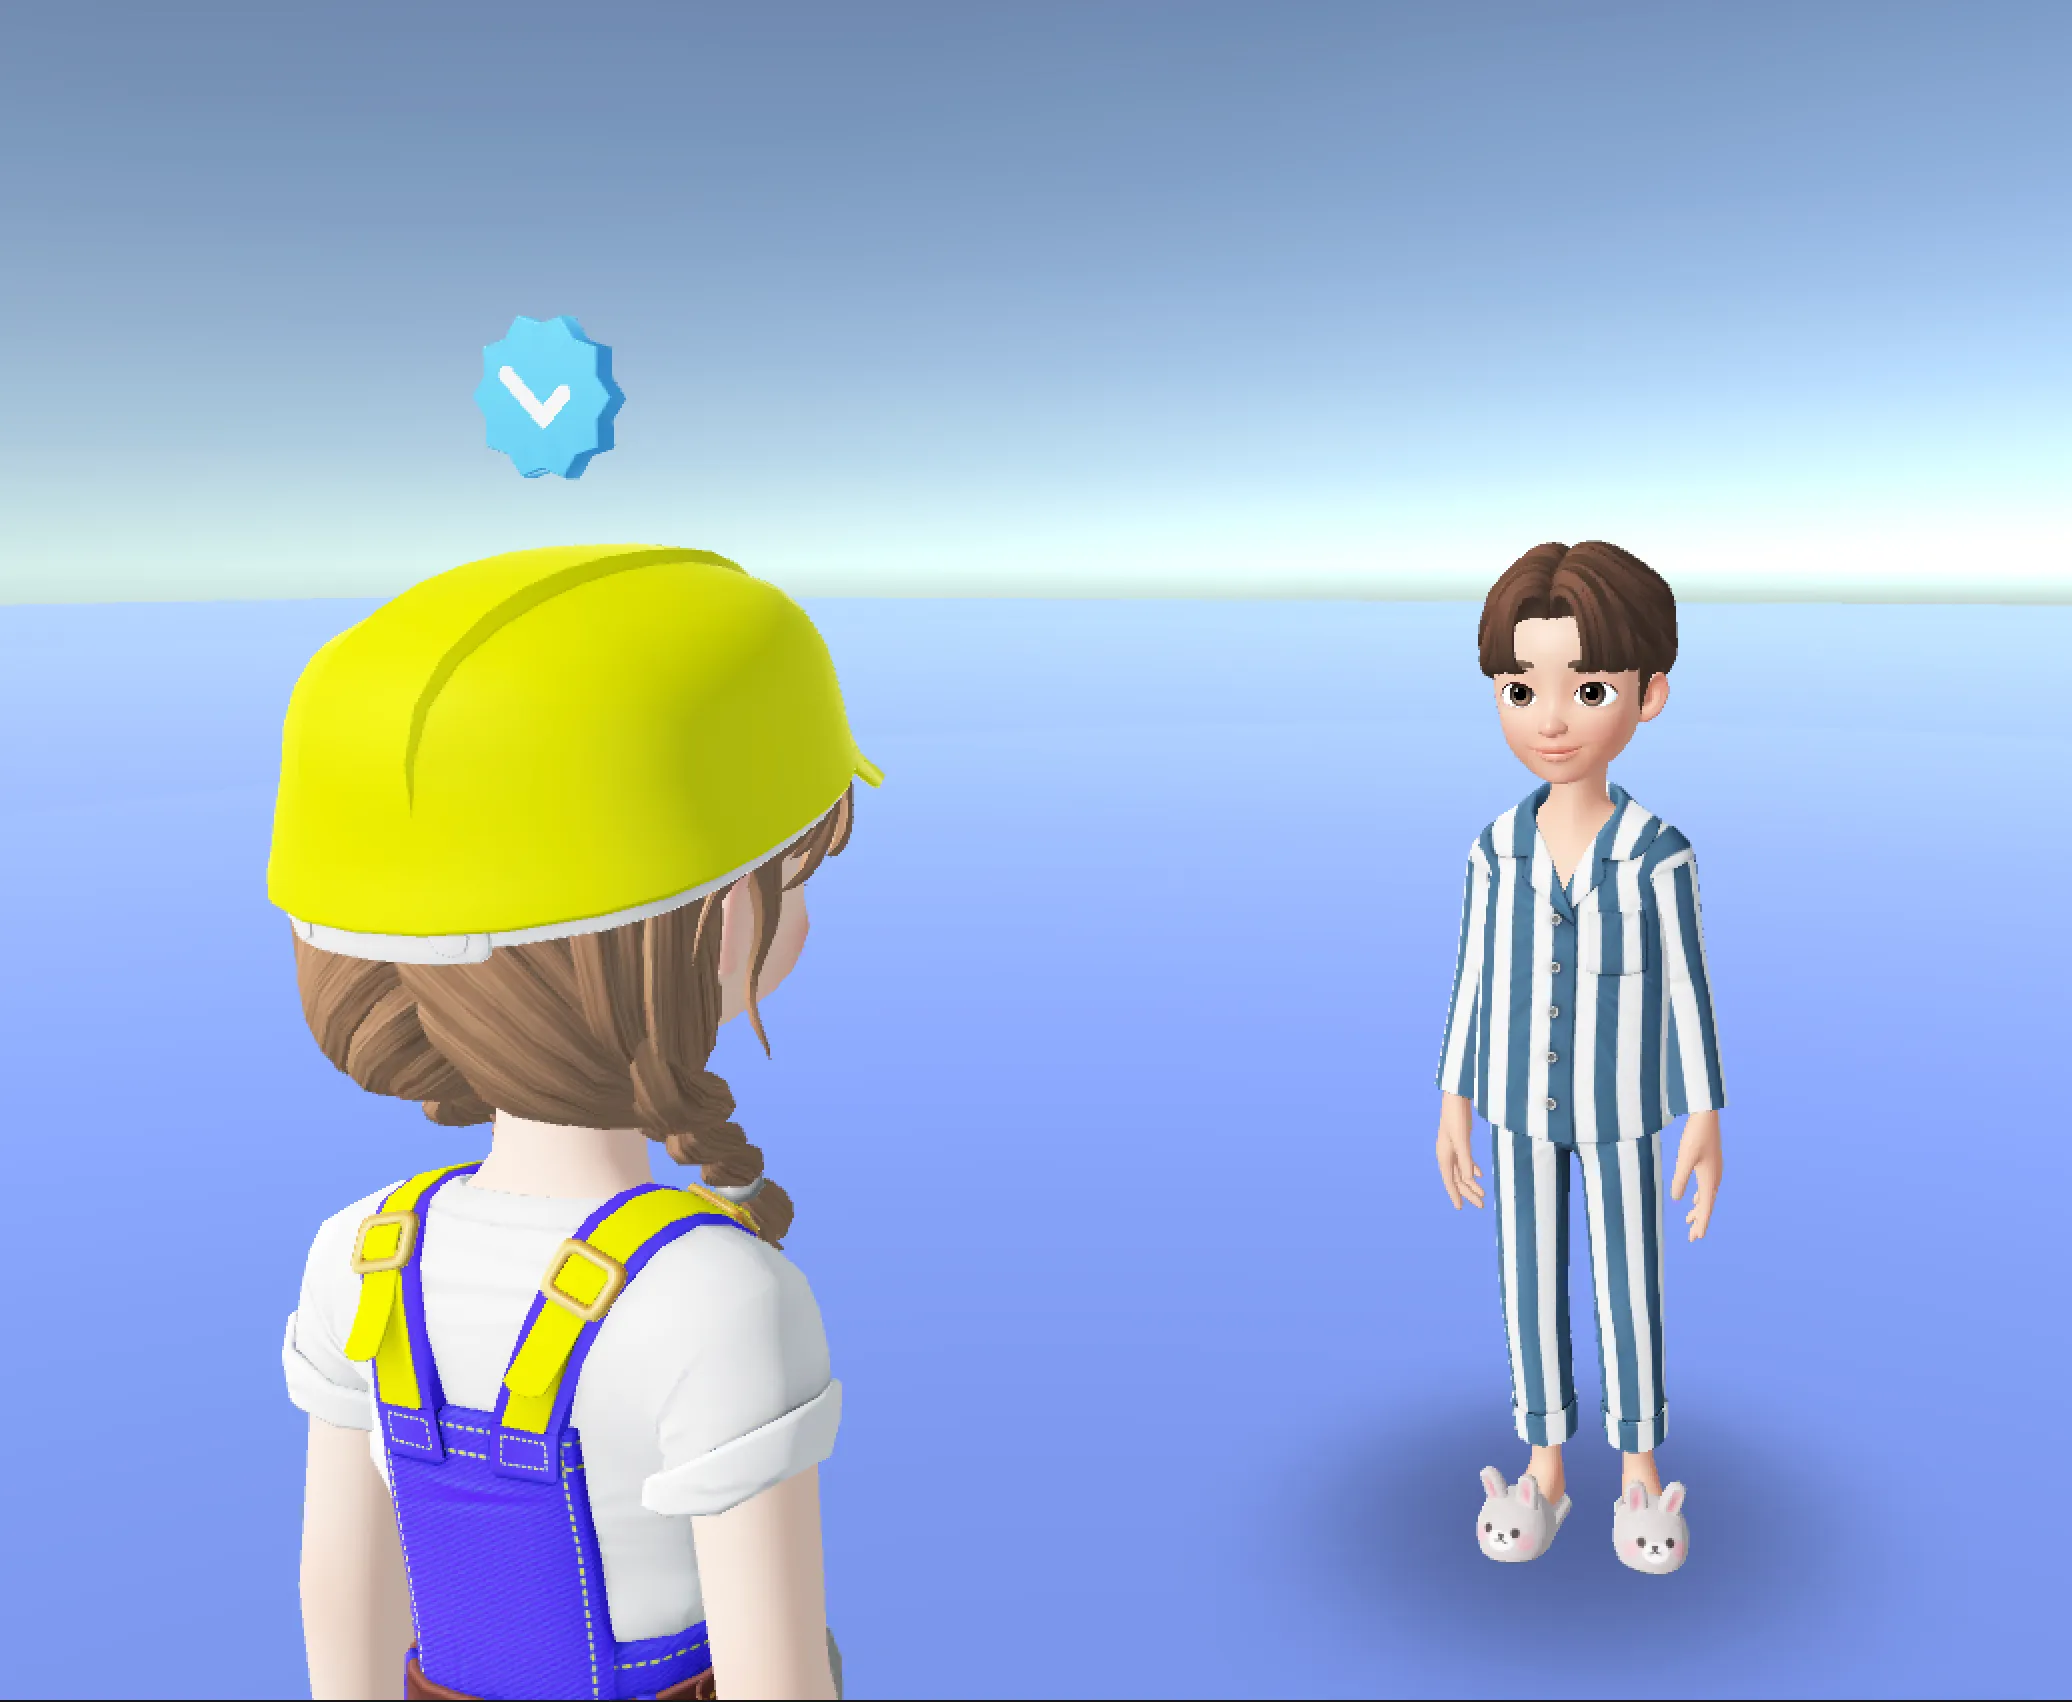
❗️คำเตือน
- รูปลักษณ์ของ NPC และไอเทมที่ใส่จะตรงกับ ZEPETO ID ที่ป้อน
- แนะนำให้ตั้งค่าตัวละคร ZEPETO ที่มีรูปลักษณ์พิเศษก่อน แล้วค่อยสร้าง NPC
ตั้งค่าวัตถุในตำแหน่งที่จะสร้าง NPC
- สร้างโค้ดสำหรับสร้างตัวละคร ZEPETO แบบพื้นฐานใน Scene
📘 กรุณาอ้างอิงจากคู่มือต่อไปนี้ [สร้างตัวละคร ZEPETO]
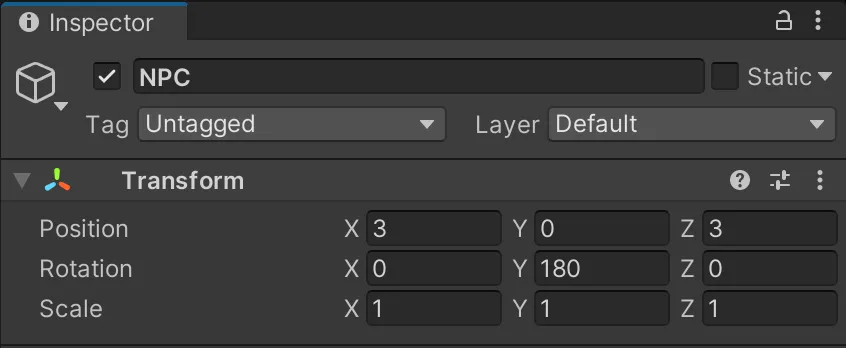
- เลือก Hierarchy > Create Empty Object เพื่อสร้างวัตถุ แล้วเปลี่ยนชื่อเป็น NPC
- วัตถุสำหรับบันทึกตำแหน่งที่จะสร้าง NPC
- ตั้งค่า Position และ Rotation
เขียนสคริปต์สร้าง NPC
- เลือก Project > Create > ZEPETO > TypeScript เพื่อสร้างสคริปต์ แล้วเปลี่ยนชื่อเป็น NPCCreator
- เขียนสคริปต์ตัวอย่างดังด้านล่าง
import { ZepetoScriptBehaviour } from 'ZEPETO.Script';
import { SpawnInfo, ZepetoCharacter, ZepetoCharacterCreator } from 'ZEPETO.Character.Controller';

export default class NPCCreator extends ZepetoScriptBehaviour {

    // ZEPETO ID of the NPC
    public zepetoId: string;
    // NPC character object
    private _npc: ZepetoCharacter;

    Start() {
        // Create a new instance of SpawnInfo and set its position and rotation based on the object's transform
        const spawnInfo = new SpawnInfo();
        spawnInfo.position = this.transform.position;
        spawnInfo.rotation = this.transform.rotation;

        // Use ZepetoCharacterCreator to create a new character by Zepeto ID and assign it to _npc variable
        ZepetoCharacterCreator.CreateByZepetoId(this.zepetoId, spawnInfo, (character: ZepetoCharacter) => {
            this._npc = character;
        })
    }

}
การทำงานของสคริปต์จะเป็นไปดังนี้
- Start()
- ใช้ฟังก์ชัน ZepetoCharacterCreator.CreateByZepetoId() สร้าง NPC ในตำแหน่งวัตถุ NPC จากนั้นบันทึกลงใน _npc
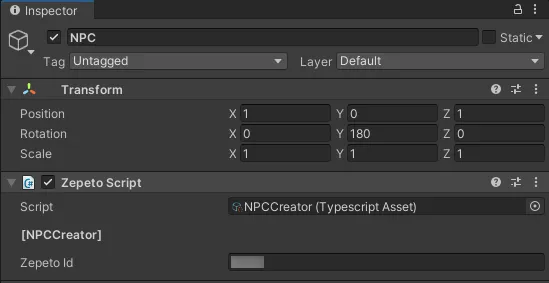
- หลังจากเขียนสคริปต์เสร็จเรียบร้อยแล้ว เพิ่มสคริปต์ลงในวัตถุ NPC
- กำหนด Zepeto Id ใน Inspector
- Zepeto Id : ZEPETO ID ของ NPC
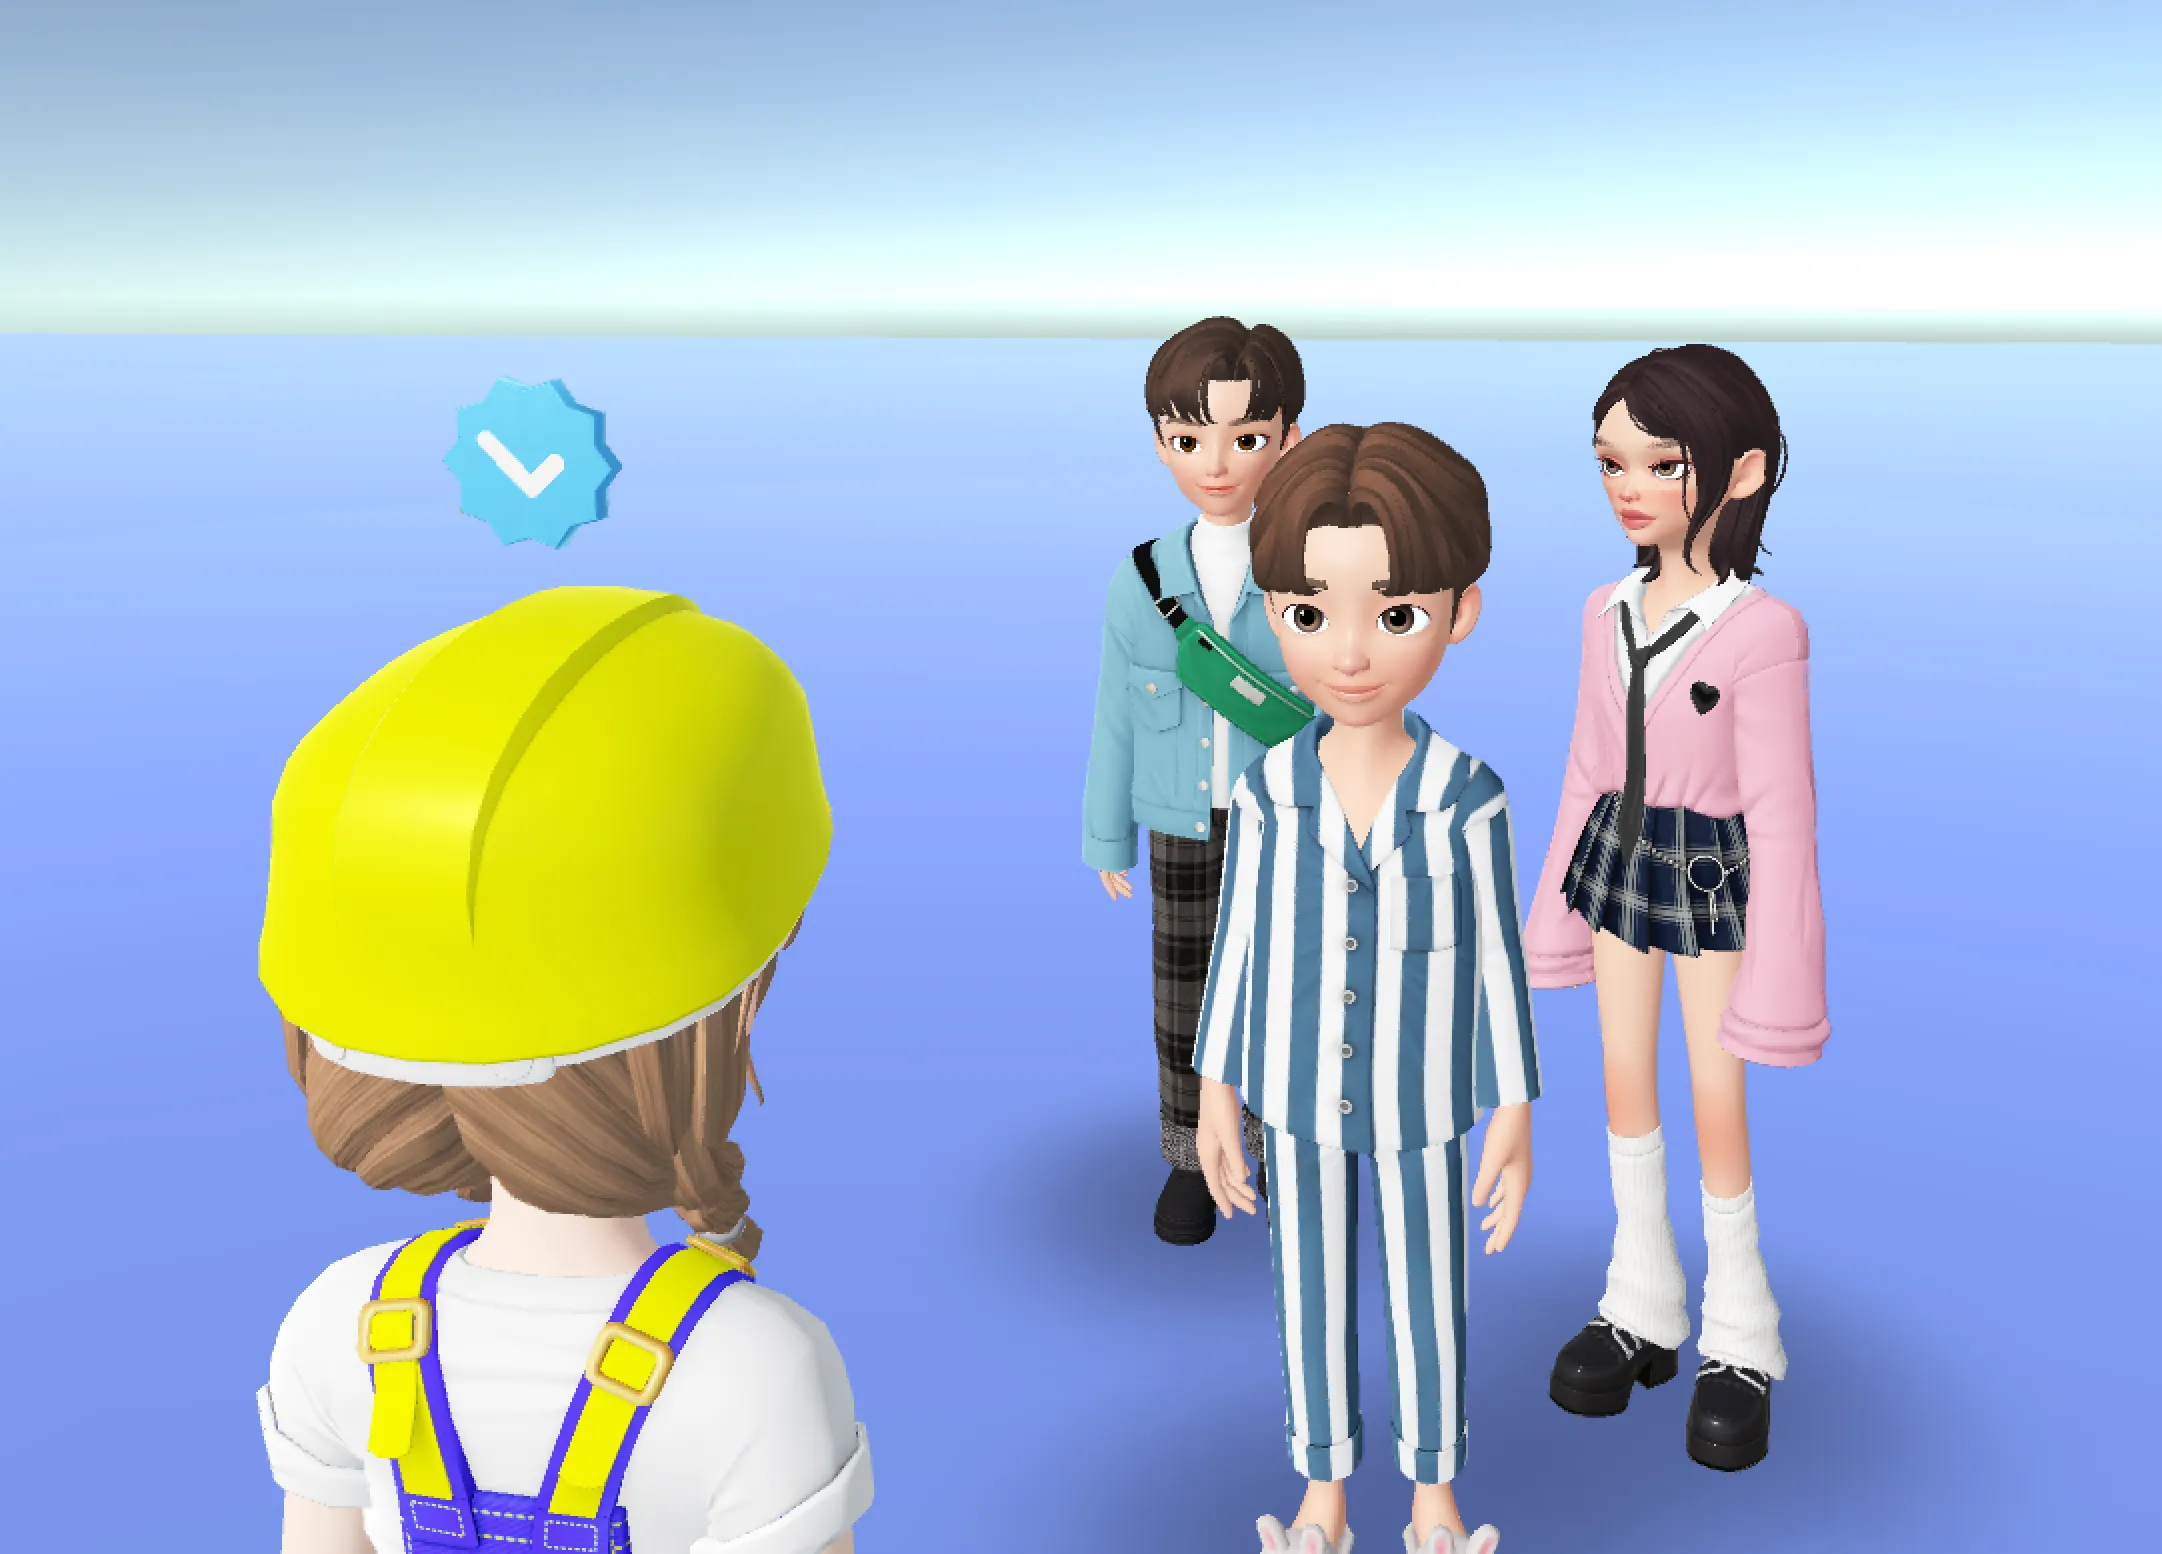
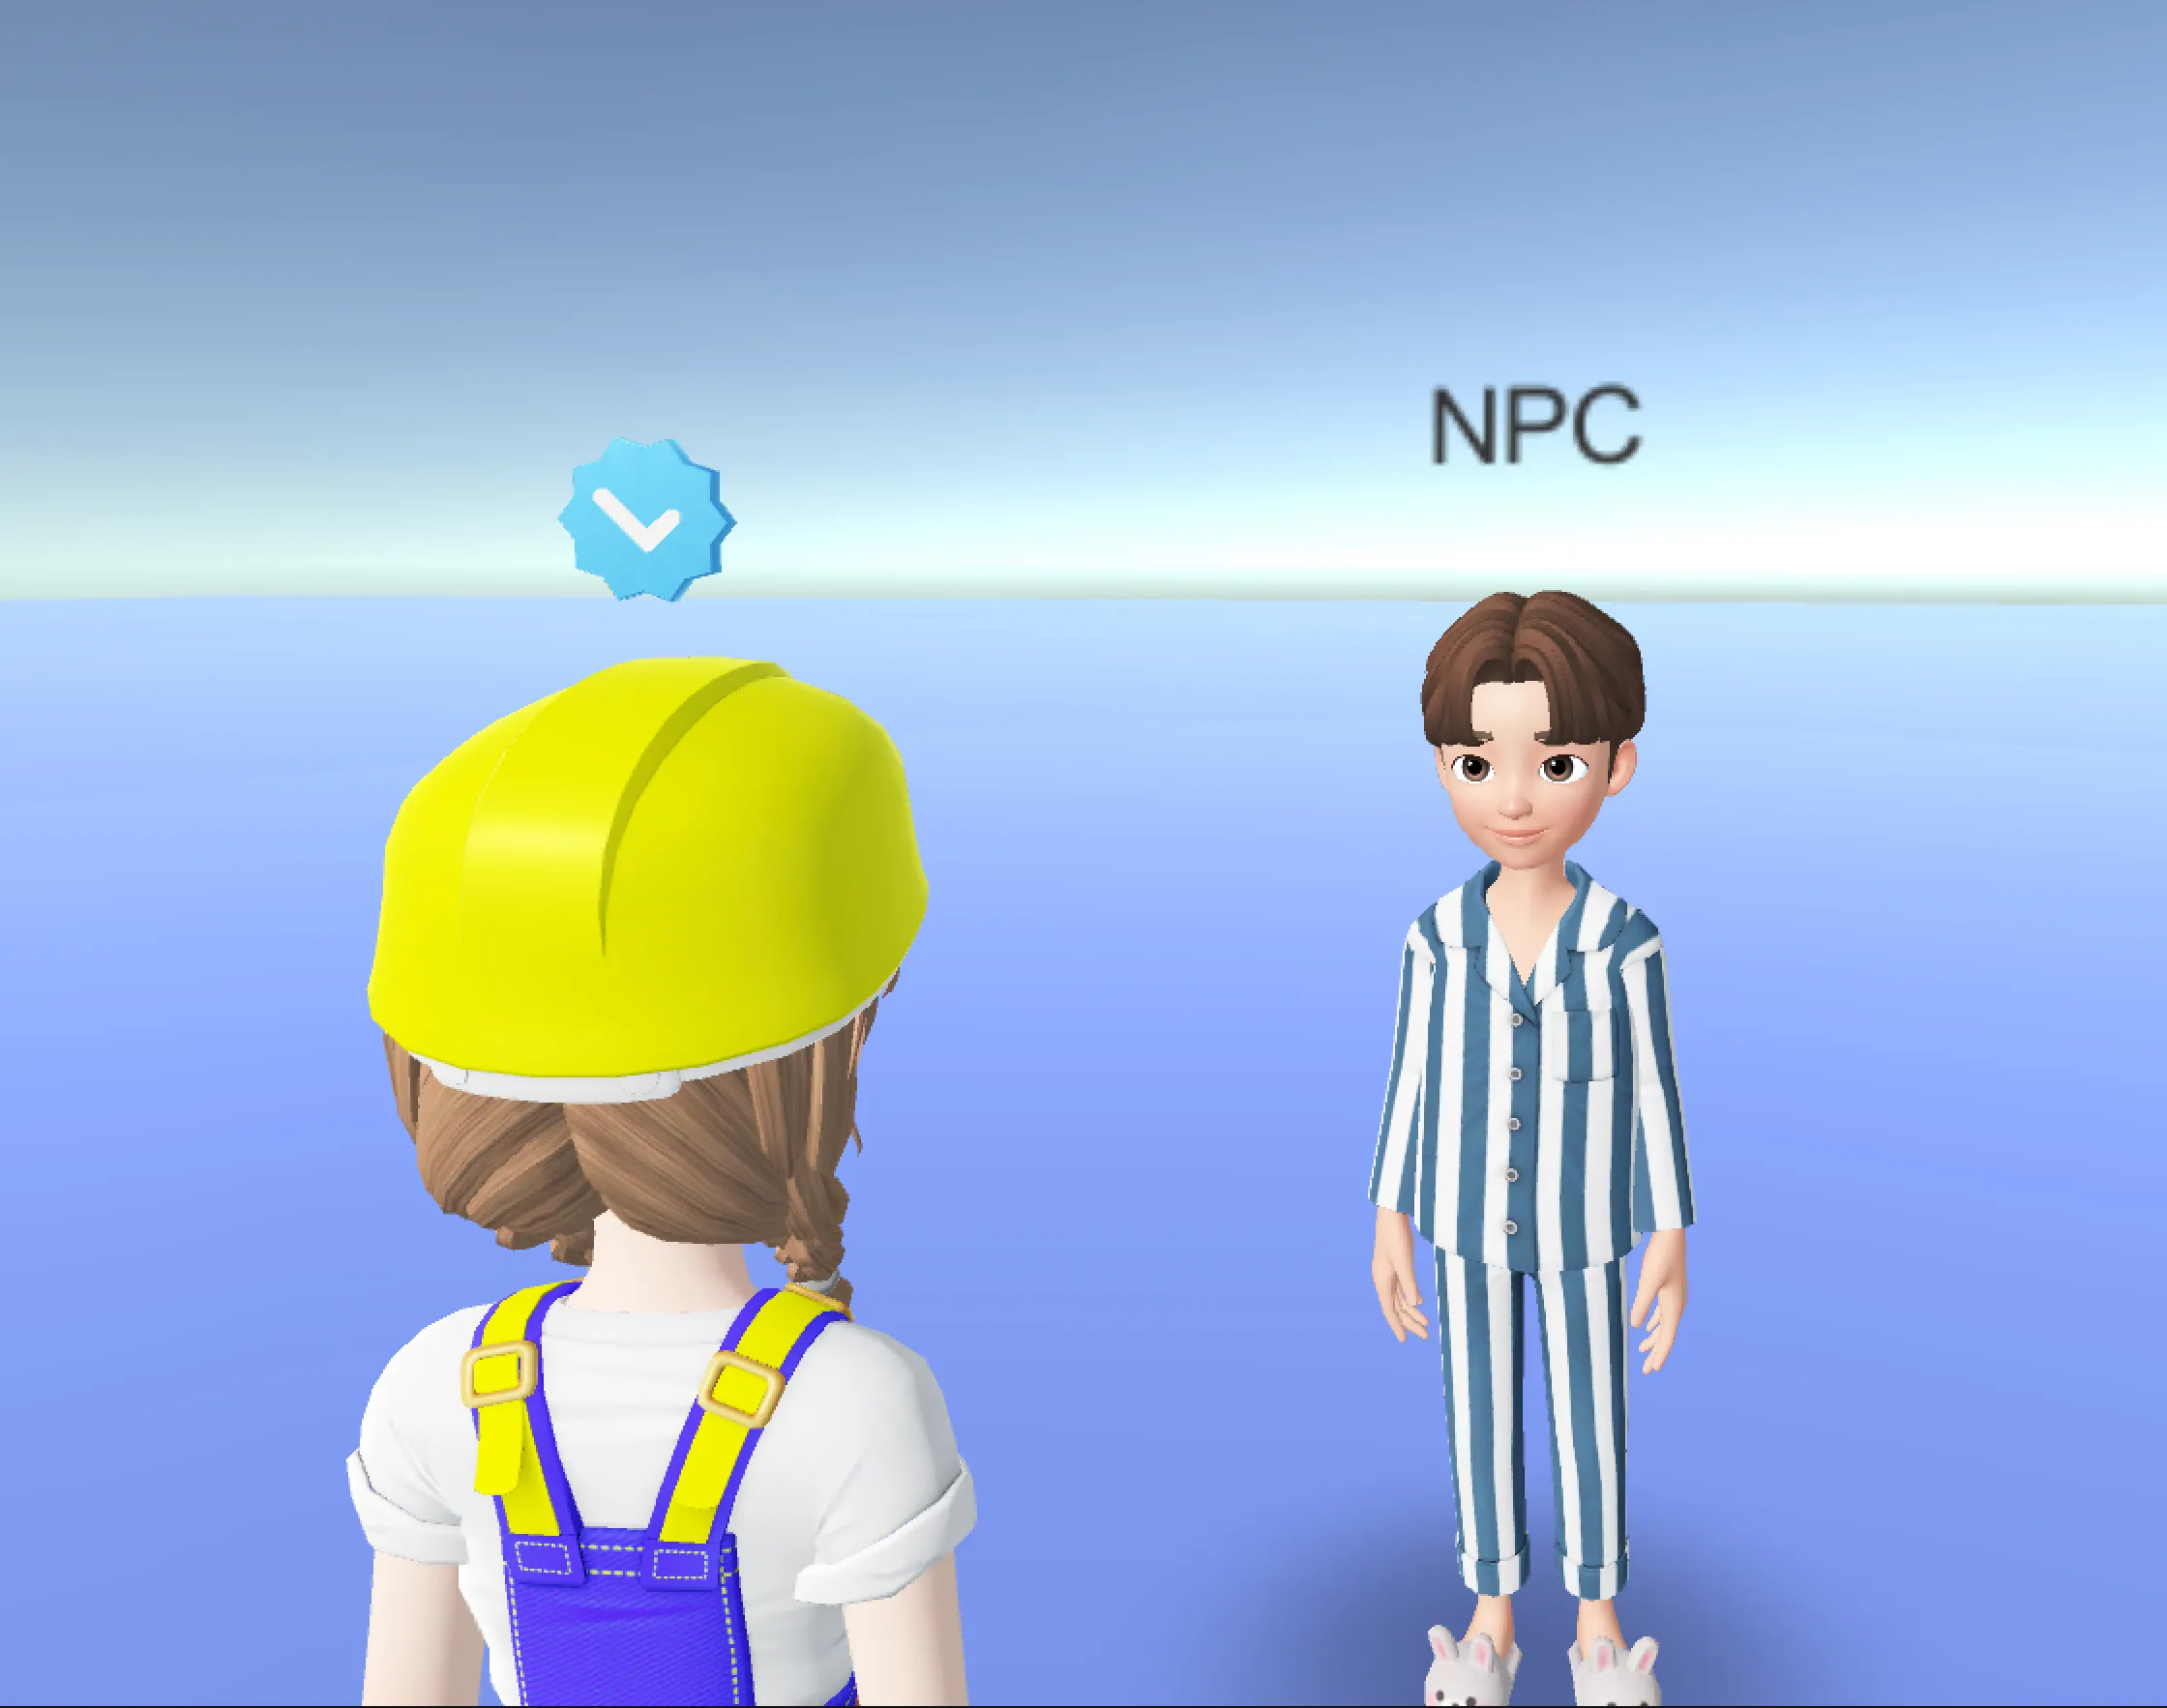
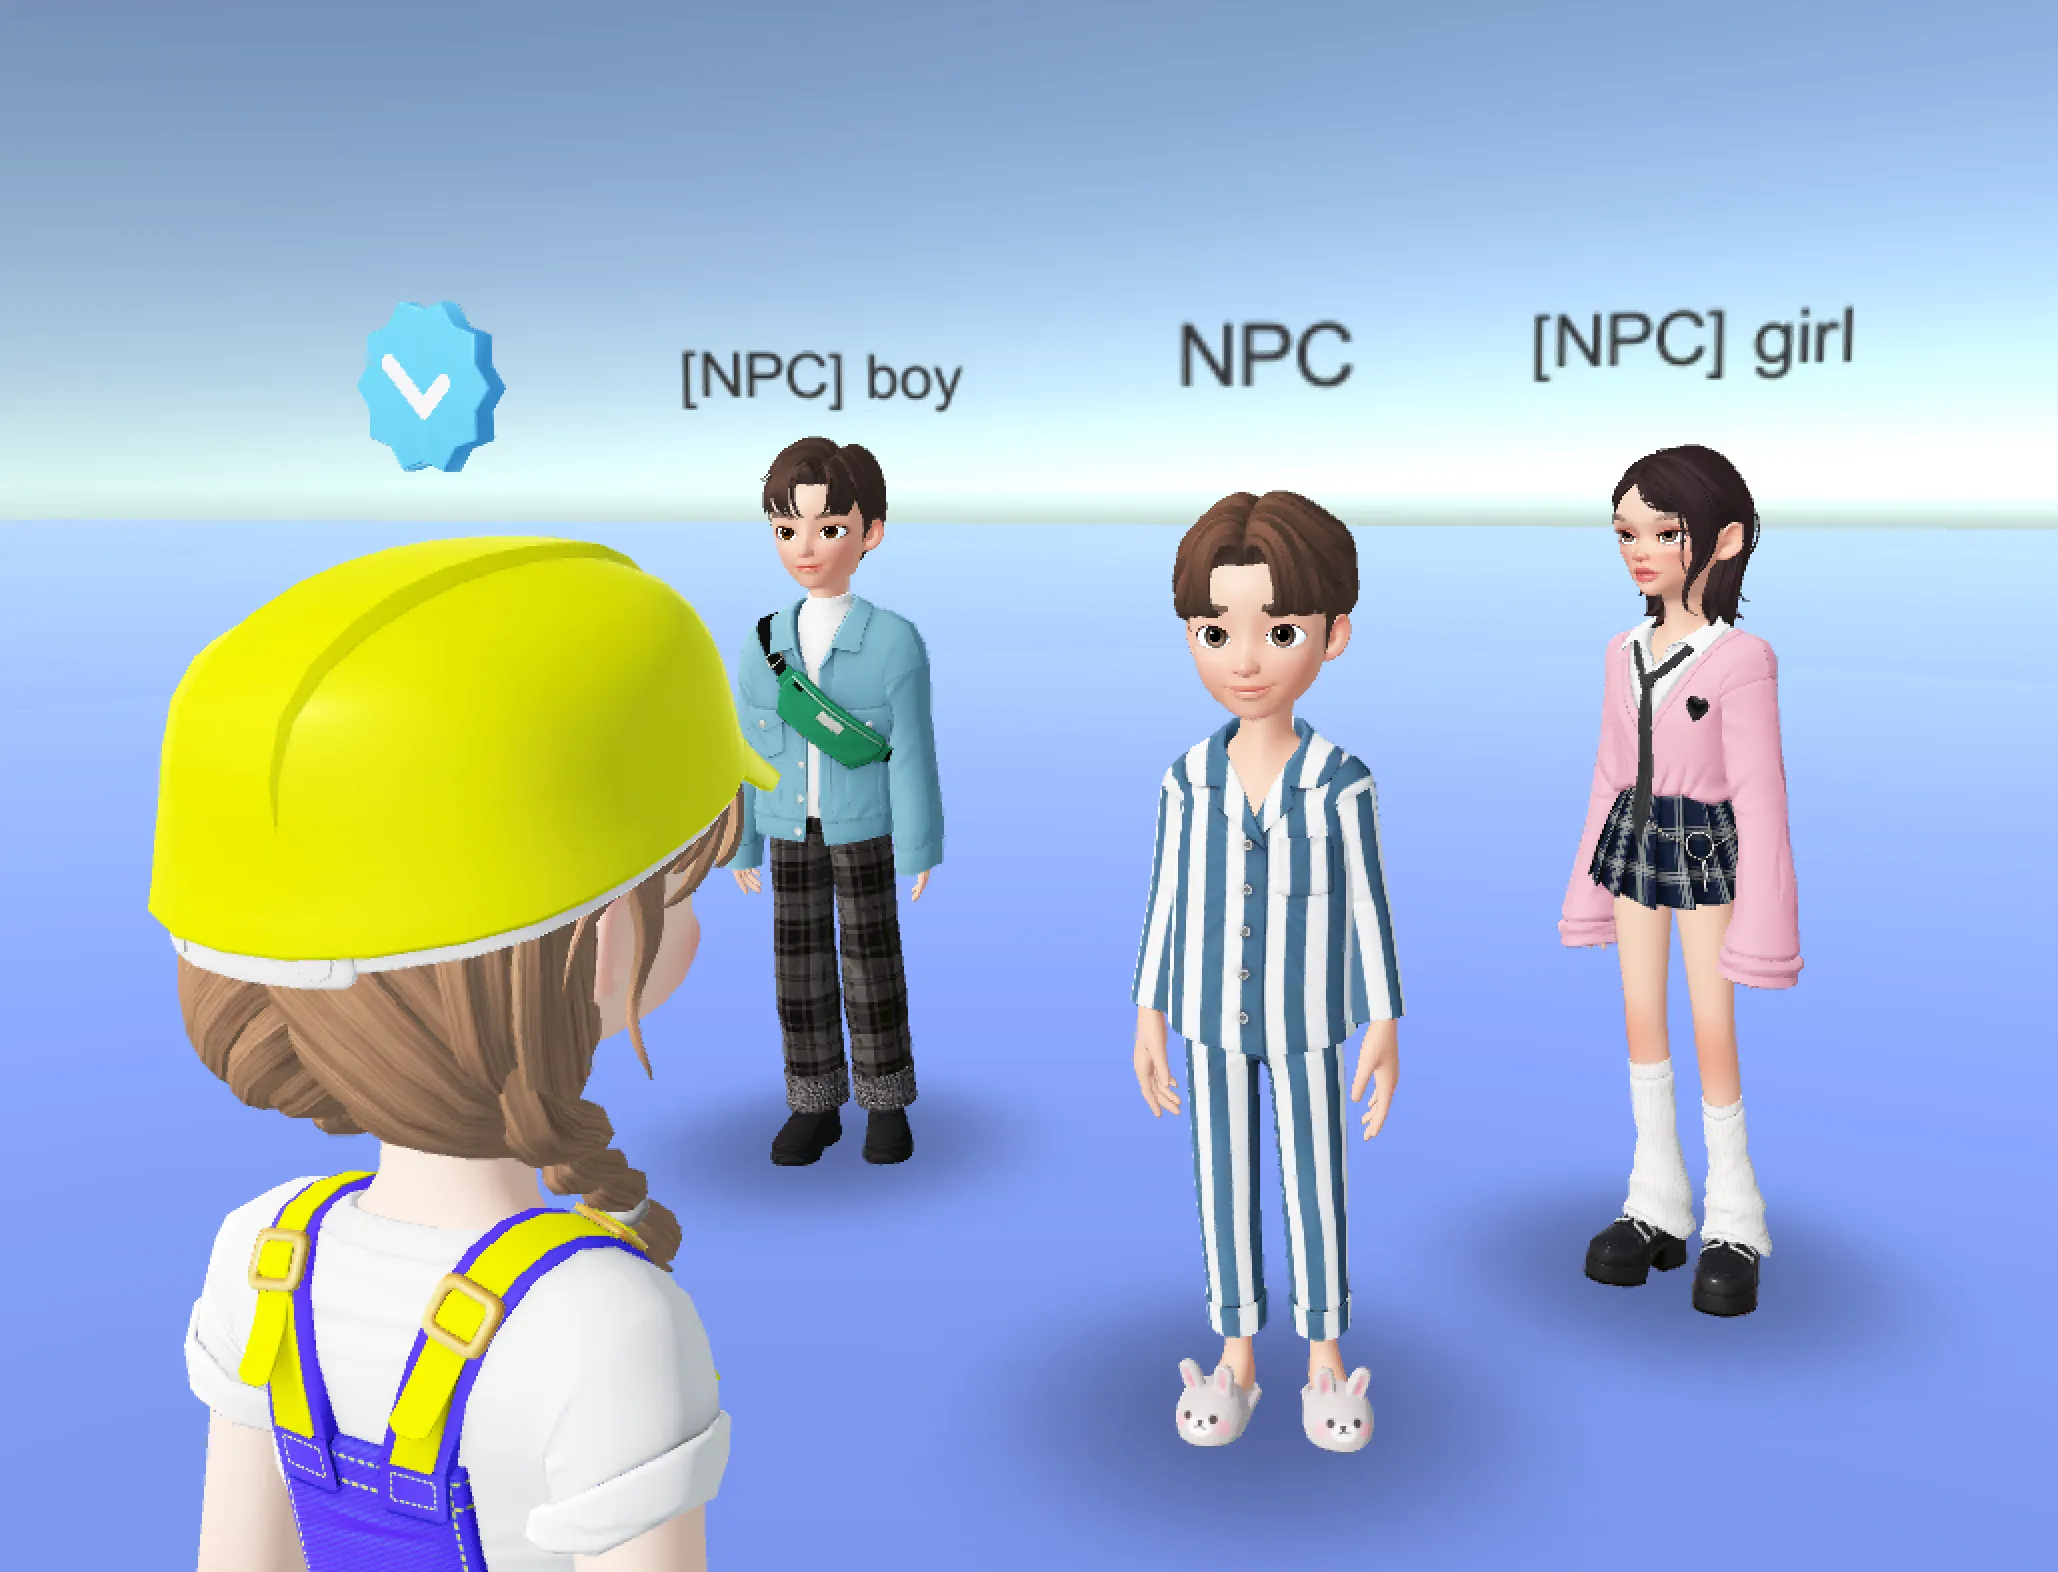
- เมื่อกดปุ่ม play เพื่อรัน NPC ที่มีป้ายชื่อจะถูกสร้างขึ้น
- สามารถสร้าง NPC ต่างๆ ได้อย่างง่ายๆ โดยการเพิ่มวัตถุในตำแหน่ง NPC ด้วยวิธีเดียวกัน และเพิ่มสคริปต์ NPC
ติดป้ายชื่อให้ NPC
สามารถแยกผู้เล่นและ NPC ได้โดยการติดป้ายชื่อให้ NPC
สร้าง Prefab ของ Canvas ป้ายชื่อ
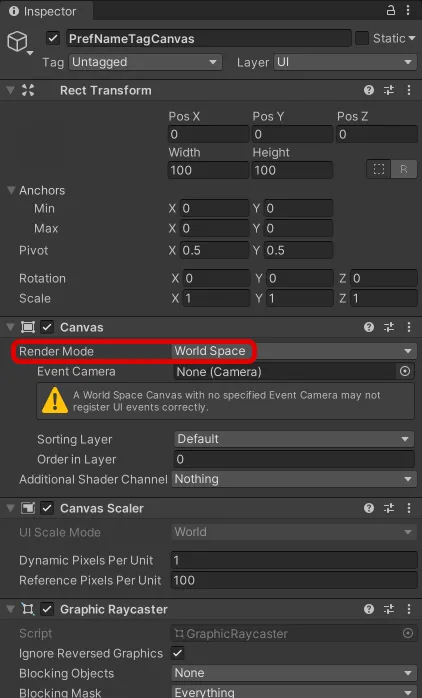
- เลือก Hierachy > UI > Canvas และสร้าง จากนั้นเปลี่ยนชื่อเป็น PrefNameTagCanvas
- ตั้งค่า Render Mode เป็น World Space
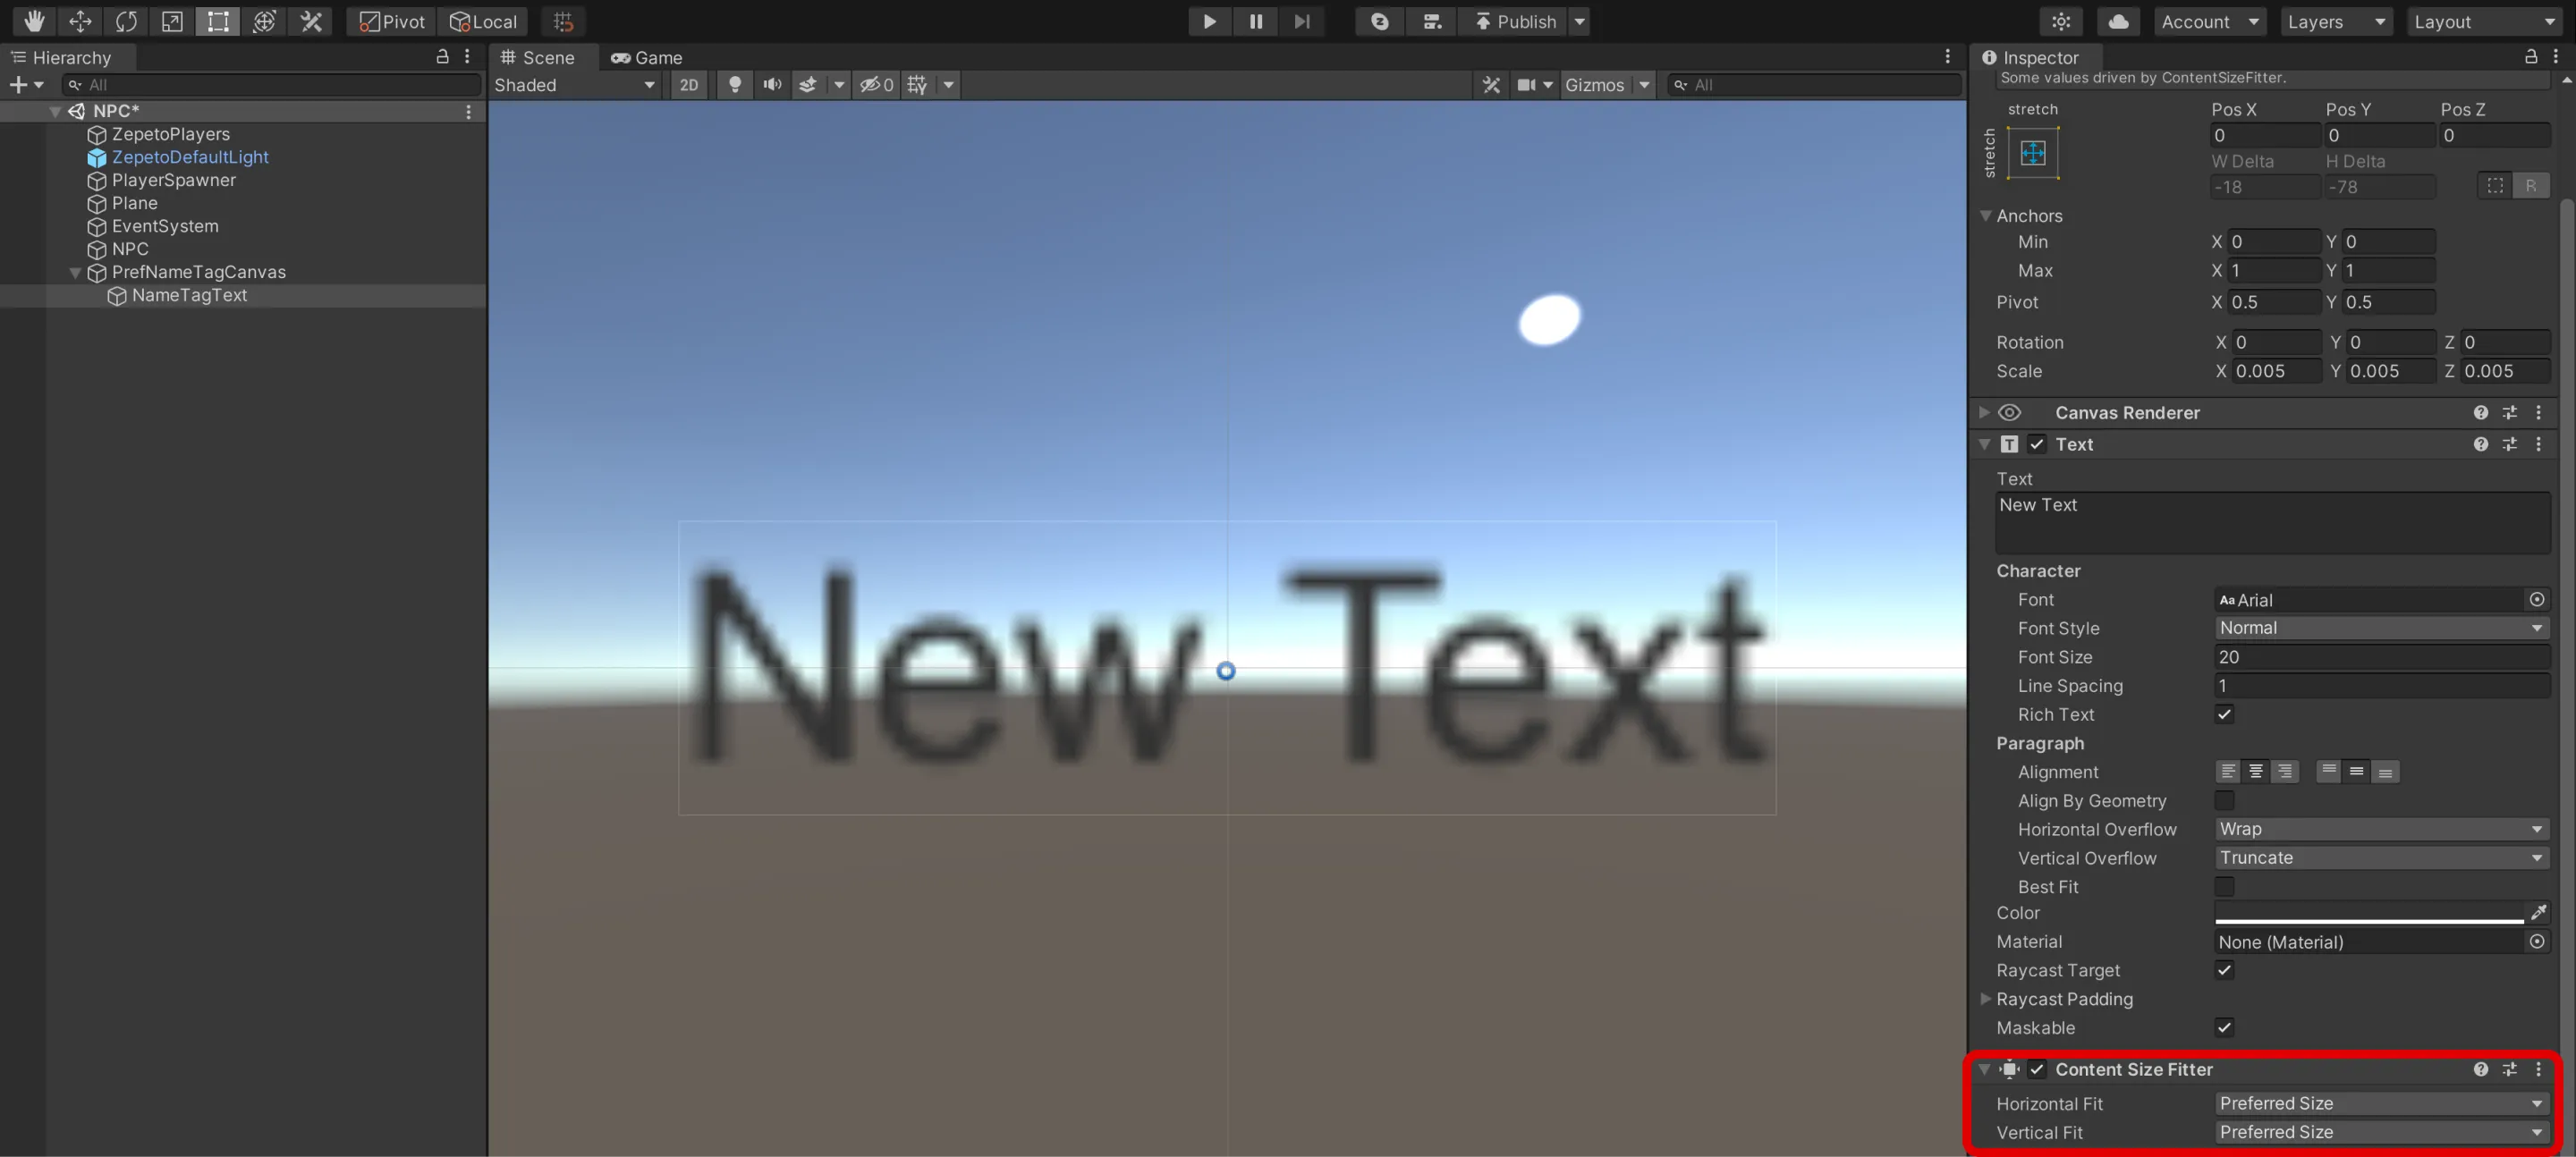
- เลือก Hierachy > UI > Text แล้วสร้างให้เป็น Child ของ PrefNameTagCanvas จากนั้นเปลี่ยนชื่อเป็น NameTagText
- ข้อความที่จะปรากฏเป็นชื่อ
- เพิ่ม Component "Content Size Fitter" เพื่อทำให้ข้อความมีขนาดเหมาะสม
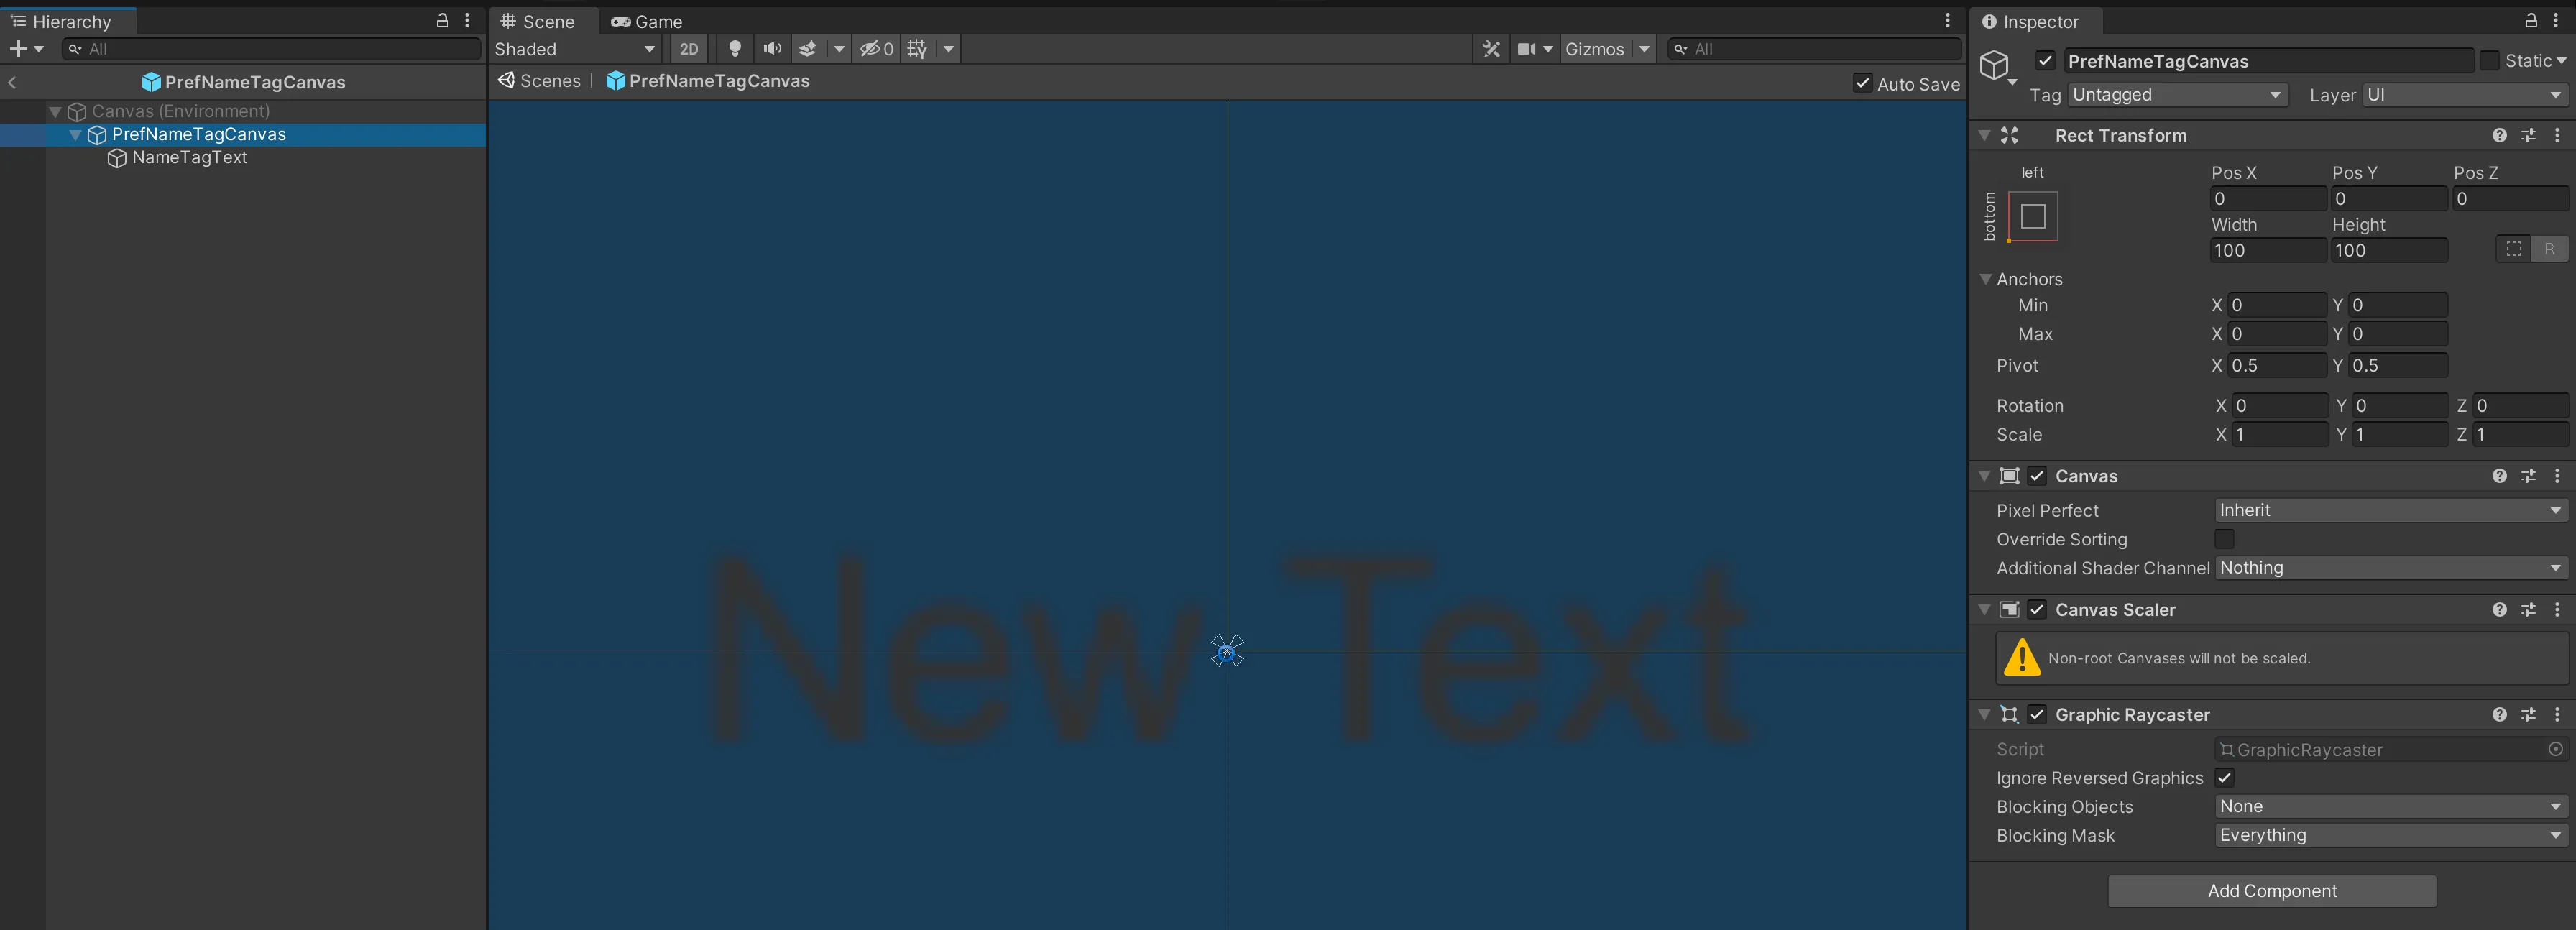
- เมื่อตั้งค่าเสร็จเรียบร้อยแล้ว ลากไปยังหน้าต่าง Project เพื่อสร้างเป็น Prefab จากนั้นลบ PrefNameTagCanvas ที่ยังเหลืออยู่ใน Hierachy
เขียนสคริปต์ป้ายชื่อ NPC
- เลือก Project > Create > ZEPETO > TypeScript และสร้าง จากนั้นเปลี่ยนชื่อเป็น NPCCreatorWithNameTag
- เขียนสคริปต์ตัวอย่างตามด้านล่างนี้
import { ZepetoScriptBehaviour } from 'ZEPETO.Script';
import { KnowSockets, SpawnInfo, ZepetoCharacter, ZepetoCharacterCreator } from 'ZEPETO.Character.Controller';
import { Canvas, Camera, Vector3, Object, GameObject } from 'UnityEngine';
import { Text } from 'UnityEngine.UI';

export default class NPCCreatorWithNameTag extends ZepetoScriptBehaviour {

    // ZEPETO ID of the NPC
    public zepetoId: string;
    // Name to be displayed in the name tag
    public nameTag: string;
    // Prefab of the name tag canvas game object
    public nameTagPrefab: GameObject;
    // Y-axis offset value of the name tag canvas game object
    public nameTagYOffset: number;

    // NPC character object
    private _npc: ZepetoCharacter;
    // Name tag canvas game object
    private _npcNameTagObject: GameObject;
    // Text inside the name tag canvas game object
    private _npcNameTagText: Text;
    // Name tag canvas
    private _canvas: Canvas;
    // World Camera
    private _cachedWorldCamera: Camera;

    Start() {
        // Create a new instance of SpawnInfo and set its position and rotation based on the object's transform
        const spawnInfo = new SpawnInfo();
        spawnInfo.position = this.transform.position;
        spawnInfo.rotation = this.transform.rotation;

        // Use ZepetoCharacterCreator to create a new character by ZEPETO ID and assign it to _npc variable
        ZepetoCharacterCreator.CreateByZepetoId(this.zepetoId, spawnInfo, (character: ZepetoCharacter) => {
            this._npc = character;

            // Set the name tag
            this.SetNameTag();
        })
    }

    // Set the name tag
    SetNameTag() {
        // Dynamically create the name tag canvas game object
        this._npcNameTagObject = Object.Instantiate(this.nameTagPrefab) as GameObject;

        // Set the parent of the name tag canvas game object transform to be the NPC transform.
        this._npcNameTagObject.transform.SetParent(this._npc.transform);

        // Set the position of the name tag canvas game object above the NPC's head
        this._npcNameTagObject.transform.position = Vector3.op_Addition(this._npc.GetSocket(KnowSockets.HEAD_UPPER).position, new Vector3(0, this.nameTagYOffset,0));

        // Set the text inside the name tag
        this._npcNameTagText = this._npcNameTagObject.GetComponentInChildren<Text>();
        this._npcNameTagText.text = this.nameTag;

        this._canvas = this._npcNameTagObject.GetComponent<Canvas>();
        this._cachedWorldCamera = Object.FindObjectOfType<Camera>();
        this._canvas.worldCamera = this._cachedWorldCamera;
    }

    private Update() {
        if (this._canvas != null) {
            this.UpdateCanvasRotation();
        }
    }

    // Update the rotation of the name tag canvas to face the camera
    private UpdateCanvasRotation() {
        this._canvas.transform.LookAt(this._cachedWorldCamera.transform);
        this._canvas.transform.Rotate(0, 180, 0);
    }

}
การทำงานของสคริปต์จะเป็นไปดังนี้
- Start()
- เรียกฟังก์ชันคัสตอม SetNameTag()
- SetNameTag()
- สร้างป้ายชื่อ NPC และปรับตำแหน่งป้ายชื่อที่สร้างให้อยู่บนหัว NPC
- ตั้งค่าข้อความในป้ายชื่อ
- Update()
- เรียกใช้ฟังก์ชันคัสตอม UpdateCanvasRotation() เพื่อหมุน Canvas ให้ตรงกับกล้อง
- หลังจากเขียนสคริปต์เสร็จแล้ว เพิ่มสคริปต์ลงในวัตถุ NPC
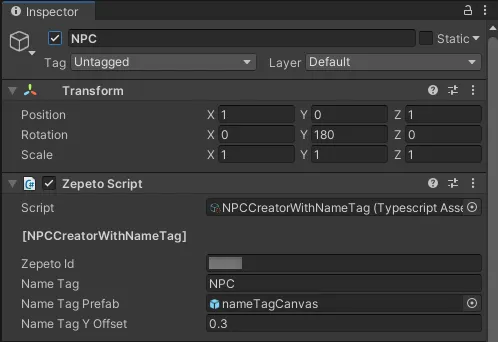
- กำหนด Zepeto Id, Name Tag, Name Tag Prefab และ Name Tag Y Offset ใน Inspector
- Name Tag : ชื่อที่จะแสดงในป้ายชื่อ NPC
- Name Tag Prefab : Prefab แคนวาสป้ายชื่อ
- Name Tag Y Offset : ตัวแปรบันทึกค่า Offset แกน y ของวัตถุแคนวาสป้ายชื่อ ซึ่งสามารถปรับระยะห่างระหว่างตัวละครและป้ายชื่อเมื่อให้ป้ายชื่อปรากฏบนหัวตัวละครได้
- เมื่อกดปุ่ม play เพื่อรัน NPC ที่มีป้ายชื่อจะถูกสร้างขึ้น
ควบคุมการเคลื่อนไหวของ NPC
สามารถควบคุมการเคลื่อนไหวของ NPC ได้
กระโดด

ใช้ ZEPETO Character API เพื่อทำให้ NPC กระโดด
สามารถใช้ ZEPETO Character API สร้างการเคลื่อนไหวให้หลากหลายมากขึ้นได้
📘 กรุณาอ้างอิงจากคู่มือต่อไปนี้ . [ZEPETO Character]
เขียนสคริปต์ NPC กระโดด
- เลือก Project > Create > ZEPETO > TypeScript แล้วสร้างสคริปต์ จากนั้นเปลี่ยนชื่อเป็น NPCJump
- เขียนสคริปต์ตัวอย่างตามด้านล่างนี้
import { ZepetoScriptBehaviour } from 'ZEPETO.Script';
import { SpawnInfo, ZepetoCharacter, ZepetoCharacterCreator } from 'ZEPETO.Character.Controller';
import { WaitForSeconds } from 'UnityEngine';

export default class NPCJump extends ZepetoScriptBehaviour {

    // ZEPETO ID of the NPC
    public zepetoId: string;
    // NPC character object
    private _npc: ZepetoCharacter;

    Start() {
        // Create a new instance of SpawnInfo and set its position and rotation based on the object's transform
        const spawnInfo = new SpawnInfo();
        spawnInfo.position = this.transform.position;
        spawnInfo.rotation = this.transform.rotation;

        // Use ZepetoCharacterCreator to create a new character by ZEPETO ID and assign it to _npc variable
        ZepetoCharacterCreator.CreateByZepetoId(this.zepetoId, spawnInfo, (character: ZepetoCharacter) => {
            this._npc = character;

            this.StartCoroutine(this.JumpCoroutine());
        });
    }

    *JumpCoroutine() {
        // Infinite loop to continuously
        while (true) {
            // Call the Jump() method of the ZepetoCharacter to make it jump
            this._npc.Jump();

            // Wait for 5 seconds
            yield new WaitForSeconds(5);
        }
    }
}
การทำงานของสคริปต์จะเป็นไปดังนี้
- Start()
- เรียกใช้ Coroutine "JumpCoroutine()"
- JumpCoroutine()
- เรียกใช้ Method "Jump()" เพื่อให้ NPC กระโดดทุก 5 วินาที
- หลังจากเขียนสคริปต์เสร็จเรียบร้อยแล้ว เพิ่มสคริปต์ลงในวัตถุ NPC
- กดปุ่ม play เพื่อให้ NPC กระโดด
ท่าทาง

ใช้ Animator Controller เพื่อทำให้ NPC ทำท่าทาง
สามารถใช้ Animator Controller สร้างท่าทางให้หลากหลายมากขึ้นได้
📘 Unity Animator Controller https://docs.unity3d.com/Manual/class-AnimatorController.html
เตรียมคลิปอนิเมชัน
- เตรียมคลิปอนิเมชันท่าทางที่จะให้ NPC ทำโดยอ้างอิงจากคู่มือต่อไปนี้
📘 Please refer to the following guide.
สร้างอนิเมเตอร์
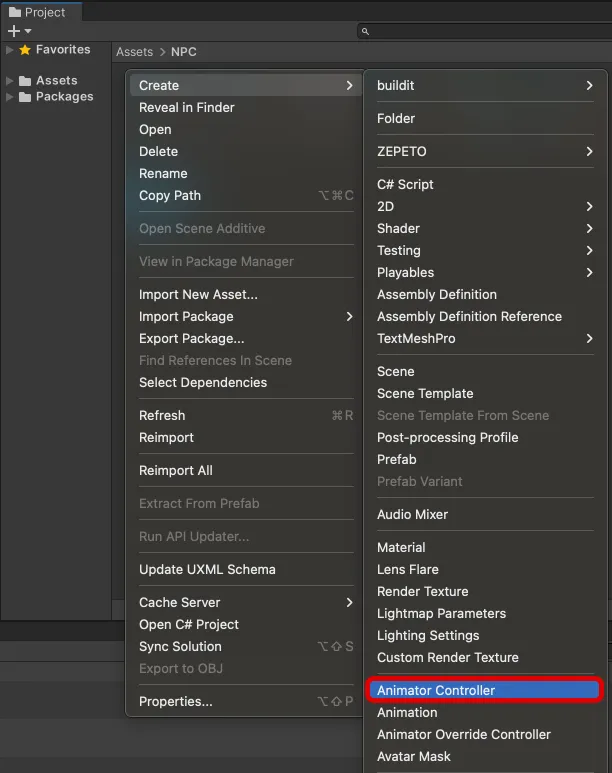
- เลือก Project > Create > Animator Controller แล้วสร้าง จากนั้นเปลี่ยนชื่อเป็น NPCAnimatorController
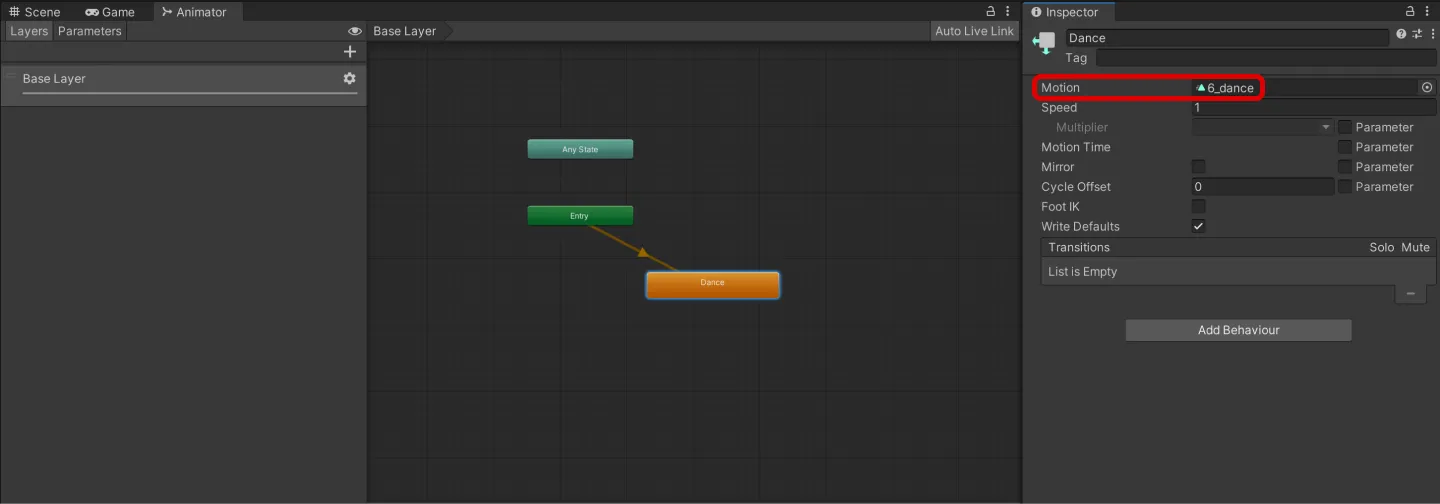
- เปิดแท็บ Animator จากนั้นเลือก Create State > Empty และสร้าง
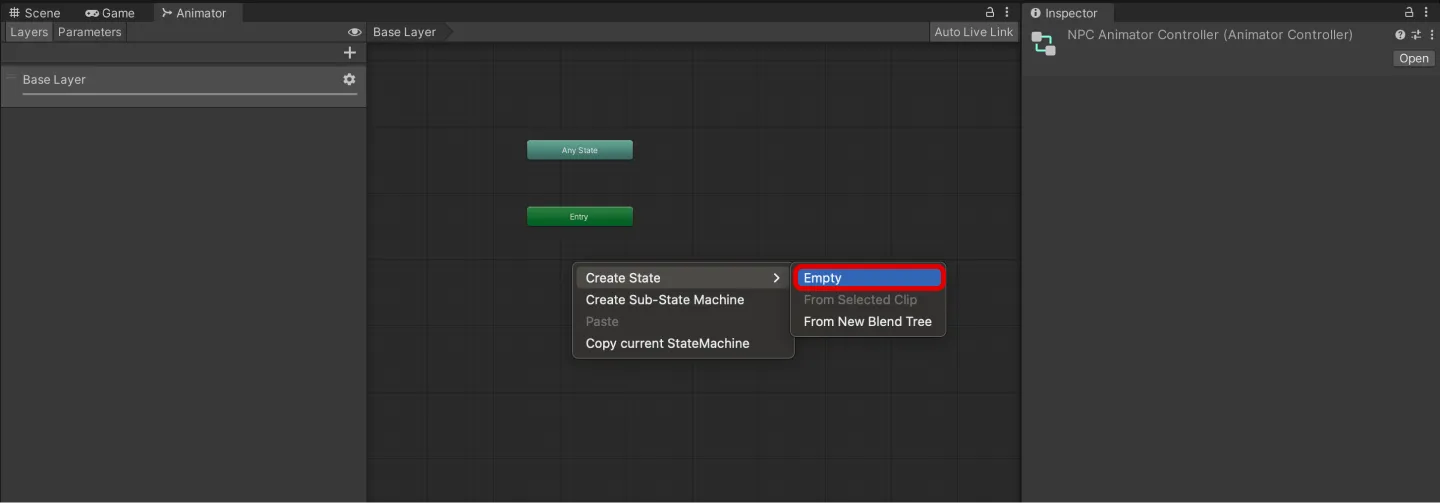
- เปลี่ยนชื่อให้เหมาะสมใน Inspector และกำหนดคลิปอนิเมชันใน Motion
เขียนสคริปต์ท่าทาง NPC
- เลือก Project > Create > ZEPETO > TypeScript แล้วสร้างสคริปต์ จากนั้นเปลี่ยนชื่อเป็น NPCGesture
- เขียนสคริปต์ตัวอย่างตามด้านล่างนี้
import { ZepetoScriptBehaviour } from 'ZEPETO.Script';
import { SpawnInfo, ZepetoCharacter, ZepetoCharacterCreator } from 'ZEPETO.Character.Controller';
import { Animator, RuntimeAnimatorController } from 'UnityEngine';

export default class NPCGesture extends ZepetoScriptBehaviour {

    // The ZEPETO ID of the NPC
    public zepetoId: string;
    // The Animator Controller of the NPC
    public npcAnimator: RuntimeAnimatorController;

    // NPC character object
    private _npc: ZepetoCharacter;

    Start() {

        // Create a new instance of SpawnInfo and set its position and rotation based on the object's transform
        const spawnInfo = new SpawnInfo();
        spawnInfo.position = this.transform.position;
        spawnInfo.rotation = this.transform.rotation;

        // Use ZepetoCharacterCreator to create a new character by ZEPETO ID and assign it to _npc variable
        ZepetoCharacterCreator.CreateByZepetoId(this.zepetoId, spawnInfo, (character: ZepetoCharacter) => {
            this._npc = character;

            // Get the Animator component from the NPC character and set its runtimeAnimatorController to npcAnimator
            this._npc.GetComponentInChildren<Animator>().runtimeAnimatorController = this.npcAnimator;
        });
    }
}
การทำงานของสคริปต์จะเป็นไปดังนี้
- Start()
- นำเข้า Animator Component ของวัตถุ NPC แล้วตั้งค่าให้เป็น Animator Controller ที่กำหนดด้วยตัวแปร npcAnimator
- หลังจากเขียนสคริปต์เสร็จแล้ว เพิ่มสคริปต์ลงในวัตถุตำแหน่งที่จะสร้าง NPC
- กำหนด Zepeto Id, Npc Animator ใน Inspector
- Npc Animator : Animation Controller ของ NPC
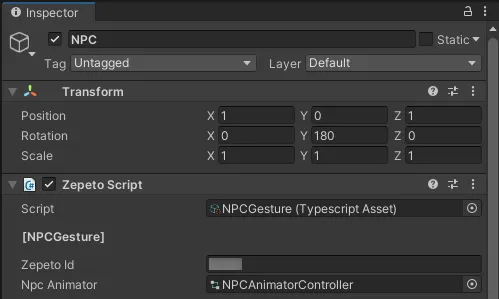
- เมื่อกดปุ่ม play เพื่อรัน จะสามารถตรวจสอบผลลัพธ์ในการทำท่าทางของ NPC ได้
- สามารถนำไปปรับใช้ในการทำให้ NPC มีการเคลื่อนไหวที่หลากหลายมากขึ้นนอกเหนือจากการกระโดดและการทำท่าทางได้
สร้างกรอบคำพูดด้านบน NPC
สามารถสร้างกรอบคำพูดได้โดยการสร้าง Canvas บนหัว NPC และแสดงรูปภาพหรือข้อความ
สร้าง Prefab แคนวาสกรอบคำพูด
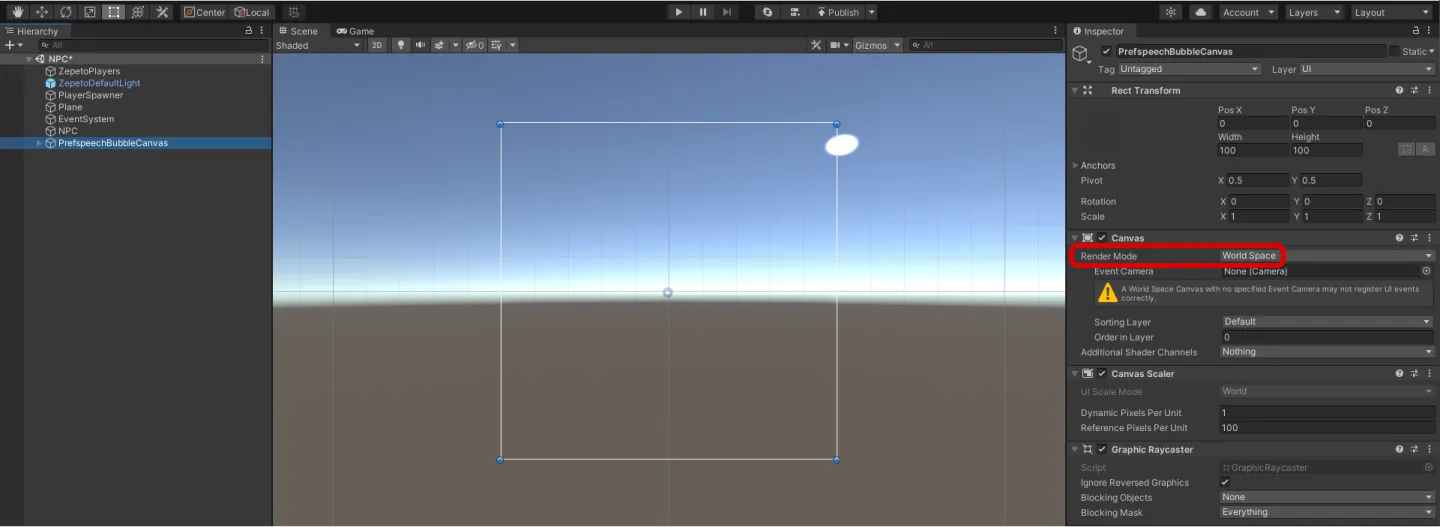
- เลือก Hierachy > UI > Canvas เพื่อสร้าง จากนั้นเปลี่ยนชื่อเป็น PrefSpeechBubbleCanvas
- ตั้งค่า Render Mode เป็น World Space
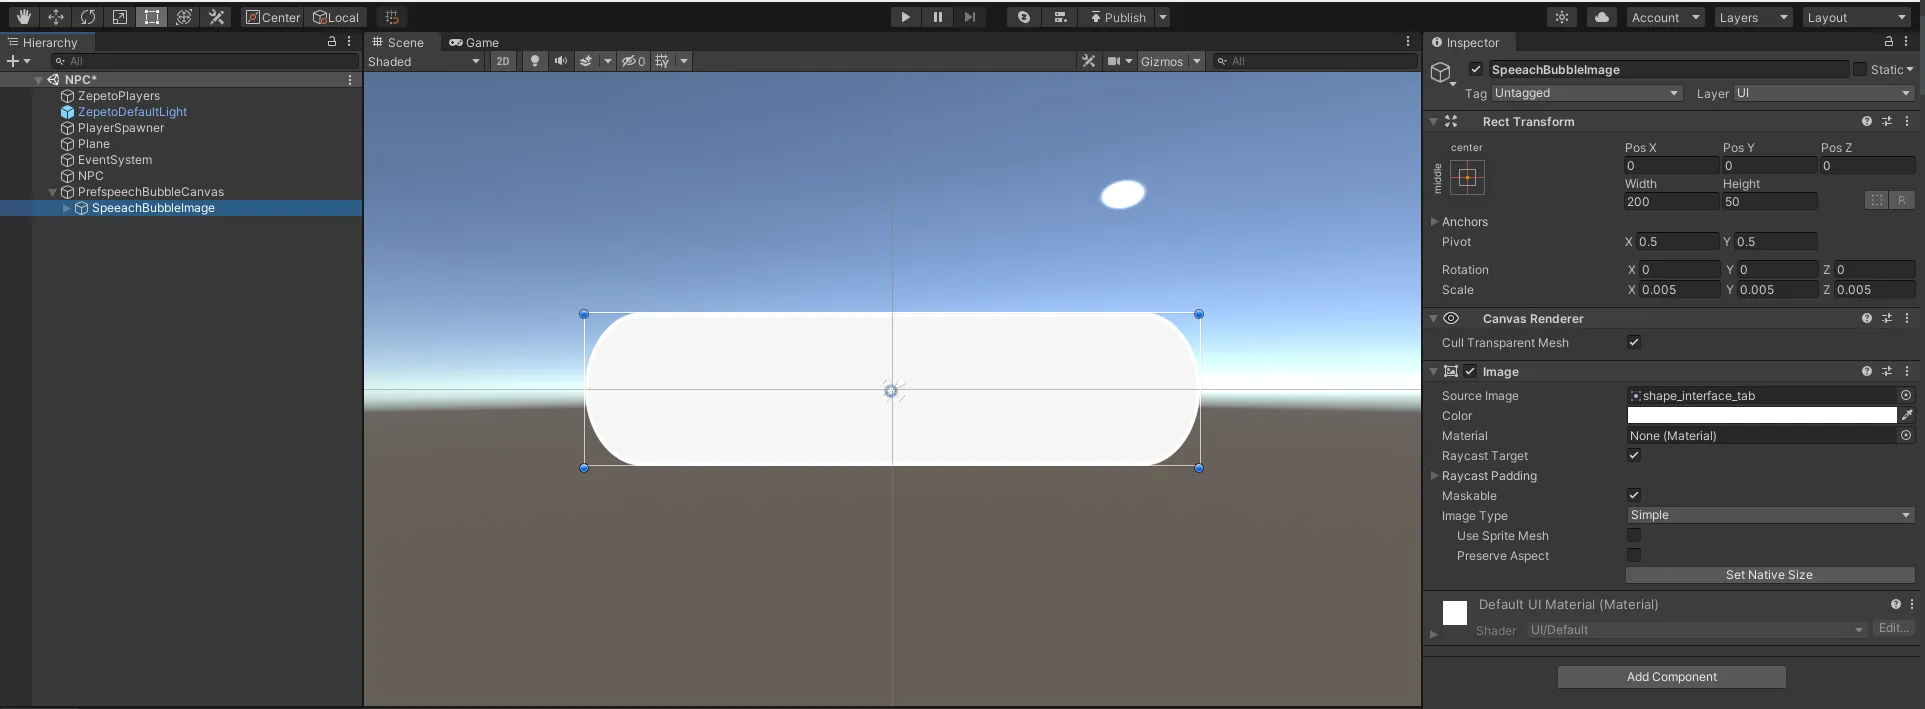
- เลือก Hierachy > UI > Image และสร้างให้เป็น Child ของ PrefSpeechBubbleCanvas จากนั้นเปลี่ยนชื่อเป็น SpeeachBubbleImage
- รูปภาพที่จะใช้เป็นพื้นหลังของกรอบคำพูด
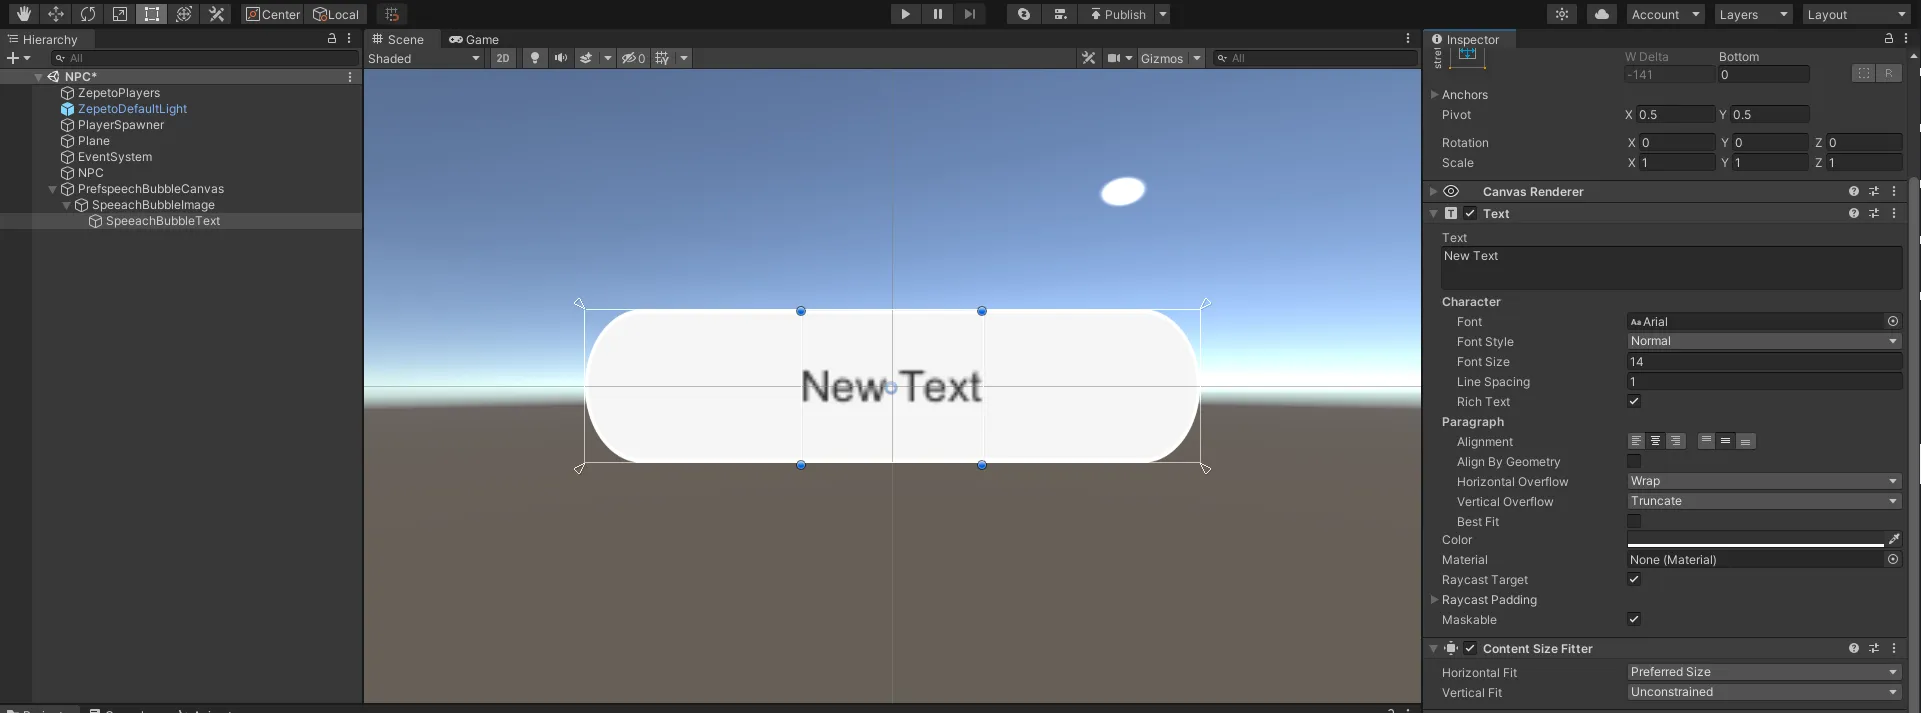
- เลือก Hierachy > UI > Text และสร้างให้เป็น Child ของ SpeeachBubbleImage จากนั้นเปลี่ยนชื่อเป็น SpeeachBubbleText
- ข้อความในกรอบคำพูด
- เพิ่ม Component "Content Size Fitter" เพื่อทำให้ข้อความมีขนาดเหมาะสม
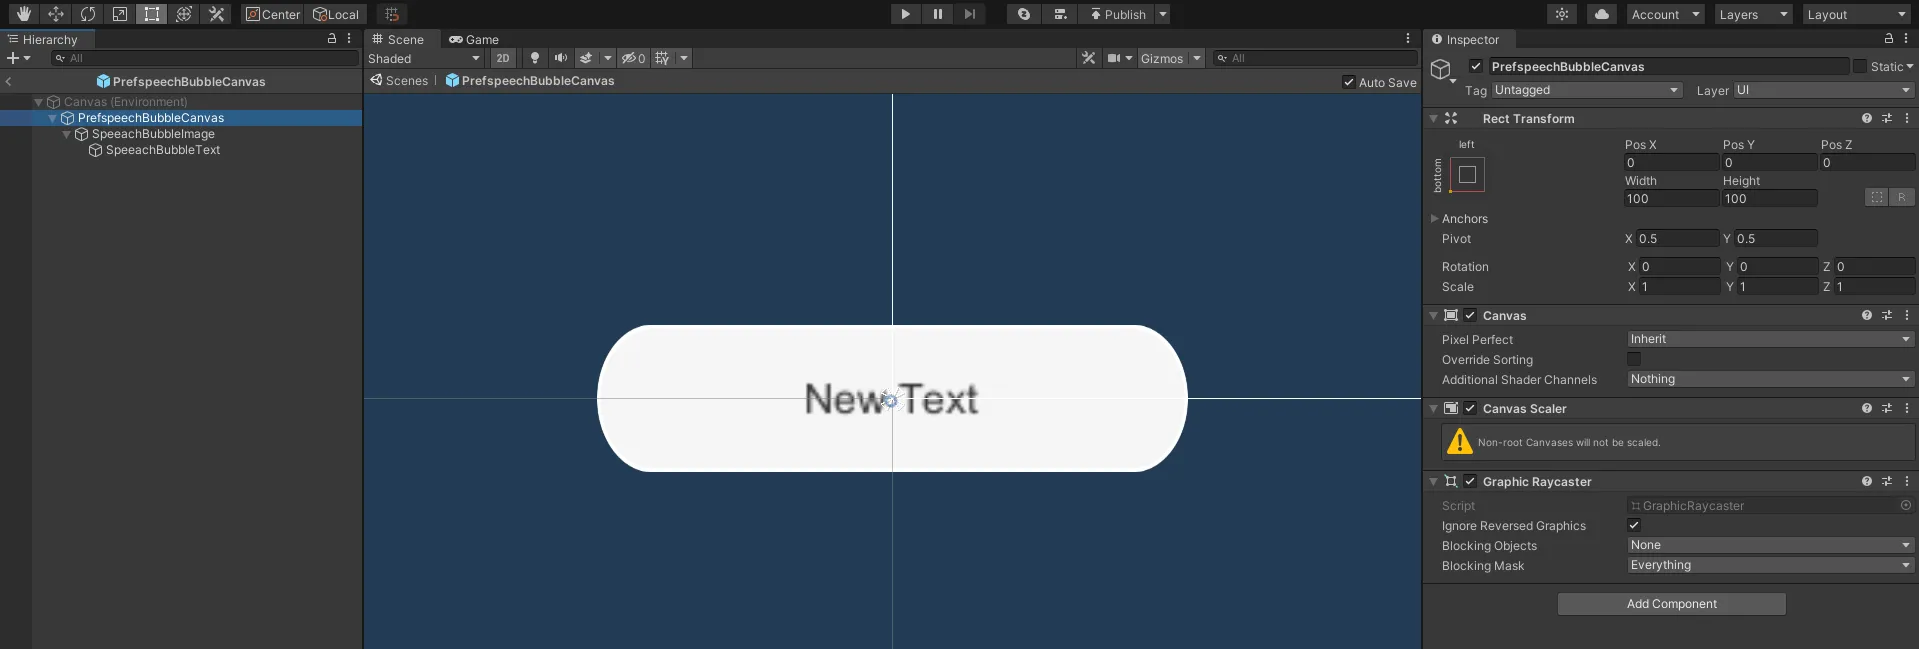
- เมื่อตั้งค่าเสร็จแล้ว ลากไปยังหน้าต่าง Project เพื่อสร้างเป็น Prefab จากนั้นลบ PrefSpeechBubbleCanvas ที่ยังเหลืออยู่ใน Hierachy
เขียนสคริปต์กรอบคำพูด NPC
- เลือก Project > Create > ZEPETO > TypeScript และสร้างสคริปต์ จากนั้นเปลี่ยนชื่อเป็น NPCSpeechBubble
- เขียนสคริปต์ตัวอย่างตามด้านล่างนี้
import { ZepetoScriptBehaviour } from 'ZEPETO.Script';
import { KnowSockets, SpawnInfo, ZepetoCharacter, ZepetoCharacterCreator } from 'ZEPETO.Character.Controller';
import { Canvas, Camera, Vector3, Object, GameObject } from 'UnityEngine';
import { Text } from 'UnityEngine.UI';

export default class NPCSpeechBubble extends ZepetoScriptBehaviour {

    // ZEPETO ID of the NPC
    public zepetoId: string;
    // Dialogue content to be displayed in the speech bubble
    public speechBubbleText: string;
    // Prefab of the speech bubble canvas game object
    public speechBubblePrefab: GameObject;
    // Y-axis offset value of the speech bubble canvas game object
    public speechBubbleYOffset: number;

    // NPC character object
    private _npc: ZepetoCharacter;
    // Speech bubble canvas game object
    private _speechBubbleObject: GameObject;
    // Text inside the speech bubble canvas game object
    private _speechBubbleText: Text;
    // Speech bubble canvas
    private _canvas: Canvas;
    // World Camera
    private _cachedWorldCamera: Camera;

    Start() {
        // Create a new instance of SpawnInfo and set its position and rotation based on the object's transform
        const spawnInfo = new SpawnInfo();
        spawnInfo.position = this.transform.position;
        spawnInfo.rotation = this.transform.rotation;

        // Use ZepetoCharacterCreator to create a new character by ZEPETO ID and assign it to _npc variable
        ZepetoCharacterCreator.CreateByZepetoId(this.zepetoId, spawnInfo, (character: ZepetoCharacter) => {
            this._npc = character;

            // Set the speech bubble
            this.SetBubble();
        })
    }

    // Set the speech bubble
    SetBubble() {
        // Dynamically create the speech bubble canvas game object
        this._speechBubbleObject = Object.Instantiate(this.speechBubblePrefab) as GameObject;

        // Set the parent of the  speech bubble canvas game object transform to be the NPC transform.
        this._speechBubbleObject.transform.SetParent(this._npc.transform);

        // Set the position of the speech bubble canvas game object above the NPC's head
        this._speechBubbleObject.transform.position = Vector3.op_Addition(this._npc.GetSocket(KnowSockets.HEAD_UPPER).position, new Vector3(0, this.speechBubbleYOffset,0));

        // Set the text inside the speech bubble
        this._speechBubbleText = this._speechBubbleObject.GetComponentInChildren<Text>();
        this.SetBubbleText(this.speechBubbleText);

        this._canvas = this._speechBubbleObject.GetComponent<Canvas>();
        this._cachedWorldCamera = Object.FindObjectOfType<Camera>();
        this._canvas.worldCamera = this._cachedWorldCamera;
    }

    // Open the speech bubble canvas and set the text
    SetBubbleText(bubbleText: string) {
        this._speechBubbleObject.SetActive(true);
        this._speechBubbleText.text = bubbleText;
    }

    private Update() {
        if (this._canvas != null) {
            this.UpdateCanvasRotation();
        }
    }

    // Update the rotation of the speech bubble canvas to face the camera
    private UpdateCanvasRotation() {
        this._canvas.transform.LookAt(this._cachedWorldCamera.transform);
        this._canvas.transform.Rotate(0, 180, 0);
    }

}
การทำงานของสคริปต์จะเป็นไปดังนี้
- Start()
- เรียกใช้ฟังก์ชันคัสตอม SetBubble()
- SetBubble()
- สร้างแคนวาสกรอบคำพูด (speechBubblePrefab) และปรับให้ตำแหน่งของกรอบคำพูดที่สร้างไปอยู่บนหัวของ NPC
- เรียกใช้ฟังก์ชันคัสตอม SetBubbleText() เพื่อตั้งค่าข้อความในกรอบคำพูด
- SetBubbleText()
- เปิดใช้งานแคนวาสกรอบคำพูดของ (_speechBubbleObject)
- แสดง string ที่ให้มาเป็นพารามิเตอร์ (bubbleText) ในกรอบคำพูด
- Update()
- เรียกใช้ฟังก์ชันคัสตอม UpdateCanvasRotation() เพื่อหมุน Canvas ให้ตรงกับกล้อง
- หลังจากเขียนสคริปต์เสร็จแล้ว เพิ่มสคริปต์ลงในวัตถุตำแหน่งที่จะสร้าง NPC
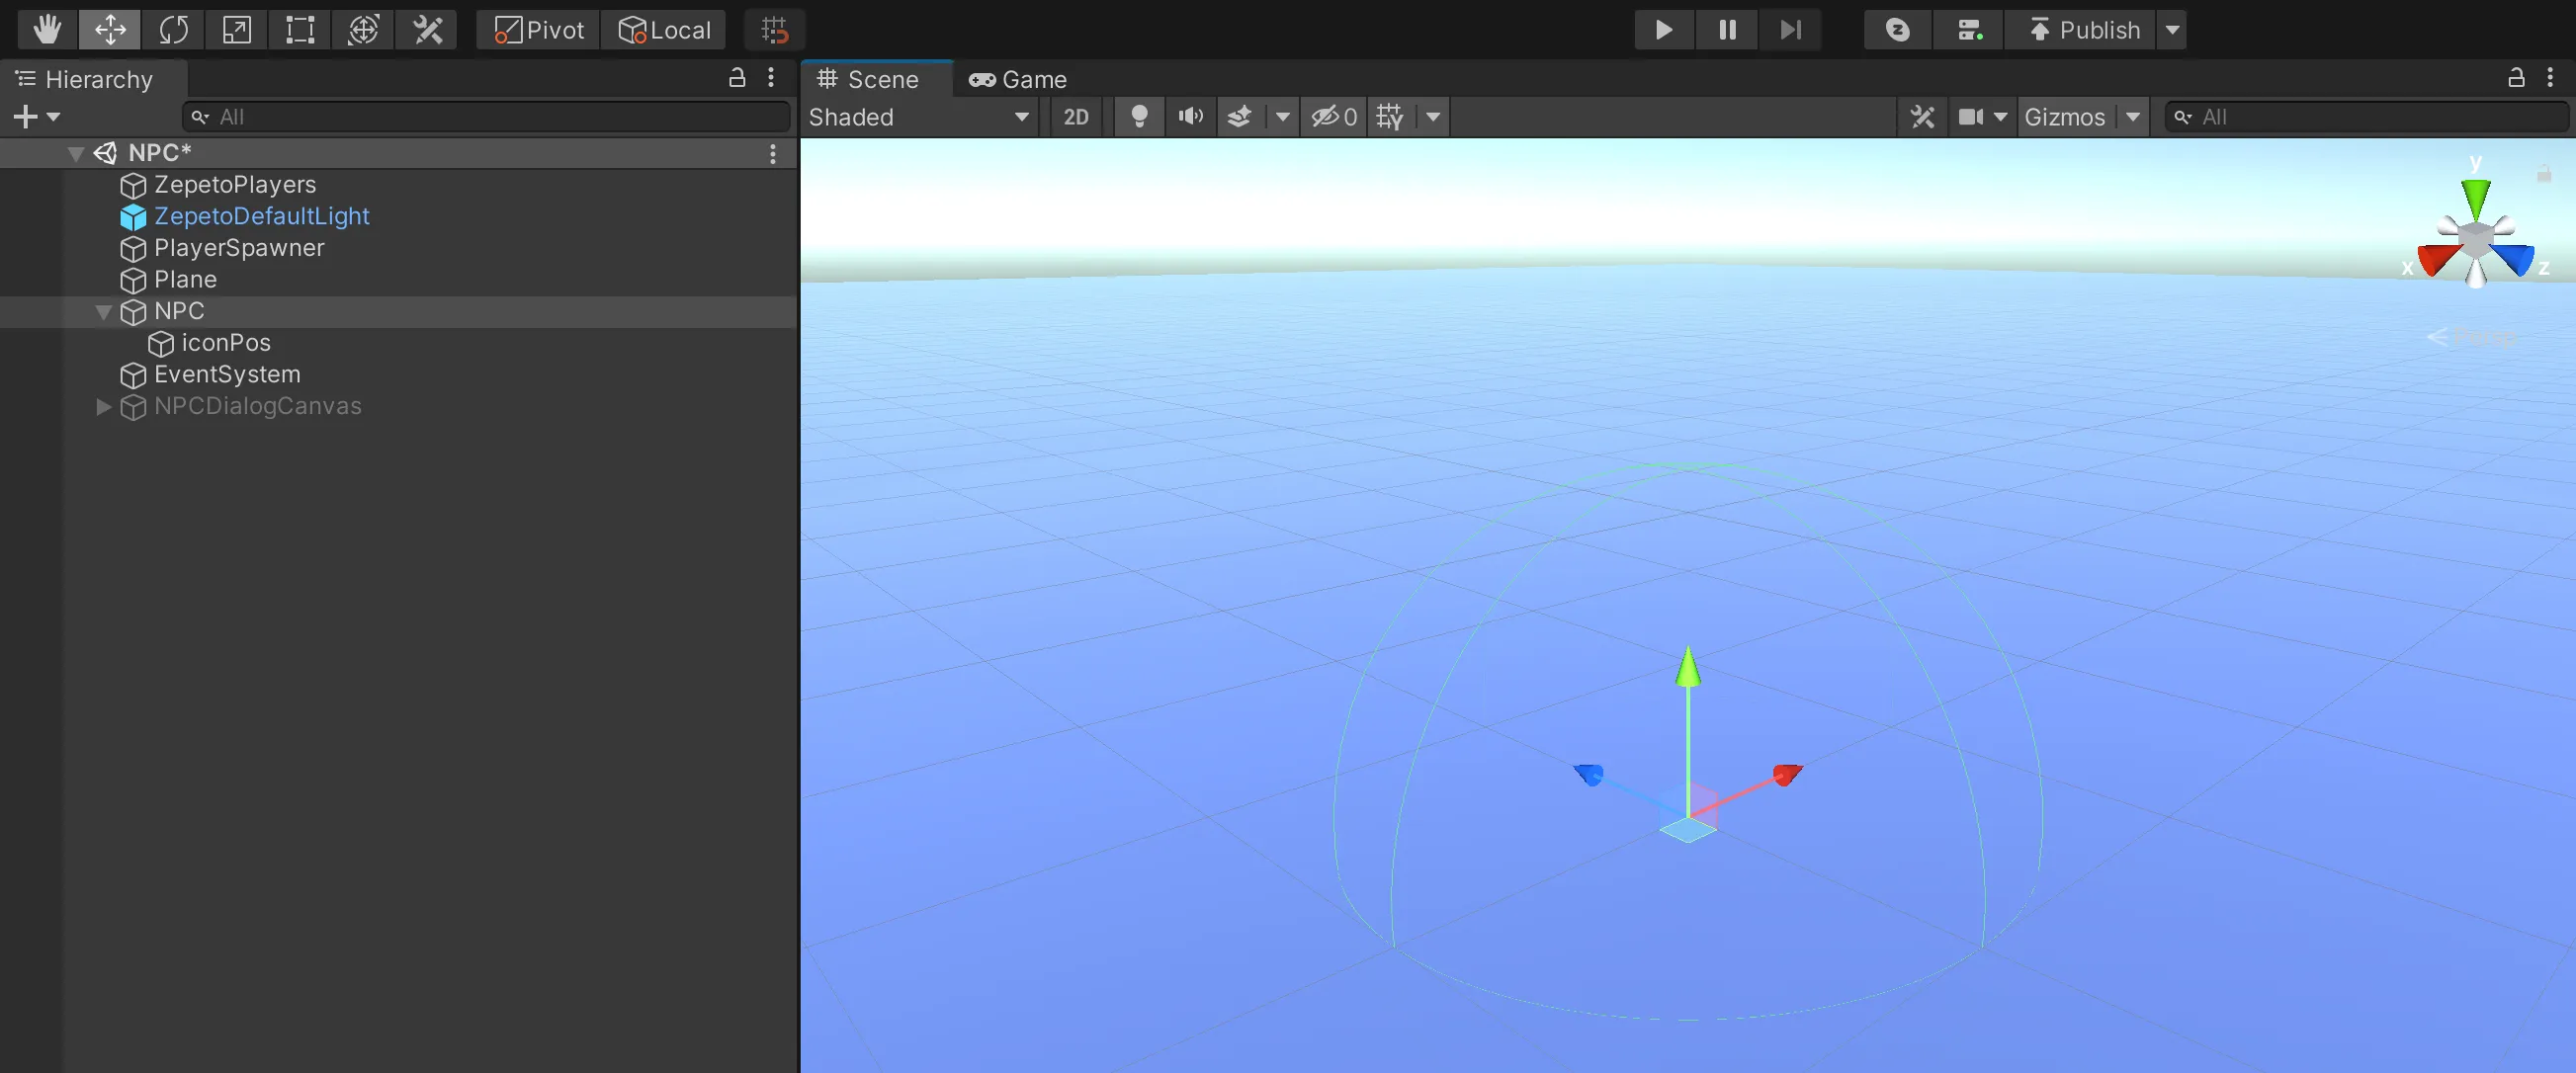
- กำหนด Zepeto Id, Speech Bubble Text, Speech Bubble Prefab และ Speech Bubble Y Offset ใน Inspector
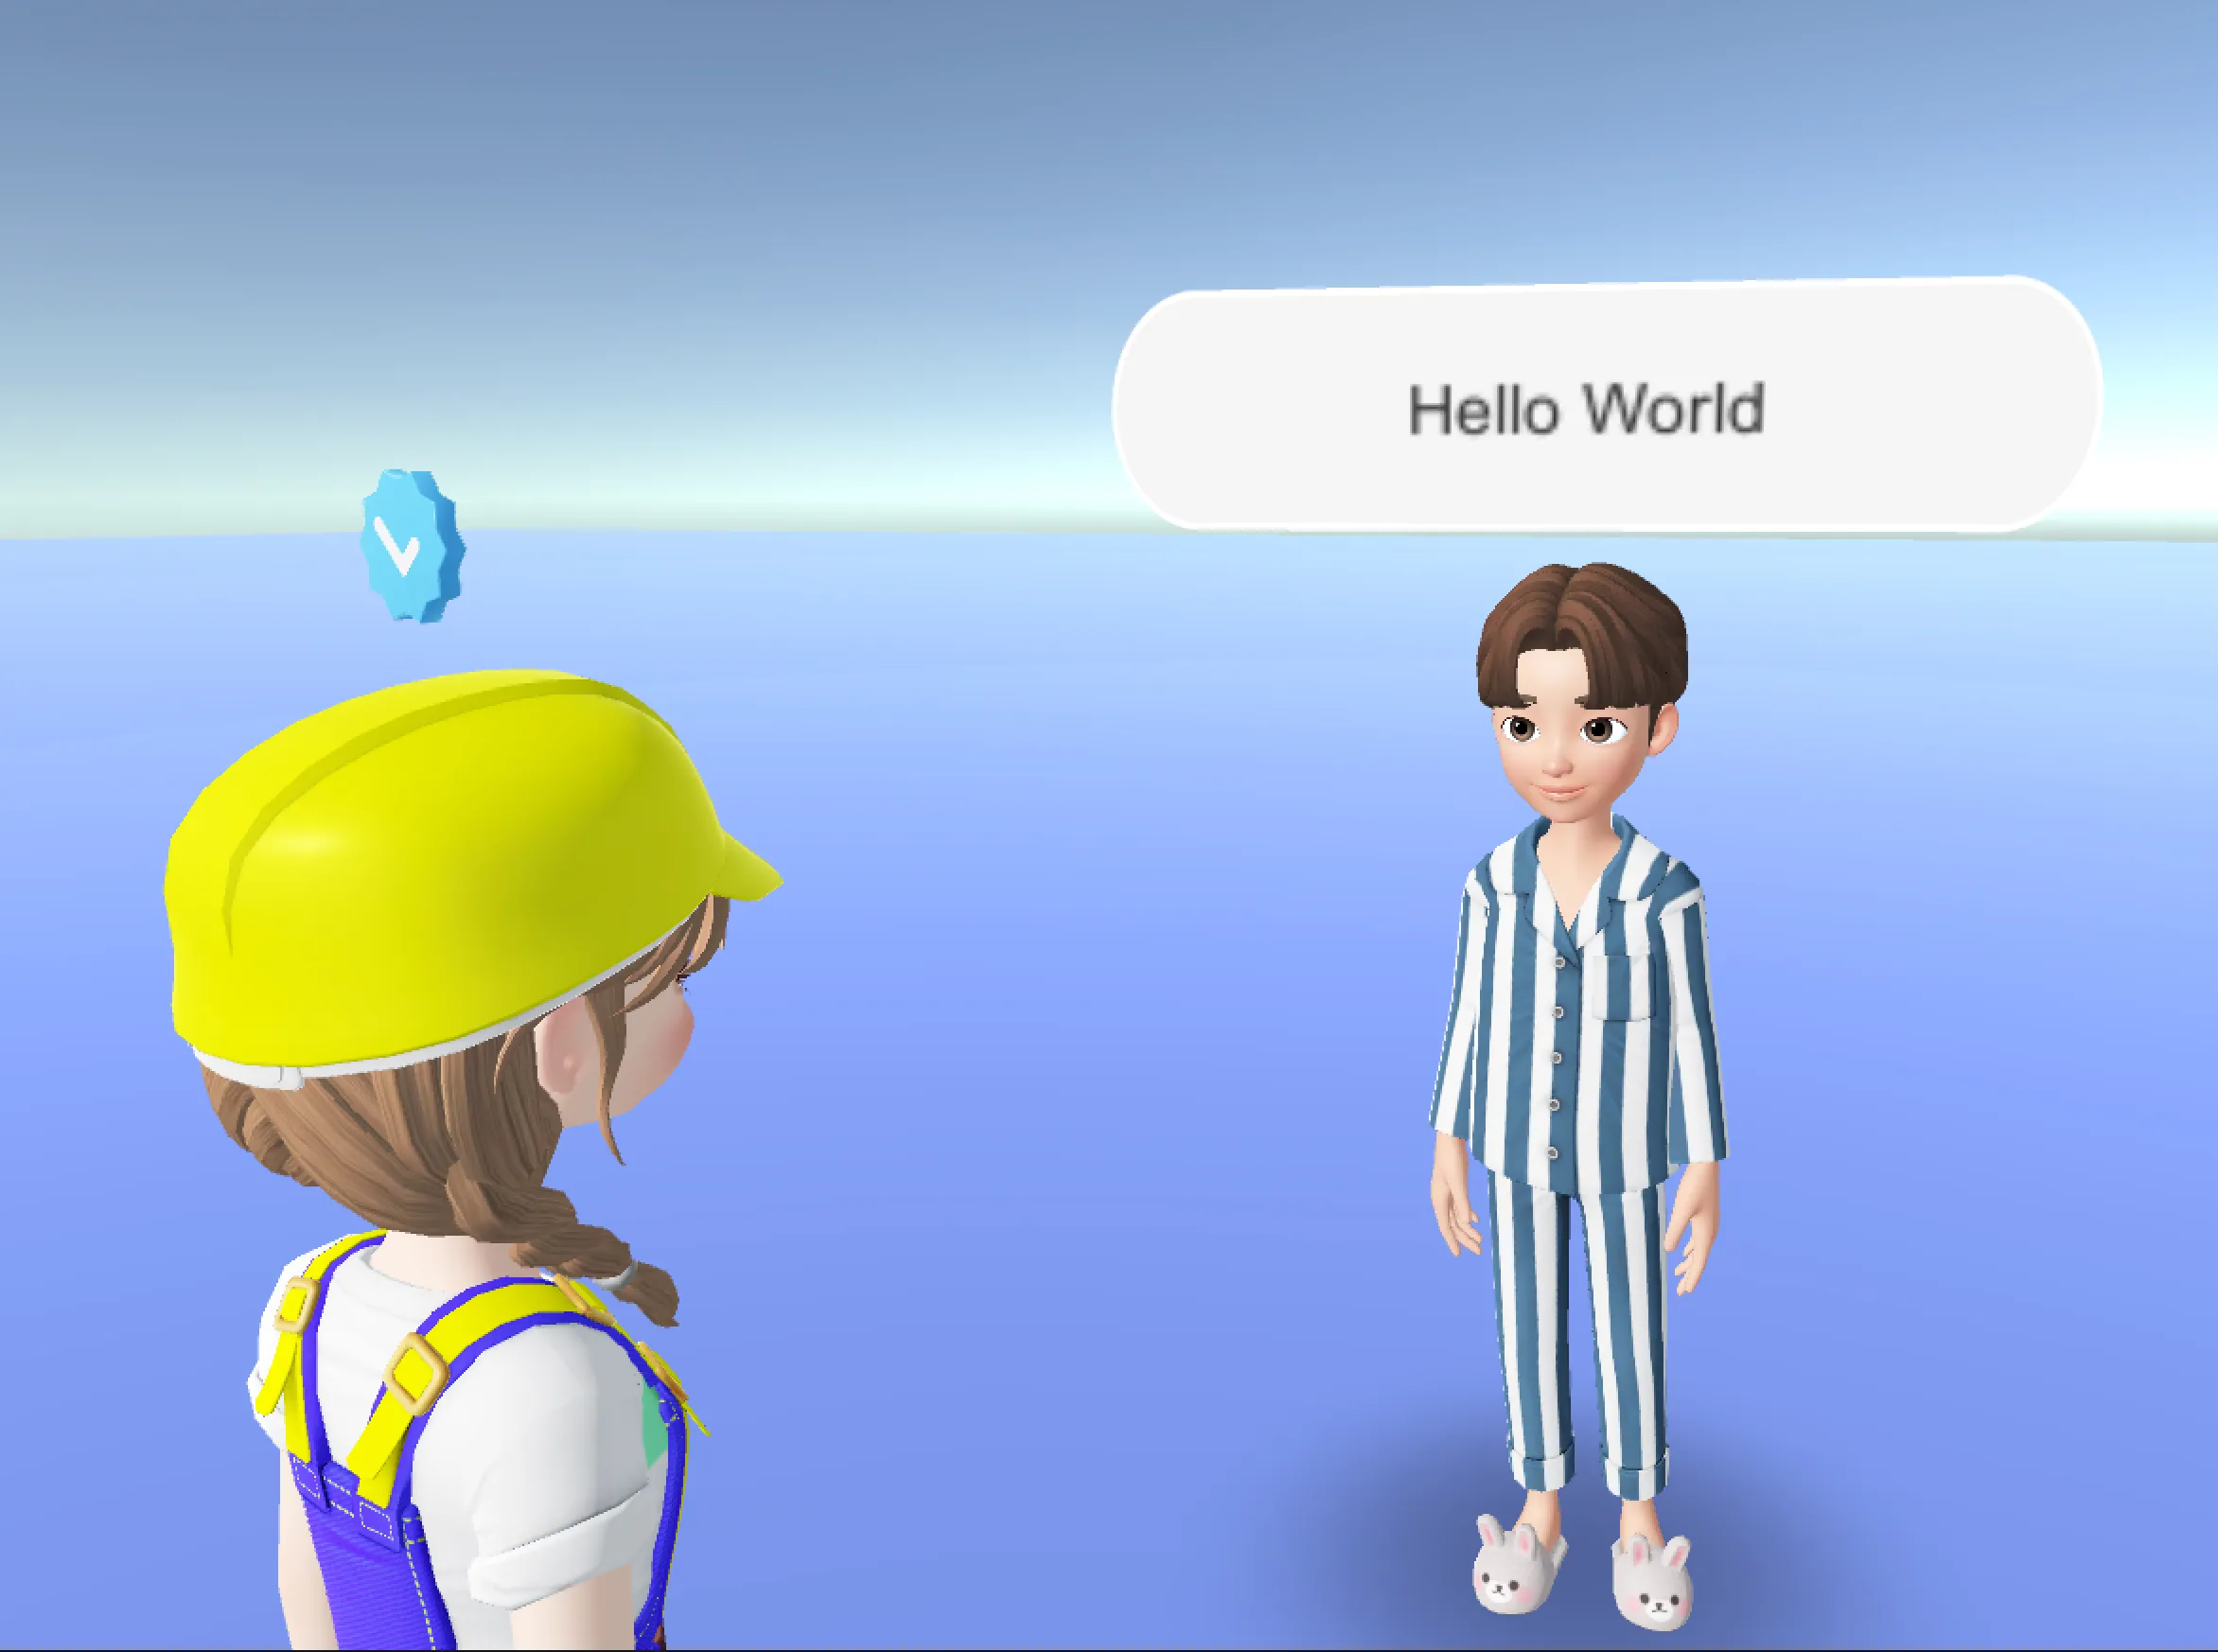
- Speech Bubble Text : ตัวแปรที่บันทึกบทสนทนาของตัวละคร NPC ที่จะให้ปรากฏในกรอบคำพูด โดยจะบันทึกบทสนทนาเหมือนกับ "Hello World" ในตัวอย่าง
- Speech Bubble Prefab : ตัวแปรที่บันทึก Prefab ของ GameObject แคนวาสกรอบคำพูด
- Speech Bubble Y Offset : ตัวแปรที่บันทึกค่า offset แกน y ของ GameObject แคนวาสกรอบคำพูด ซึ่งสามารถปรับระยะห่างระหว่างตัวละครและกรอบคำพูดเมื่อมีกรอบคำพูดปรากฏบนหัวของตัวละครได้
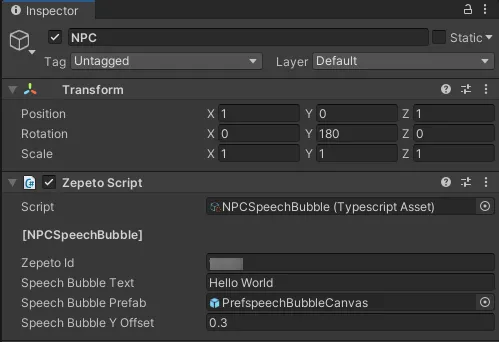
- เมื่อกดปุ่ม play เพื่อรัน จะเห็นกรอบคำพูดปรากฏบนหัวของ NPC
Interaction กับ NPC
สามารถสร้างคอนเทนต์น่าสนใจได้มากมายโดย Interaction กับ NPC
ในคู่มือนี้ จะใช้ตัวอย่างสร้างกรอบคำพูดที่จะเปลี่ยนไปเมื่อเข้าใกล้ NPC

ตั้งค่า Colider
- เพิ่ม Colider Component ลงในวัตถุเพื่อ Interaction กับ NPC จากนั้นกดเช็ก isTrigger
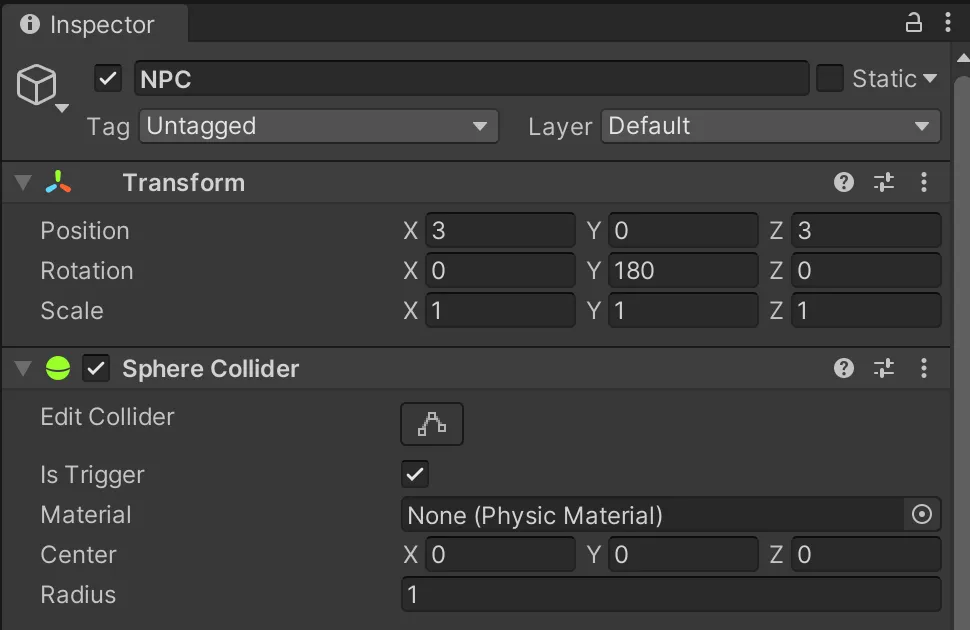
- ปรับขนาด Colider ให้มีขอบเขตเท่าที่ต้องการให้ผู้เล่นสามารถมี Interaction กับ NPC ได้
เขียนสคริปต์ Interaction กับ NPC
- เลือก Project > Create > ZEPETO > TypeScript และสร้างสคริปต์ จากนั้นเปลี่ยนชื่อเป็น NPCInteraction
- เขียนสคริปต์ตัวอย่างตามด้านล่างนี้
import { ZepetoScriptBehaviour } from 'ZEPETO.Script';
import { KnowSockets, SpawnInfo, ZepetoCharacter, ZepetoCharacterCreator, ZepetoPlayers } from 'ZEPETO.Character.Controller';
import { Canvas, Camera, Vector3, Object, GameObject, Collider } from 'UnityEngine';
import { Text } from 'UnityEngine.UI';

export default class NPCInteraction extends ZepetoScriptBehaviour {

    // ZEPETO ID of the NPC
    public zepetoId: string;
    // Dialogue content to be displayed in the speech bubble
    public speechBubbleText: string;

    public changedSpeechBubbleText: string;
    // Prefab of the speech bubble canvas game object
    public speechBubblePrefab: GameObject;
    // y-axis offset value of the speech bubble canvas game object
    public speechBubbleYOffset: number;

    // Local character object
    private _zepetoCharacter: ZepetoCharacter;
    // NPC character object
    private _npc: ZepetoCharacter;
    // Speech bubble canvas game object
    private _speechBubbleObject: GameObject;
    // Text inside the speech bubble canvas game object
    private _speechBubbleText: Text;
    // Speech bubble canvas
    private _canvas: Canvas;
    // World Camera
    private _cachedWorldCamera: Camera;

    Start() {
        // Create a new instance of SpawnInfo and set its position and rotation based on the object's transform
        const spawnInfo = new SpawnInfo();
        spawnInfo.position = this.transform.position;
        spawnInfo.rotation = this.transform.rotation;

        // Use ZepetoCharacterCreator to create a new character by ZEPETO ID and assign it to _npc variable
        ZepetoCharacterCreator.CreateByZepetoId(this.zepetoId, spawnInfo, (character: ZepetoCharacter) => {
            this._npc = character;

            // Set the speech bubble
            this.SetBubble();
        })

        ZepetoPlayers.instance.OnAddedLocalPlayer.AddListener(() => {
            this._zepetoCharacter = ZepetoPlayers.instance.LocalPlayer.zepetoPlayer.character;
        });
    }

    // Check if Player character enter collider
    OnTriggerEnter(collider: Collider) {
        if (this._zepetoCharacter == null || collider.gameObject != this._zepetoCharacter.gameObject) {
            return;
        }
        this.SetBubbleText(this.changedSpeechBubbleText);
    }

    OnTriggerExit(collider: Collider) {
        if (this._zepetoCharacter == null || collider.gameObject != this._zepetoCharacter.gameObject) {
            return;
        }
        this.SetBubbleText(this.speechBubbleText);
    }


    // Set the speech bubble
    SetBubble() {
        // Dynamically create the speech bubble canvas game object
        this._speechBubbleObject = Object.Instantiate(this.speechBubblePrefab) as GameObject;

        // Set the parent of the  speech bubble canvas game object transform to be the NPC transform.
        this._speechBubbleObject.transform.SetParent(this._npc.transform);

        // Set the position of the speech bubble canvas game object above the NPC's head
        this._speechBubbleObject.transform.position = Vector3.op_Addition(this._npc.GetSocket(KnowSockets.HEAD_UPPER).position, new Vector3(0, this.speechBubbleYOffset,0));

        // Set the text inside the speech bubble
        this._speechBubbleText = this._speechBubbleObject.GetComponentInChildren<Text>();
        this.SetBubbleText(this.speechBubbleText);

        this._canvas = this._speechBubbleObject.GetComponent<Canvas>();
        this._cachedWorldCamera = Object.FindObjectOfType<Camera>();
        this._canvas.worldCamera = this._cachedWorldCamera;
    }

    // Open the speech bubble canvas and set the text
    SetBubbleText(bubbleText: string) {
        this._speechBubbleObject.SetActive(true);
        this._speechBubbleText.text = bubbleText;
    }

    private Update() {
        if (this._canvas != null) {
            this.UpdateCanvasRotation();
        }
    }

    // Update the rotation of the speech bubble canvas to face the camera
    private UpdateCanvasRotation() {
        this._canvas.transform.LookAt(this._cachedWorldCamera.transform);
        this._canvas.transform.Rotate(0, 180, 0);
    }

}
การทำงานของสคริปต์จะเป็นไปดังนี้
- OnTriggerEnter(), OnTriggerExit()
- เรียกใช้ฟังก์ชันคัสตอม SetBubbleText() เพื่อตั้งข้อความในกรอบคำพูดเป็น changedSpeechBubbleText เมื่อเข้ามาในขอบเขต Collider แล้วตรวจจับทริกเกอร์
- เรียกใช้ฟังก์ชันคัสตอม SetBubbleText() เพื่อตั้งข้อความในกรอบคำพูดเป็น speechBubbleText เมื่อออกไปนอกขอบเขต Collider
- หลังจากเขียนสคริปต์เสร็จแล้ว เพิ่มสคริปต์ลงในวัตถุตำแหน่งที่จะสร้าง NPC
- กำหนด Zepeto Id, Speech Bubble Text, Speech Bubble Prefab, Speech Bubble Y Offset และ Changed Speech Bubble ใน Inspector
- Speech Bubble Text : ตัวแปรที่บันทึกบทสนทนาของตัวละคร NPC ที่จะให้ปรากฏในกรอบคำพูด โดยจะบันทึกบทสนทนาเหมือนกับ "Hello World" ในตัวอย่าง
- Speech Bubble Prefab : ตัวแปรที่บันทึก Prefab ของ GameObject แคนวาสกรอบคำพูด
- Speech Bubble Y Offset : ตัวแปรที่บันทึกค่า offset แกน y ของ GameObject แคนวาสกรอบคำพูด ซึ่งสามารถปรับระยะห่างระหว่างตัวละครและกรอบคำพูดเมื่อมีกรอบคำพูดปรากฏบนหัวของตัวละครได้
- Changed Speech Bubble : บันทึกบทสนทนาที่จะแสดงในกรอบคำพูดของ NPC เมื่อผู้เล่นเข้าไปใน Colider ของ
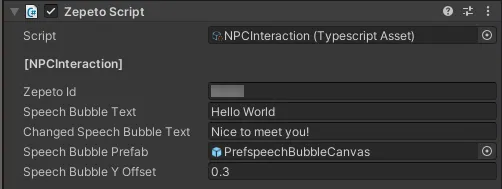
- หลังจากกดปุ่ม play เพื่อรันแล้ว ข้อความในกรอบคำพูดจะเปลี่ยนเมื่อเข้าใกล้ NPC
ใช้การโต้ตอบกับ NPC
หากต้องการสร้างรูปแบบไดอะล็อก ให้สร้าง UI โดยใช้แผง
ต่อไปนี้เป็นตัวอย่างของกล่องโต้ตอบง่ายๆ ที่ประกอบด้วยแผงและปุ่มต่างๆ
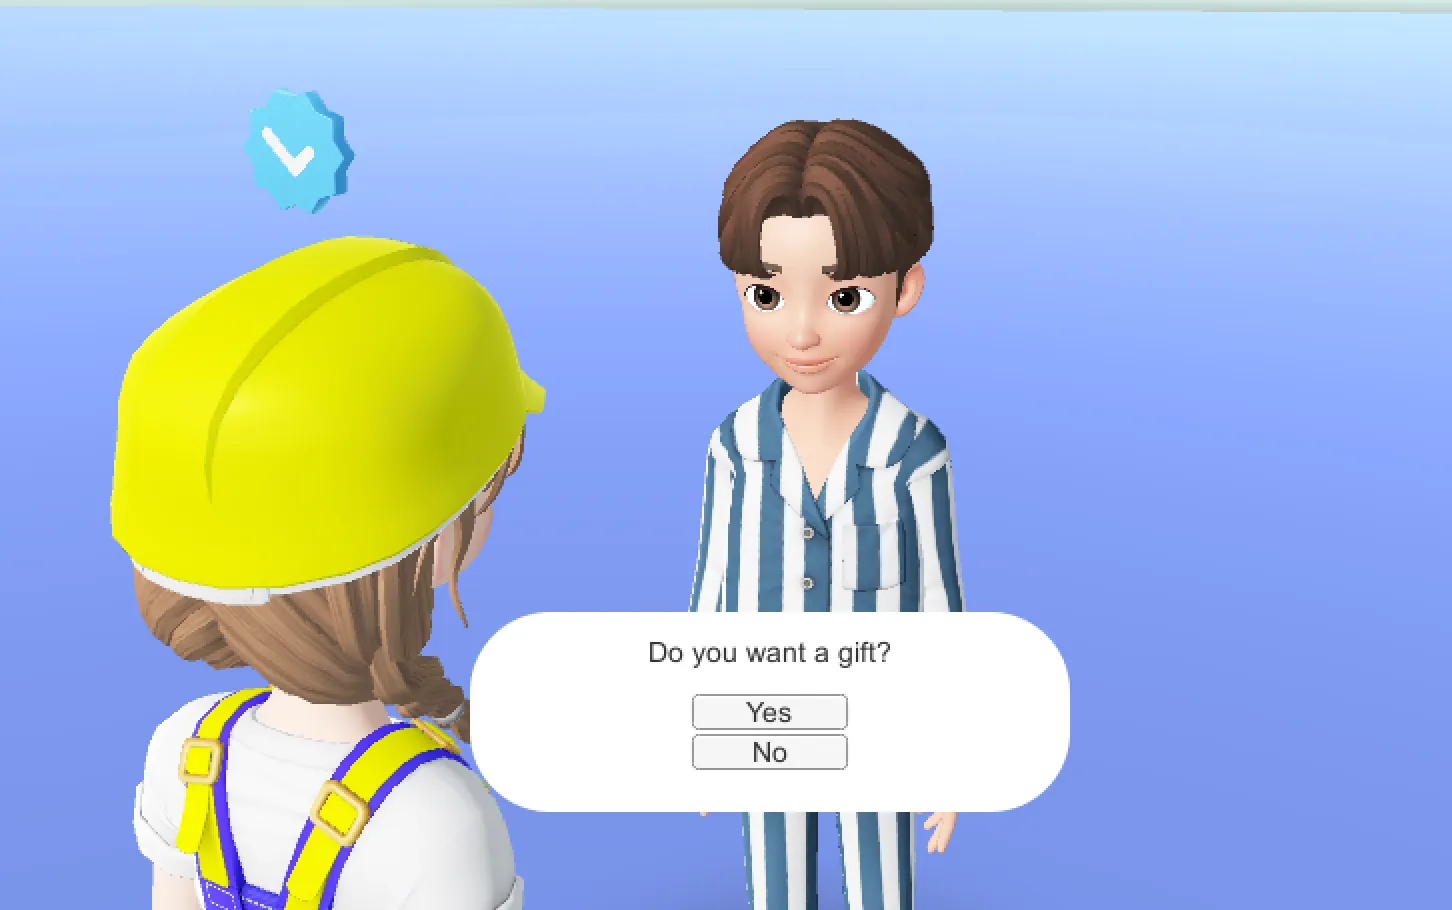
นี่คือสคริปต์ตัวอย่างที่เปิดกล่องโต้ตอบเมื่อโต้ตอบกับ NPC และประมวลผลเมื่อกดปุ่มแต่ละปุ่ม
ใช้สิ่งนี้เพื่อปรับใช้เนื้อหาที่น่าสนใจ
import { GameObject, HumanBodyBones, Object, Collider } from 'UnityEngine';
import { ZepetoScriptBehaviour } from 'ZEPETO.Script';
import { Button } from 'UnityEngine.UI';
import { ZepetoCharacter, ZepetoPlayers } from "ZEPETO.Character.Controller";

export default class NPCDialogInteraction extends ZepetoScriptBehaviour {

    public npcDialogCanvas: GameObject;
    public yesButton: Button;
    public noButton: Button;

    private _zepetoCharacter: ZepetoCharacter;

    Start() {

        ZepetoPlayers.instance.OnAddedLocalPlayer.AddListener(()=>{
            this._zepetoCharacter = ZepetoPlayers.instance.LocalPlayer.zepetoPlayer.character;
        });

        // Dialog - Select Yes
        this.yesButton.onClick.AddListener(() => {
            console.log("yes")
            this.npcDialogCanvas.SetActive(false);
        });

        // Dialog - Select No
        this.noButton.onClick.AddListener(() => {
            console.log("no")
            this.npcDialogCanvas.SetActive(false);
        });

    }

    // Check if Player character enter collider
    OnTriggerEnter(collider: Collider) {
        if (this._zepetoCharacter == null || collider.gameObject != this._zepetoCharacter.gameObject) {
            return;
        }
        this.npcDialogCanvas.SetActive(true);
    }

    OnTriggerExit(collider: Collider) {
        if (this._zepetoCharacter == null || collider.gameObject != this._zepetoCharacter.gameObject) {
            return;
        }
        this.npcDialogCanvas.SetActive(false);
    }

}