3. Design Your World with Build it Unity Plug-in
1. Adding Basic Features
Follow the video below to add various features to your world without any coding!
Subtitles are available in multiple languages, so please turn them on while watching!
Interaction Object
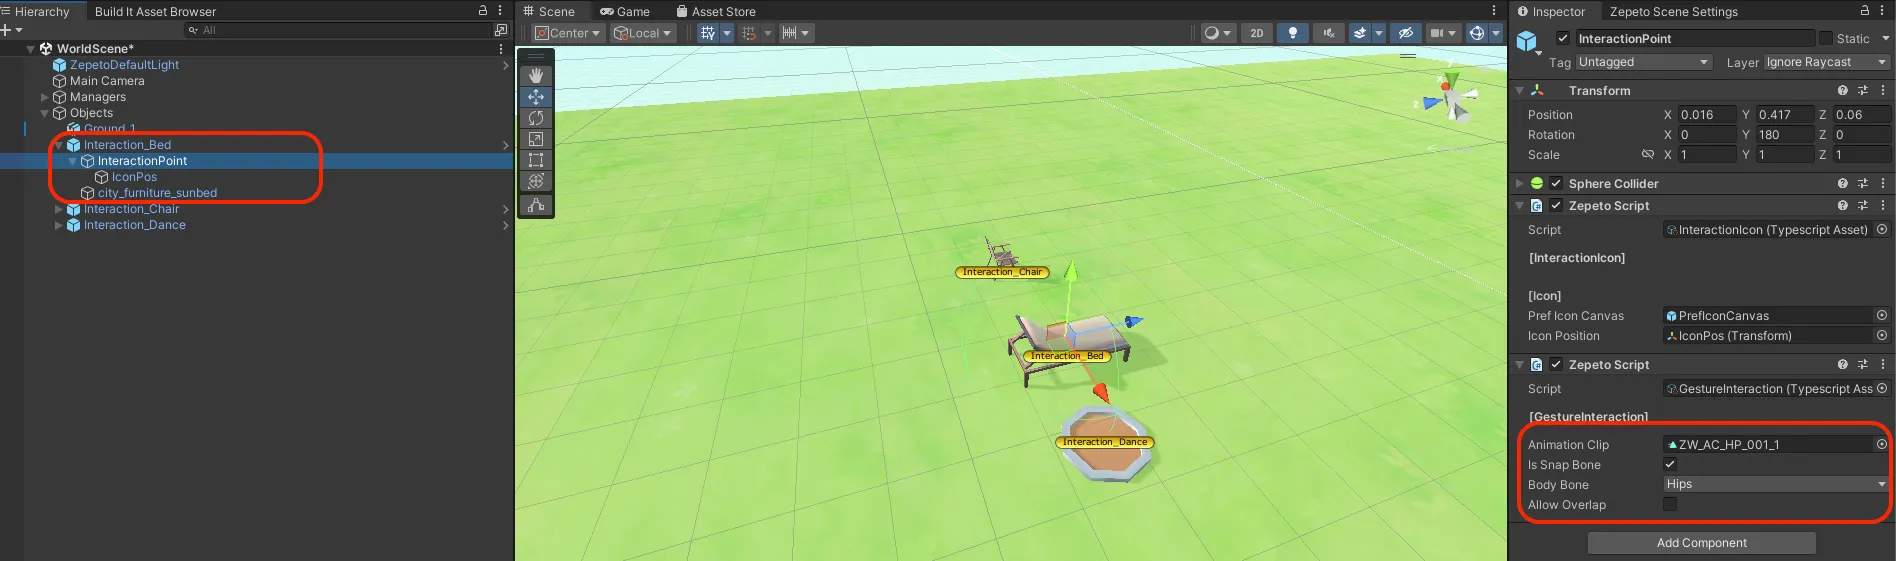
The Interaction object makes your character perform a specific gesture when the user clicks its icon.
- Interaction_bed: Plays a gesture of the character lying naturally on a bed.
- Interaction_chair: Plays a gesture of the character sitting naturally on a chair.
- Interaction_dance: Plays a gesture of the character dancing.
You can modify interaction objects to apply them in various ways.
- Change Animation Clip: If you replace the animation file applied to the child object's (InteractionPoint) animation clip, a different gesture will be played during interaction.
- Is Snap Bone: The character's position is fixed based on a specific Bone. For example, if Bone is set to Foot, the character's feet will be fixed to the InteractionPoint location while the animation plays. Unchecking this allows the character to move freely separate from the object.
- Body Bone: Sets which Bone the character will be fixed to when Is Snap Bone is checked.
- Change Object Appearance: Remove the child object responsible for the appearance and place another object from the map in the exact same position to change its look.
- Change Interaction Icon Position: If you changed the object's appearance, adjust the position of the child object IconPos to match your new design.
Setting Spawn Points
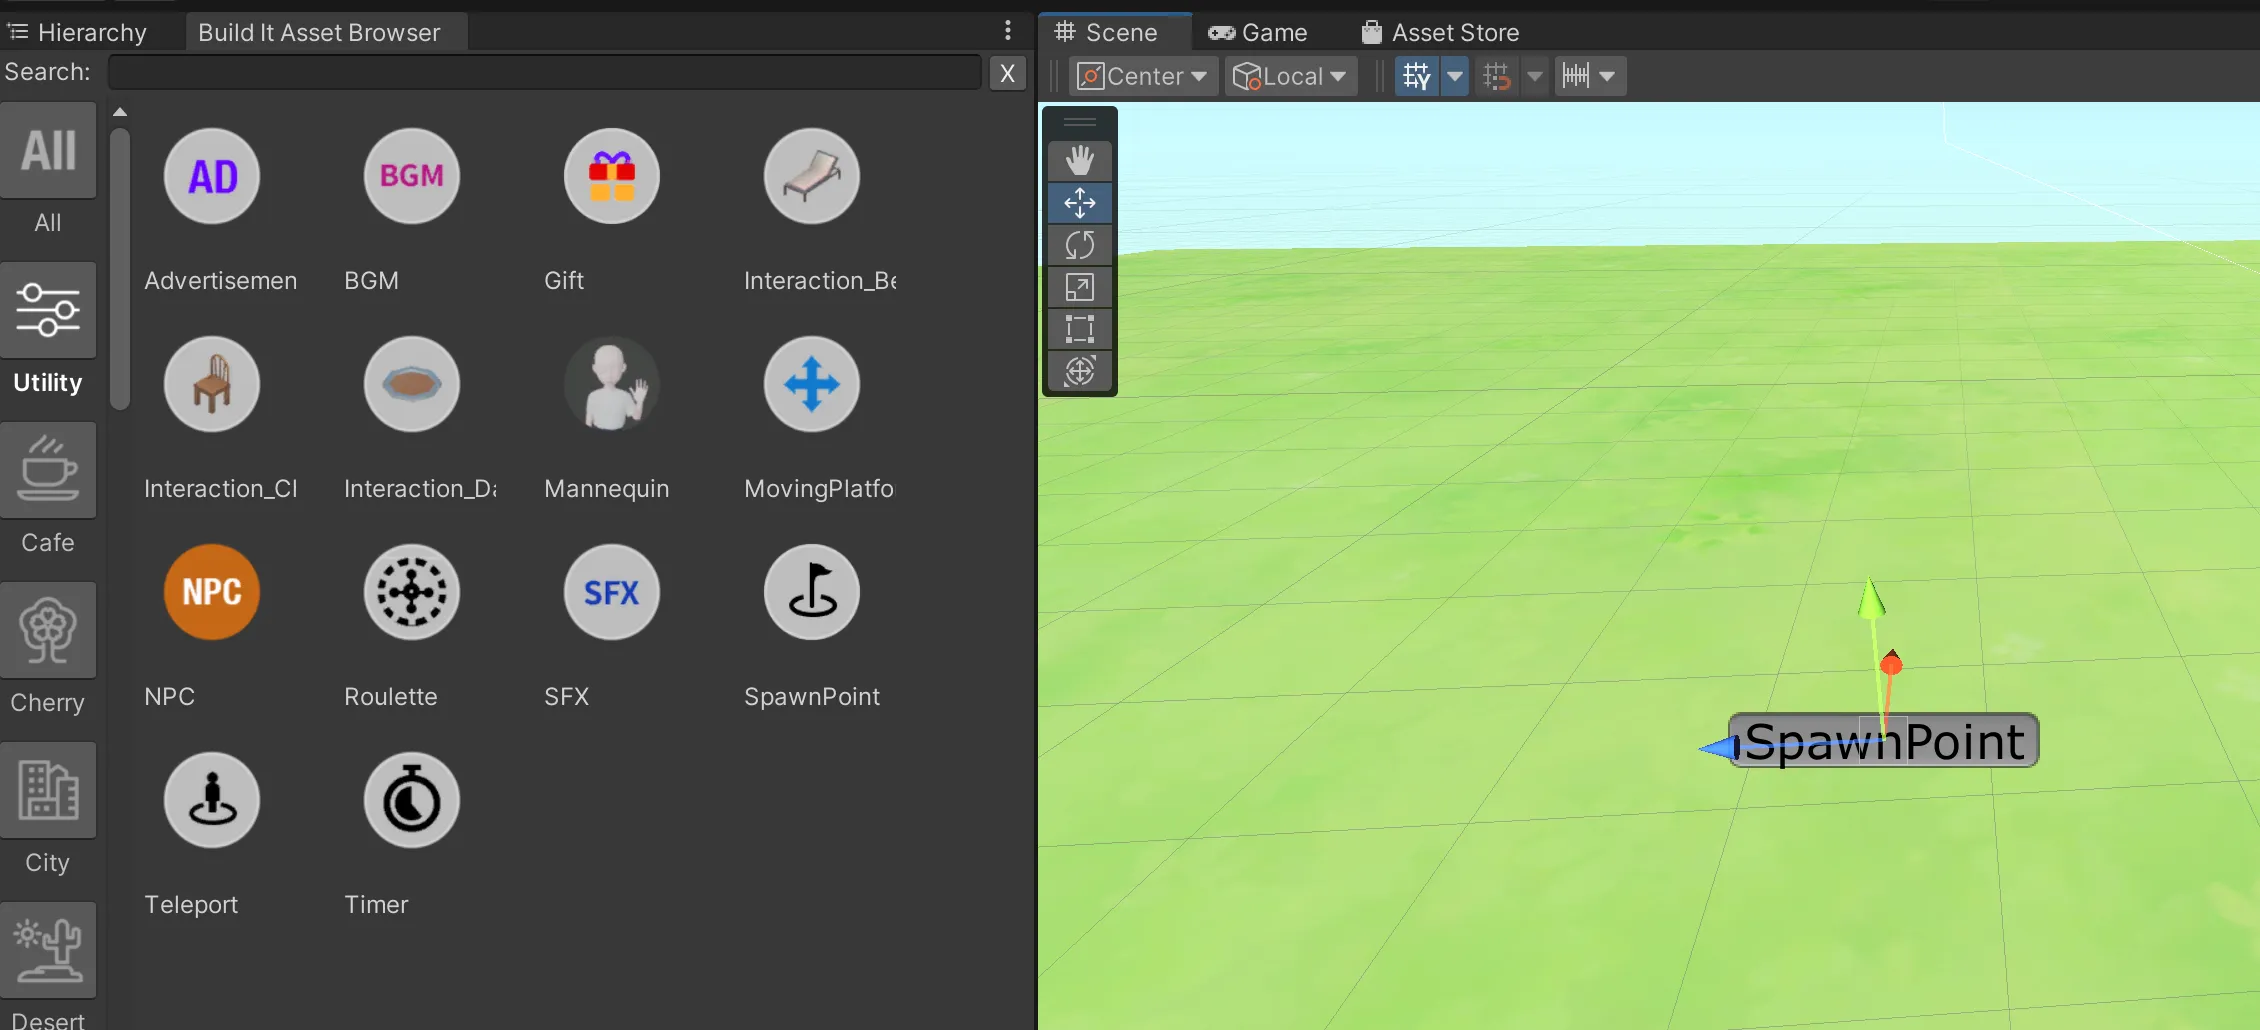
By using the SpawnPoint object, you can set the exact location where ZEPETO characters will spawn when the world starts.
- If there is no Spawn Object in the Scene, ZEPETO characters will spawn at the coordinates x=0, y=0, z=0.
- If there are multiple Spawn Objects, the ZEPETO character will randomly select one and spawn at that location.
Playing Sounds
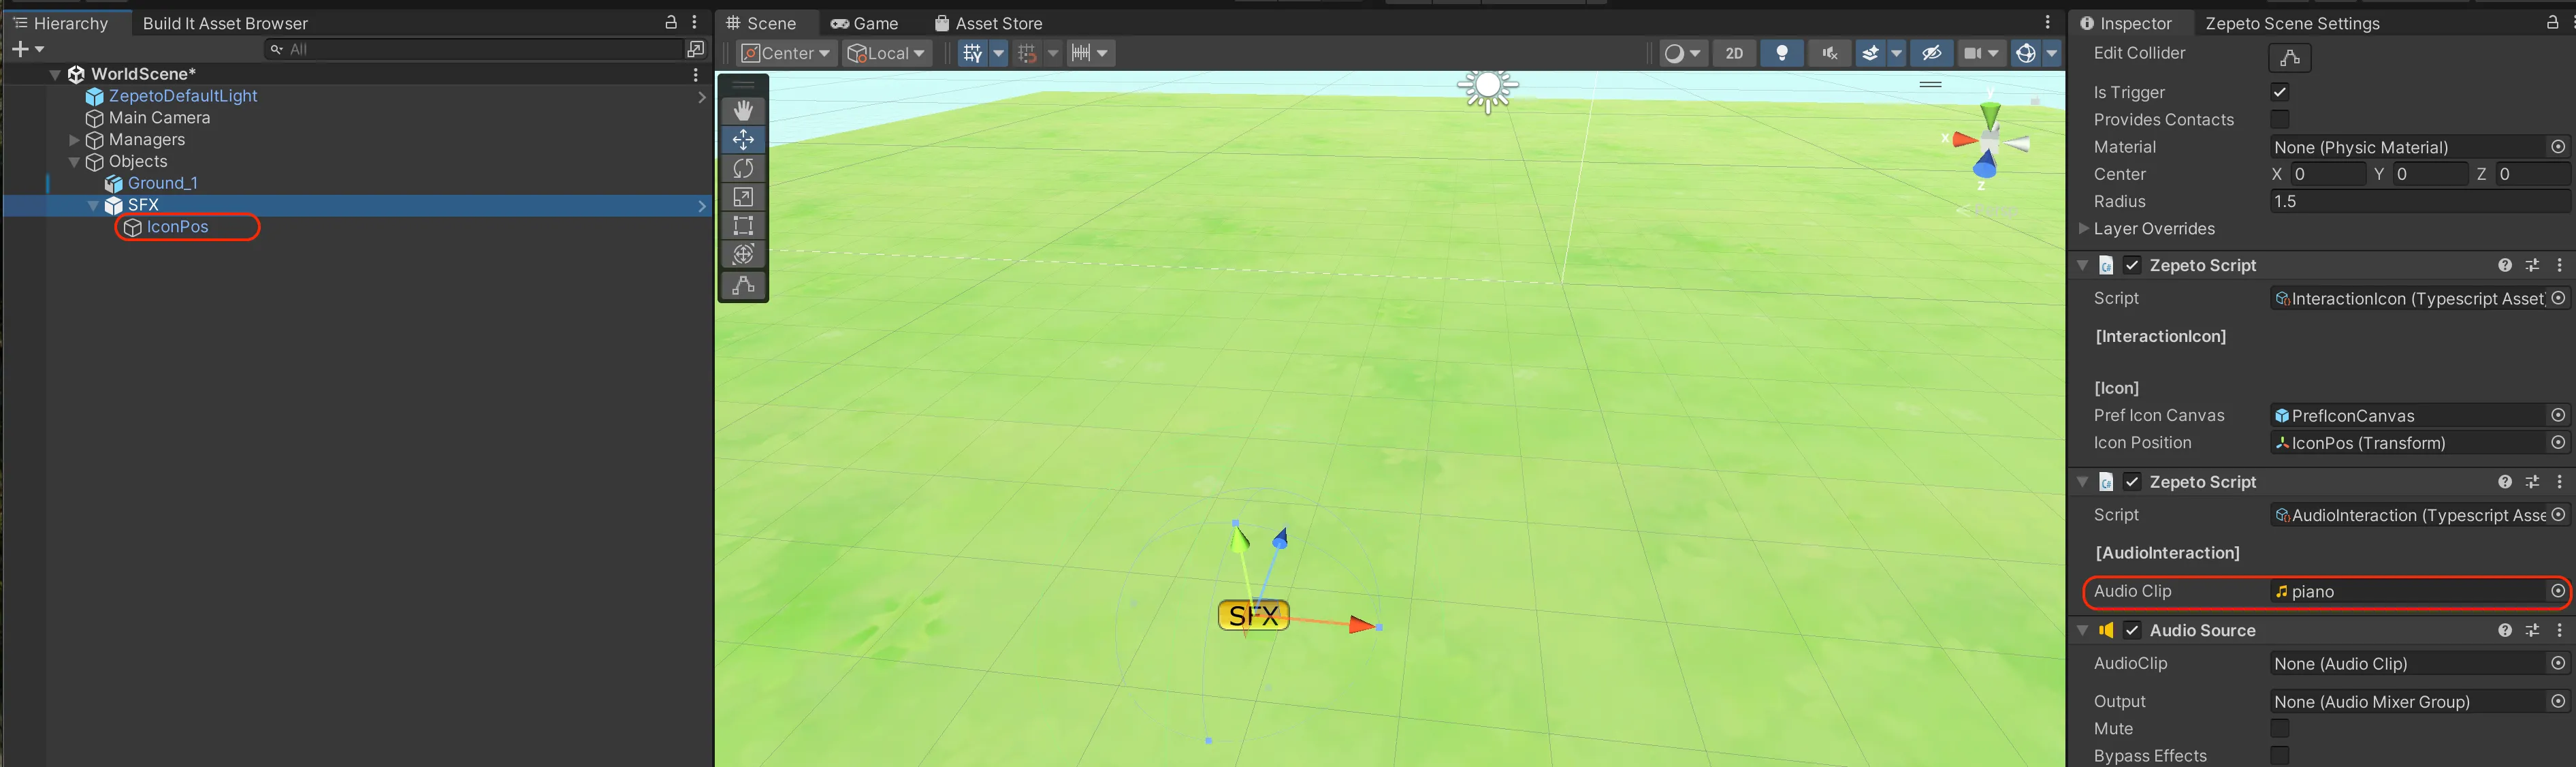
The SFX object plays a designated sound when a user clicks its icon. Place the object in the Scene and adjust the settings in the Inspector.
- AudioClip: You can assign an audio clip in the Inspector window. Apply .mp3 or .wav format audio files here.
- IconPos: You can adjust the position of the button the user interacts with.
Mission Timer
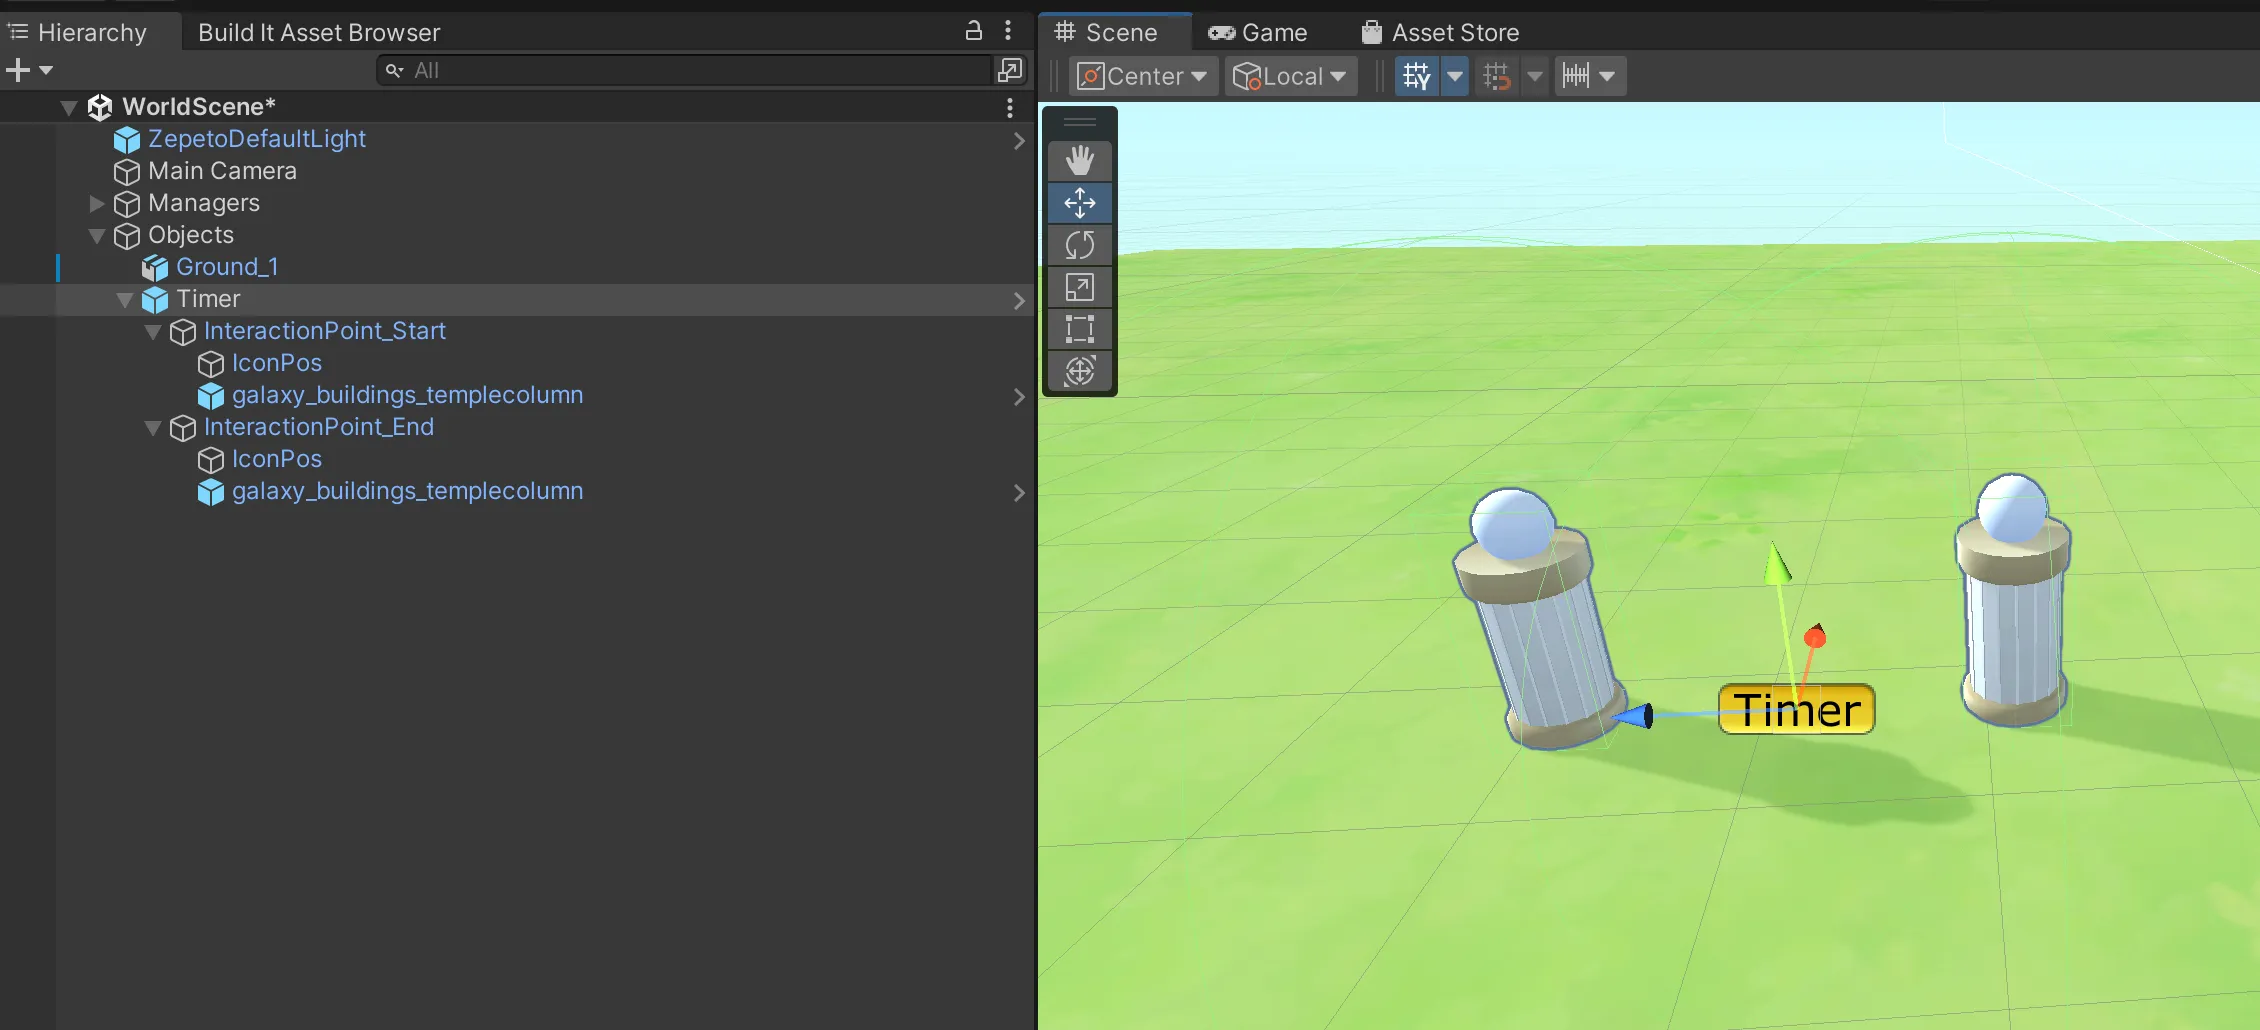
The Timer object displays a timing UI and starts recording the time when a user clicks the "Start" object. When the user clicks the "Arrival" object, the timing UI disappears, and a success message appears.
You can customize the Timer object's appearance and interaction button position to fit your world's concept.
- Change Object Appearance: Remove the child object responsible for the appearance and place another object from the map in the same position to change its look.
- Change Interaction Icon Position: If you changed the object's appearance, adjust the position of the child object IconPos accordingly.
Generating Random Numbers
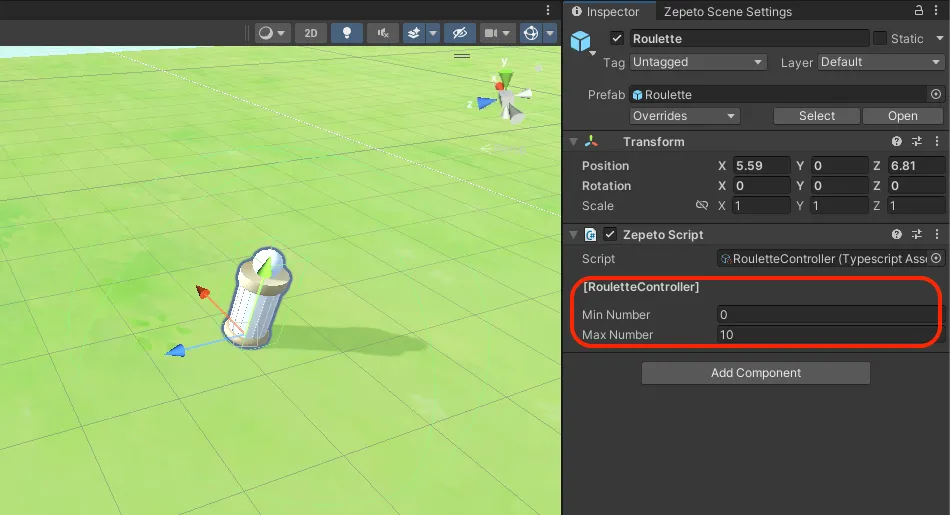
Using the Roulette object, a random number is generated when a user clicks the icon, and the result is displayed in the Zepeto chat window.
- Set Number Range: Select the Roulette object and adjust the minimum and maximum numbers in the Inspector window.
You can also customize the Roulette object's appearance and interaction button position to fit your own concept.
- Change Object Appearance: Remove the child object responsible for the appearance and place another object from the map in the same position to change its look.
- Change Interaction Icon Position: If you changed the object's appearance, adjust the position of the child object IconPos accordingly.
Teleport Object
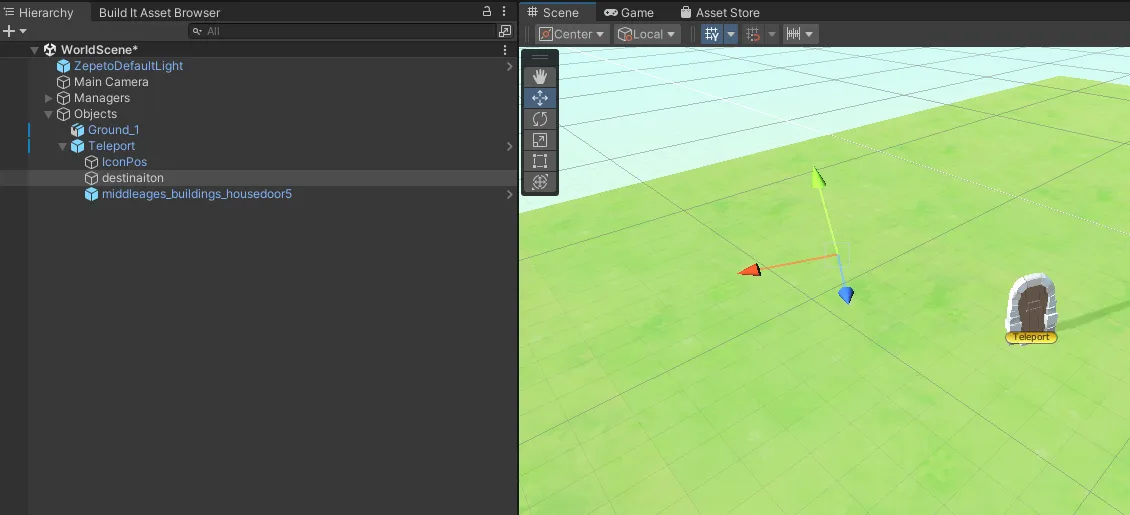
The Teleport object instantly teleports the user to a designated location when they click the icon.
- Destination Point: You can set the arrival point by moving the child object destination to your desired location.
You can customize the Teleport object's appearance and interaction button position to fit your world's concept.
- Change Object Appearance: Remove the child object responsible for the appearance and place another object from the map in the same position to change its look.
- Change Interaction Icon Position: If you changed the object's appearance, adjust the position of the child object IconPos accordingly.
Playing BGM
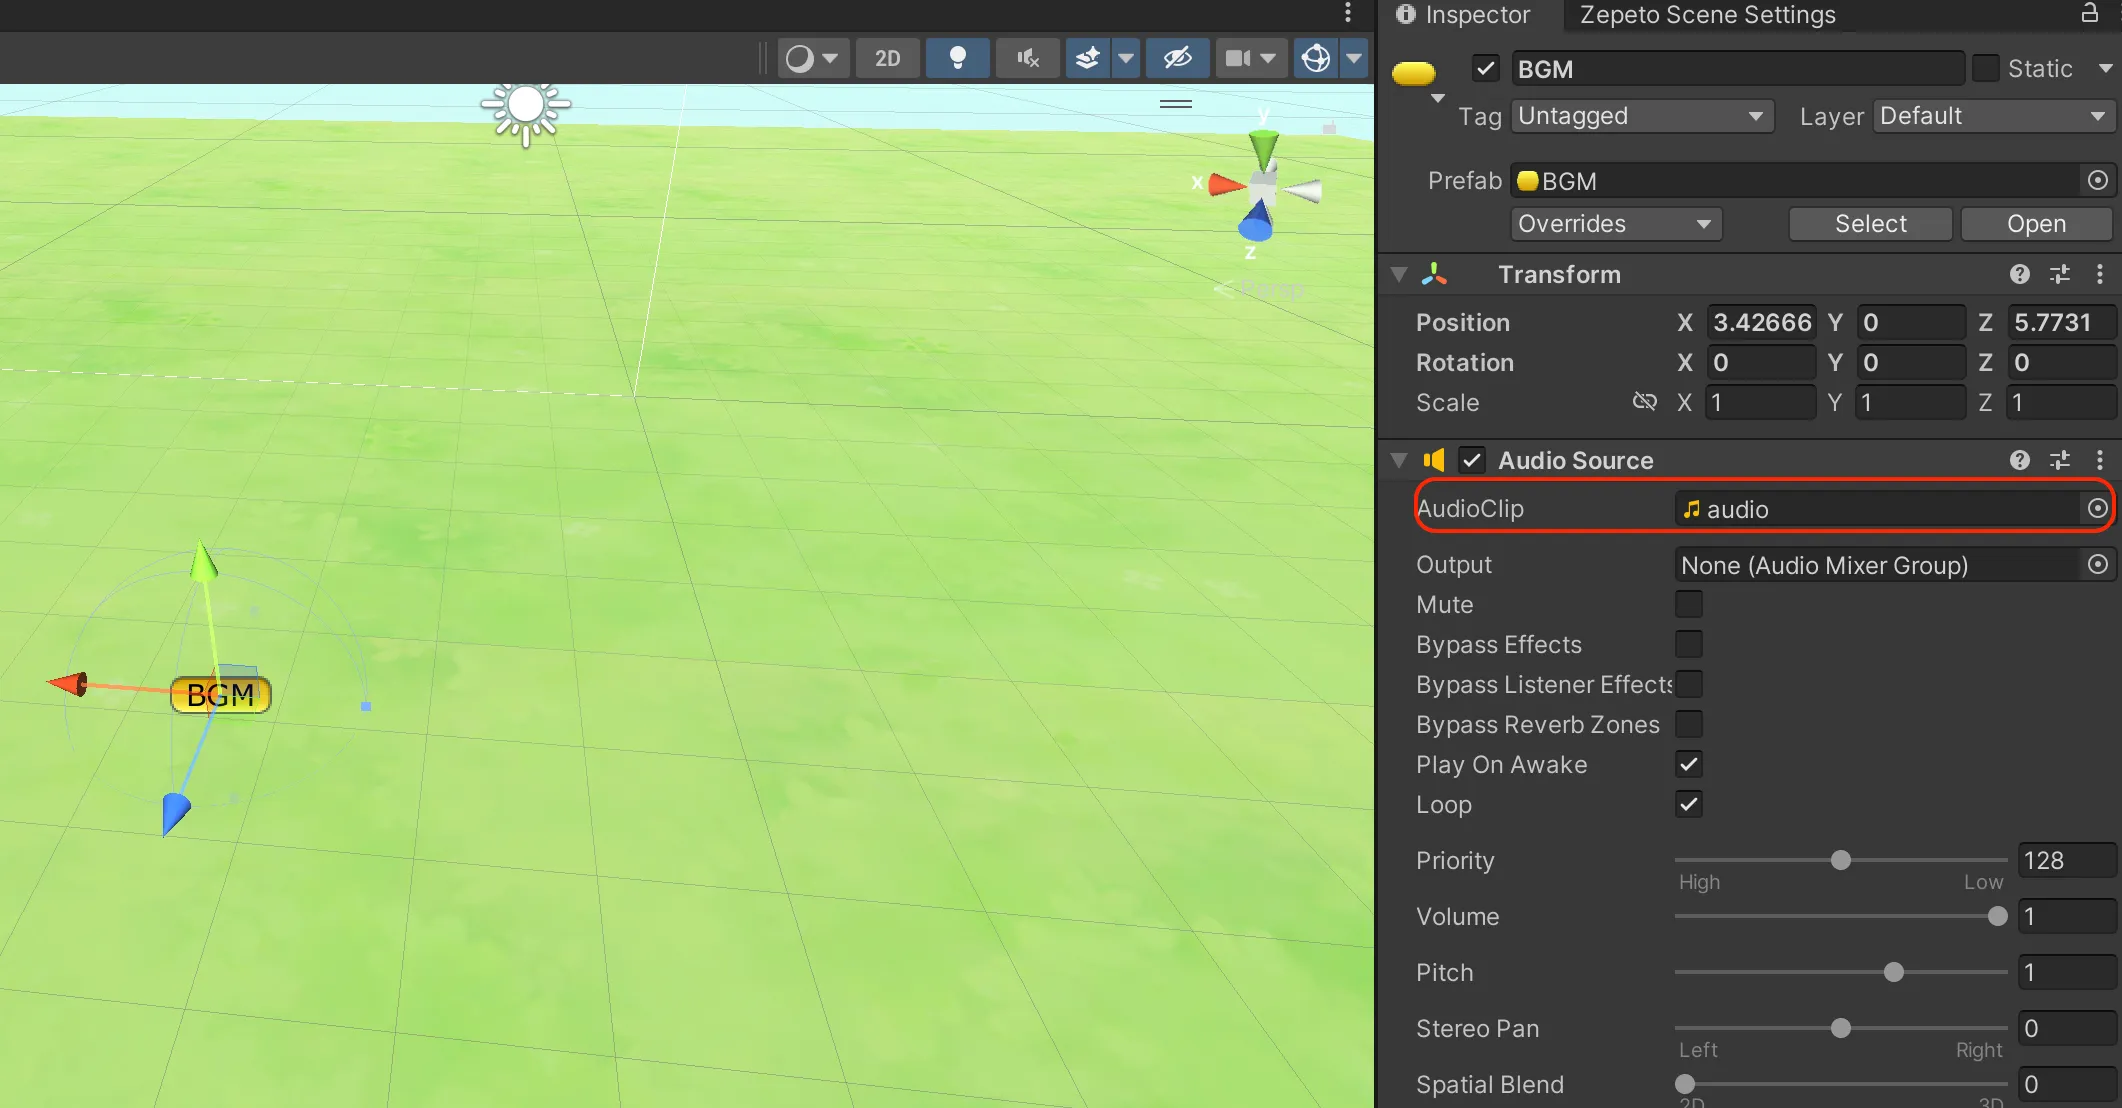
Placing a BGM object in the Scene will play background music. Please place only one per Scene.
- AudioClip: You can assign an audio clip in the Inspector window. Apply .mp3 or .wav format audio files here.
Users can turn the background music on or off by tapping the BGM icon on the right side of the screen.

Creating a Welcome Popup
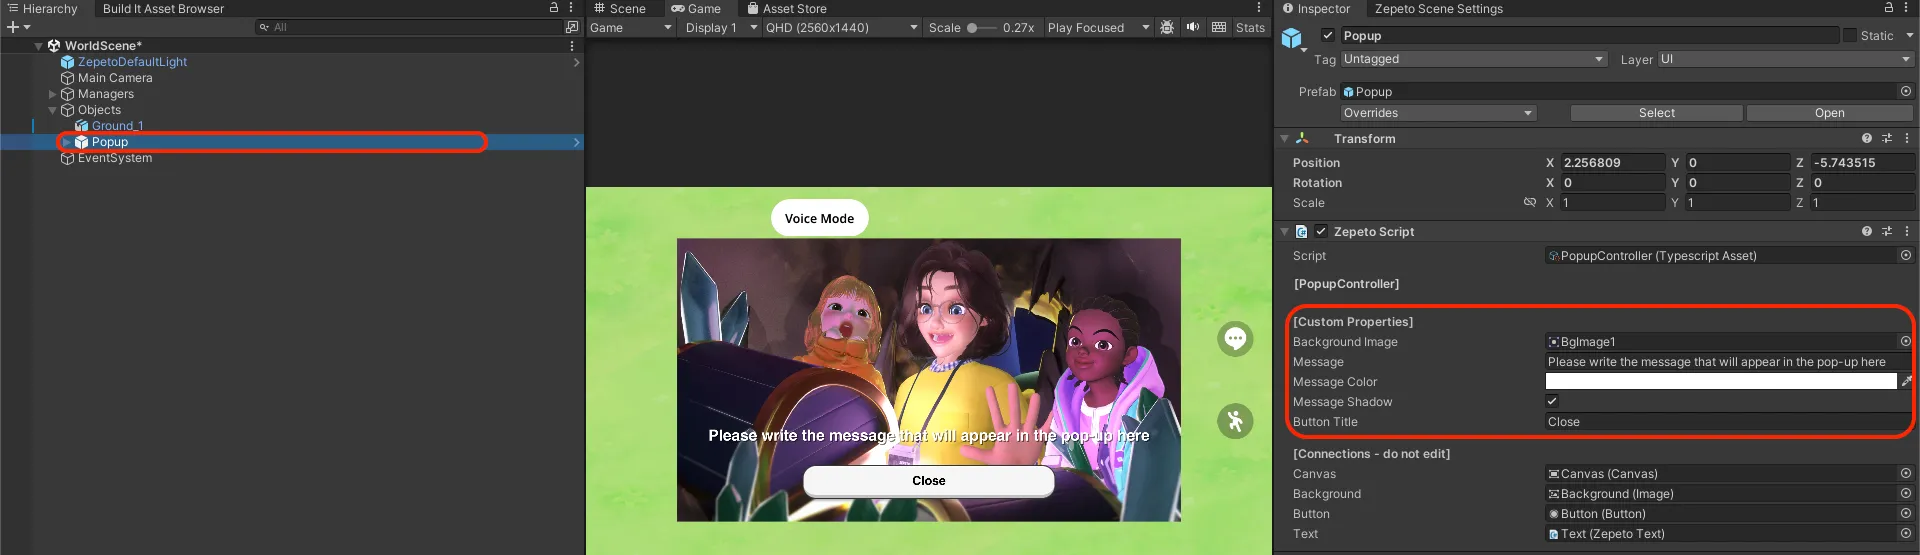
The Popup object is a window that appears when users enter the world. Clicking a button inside the popup will automatically close it.
Use this popup window to introduce your world or promote your special events!
Important Notes
- The Popup window is not placed on the ground like a normal object.
- It is placed in the UI screen area and can be checked in the Game view.
Select the Popup in the Hierarchy and modify its properties in the Inspector. You can check your changes in Play mode.
- Background Image: Drag and drop a 2D sprite image to change it.
- Message: You can change the message text.
- Message Color: You can change the color of the message text.
- Message Shadow: You can toggle the shadow effect of the message text on/off.
- Button Title: You can change the button text.
Reward Chest Object
By placing a Reward Chest in your world, players can earn ZEMs or Coins depending on the event.
When a user enters a world that has a Reward Chest, a popup will notify them of how many chests are available in that world.

Try hiding the Reward Chest in a secret location or placing it at the finish line of a jump map to reward your players!

- Operation Logic
- World creators should place the Reward Chest in appropriate locations in their world.
- Please do not place them where they can be found too easily.
- If rewards are too easy to obtain, your world may not pass the review process or could be taken down without notice.
- World creators can also earn rewards in their own worlds.

- Timeout - If you want to increase playtime in your world, try adding a short countdown before they can collect the reward.
- Enter the countdown time (in seconds) in the Timeout field. The default value is 60 seconds.
- Entering 0 will grant the reward immediately without a countdown.
- Activated Icon Color
- Before the countdown starts, the interaction icon appears white. Once the countdown is complete, the icon color changes to the color set here.
- Group id
- Only one chest from the same Group id will be visible.
- If you assign different Group ids, one chest from each group will be visible.
Important Notes
- The ZEM/Coin reward events are operated by ZEPETO and cannot be configured by the world creator.
- There is a limit to the rewards a single person can obtain from the event. Once the limit is reached, they can no longer obtain rewards.
- If it is not during an event period, the Reward Chest will not be visible, and rewards cannot be obtained.
Drawing Canvas Object
DrawingCanvas is a canvas object that allows players to freely draw pictures within your world.
It automatically supports multiplayer synchronization, allowing you to draw and communicate in real-time with other users connected to the same world.
Try utilizing it in various ways with your own creative ideas, such as creating a space to doodle and play freely with friends, or planning a quiz game where players guess what you drew!
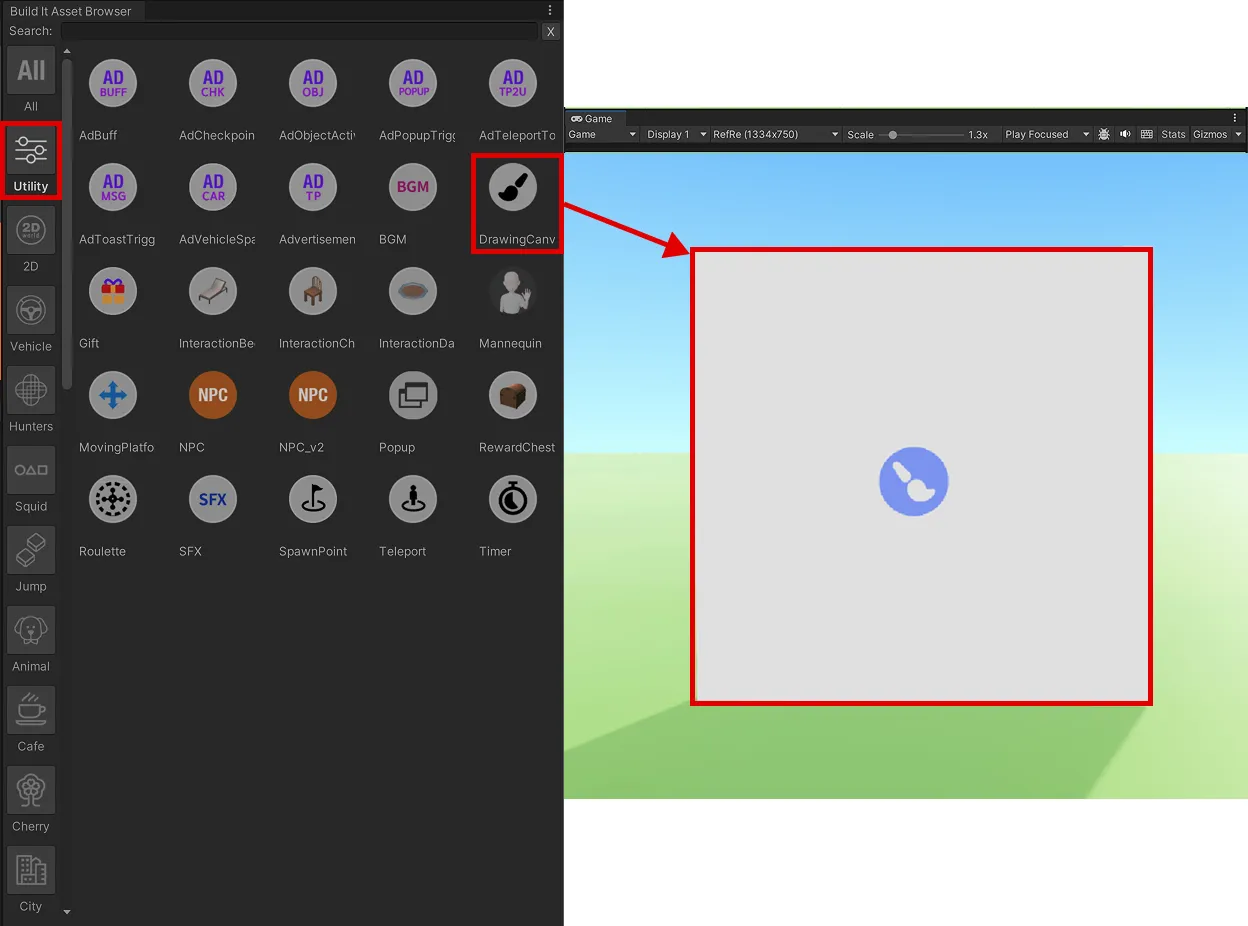
- Select the DrawingCanvas object from Build it Asset Browser > Utility.
- Place it in your desired position in the Scene.
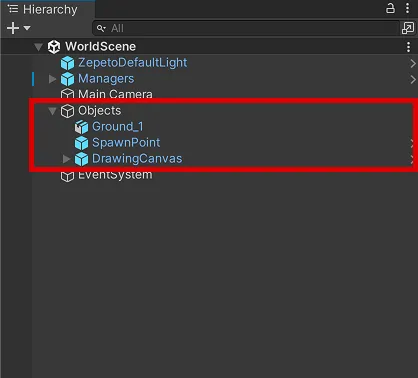
- Make sure to check if the DrawingCanvas object is correctly placed under Objects in the Hierarchy window.
Using the Drawing Feature
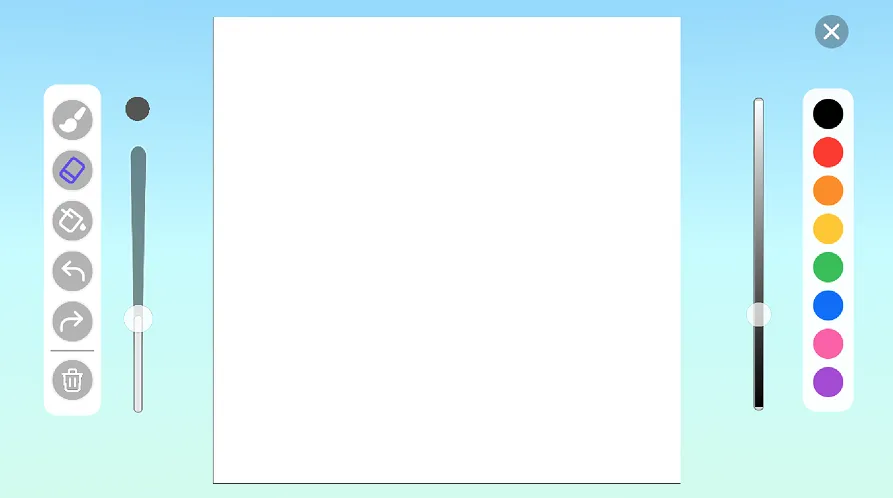
Users visiting the world can approach the canvas and experience various drawing features directly as follows:
- Entering Drawing Mode: When you get close to the canvas, a drawing UI icon will appear. Pressing this icon will start the drawing mode.
- Brush and Color Settings:
- Adjusting Brush Size: You can adjust the brush size using the left bar and freely pick your desired color.
- Adjusting Color Intensity: You can adjust the color saturation by moving the right bar.
- Eraser: Use the eraser tool to easily wipe away and fix parts you drew incorrectly.
- Paint Bucket: Draw lines with the brush to create an area, then touch the inside of that area to fill it with the selected color all at once.
- Undo and Redo: You can return to the previous step or restore the undone work. Please note that this feature is supported up to a maximum of 3 steps.
- Clear All: You can clear everything drawn on the canvas.
Multiplayer Usage Rules * Only one person can draw on a canvas: When a user starts drawing on a canvas, it becomes occupied by that user. The drawing icon will be completely hidden from other users, meaning no one else can add to a canvas that someone has already drawn on.
- You can continue drawing on your canvas at any time: The drawing icon will remain visible to you on your claimed canvas, allowing you to freely continue drawing whenever you want.
- The canvas resets when you leave the room: If the user who was drawing exits the room, their drawing on the canvas will be deleted. The canvas will then return to an empty state where anyone can draw on it again.
- Recommended placement limit (Optimization): There is no theoretical limit to the number of canvases you can place. However, for smooth world optimization, we recommend placing no more than 10 canvases per world.
2. NPC Object
Basic NPC Object
You can create an NPC character by entering a Zepeto ID. Place the NPC object in the Scene and change its settings in the Inspector.
The NPC will not appear in Edit mode; it will only appear when you press Play.
Utilize the properties below to configure your NPC.
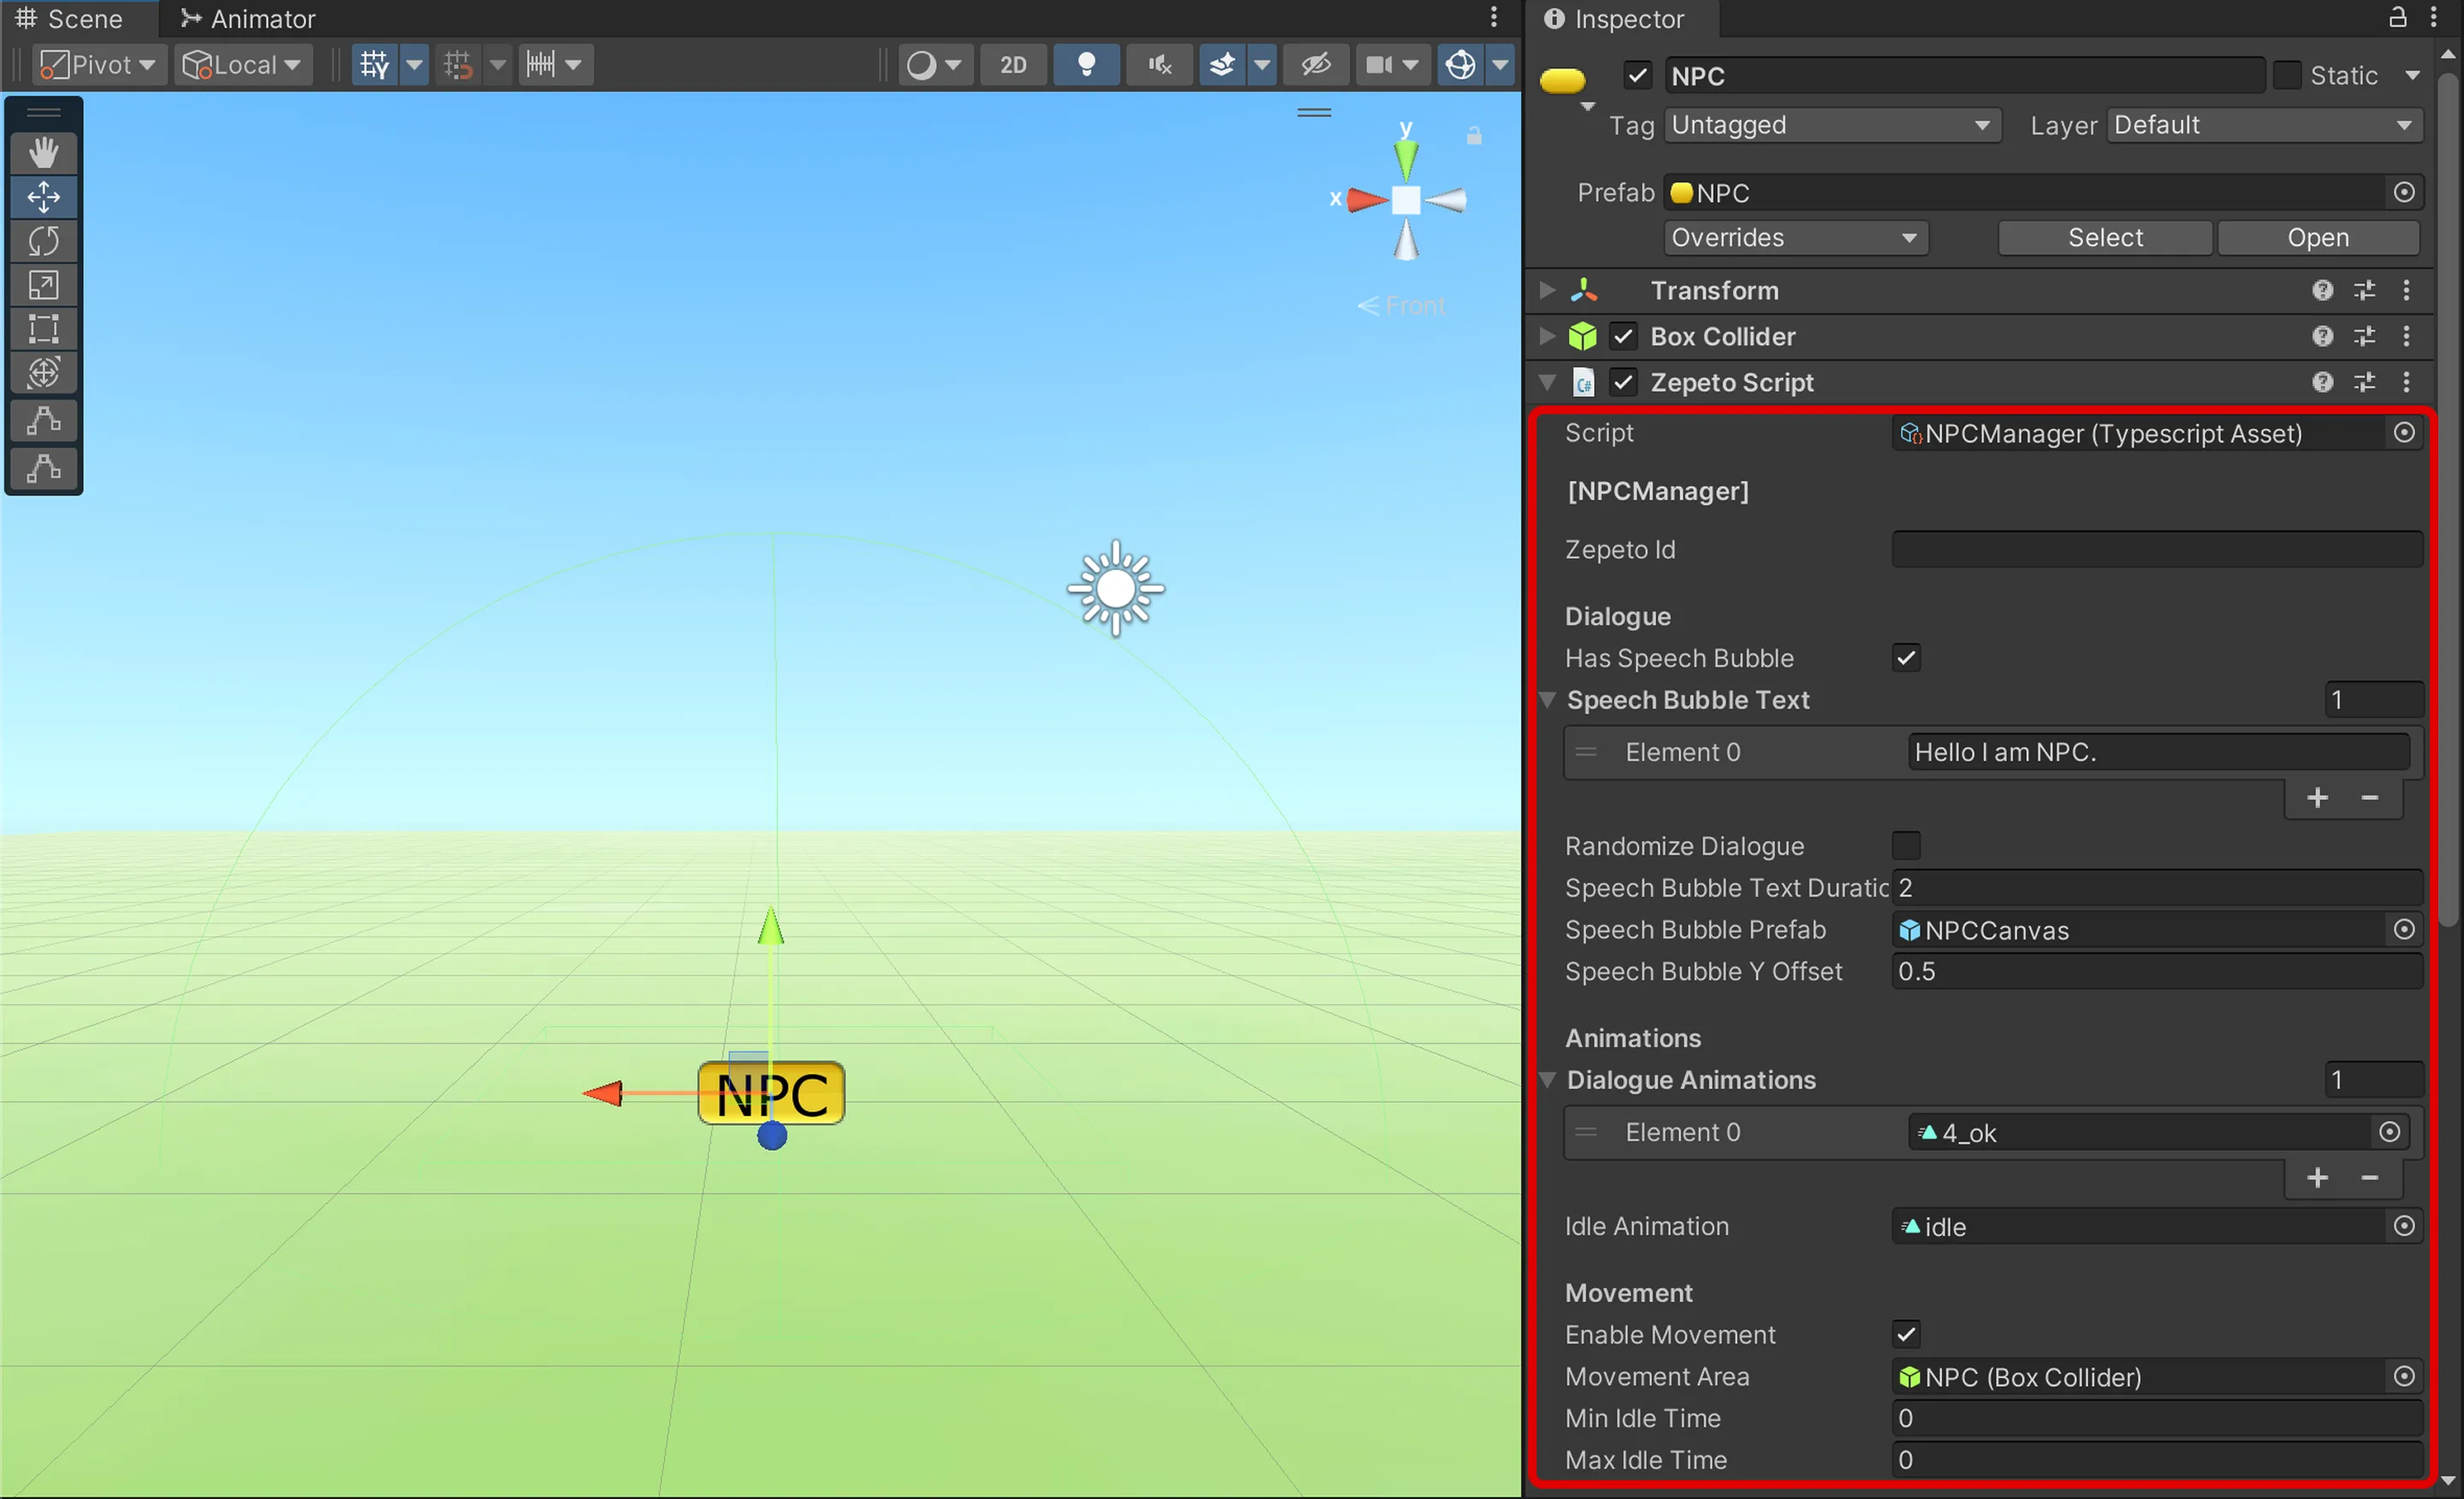
- Zepeto ID: Enter the ZEPETO account ID to use.
- Dialogue
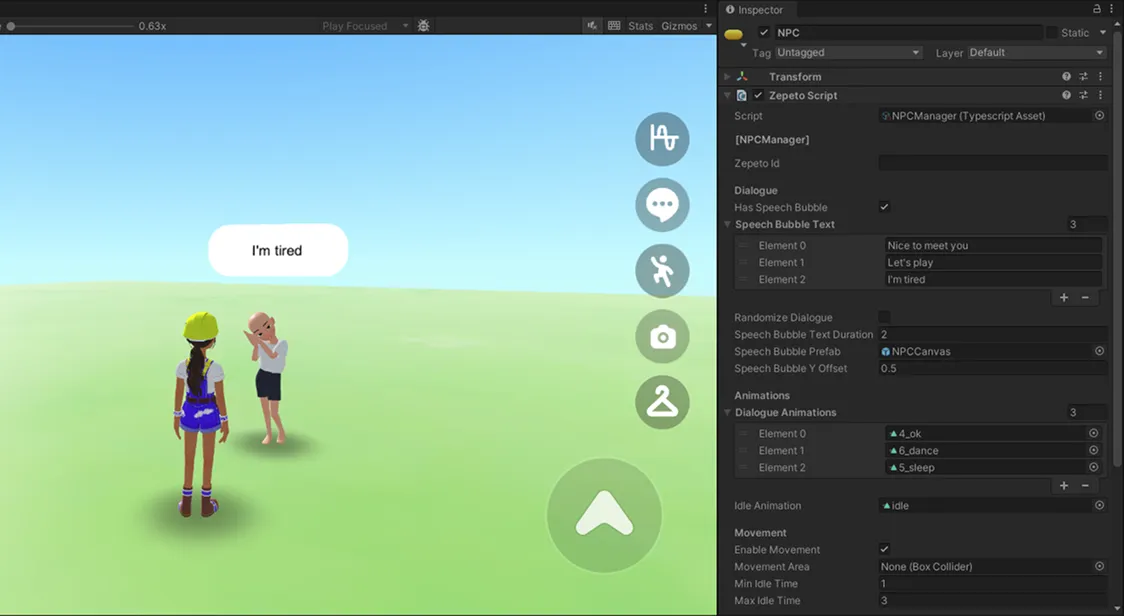
- Has Speech Bubble: If enabled, a speech bubble appears when players get close to the NPC.
- Speech Bubble Text: Enter the text for the NPC character's speech bubble.
- You can register multiple speech bubble texts.
- Click the + button to add new text, or the - button to delete existing text.
- Randomize Dialogue: You can set the NPC's speech bubble text to appear in a random order.
- If unchecked, the text will be displayed in sequence, starting from the first one (Element 0).
- Speech Bubble Text Duration: Set how long (in seconds) the speech bubble stays on screen.
- Speech Bubble Prefab: The prefab design for the speech bubble.
- Speech Bubble Y Offset: Adjust the Y-axis (height) position of the speech bubble relative to the character's head.
- Animations
- Dialogue Animations: A list of character animations that will play alongside the dialogue.
- The animation corresponding to the order of the Speech Bubble Text will play.
- If no animation is specified for the current dialogue order, the first animation (Element 0) in the list will play by default.
- Idle Animation: If Enable Movement is disabled, this is the animation that plays while the character stands still.
- Movement
- Enable Movement: If enabled, the character wanders randomly within a defined area.
- If you want a stationary NPC, turn this option off.
- Movement Area: Defines the roaming area for the NPC using a Box Collider component.
- You can customize the NPC's movement range by adjusting the size and position of the Box Collider.
- The Box Collider lines will disappear during Play mode.
- Min Idle Time: The minimum waiting time (in seconds) after moving before starting the next movement.
- Max Idle Time: The maximum waiting time (in seconds) after moving before starting the next movement.
- Usage Example
Interactive NPC Object
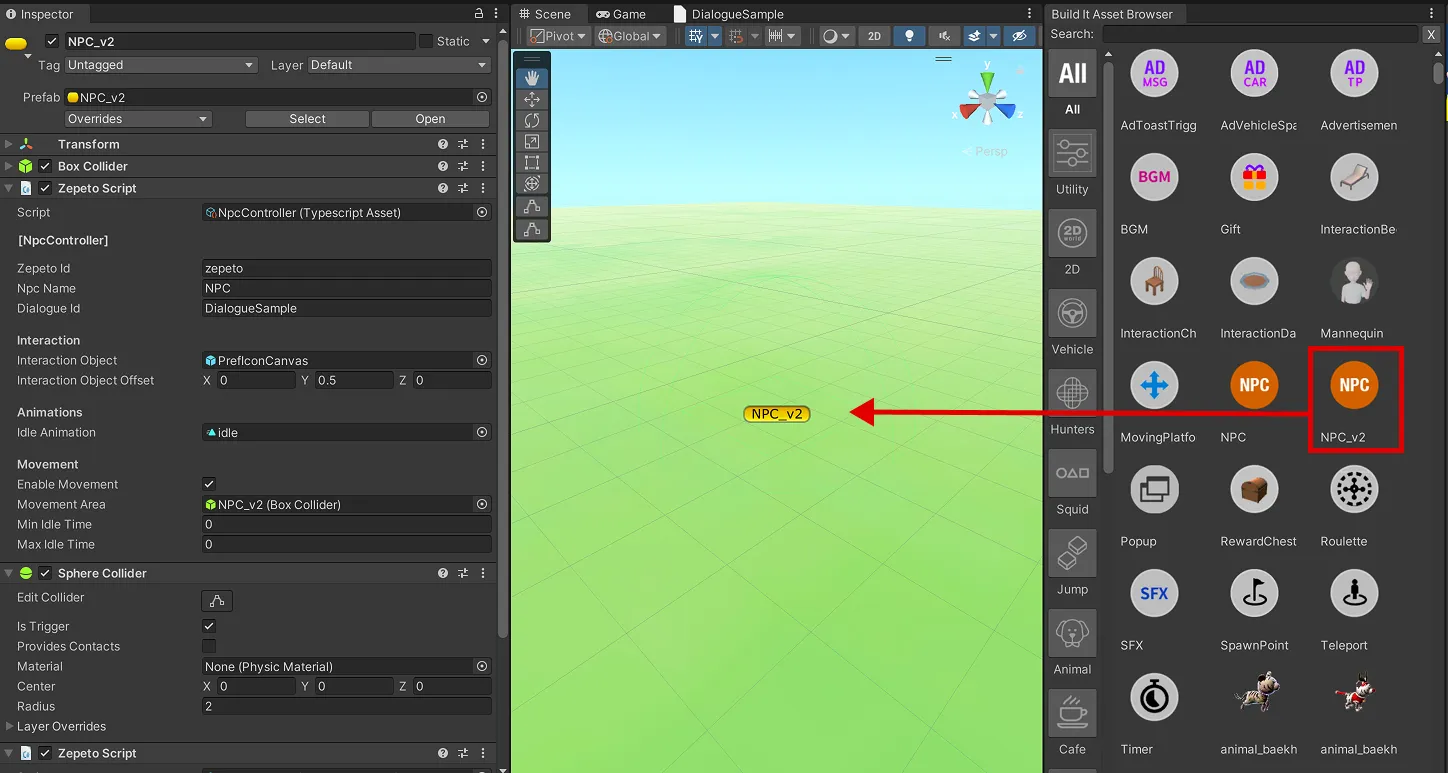
The NPC_v2 object includes a new Dialogue feature that transitions into a full conversation mode when a player approaches and interacts with it.
The basic setup is the same as the 'Basic NPC Object', but there are newly added properties specifically for dialogue. See what's different below!
- Zepeto ID, Animations, Movement : Works exactly the same as the basic NPC.
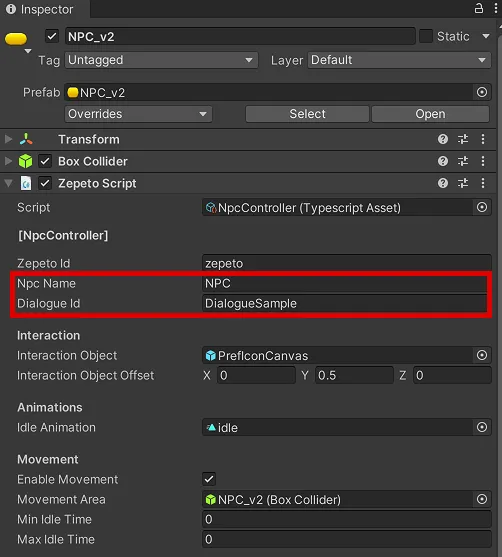
- Npc Name : Enter the NPC's name to be displayed on the dialogue screen.
- Dialogue Id : Enter the name of the dialogue file to be applied.
Setting up NPC Dialogue
By utilizing the new NPC Dialogue System, you can add much more fun and lively NPCs to your world!
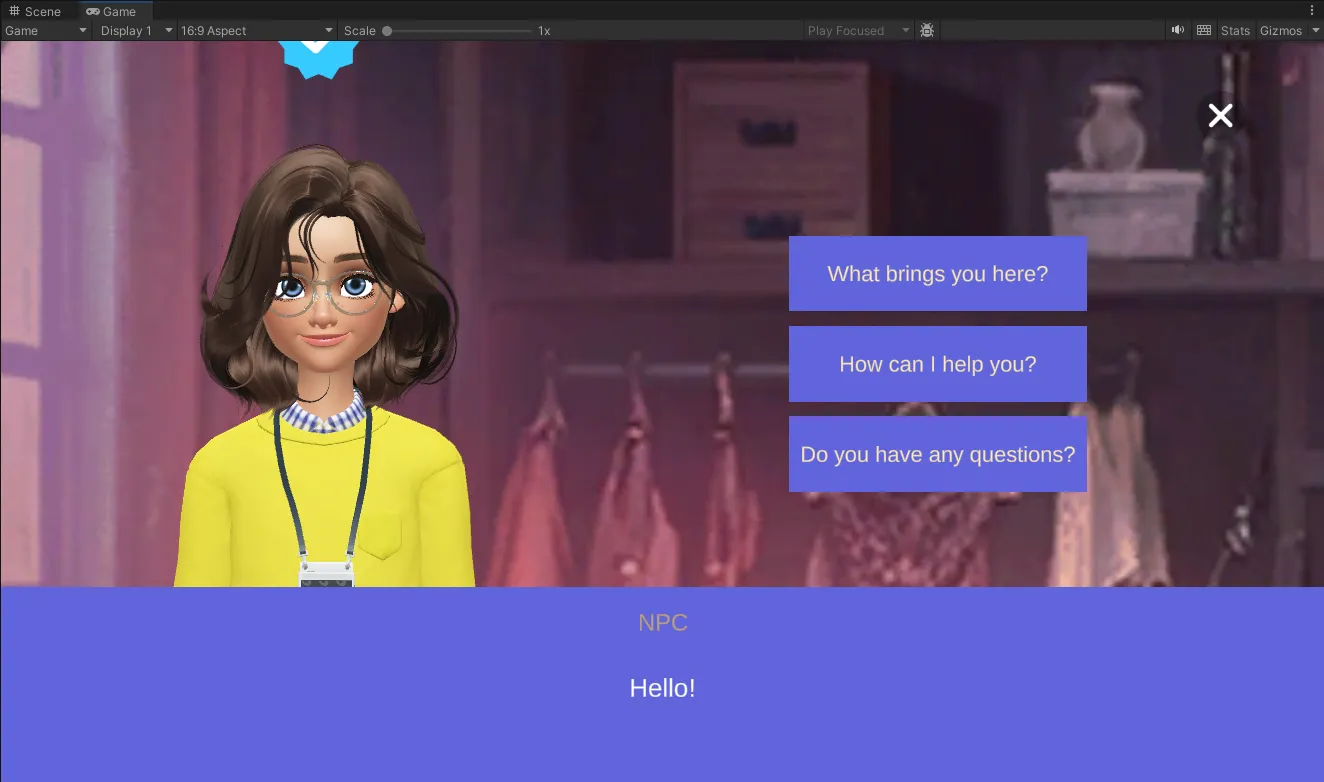
Rather than simple short answers, you can create a continuous dialogue system where the story branches based on the user's choices.
With Localization support for global users, anyone can naturally immerse themselves in the conversation.
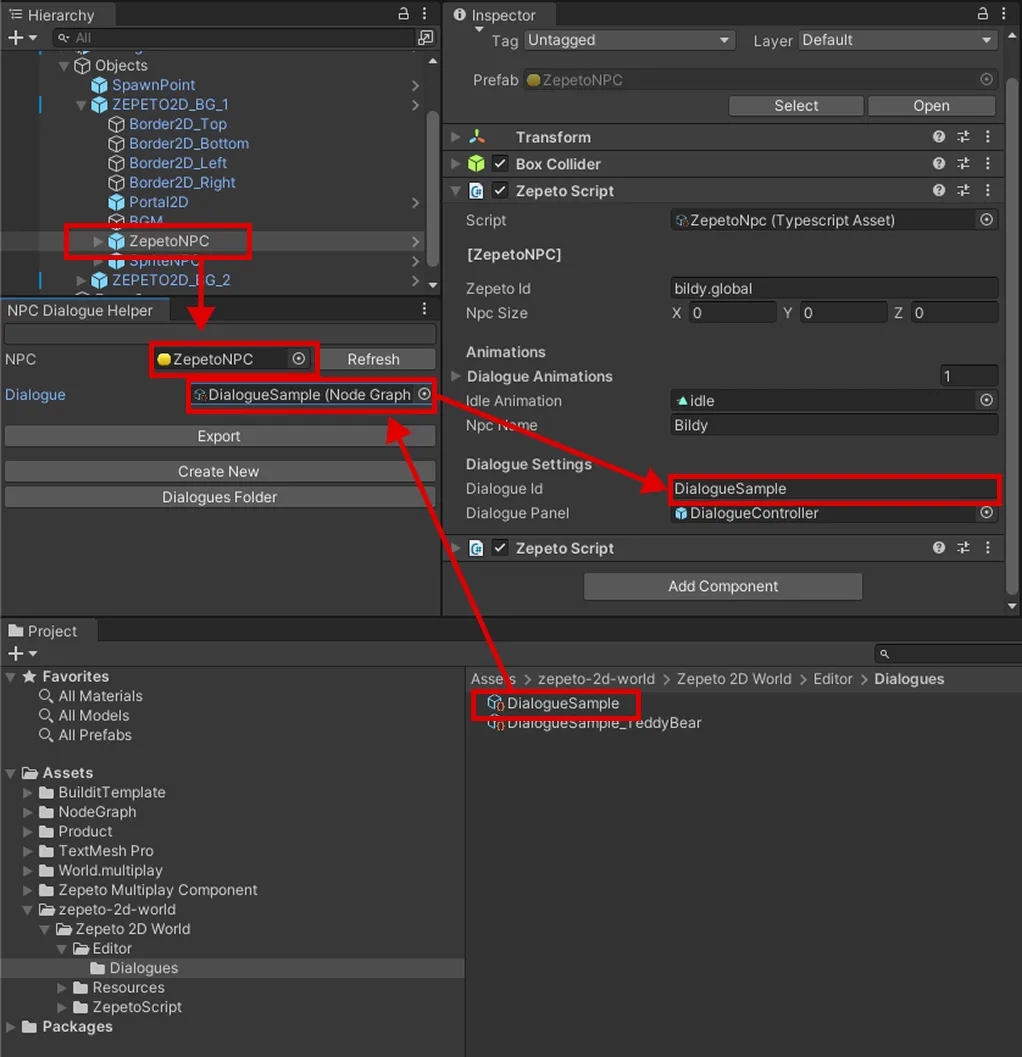
1. Using the Dialogue Helper
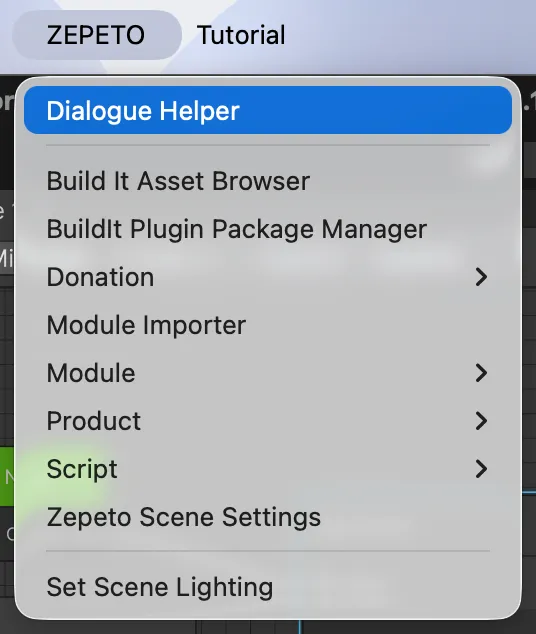
The Dialogue Helper is a central menu where you can manage dialogue creation and NPC assignments in one place.
- Open the window by selecting ZEPETO > Dialogue Helper from the top menu.
- NPC Field : Displays the currently selected NPC in the Scene. It updates automatically when you select a GameObject with a ZepetoNPC Component. (If it doesn't update automatically, press Refresh).
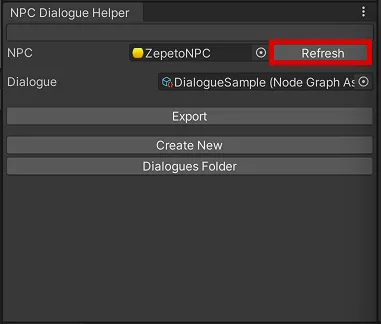
- Dialogue Field : Shows the dialogue connected to the current NPC. Click here to easily select and assign your desired dialogue asset (Node Graph Asset).
- Export Button : This button applies your dialogue settings so they work properly in the actual world. You must click this button after entering all NPC lines to finalize the dialogue asset.
- Dialogue Folder : Opens the folder where all your created dialogue assets (Node Graph Asset) are saved.
- Create New : Creates a new dialogue asset (Node Graph Asset).
What is a Dialogue Asset (Node Graph Asset)? It is the dialogue file where all your written lines are saved. This file is required for the NPC in the actual world to speak the lines you wrote.
2. Using the Dialogue Graph Editor (Node Editor)
When you click Create New in the Dialogue Helper or open a dialogue asset, the Dialogue Graph Editor appears.
This editor allows you to easily design complex dialogue flows by connecting conversation boxes. You can visually see how the dialogue branches based on choices as you build it.
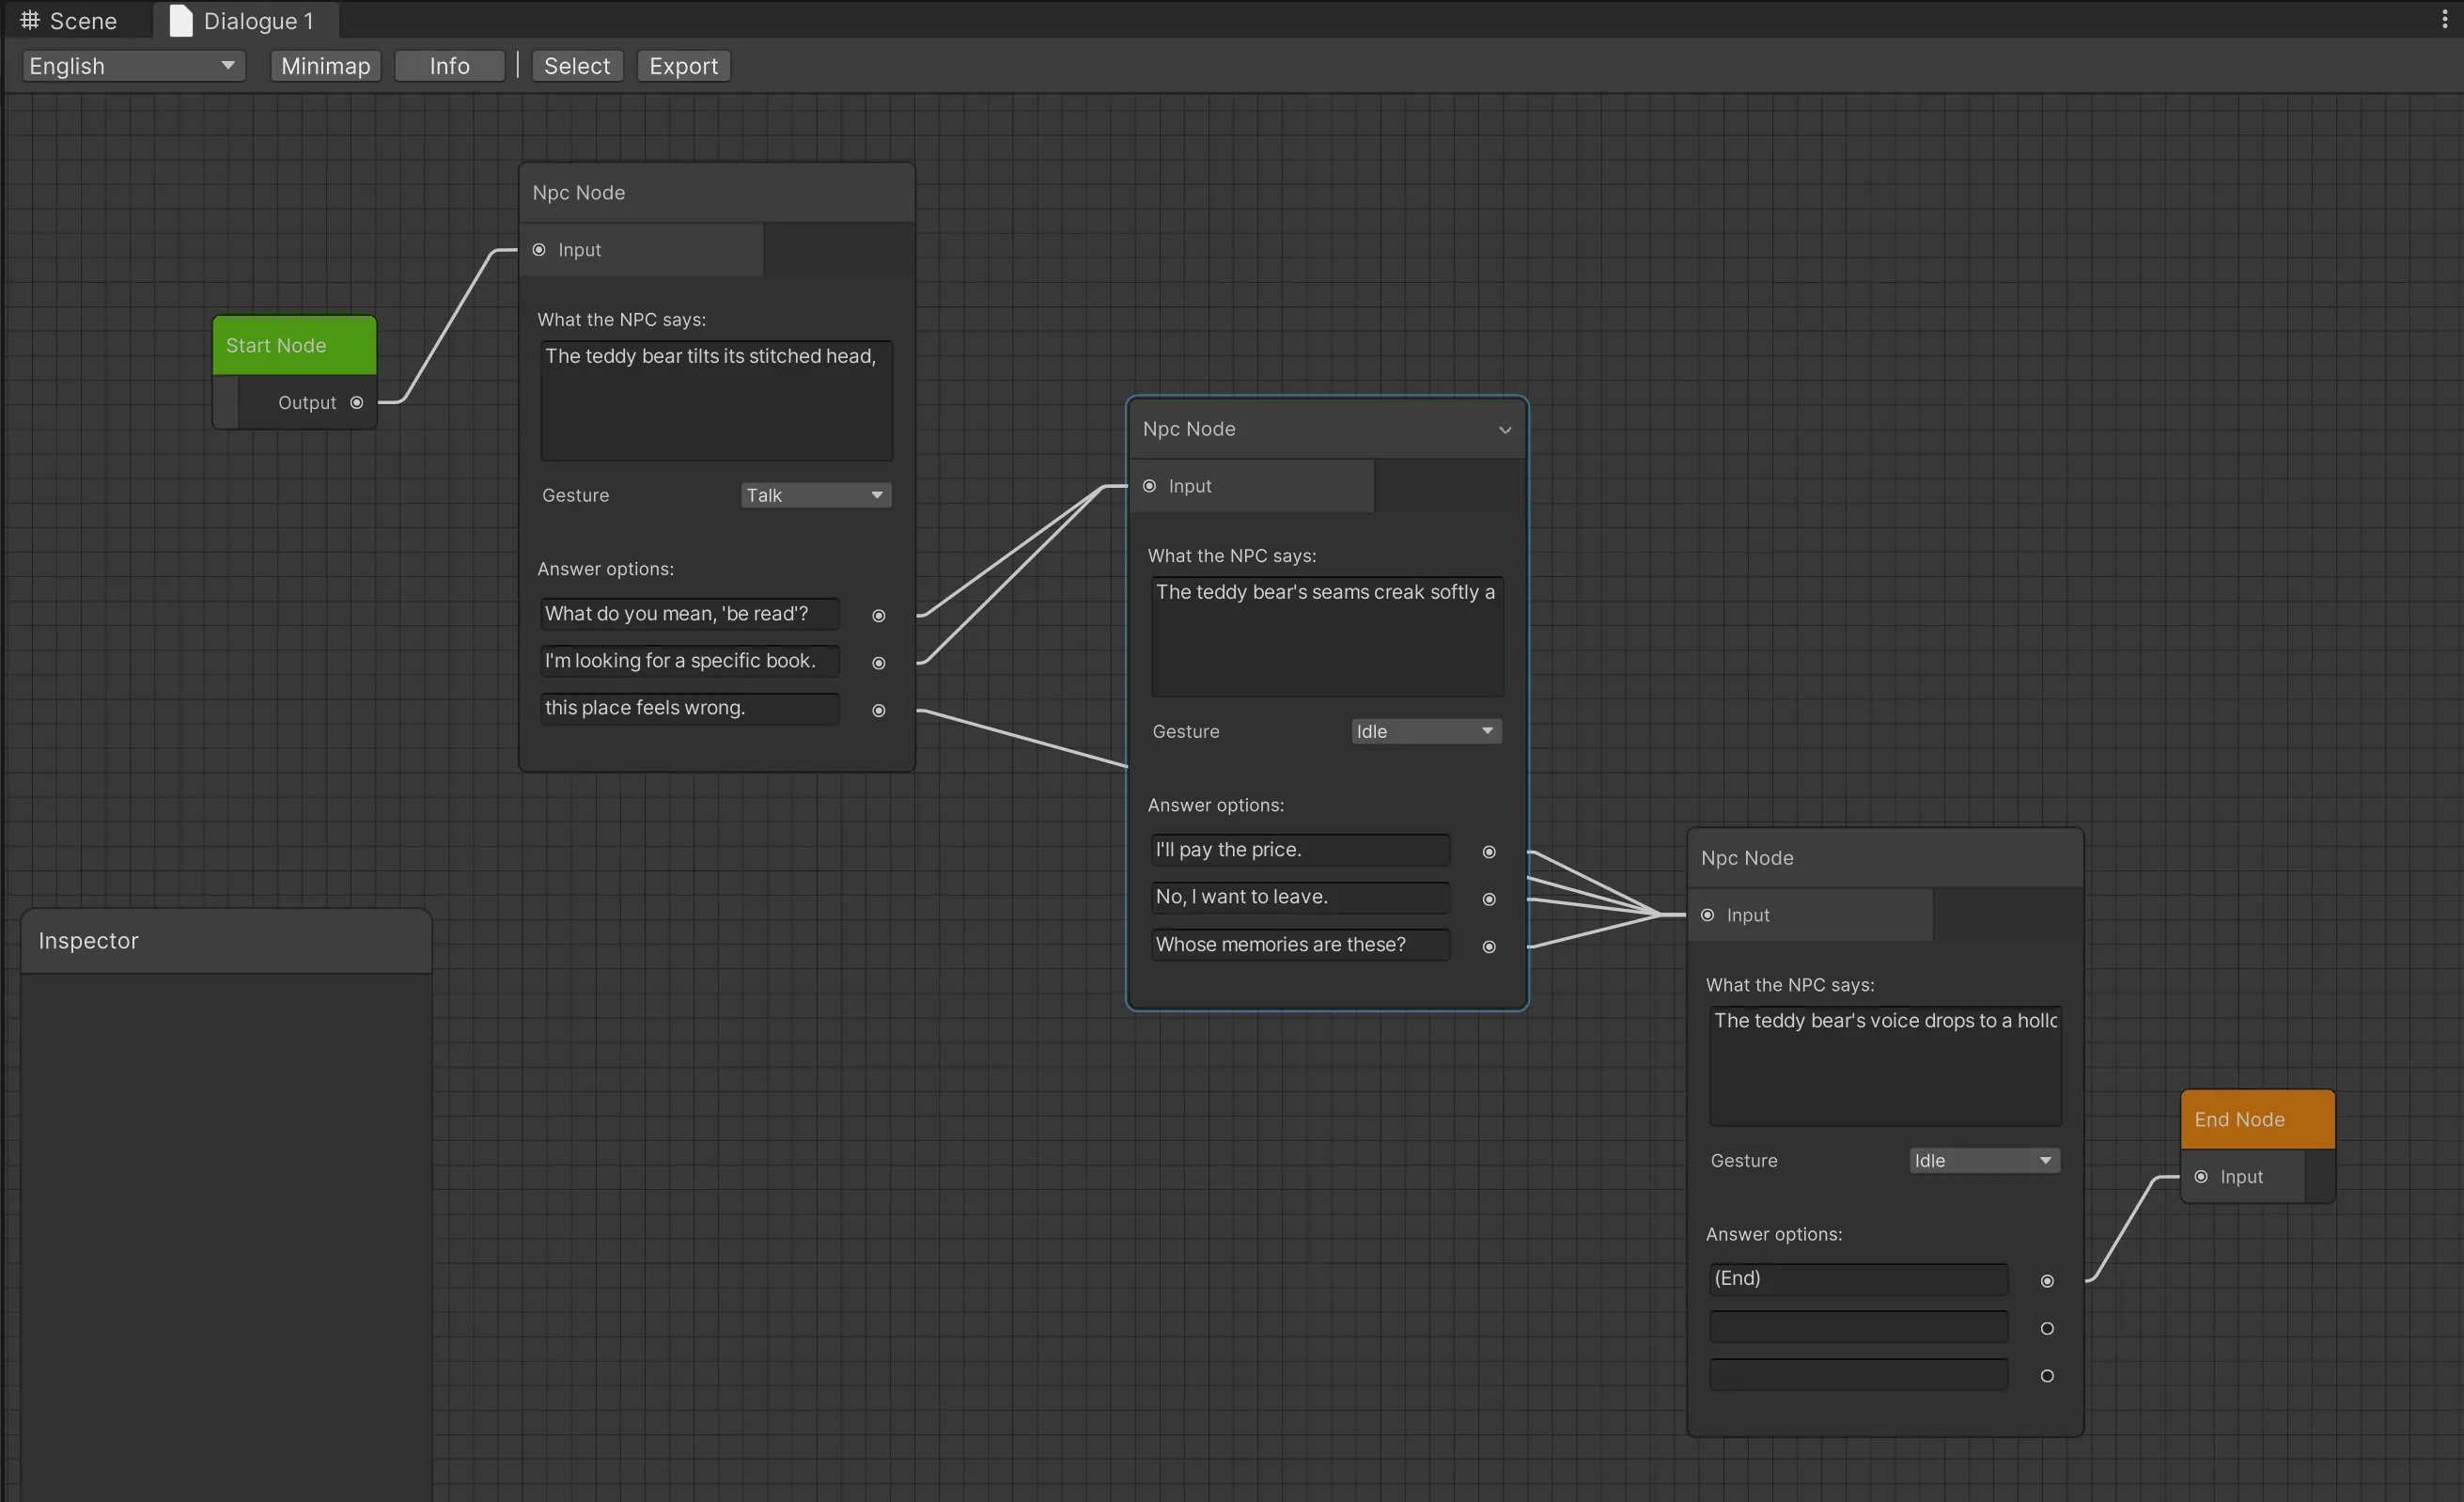
How to use the Dialogue Graph Editor
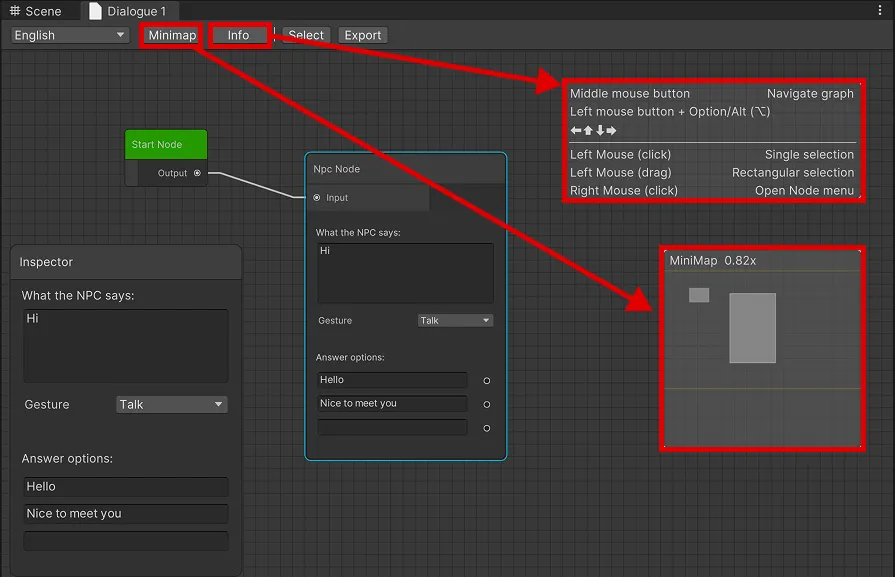
- Minimap: A map that helps you grasp the overall flow at a glance when the dialogue structure gets complex and nodes increase. You can use it to check your current view or quickly jump to a desired location.
- Info: Provides basic controls and shortcuts needed when navigating the Dialogue Graph Editor.
Core Node Types
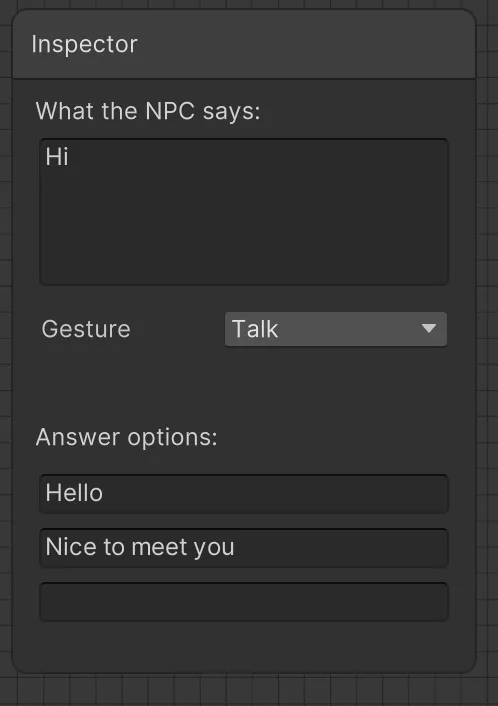
- NPC Node: The core node for entering NPC lines and player responses (choices).
- What the NPC says: The field to enter the lines the NPC will speak.
- Gesture: Select the animation the NPC will show during the conversation.
- You can apply default gestures directly from the dropdown list.
- Provided actions: Idle, Talk, Laugh, Think, Ok, No, Hi, Bye.
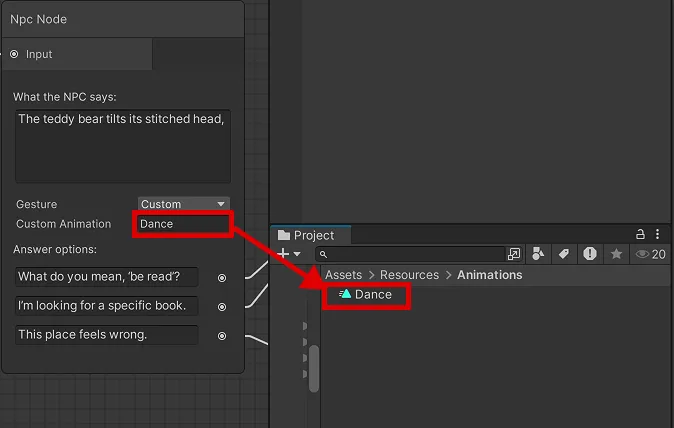
- If you want to use your own custom gesture not on the list, select Custom and enter the exact matching animation name in the Custom Animation field.
- Please place the character animation file you want to link inside the Resources/Animations/ folder in your Unity project.
Important When using a Custom gesture, if there is a typo in the animation file name or the file does not exist, a warning popup will appear, and you will not be able to Export.
- Answer options: You can add 1 to 3 response options for the player to choose from.
- By connecting nodes to each response, you can branch into new conversations based on the user's choices.
- End Node: Marks the end of the conversation. When the player selects an option connected to this node, the dialogue terminates.
Editing and Connecting the Graph
You can create and connect nodes on the dialogue canvas as follows:
- Right-click on an empty space to create a new node (Create Node), or copy and delete existing nodes.
- Drag the Output port on the right side of the choices (Answer options) and connect it to the Input port of the next node to complete the conversation flow.
TIPs
You can navigate the screen using the following methods:
- Navigation:
- Middle mouse button (Scroll wheel click)
- Left mouse button + Option/Alt (⌥) key
Selection & Menu:
- Single selection: Left mouse button (Click)
- Rectangular selection: Left mouse button (Drag to select as a rectangle)
- Open Node menu: Right mouse button (Click)
Localization Support Settings
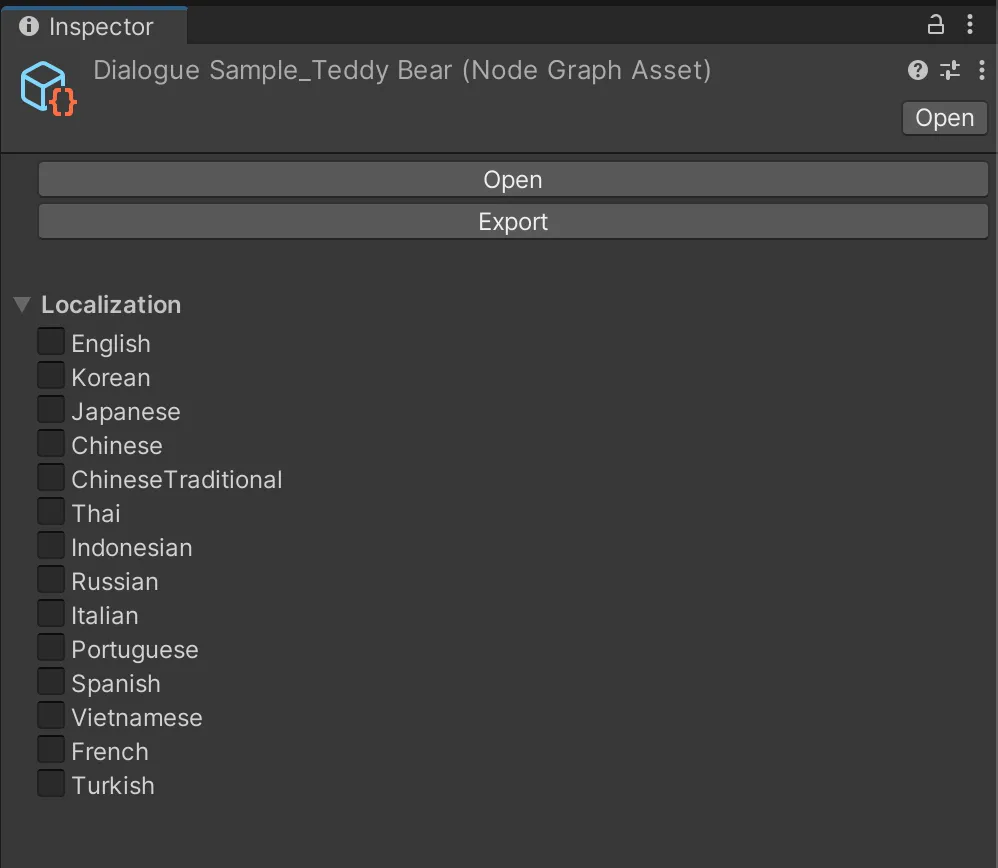
- Inspector Window Settings: Click the generated dialogue asset (Node Graph Asset) and check the Inspector window to select supported languages (English, Korean, Japanese, etc.).
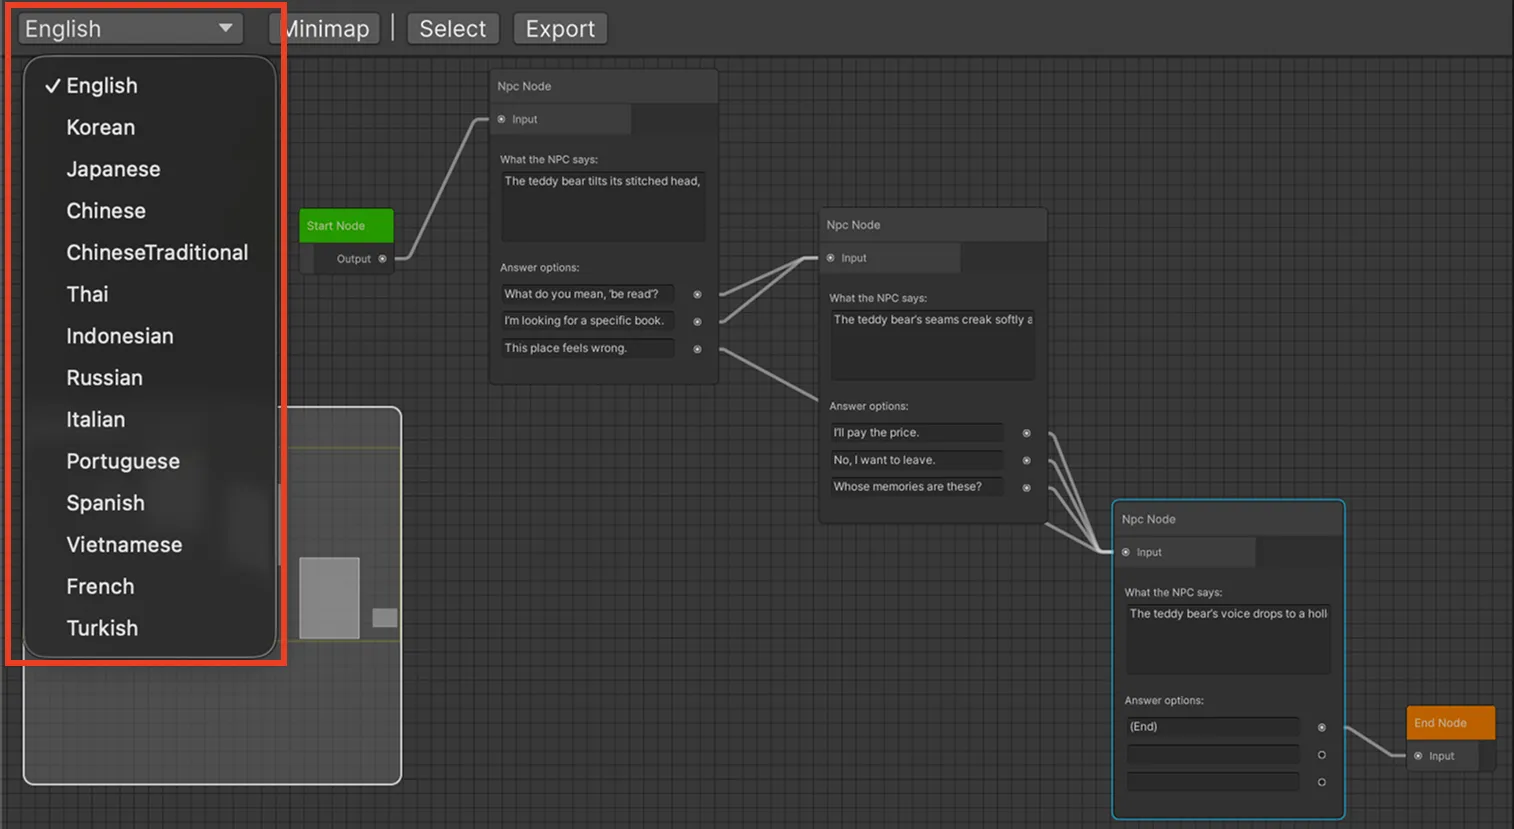
- Using the Editor Toolbar: Change the language in the Language Selector at the top left of the editor window to directly input translated text for each language.
3. Creating a New NPC Dialogue
Creating a Dialogue
- Click Create New in the Dialogue Helper window.
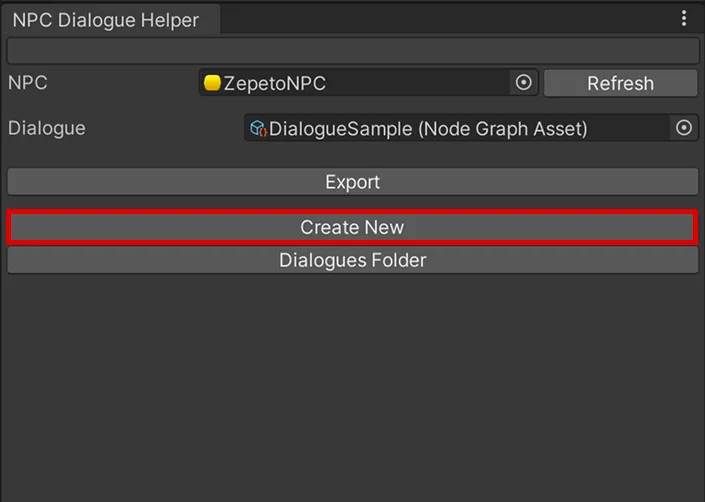
- In the automatically opened Dialogue Editor, freely edit NPC lines and player choices to build your dialogue nodes.
Assigning an NPC
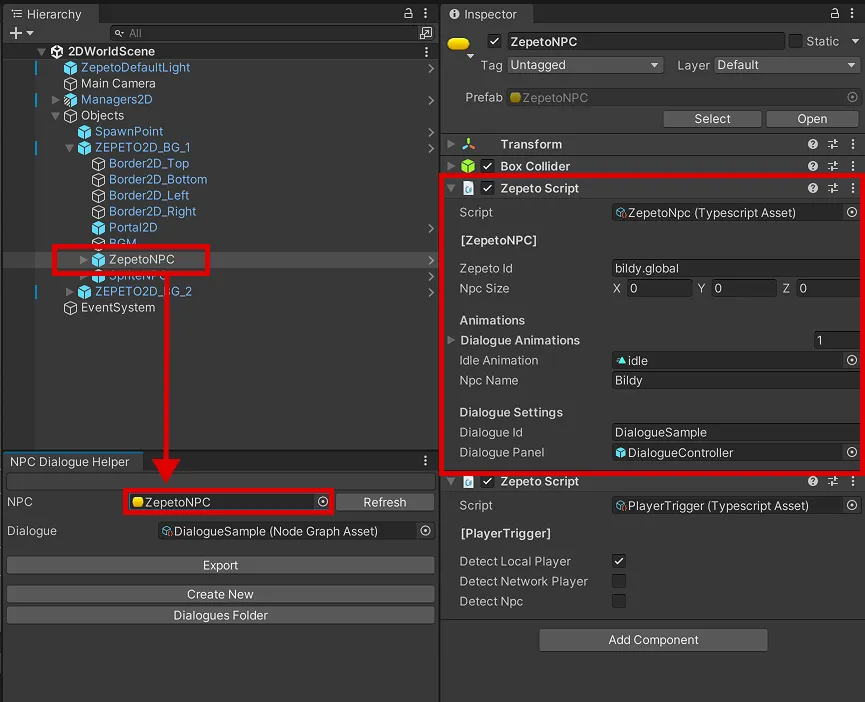
- Click the NPC object you want to add dialogue to in the Hierarchy window.
- Verify that the object has a ZepetoNPC Component in the Inspector window.
- Drag and drop the NPC into the 'NPC' field of the Dialogue Helper.
Assigning Dialogue and Exporting
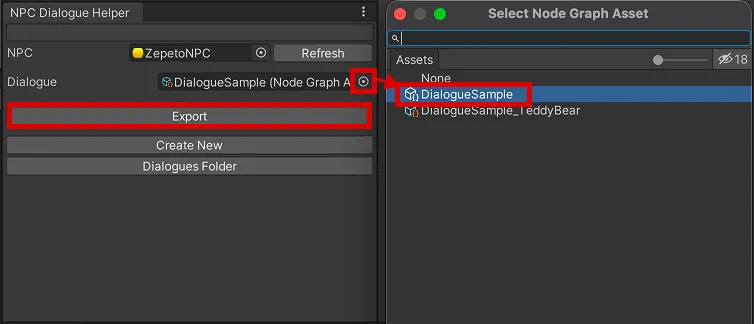
- Click the Dialogue field in the Dialogue Helper to link your newly created dialogue asset.
- Once applied, click the Export button so it runs properly in the world.
Final Inspector Check Ensure the settings are correct in the NPC's Inspector window (ZepetoNPC Component).
- NPC : Verify the correct NPC asset is assigned.
- Dialogue Id : Ensure the string matches your selected dialogue asset.
TIPs
- You can easily reuse the same NPC dialogue asset for multiple NPCs.
- To ensure your dialogue changes are properly reflected in the actual game, please Export frequently after modifying the dialogue.
FAQ
- When the dialogue doesn't work as configured: Make sure you clicked Export, and check that the Dialogue Panel and Dialogue Id are correctly entered in the Inspector.
- When NPC information doesn't update in the tool: Press the Refresh button in the Dialogue Helper window, or click the NPC again in the Hierarchy.
3. Vehicle Object
Vehicle
If you place an official vehicle from the Vehicle theme in your world, players can hop in and drive it.
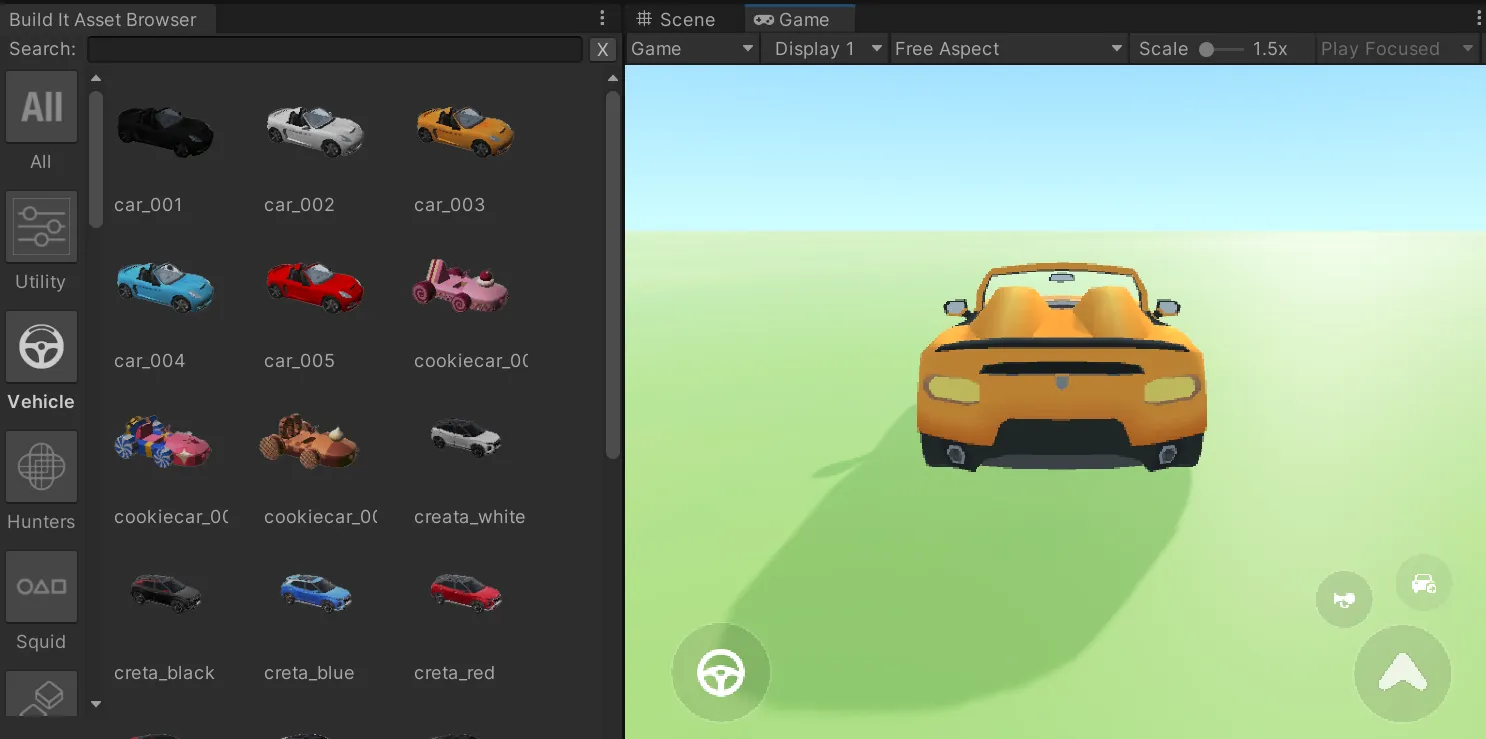
If you place multiple identical vehicles in a Scene with the same name, errors might occur. Please ensure each vehicle has a unique name.
- You can adjust the speed for each vehicle. Try making a racing game with vehicles of different speeds!
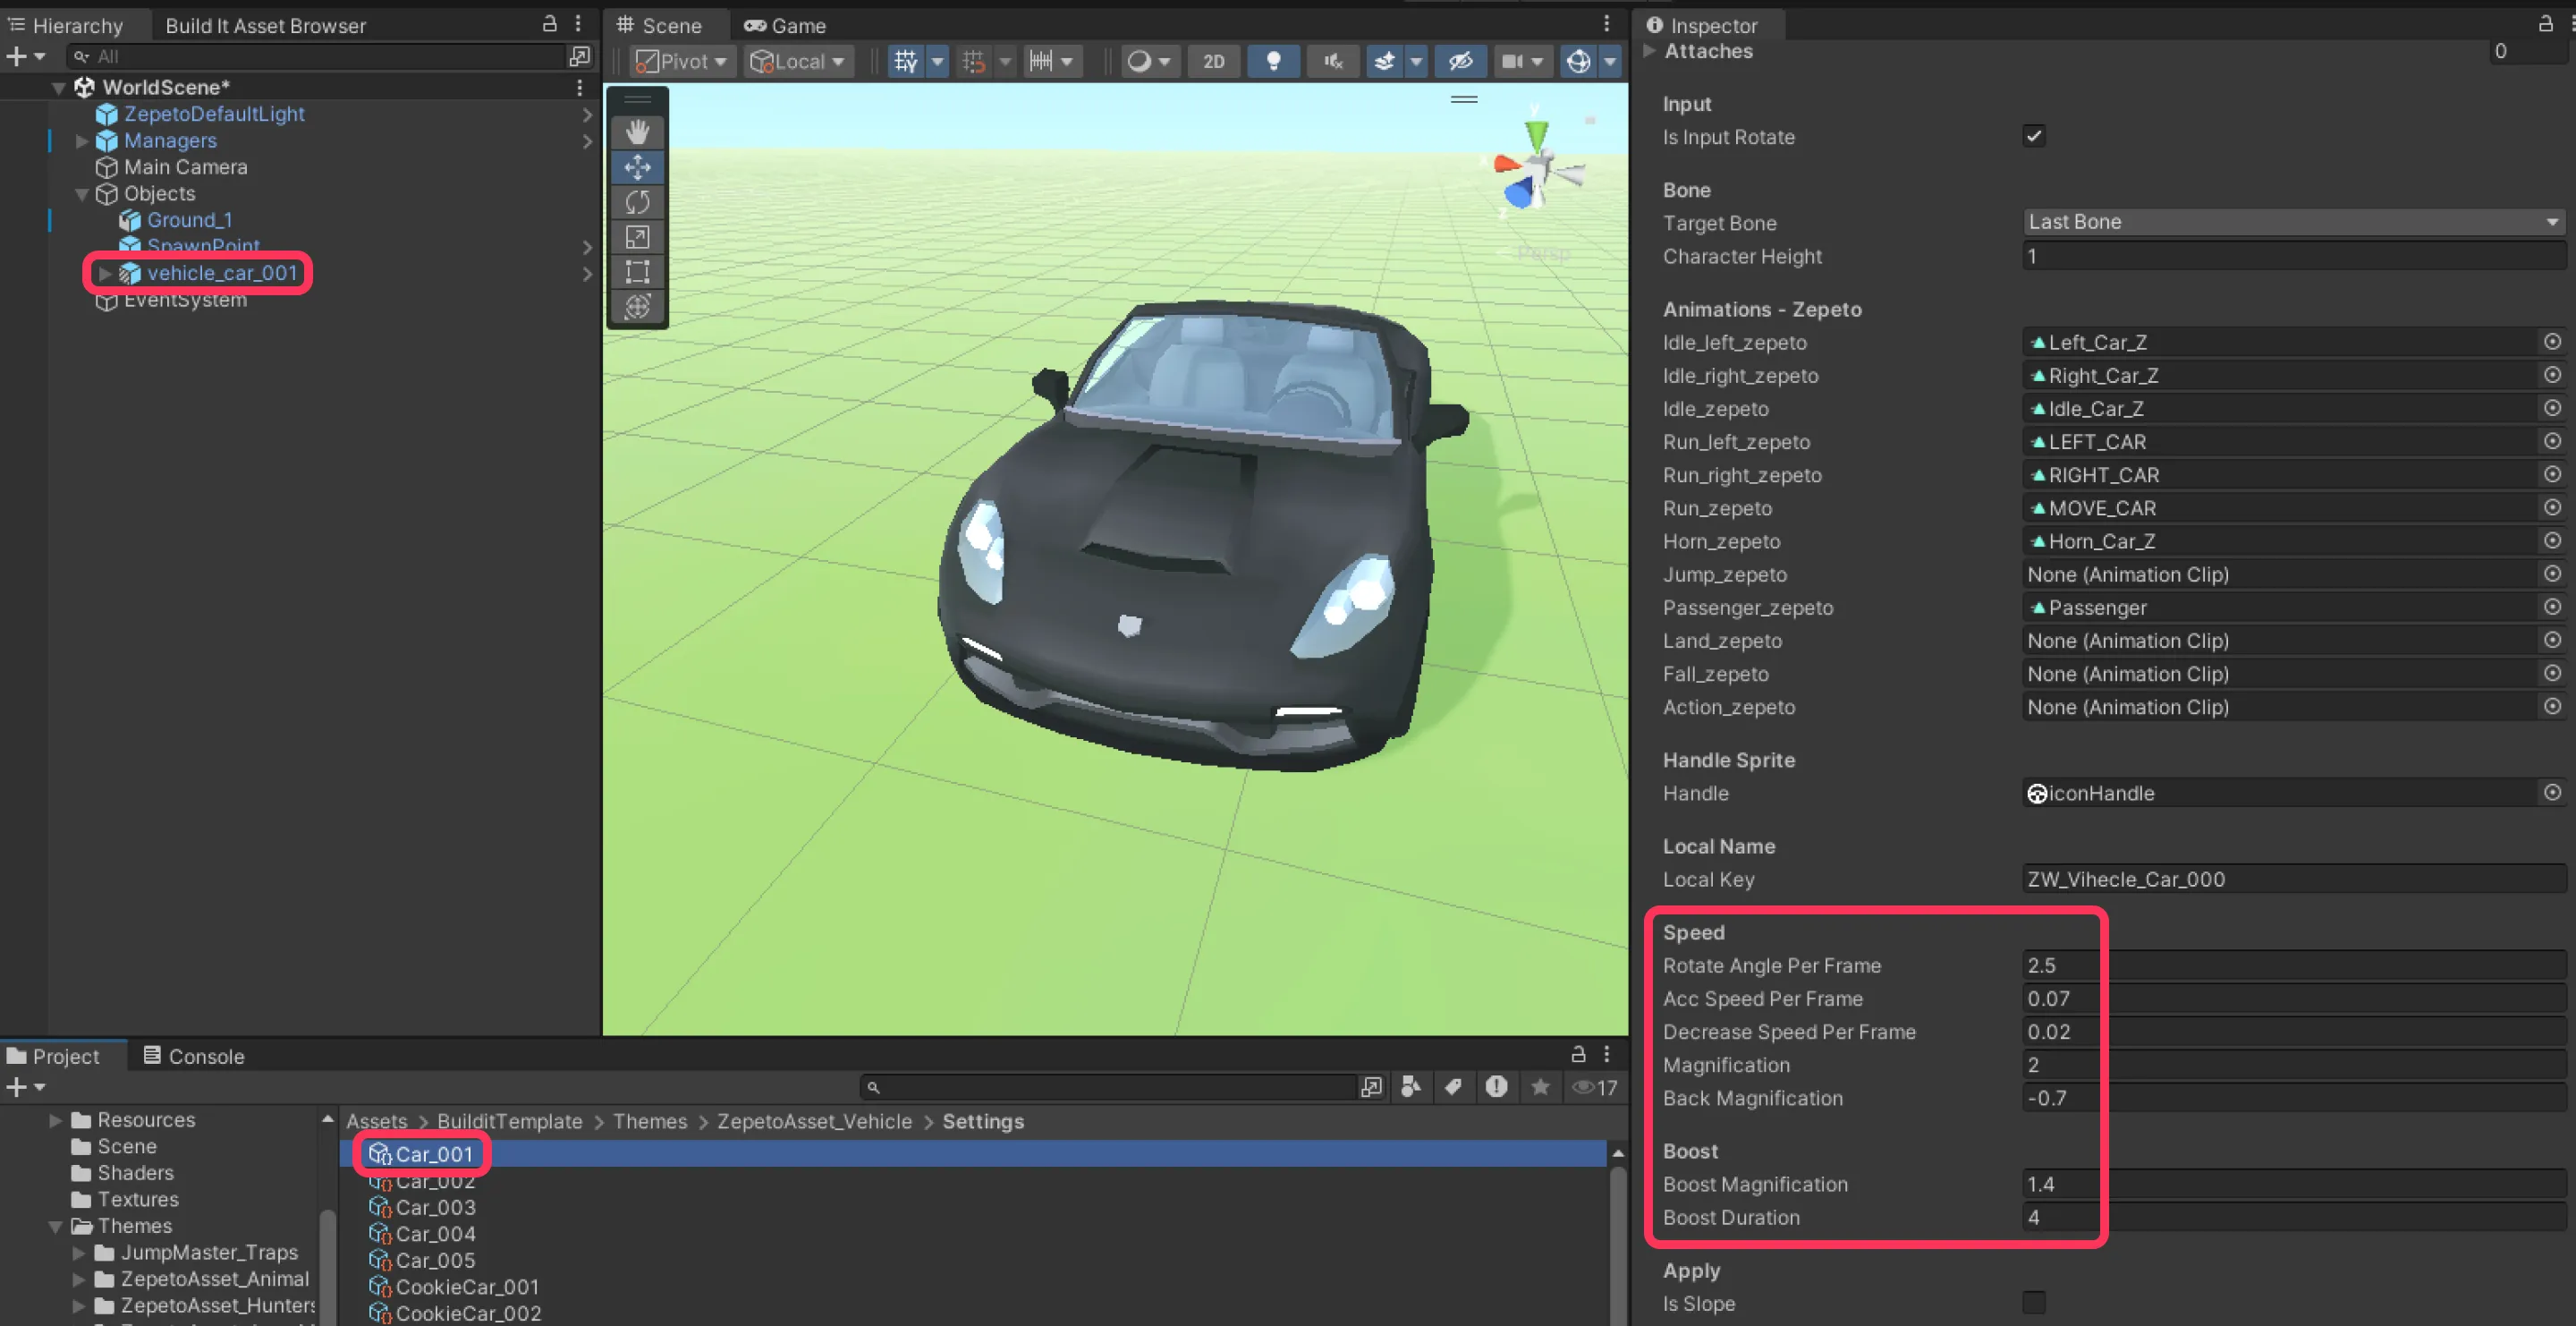
- Speed Settings Location
- Go to the Assets/BuilditTemplate/Themes/ZepetoAsset_Vehicle/Settings folder.
- Select a vehicle's script file, and you can edit its values in the Inspector on the right.
- Speed Settings
- rotateAnglePerFrame: How fast the steering wheel turns (handling sensitivity).
- accSpeedPerFrame: How quickly the car accelerates.
- decreaseSpeedPerFrame: How quickly the car decelerates.
- magnification: The base speed of the car.
- backMagnification: The speed when reversing.
- boostMagnification: The speed when using a boost.
- boostDuration: How long the boost lasts.
Application Tip
- You can change the appearance object under the vehicle to make it look like a completely different ride.
- Let players ride unique objects!

vehicle_vendor
Placing vehicle_vendor from the Vehicle theme in your world allows players to interact with the vendor object and summon a vehicle.
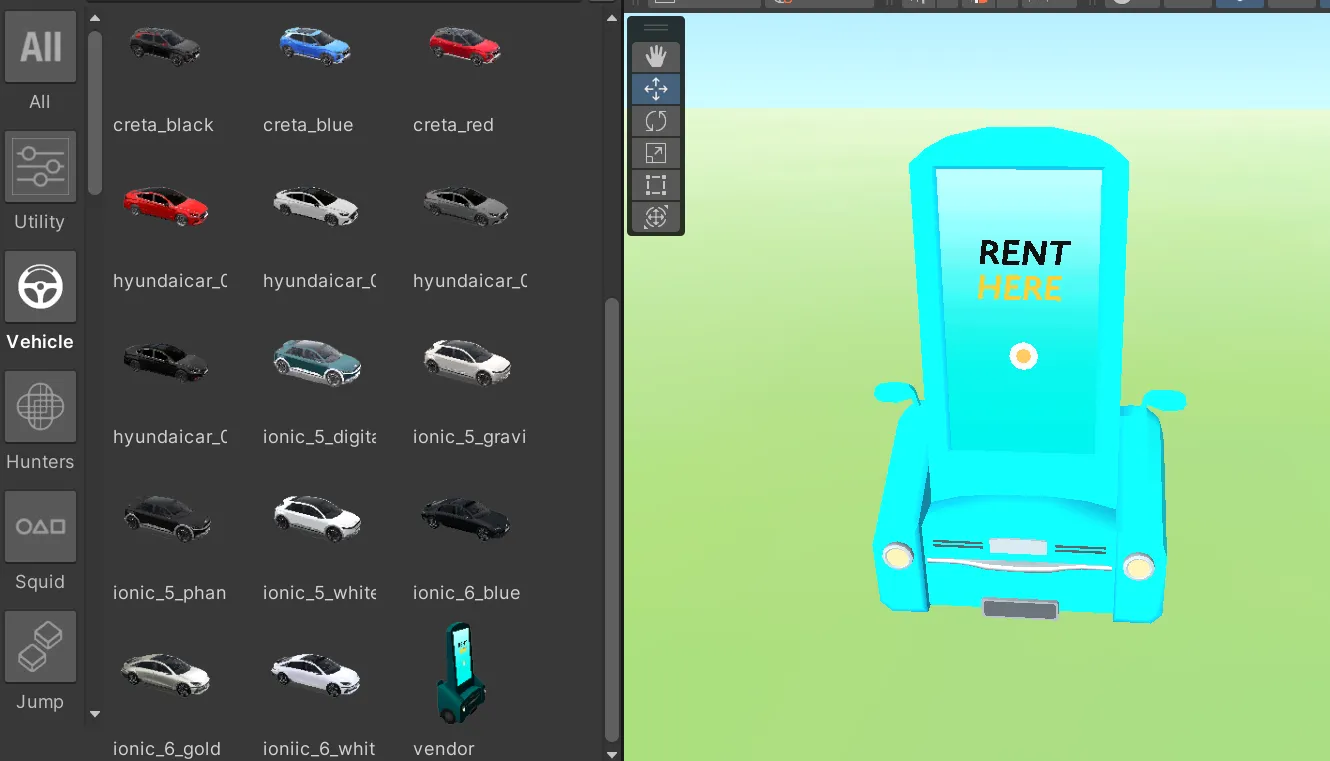
- Vendor Configuration
- Booth: You can set the shape/look of the vendor.
- Popup: The window that appears on screen for players to choose a car when they press the vendor button.
- SpawnLocation: You can set where the summoned car will appear.
AdVehicleSpawner
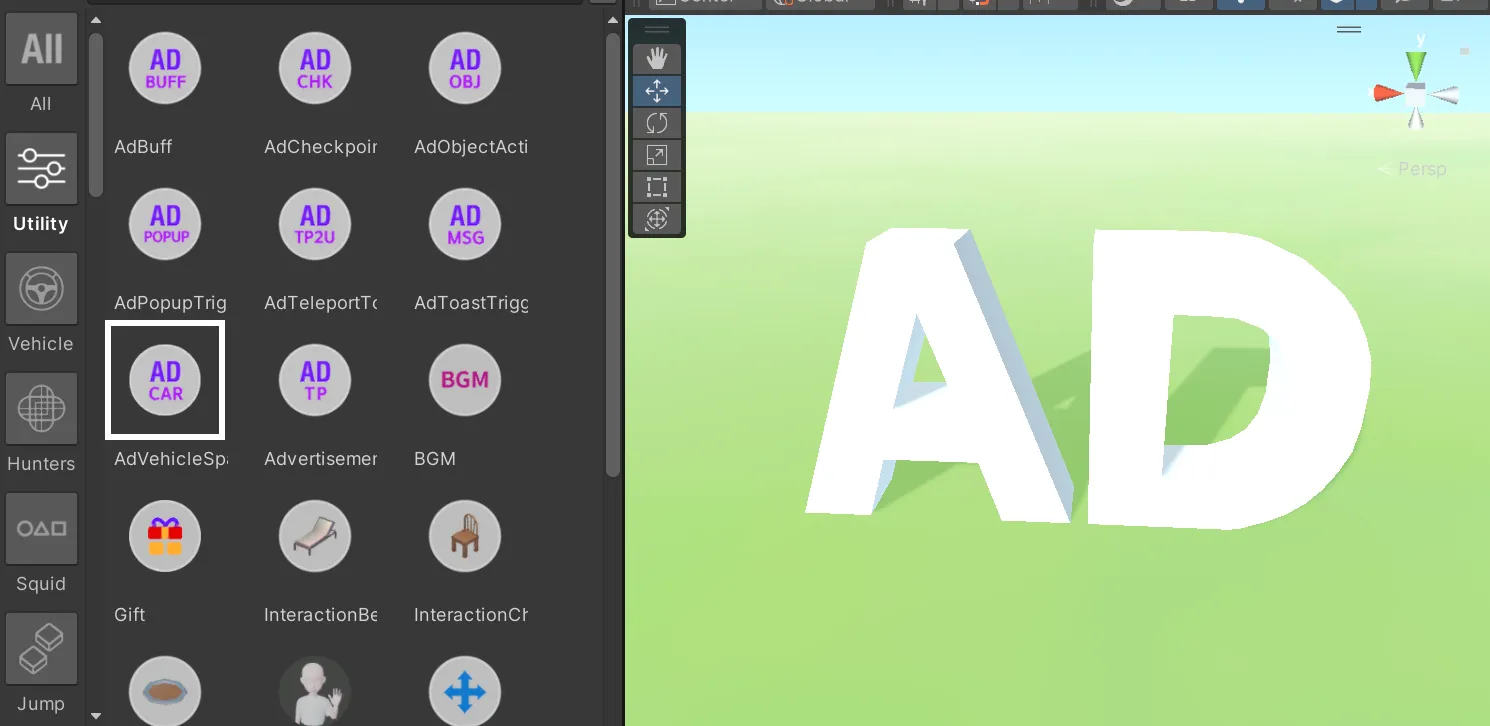
Placing AdVehicleSpawner from the Utility theme allows players to ride a vehicle after watching an ad.
- Important Notes
- Ad reward vehicles only remain while the player is driving them.
- As soon as you get out of the car, it disappears immediately.
- Spawner Configuration
- Vehicle Prefab: You can choose which vehicle to offer as the ad reward.
- Spawn Point: You can set where the car will appear after the ad is watched.
- Life Time: You can set how long it takes for the car to disappear. If you set it to '0 seconds', players can ride it indefinitely until they get out.
4. Adding Jump Map Essentials
Follow the video below and try adding various objects to your jump map!
Subtitles are available in multiple languages, so please turn them on while watching!
Using Moving Platforms
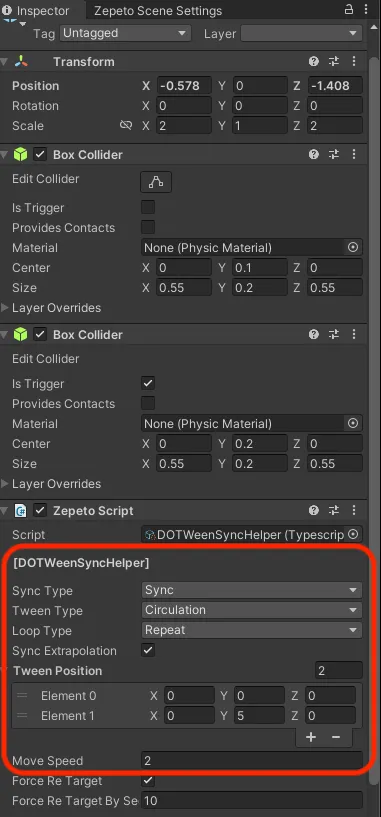
The MovingPlatform object is an incredibly useful moving platform for jump maps. Characters can ride it, and you can easily configure its movement trajectory and speed.
It automatically synchronizes in multiplayer, so everyone in the room sees the exact same movement.
You can set its properties in the child object MovingPlatformManager.
- Sync Type: Property for synchronization settings.
- Sync: Uses multiplayer synchronization.
- NoneSync: Does not use synchronization.
- Tween Type: Property defining how DOTween handles the back-and-forth movement.
- Circulation: Moves in a circular loop. 1 -> 2 -> 3 -> 4 -> 1 -> 2 -> 3 -> 4
- Linear: Returns along the same linear path. 1 -> 2 -> 3 -> 4 -> 3 -> 2 -> 1
- TeleportFirstPoint: Teleports back to the starting point upon reaching the end and loops again. 1 -> 2 -> 3 -> 4 -> 1(teleport)
- Loop Type: Property defining how many times it loops.
- Repeat: Loops continuously.
- JustOneWay: Moves only one way.
- JustOneRoundTrip: Makes only one round trip.
- Sync Extrapolation: Calculates additional position adjustments considering server delay times.
- default : true
- Tween Position
- Enter the localPosition coordinates the platform will move through. The platform moves in the order of the entered coordinates based on the Tween Type.
- At least 2 coordinates (Start-End) must be set.
- Move Speed: The movement speed of the object.
You can customize the MovingPlatform Object's appearance to fit your concept.
- Change Object Appearance: Remove the child object responsible for the appearance and place another object from the map in the same position to change its look.
Time Bomb
The BombTrap is an object that explodes when a character touches it.
If the character is within the explosion range when it detonates, they will be sent to the last checkpoint or SpawnPoint.
- Fuse Duration: Time (in seconds) from ignition to explosion.
- Explosion Range: The area affected by the explosion.
- Show Timer: If checked, the remaining time until explosion is displayed above the object.

Buff Platform
The BuffPanel alters the character's movement speed and jump power when stepped on.
Place them around your map to enhance or restrict character abilities in specific sections for various effects.
- Walk Speed: Character's walking speed on the object.
- Run Speed: Character's running speed on the object.
- Jump Power: Character's jump power on the object.
✏️ Tip
- If you want to make the character faster, enter positive values like 10 or 20. If you want to slow them down, enter negative values like -3.
- Try applying different speeds to create mission zones or puzzle elements!

Scaling Platform
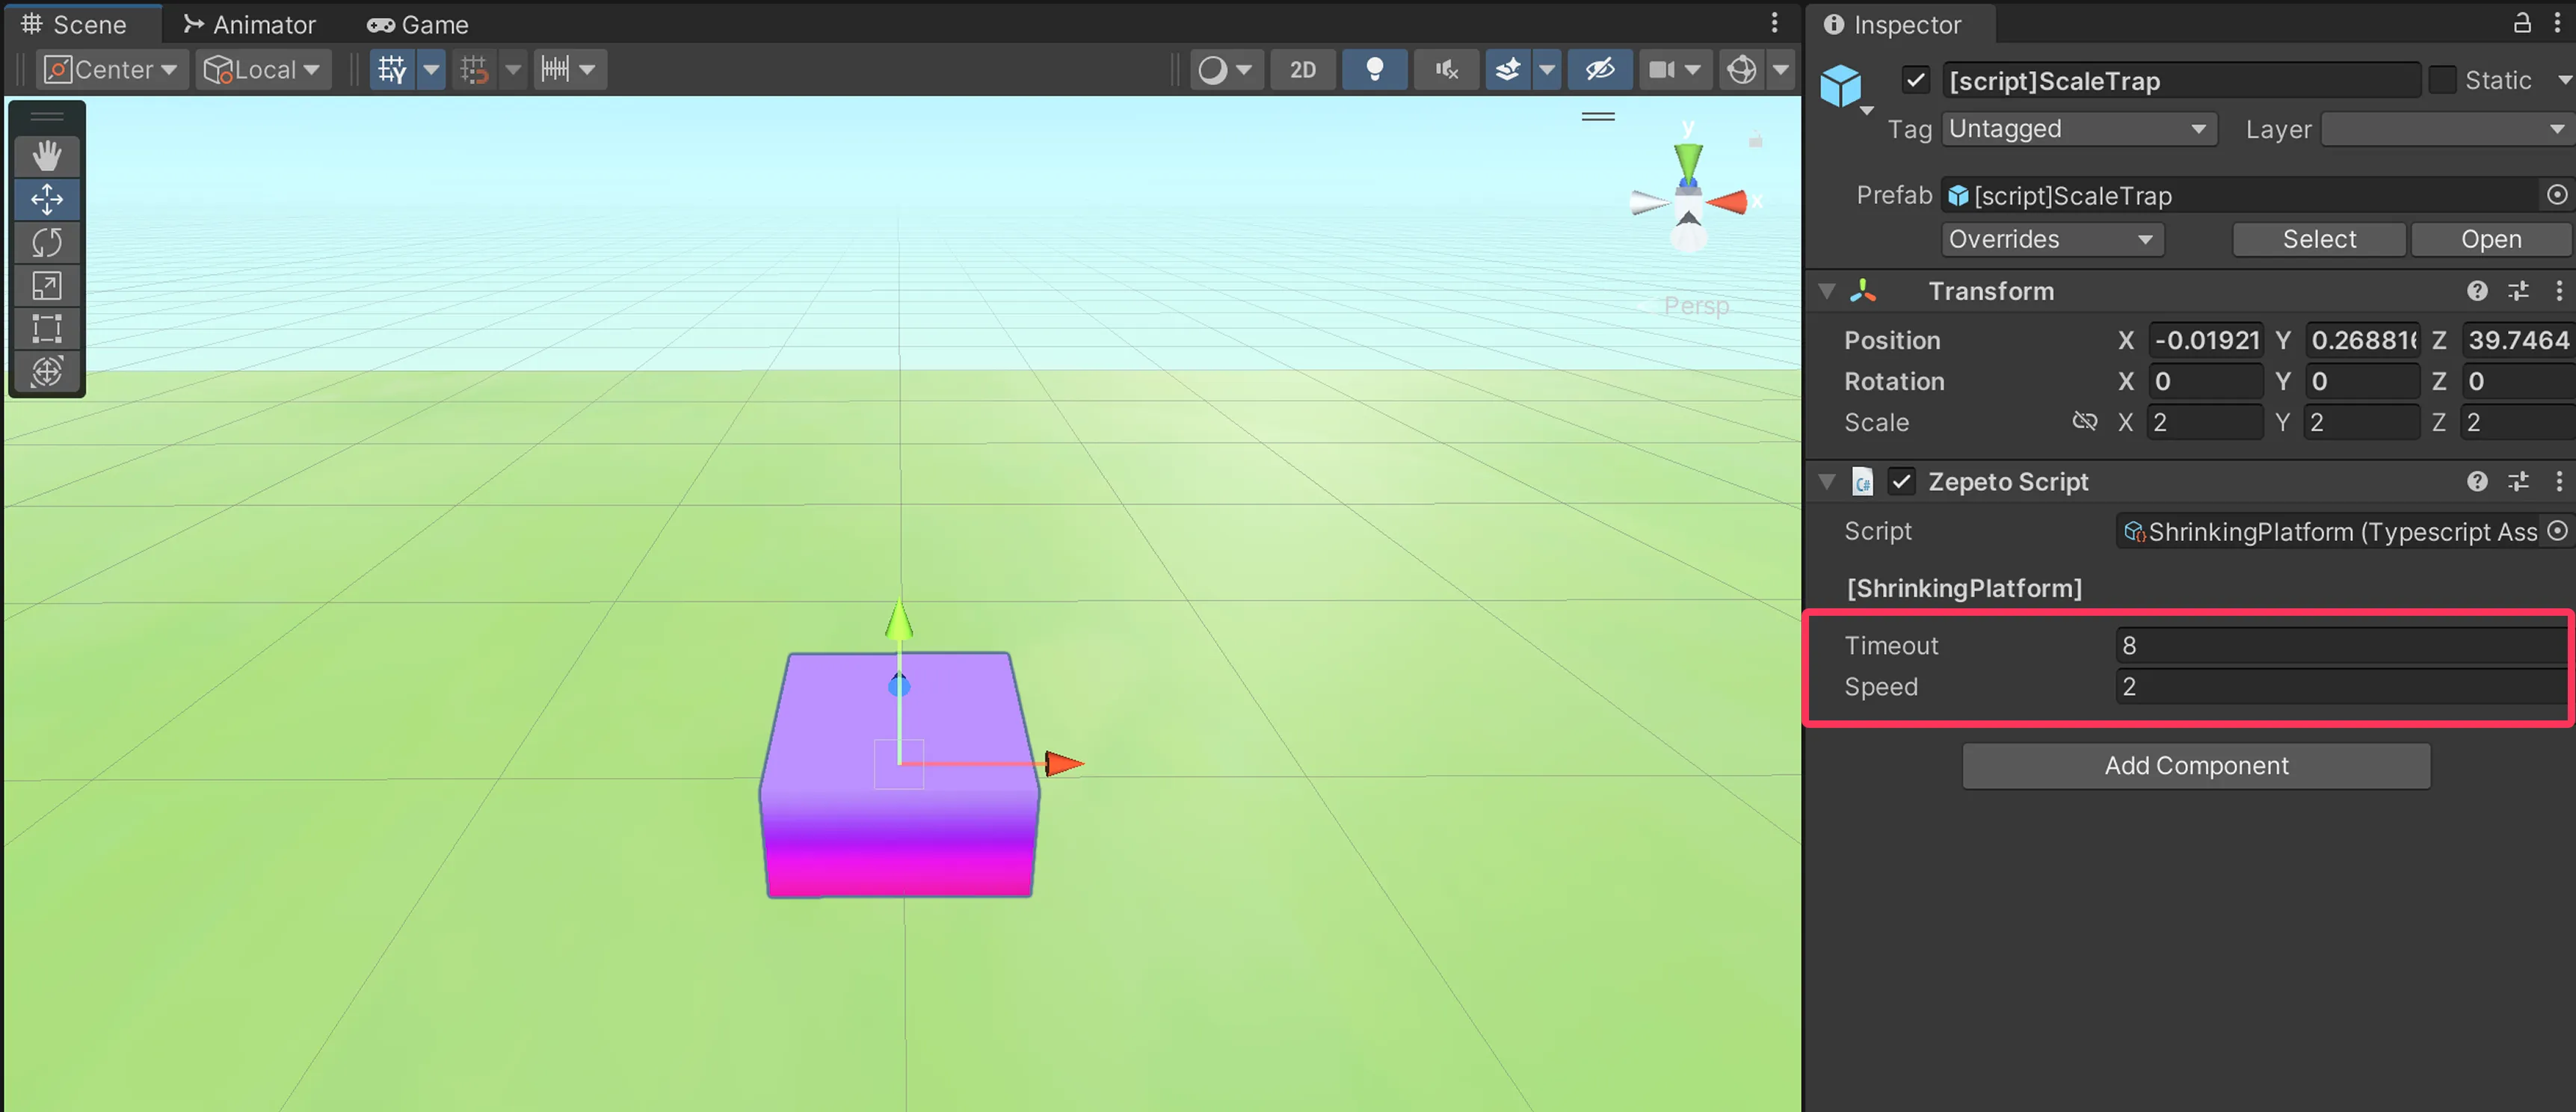
The ScaleTrap is a platform that repeatedly shrinks and grows at a set interval.
Place it in jump maps or timing-critical courses to create varying levels of difficulty.
- Timeout: Time (in seconds) the object stays at its maximum size.
- Speed: How fast the object scales up and down.
Spring Platform
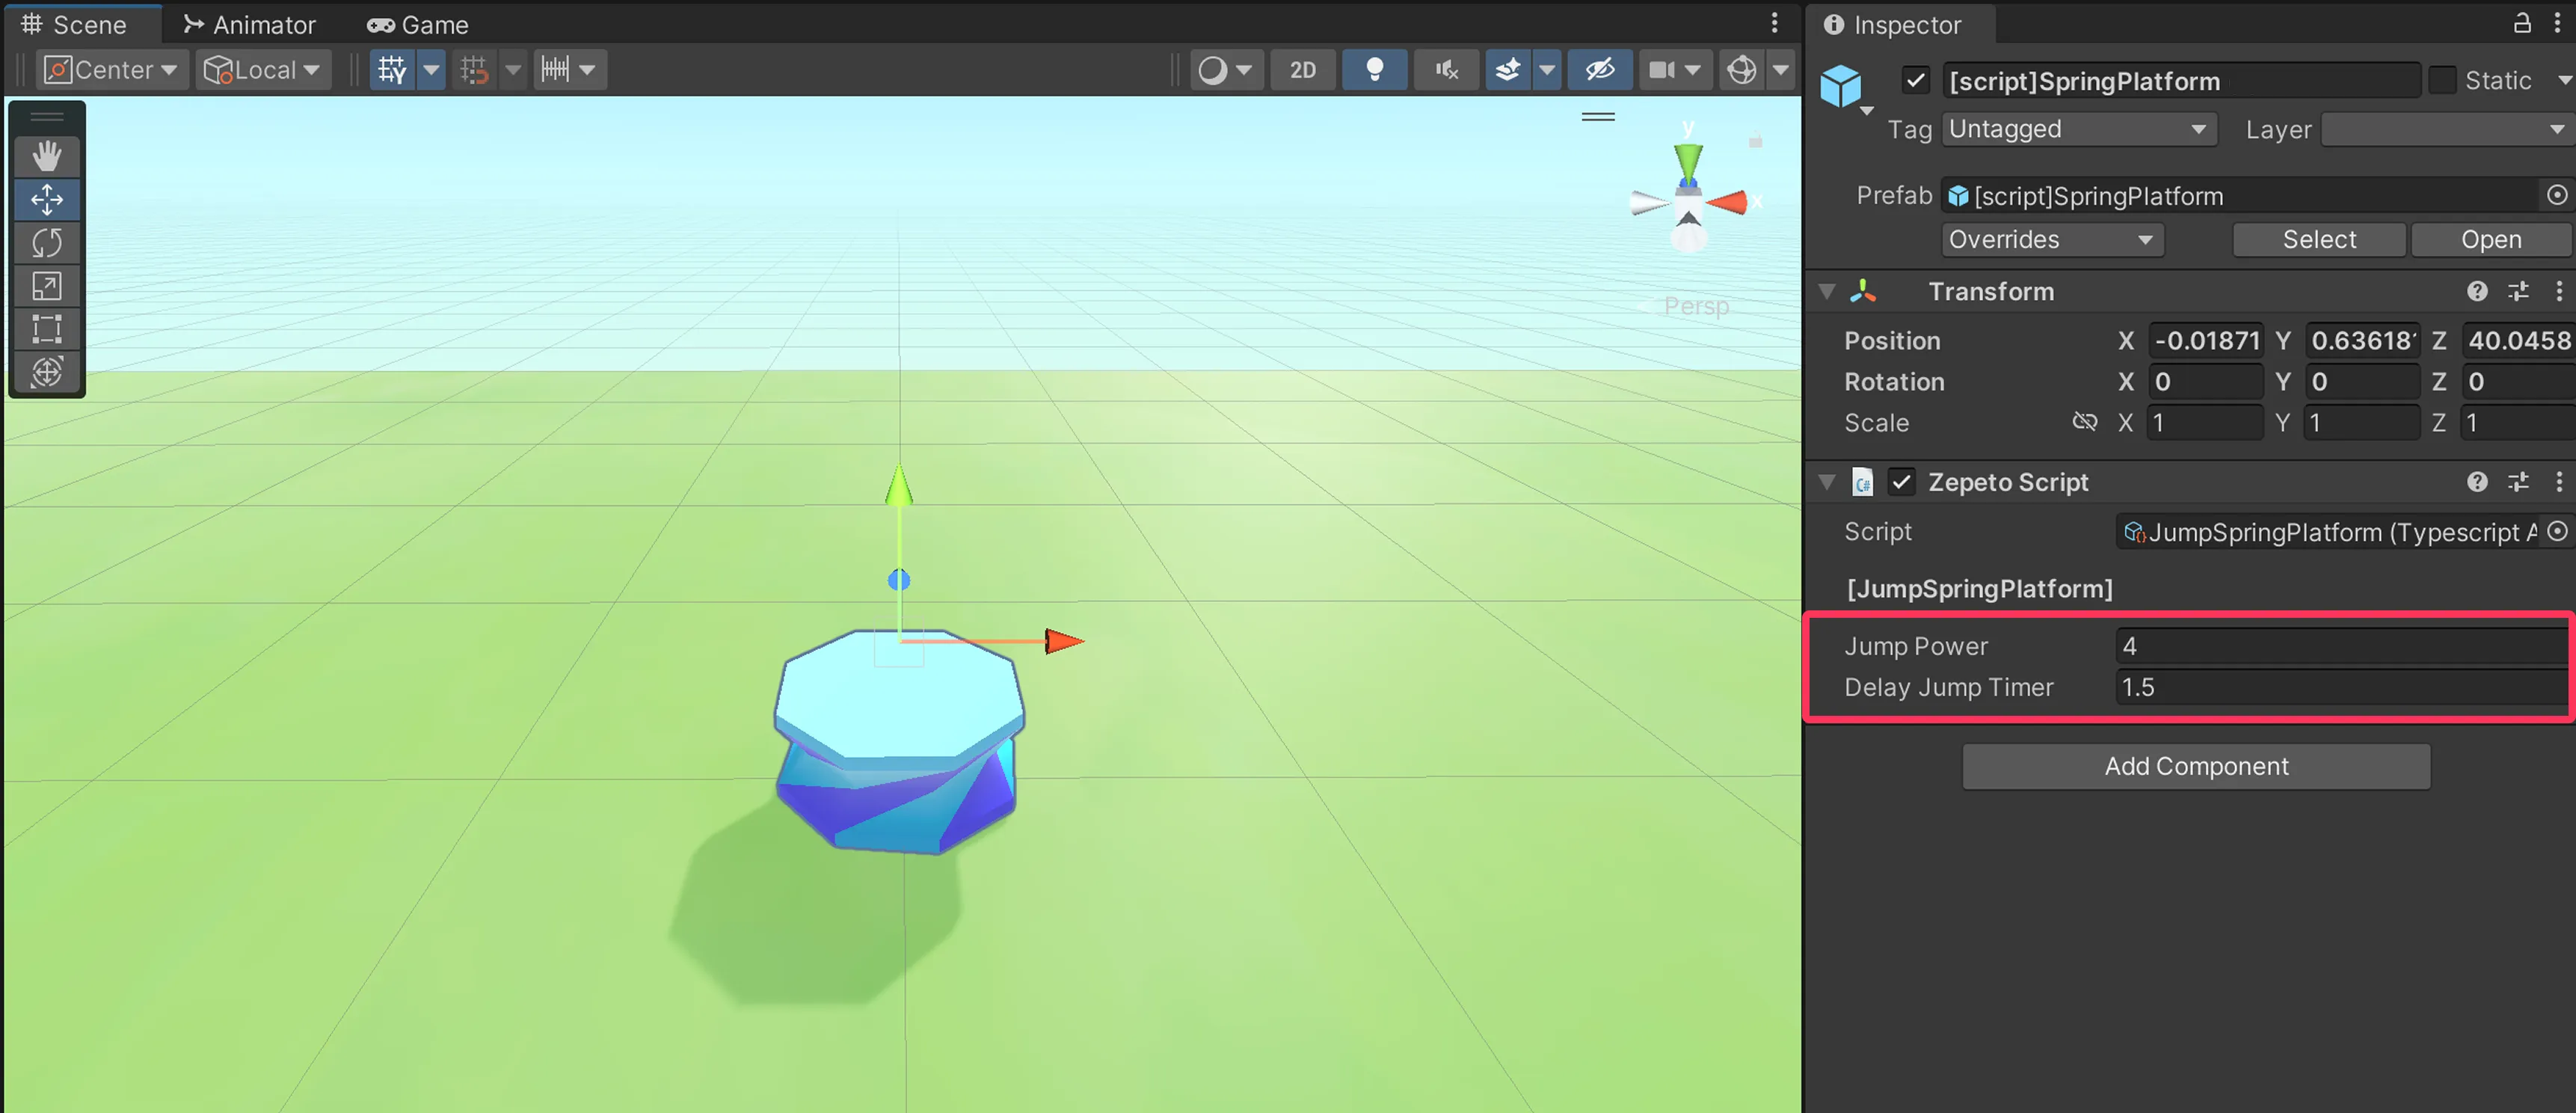
The SpringPlatform automatically launches the character into the air at regular intervals without any input required.
- Jump Power: The force that bounces the character upwards.
- Delay Jump Timer: The interval between each jump (in seconds).
Blinking Platform
The BlinkingPlatform repeatedly appears and disappears over set intervals.
- Visible Time: Time (in seconds) the platform remains visible.
- Invisible Time: Time (in seconds) the platform remains hidden.
- Change Object Appearance: Remove the child object Model responsible for the appearance and place another object from the map in the same position to change its look. If you change the appearance, be sure to adjust the size and position of the Collider in the Inspector window to match the new shape.

Conveyor Belt
The Conveyor object makes characters move as if they are standing on a real conveyor belt.
When stepping on the Conveyor, characters move forward at the set speed.
Moving in the arrow's direction increases walking or running speed.
Conversely, moving against the arrow's direction decreases walking or running speed.
- Conveyor Speed: Adjust the speed of the belt.
- Change Object Appearance: Remove the child object Model responsible for the appearance and place another object from the map in the same position to change its look. If you change the appearance, be sure to adjust the size and position of the Collider in the Inspector window to match the new shape.

Rotating Platform
(1) Character Rotates Together
RotatingPlatform is a spinning platform characters can ride on.
- x Speed: Change the rotation speed along the x-axis.
- y Speed: Change the rotation speed along the y-axis.
- z Speed: Change the rotation speed along the z-axis.
- Change Object Appearance: Remove the child object Model responsible for the appearance and place another object from the map in the same position to change its look. If you change the appearance, be sure to adjust the size and position of the Collider in the Inspector window to match the new shape.

(2) Character Remains Still, Only Object Rotates
Rotator is a purely visual rotating object. Since it cannot carry characters along its rotation, use it mostly for decoration.
- x Speed: Change the rotation speed along the x-axis.
- y Speed: Change the rotation speed along the y-axis.
- z Speed: Change the rotation speed along the z-axis.
- Change Object Appearance: Remove the child object Model responsible for the appearance and place another object from the map in the same position to change its look. If you change the appearance, be sure to adjust the size and position of the Collider in the Inspector window to match the new shape.

Falling Platform
The FallingPlatform drops downwards after a set amount of time once a character touches it.
- Duration: Time (in seconds) it stays in place after being touched before falling.
- Falling Speed: The speed at which it drops.
- Falling Distance: How far down it drops.
- Change Object Appearance: Remove the child object Model responsible for the appearance and place another object from the map in the same position to change its look. If you change the appearance, be sure to adjust the size and position of the Collider in the Inspector window to match the new shape.

Deadly Trap
(1) Basic Trap
TrapObj teleports the character upon contact.
It sends them to the most recently activated CheckpointPlatform, or the SpawnPoint if none exist.
- Change Object Appearance: Remove the child object Model responsible for the appearance and place another object from the map in the same position to change its look. If you change the appearance, be sure to adjust the size and position of the Collider in the Inspector window to match the new shape.

(2) Moving Trap
TrapMovingCube moves back and forth between a startPoint and endPoint, teleporting characters on contact.
It sends them to the most recently activated CheckpointPlatform, or the SpawnPoint if none exist.
- startPoint: Select the startPoint object in the Hierarchy and move it to change the starting location of the path.
- endPoint: Select the endPoint object in the Hierarchy and move it to change the ending location of the path.
- Speed: Change the movement speed in the Inspector window.
- Change Object Appearance: Remove the child object Model responsible for the appearance and place another object from the map in the same position to change its look. If you change the appearance, be sure to adjust the size and position of the Collider in the Inspector window to match the new shape.

(3) Pendulum Trap
TrapPendulum swings side to side like a pendulum.
- Amplitude: The height of the pendulum's swing.
- Speed: The speed of the pendulum.
- Enable Kill: If checked, teleports characters who touch the bottom sphere. It sends them to the most recently activated CheckpointPlatform, or the SpawnPoint if none exist.
- Change Object Appearance: Remove the child object Model responsible for the appearance and place another object from the map in the same position to change its look. If you change the appearance, be sure to adjust the size and position of the Collider in the Inspector window to match the new shape.

(4) Rotating Trap (Horizontal)
TrapRotatingHorizontal spins horizontally. Teleports characters touching the white bar.
It sends them to the most recently activated CheckpointPlatform, or the SpawnPoint if none exist.
- Rotation Speed: Speed of rotation.
- Change Object Appearance: Remove the child object Model responsible for the appearance and place another object from the map in the same position to change its look. If you change the appearance, be sure to adjust the size and position of the Collider in the Inspector window to match the new shape.

(5) Rotating Trap (Vertical)
TrapRotatingVertical spins vertically. Teleports characters touching the white bar.
It sends them to the most recently activated CheckpointPlatform, or the SpawnPoint if none exist.
- Rotation Speed: Speed of rotation.
- Change Object Appearance: Remove the child object Model responsible for the appearance and place another object from the map in the same position to change its look. If you change the appearance, be sure to adjust the size and position of the Collider in the Inspector window to match the new shape.

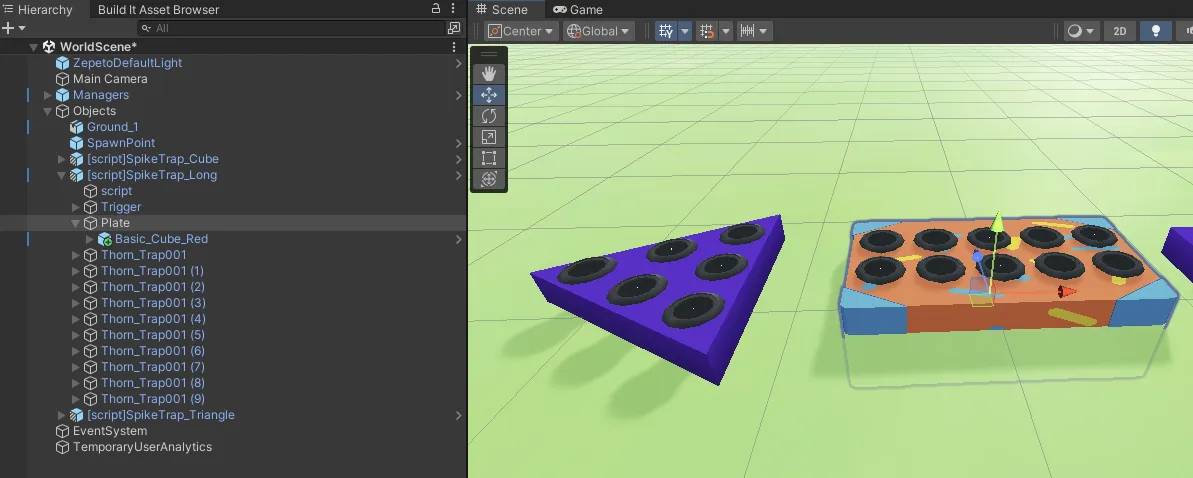
(6) Spike Trap
SpikeTrap reveals spikes at set intervals.
Place them to add tension to your map.
- Spike Active Duration : Time the spikes remain extended.
- Spike Cooldown Duration : Time the spikes remain retracted.

- Change Object Appearance: To change the base plate, delete the appearance object under Plate and add your desired one.
- We recommend not modifying the other elements.
Checkpoint
The CheckpointPlatform sets a respawn point when touched.
Place them strategically between stages when creating a jump map.
- Index: Determines the activation order of the CheckpointPlatform.
- The default Index value is 0. Please enter a value greater than 0. Negative values will not work properly.
- The character respawns at the CheckpointPlatform with the highest Index value they have visited.
- Using the Index prevents players from being sent back to a lower-level checkpoint if they backtrack after clearing a higher level.
- A CheckpointPlatform is activated the first time a character visits it. If Index values are the same, the character respawns at the most recently activated CheckpointPlatform.
- Example) If a character visits checkpoints in the order of 1 -> 2 -> 3 -> 2, they will respawn at checkpoint 3 (the most recently activated new checkpoint), not the recently revisited checkpoint 2.
- Change Object Appearance: Remove the child object Model responsible for the appearance and place another object from the map in the same position to change its look. If you change the appearance, be sure to adjust the size and position of the Collider in the Inspector window to match the new shape.

5. Using the Squid Theme
Yonghee Object
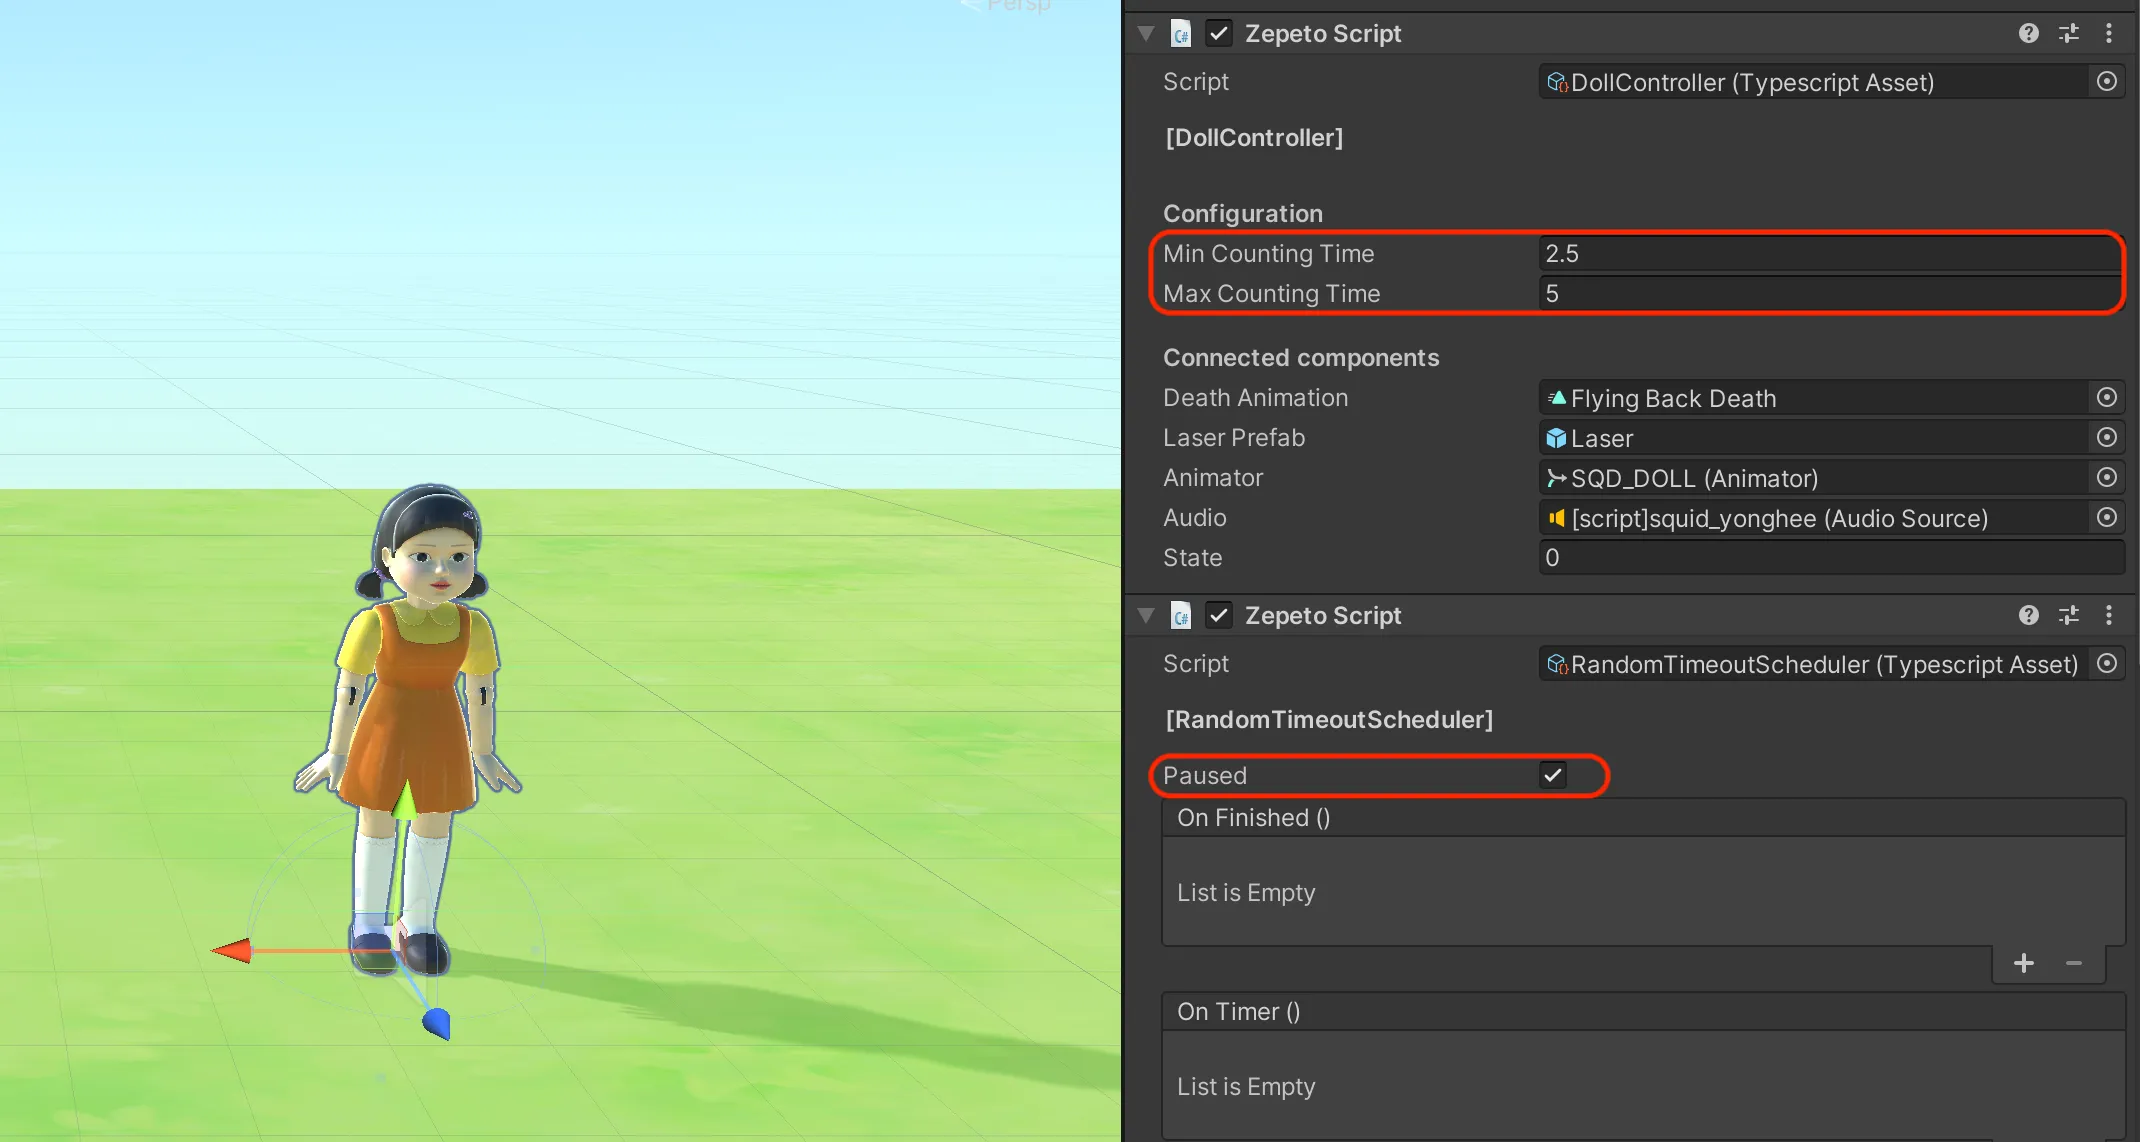
The yonghee object lets you play a simple mini-game just by placing it in your world.
- Basic Operation
- It operates automatically when you press Play.
- If you move while the Yonghee character is looking at you, lasers fire and you fall over. (It only triggers a falling animation).
- The time the Yonghee character looks back can be set in the Inspector.
- Min Counting Time: Minimum time Yonghee spends looking back.
- Max Counting Time: Maximum time Yonghee spends looking back.
- Paused: Toggles her operation on/off. If you just want her as a decorative object with no function, set Paused to ON before placing.
Voting Feature
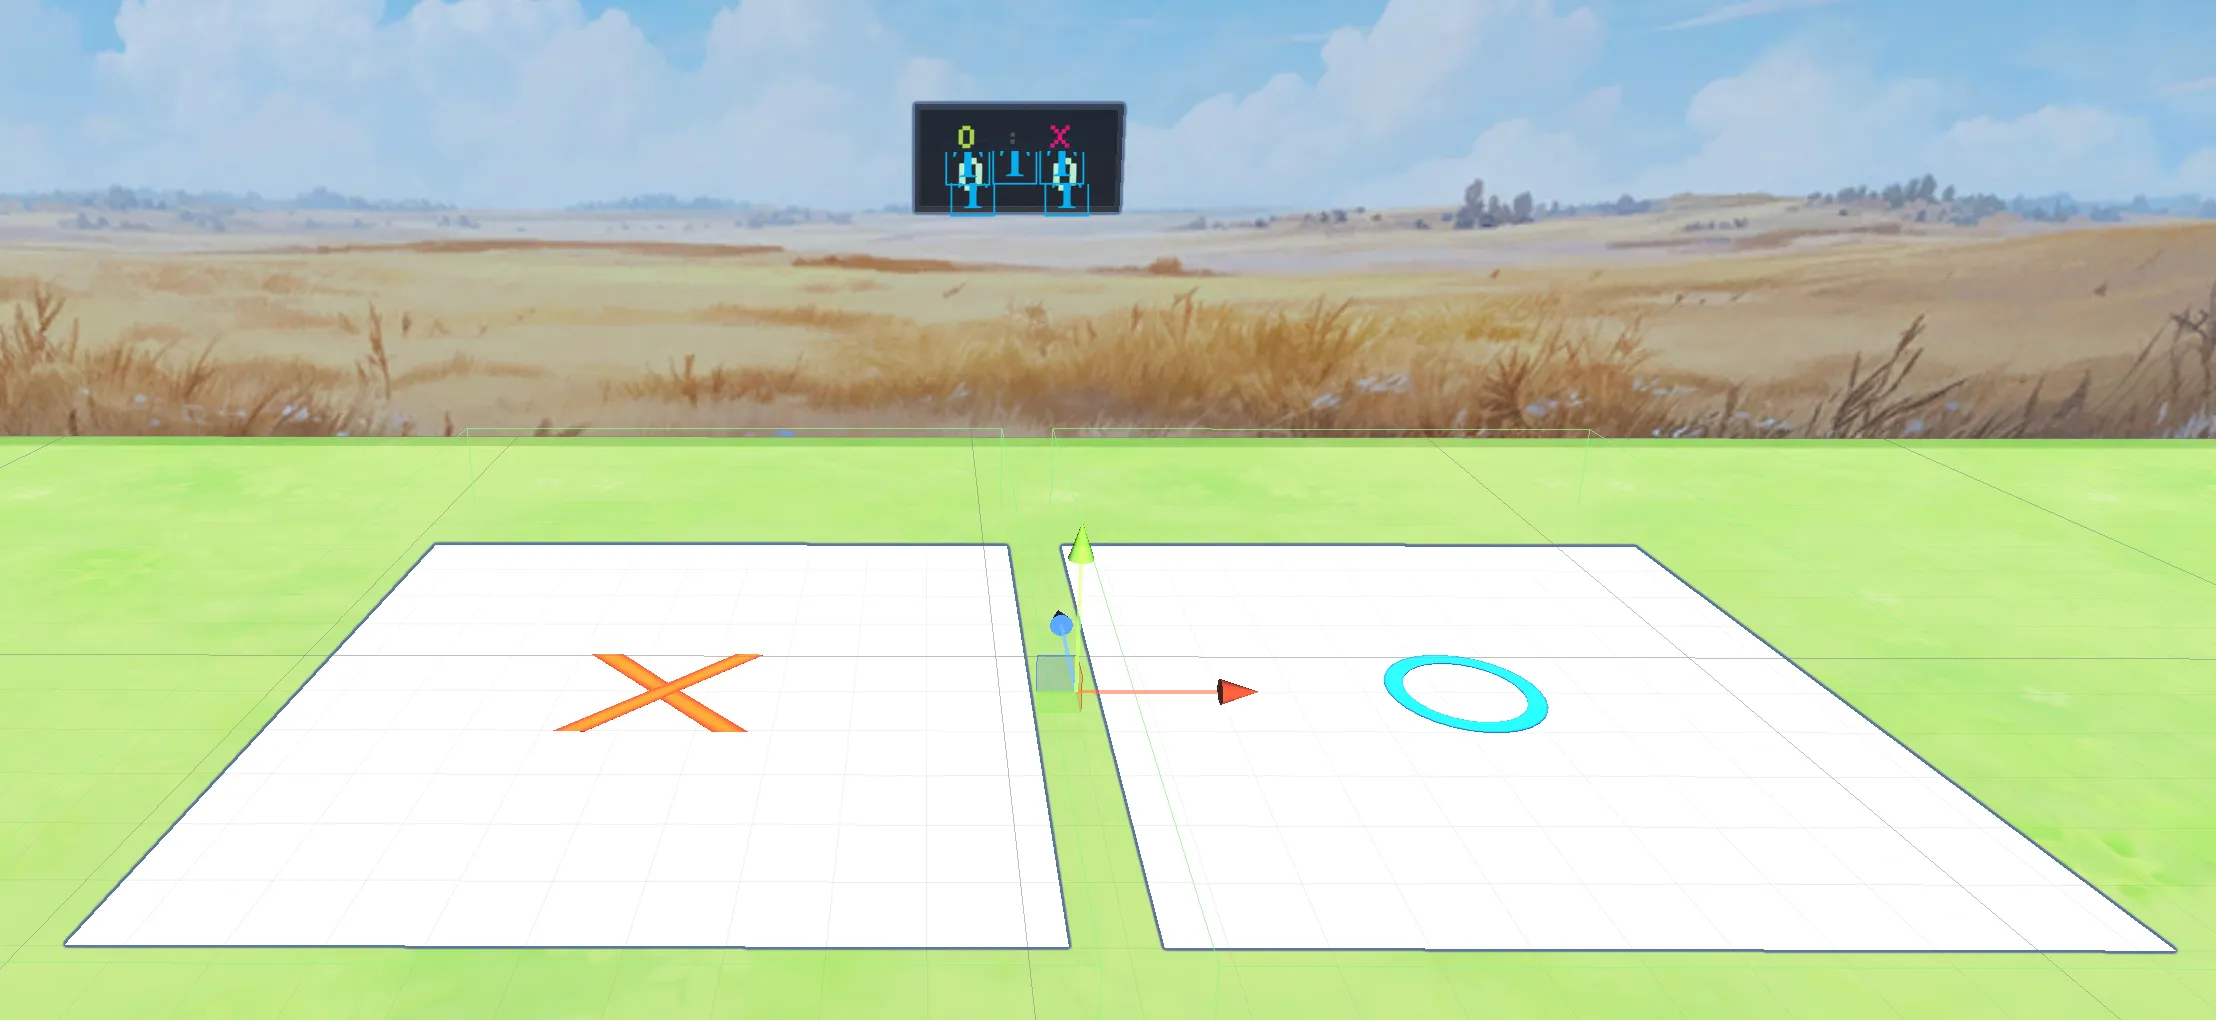
The voting object counts the number of people standing in the O and X areas, respectively.
Just place it on the ground; it works immediately without extra setup.
- The Collider areas of the O and X floors are where counting occurs. You can resize them to adjust the recognition zones.
Countdown Timer
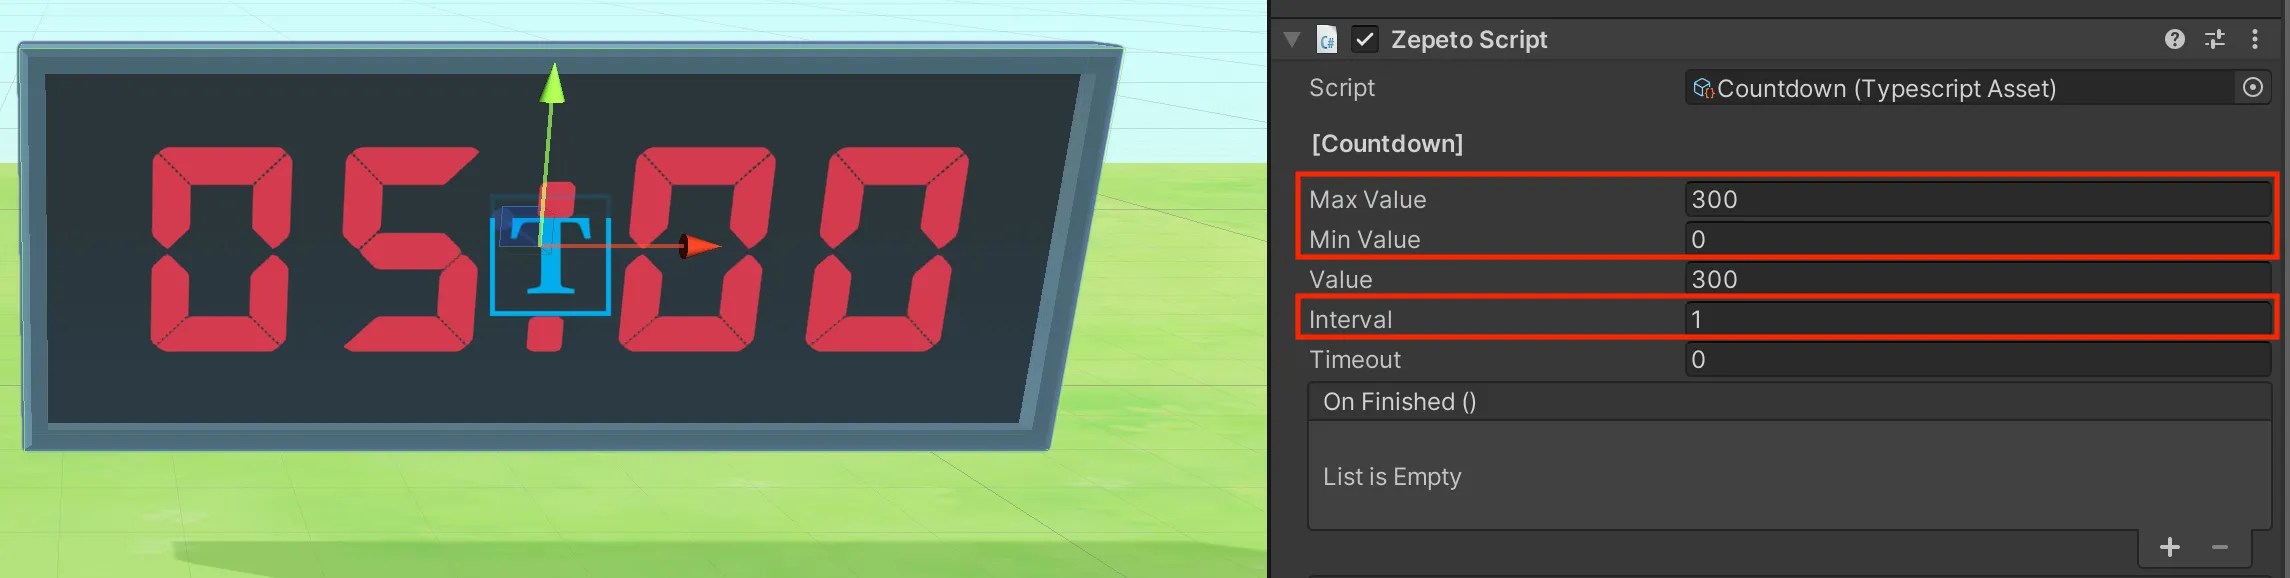
timedisplay provides a countdown display screen.
It defaults to a 5-minute countdown.
You can freely adjust the countdown time in the Inspector.
- MaxValue: Countdown start time (seconds).
- MinValue: Countdown end time (seconds).
- Interval: The interval at which time decreases (seconds).
Breakable Glass Platform
breakable_glass is a platform that disappears when stepped on or touched.
Use it as an obstacle in jump maps.
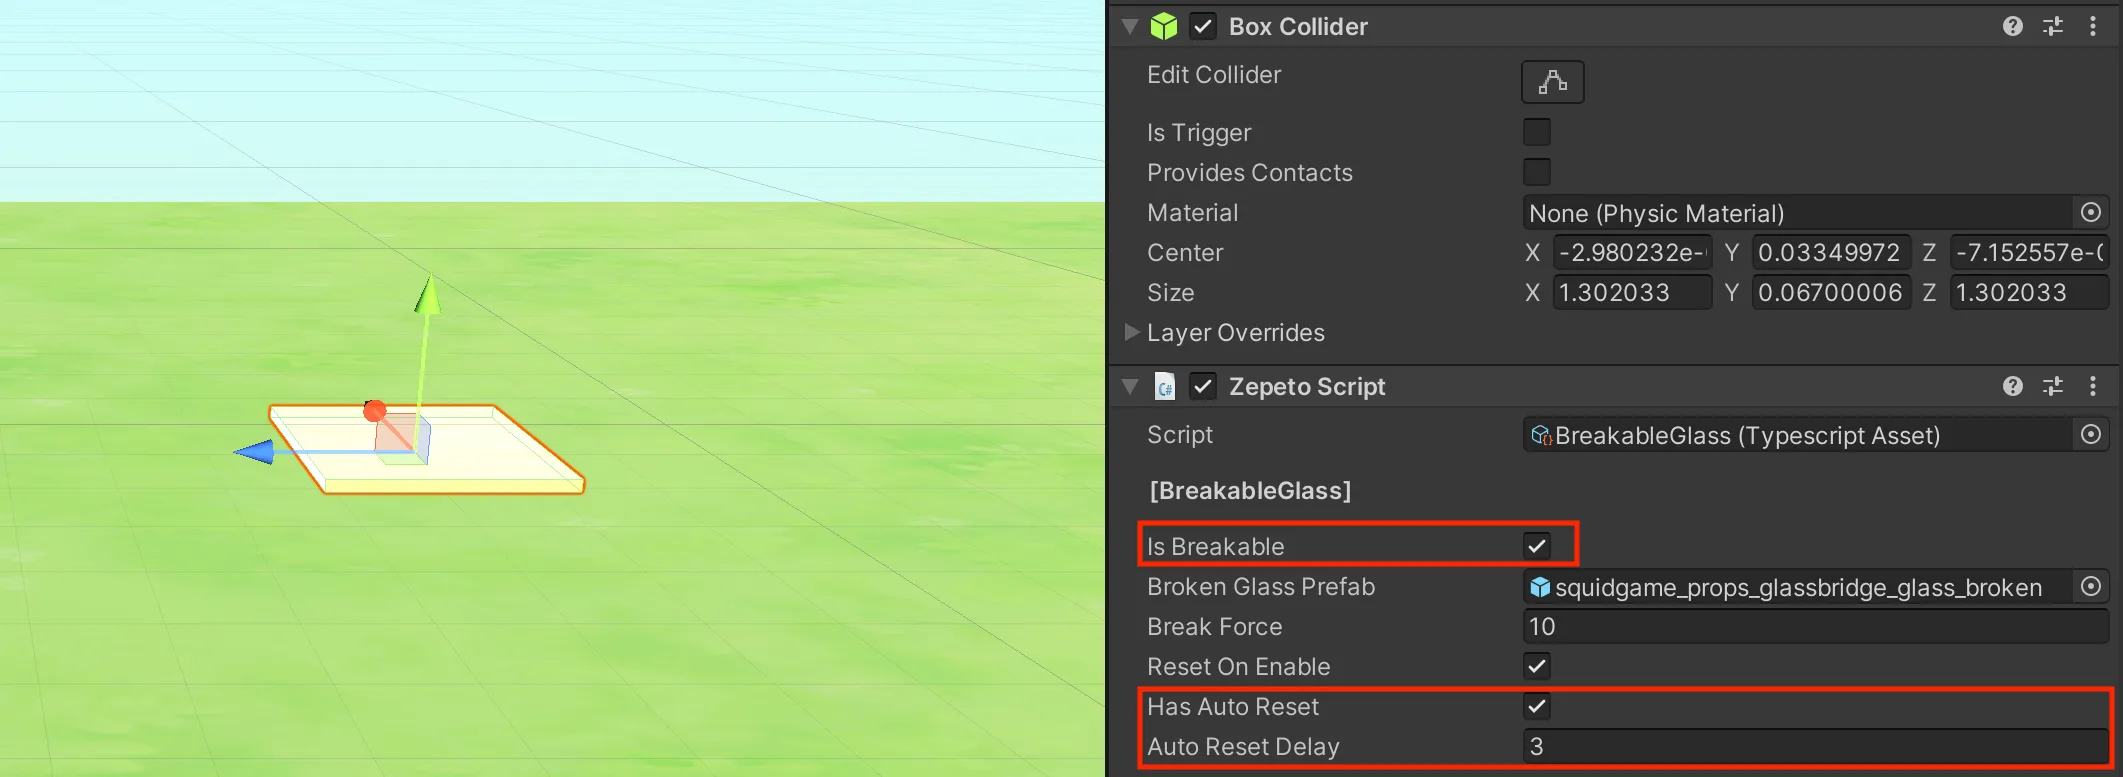
- Is Breakable: Toggles the breaking property on/off. The attributes below only work when this is ON.
- Auto Reset Delay: Once touched, it automatically respawns after the time set in Auto Reset Delay.
- Has Auto Reset: If you don't want the platform to respawn, turn Has Auto Reset OFF.