การโต้ตอบกับวัตถุ
สร้างปุ่มโต้ตอบที่ปรากฏเมื่ออักขระ ZEPETO เข้าใกล้วัตถุ

ขั้นตอนที่ 1 : ตั้งค่าสภาพแวดล้อม
- คุณสามารถดาวน์โหลดแอนิเมชันและทรัพยากรปุ่มที่ใช้ในตัวอย่างการโต้ตอบและคู่มือจากลิงก์ด้านล่างนี้
📘 ตัวอย่างการโต้ตอบ ZEPETO โมดูลการโต้ตอบ Zepeto
- สร้างโค้ดการสร้างอักขระ ZEPETO ในฉากเป็นค่าเริ่มต้น
📘 กรุณาอ้างอิงจากคู่มือต่อไปนี้ [ผู้เล่น ZEPETO]
ขั้นตอนที่ 2 : การตั้งค่าอ็อบเจ็กต์
ตั้งค่าอ็อบเจ็กต์เพื่อให้มีปฏิสัมพันธ์กับตัวละคร ZEPETO.
1) วางอ็อบเจ็กต์ที่ตัวละคร ZEPETO จะมีปฏิสัมพันธ์ด้วย.
2) สร้างลำดับชั้น > สร้างอ็อบเจ็กต์ว่างและเปลี่ยนชื่อเป็น DockPoint.
- นี่คือจุดที่ตัวละคร ZEPETO จะมีปฏิสัมพันธ์ด้วย ปรับตำแหน่งของอ็อบเจ็กต์.
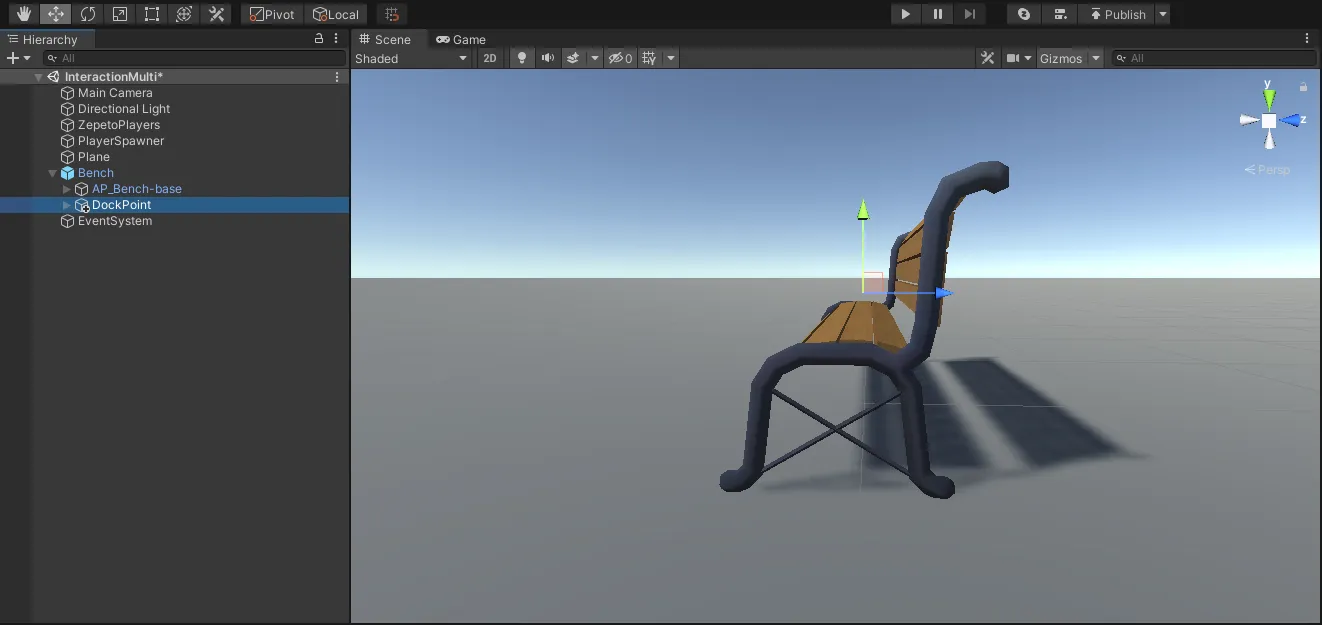
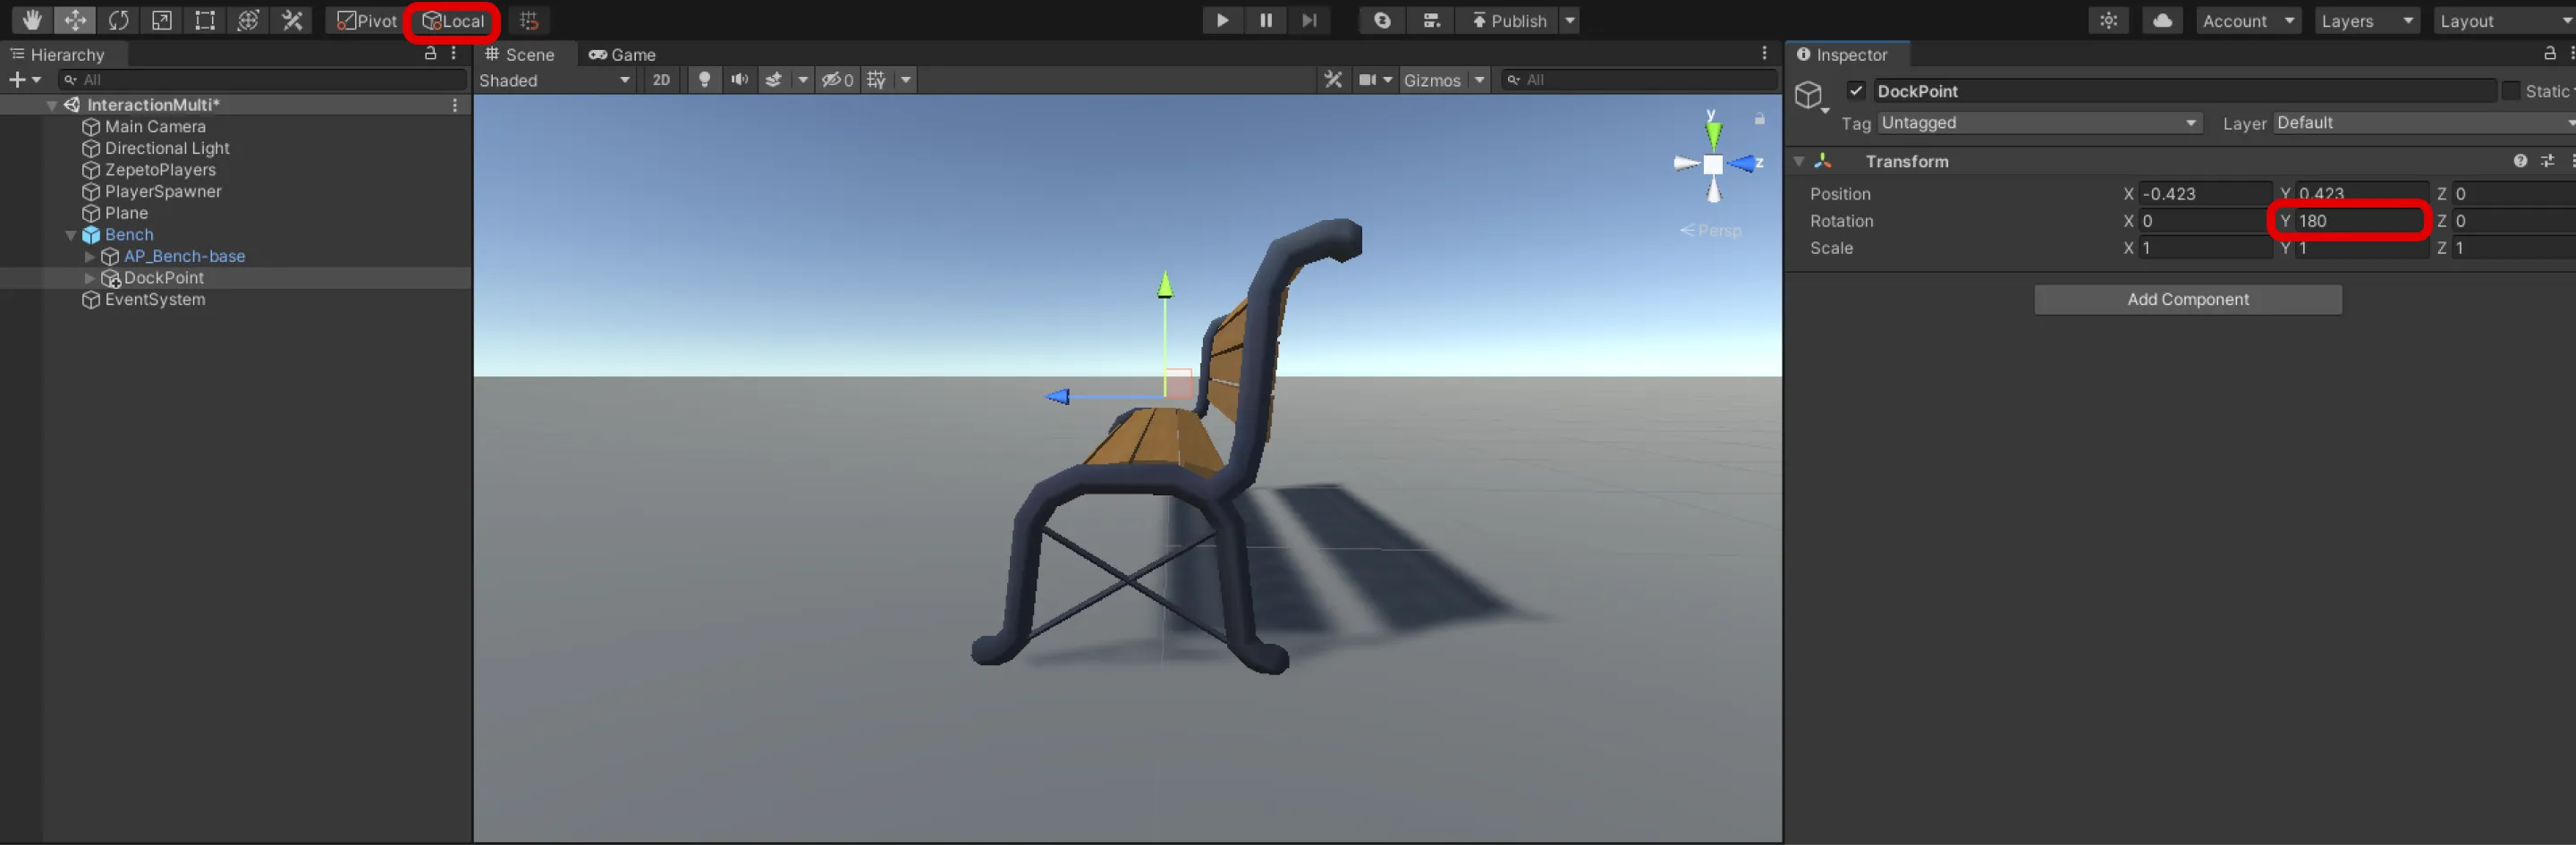
- ตรวจสอบว่าปุ่มสลับ Gizmo การแปลงที่ด้านบนของ Unity Editor เป็น Local และหมุนแกน Z (ลูกศรสีน้ำเงิน) ไปด้านนอกของวัตถุ
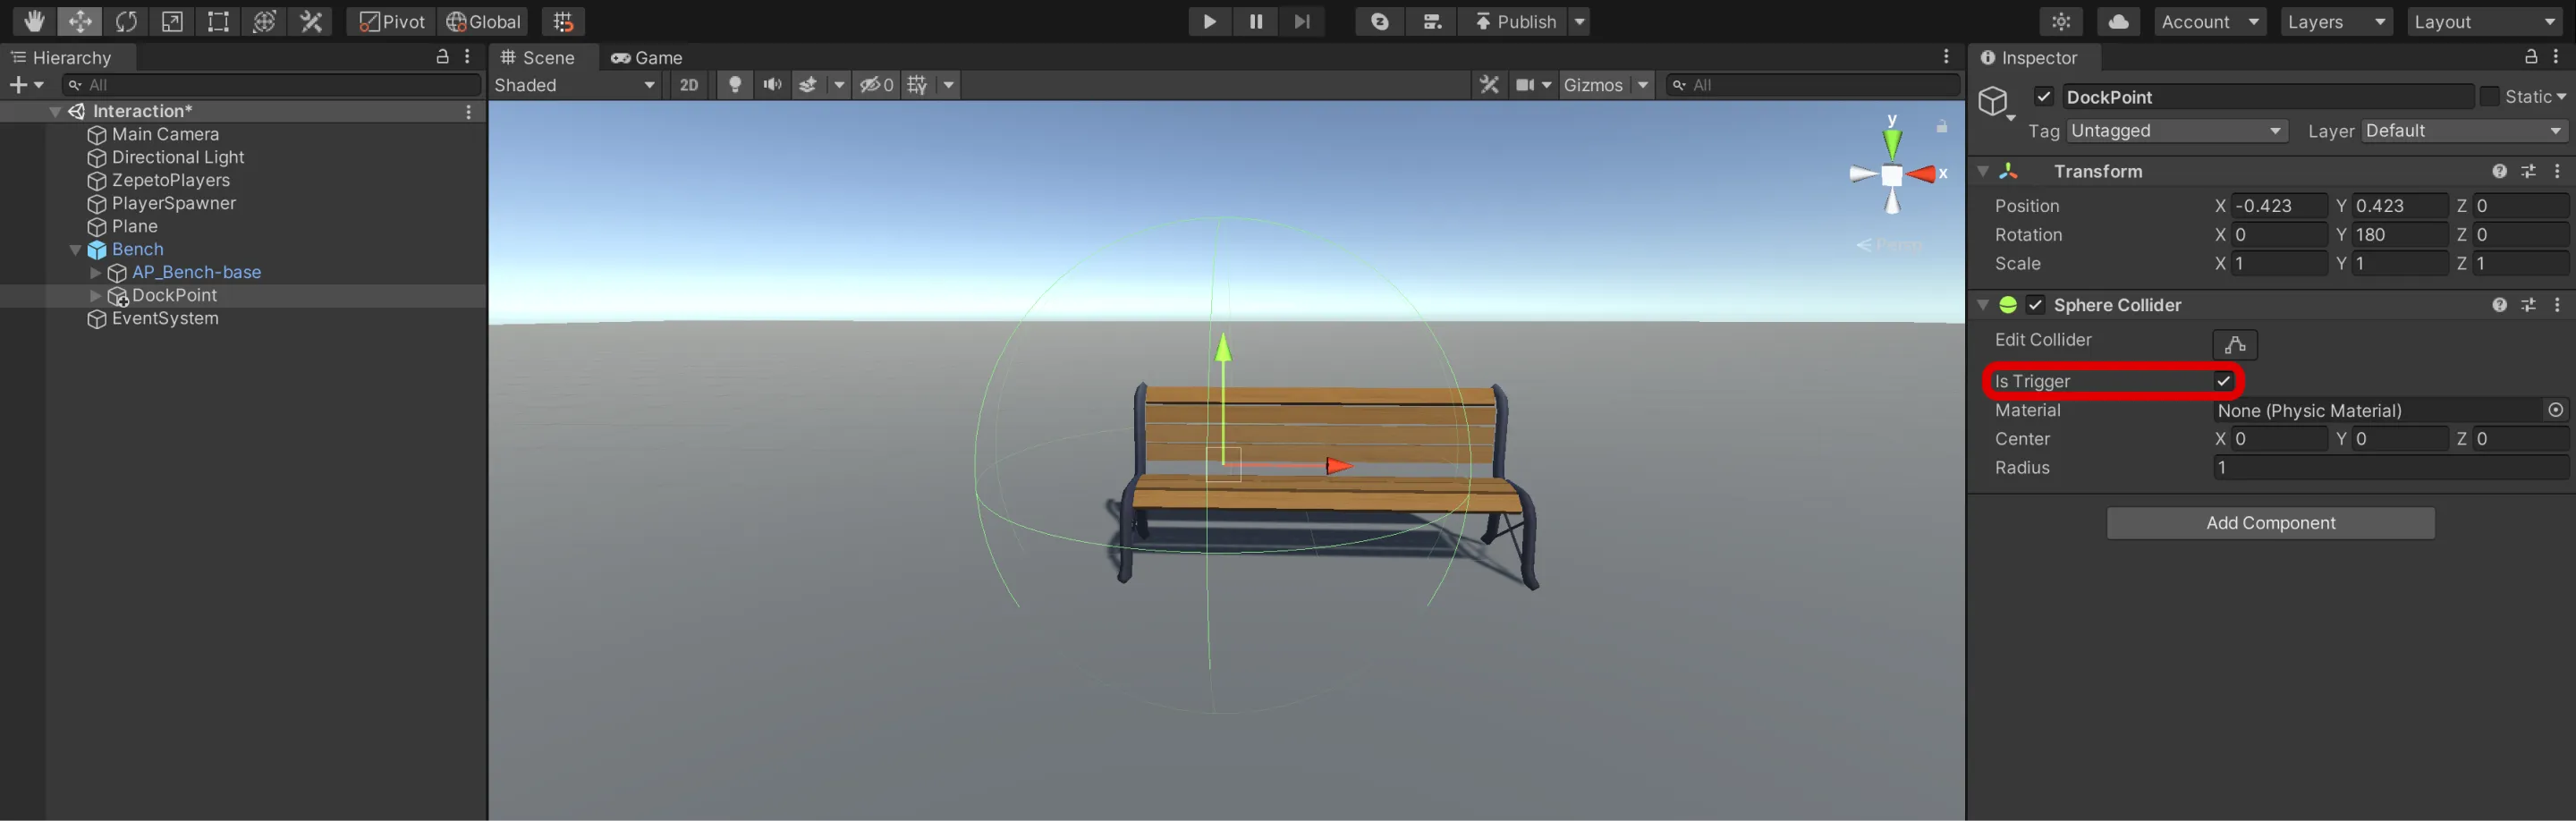
- หลังจากเพิ่มคอมโพเนนต์ Collider ให้ตรวจสอบ isTrigger
- ปรับขนาดของ Collider ให้ตรงกับช่วงที่ผู้เล่นสามารถโต้ตอบกับวัตถุได้
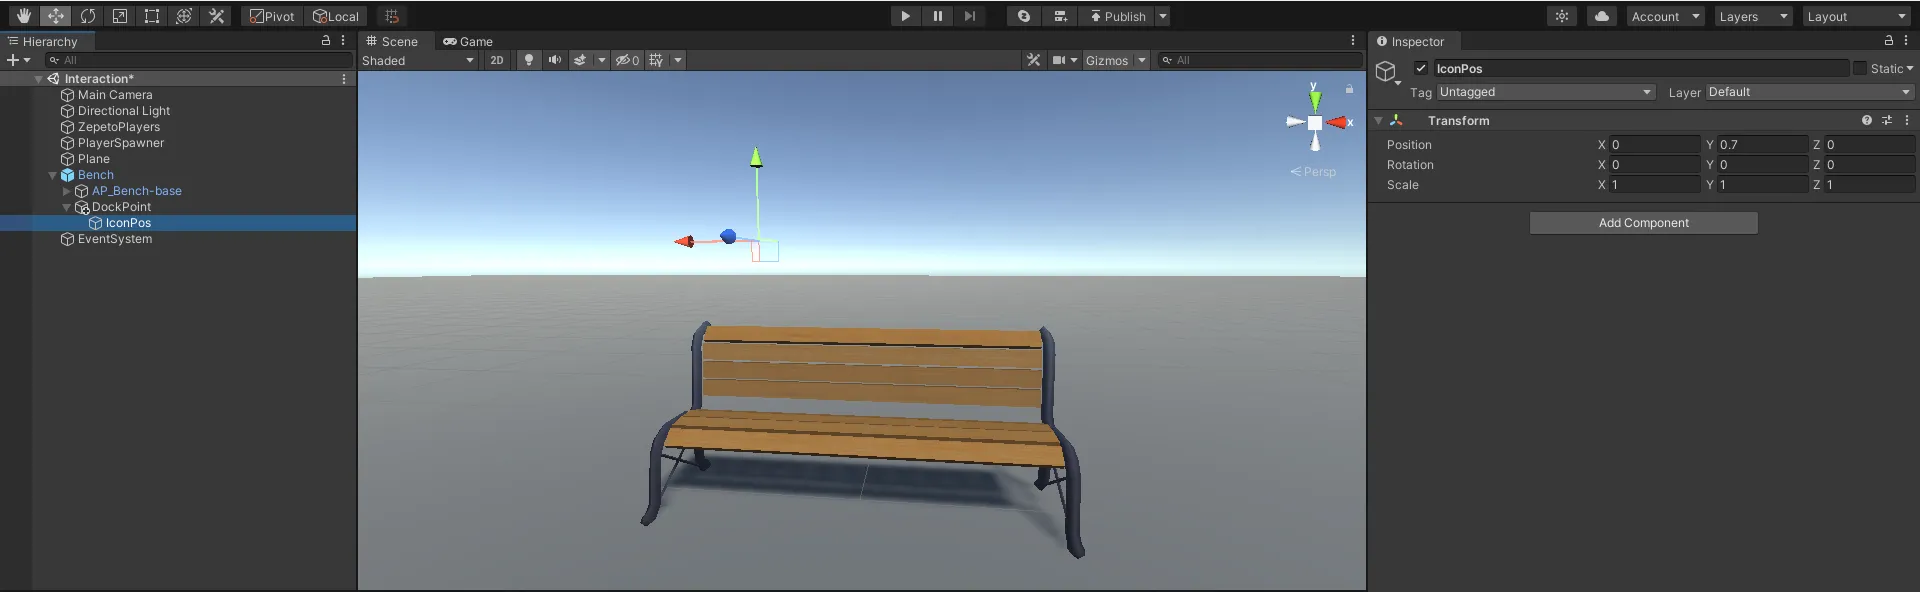
3) สร้าง Hierarchy > สร้างวัตถุเปล่าเป็นลูกของ DockPoint และเปลี่ยนชื่อเป็น IconPos
ขั้นตอนที่ 3 : การตั้งค่า UI
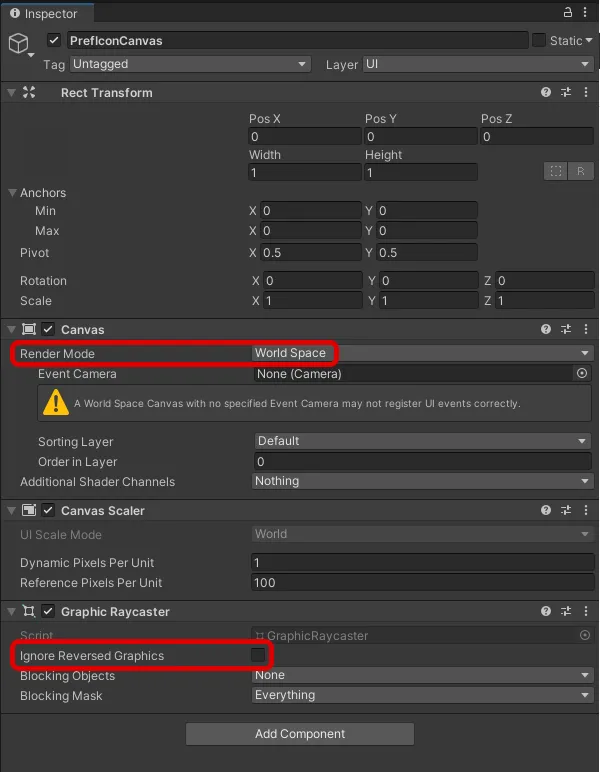
1) สร้าง Hierachy > UI > Canvas เป็นลูกของวัตถุที่ตัวละคร ZEPETO จะโต้ตอบด้วยและเปลี่ยนชื่อเป็น PrefIconCanvas.
- ตั้งค่า Render Mode เป็น World Space.
- ตั้งค่า Width และ Height เป็น 1 ตามลำดับ.
- ยกเลิกการเลือกตัวเลือก Ignore Reversed Graphics ในส่วนของ Graphic Raycaster.
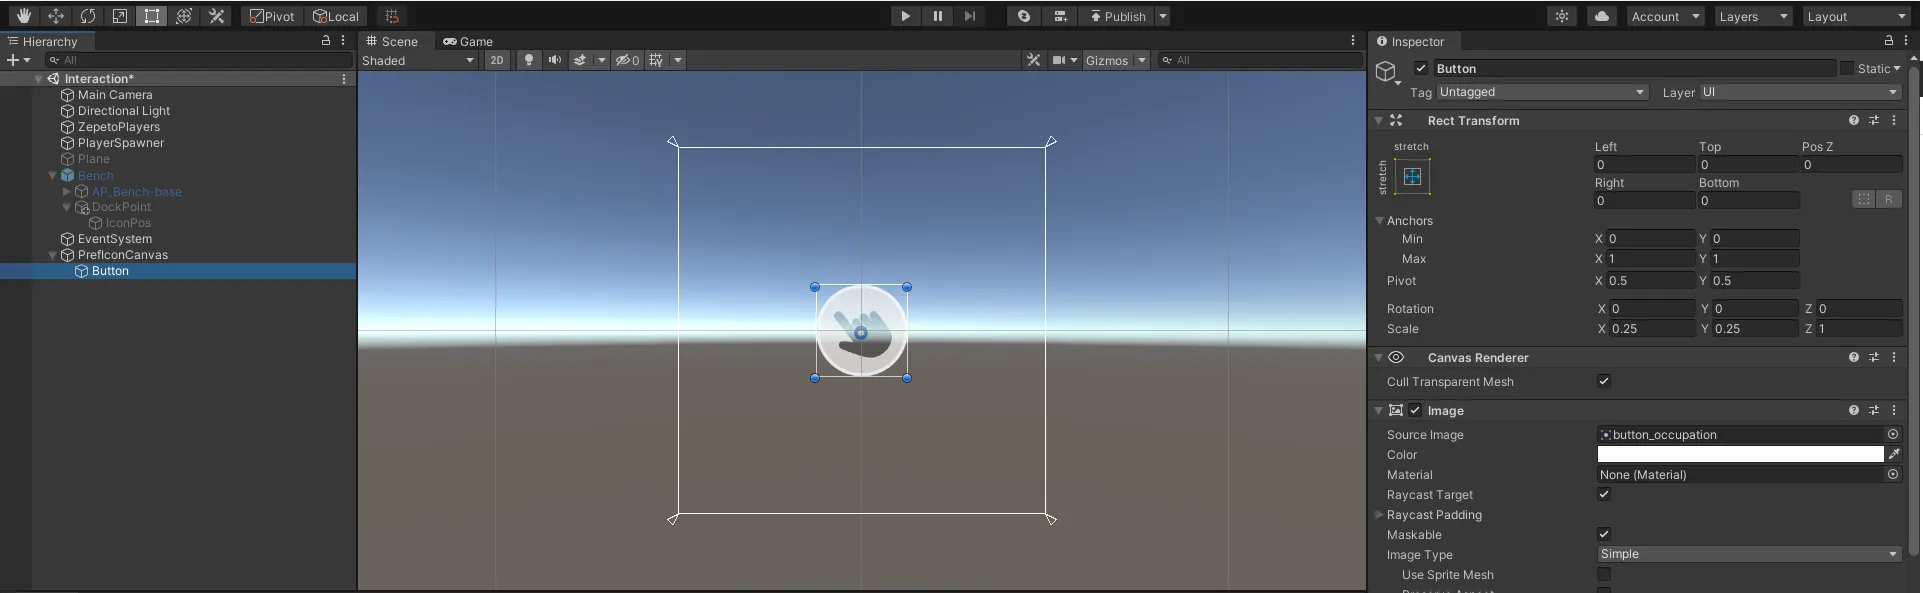
2) สร้าง Hierachy > UI > Button เป็นลูกของ PrefIconCanvas.
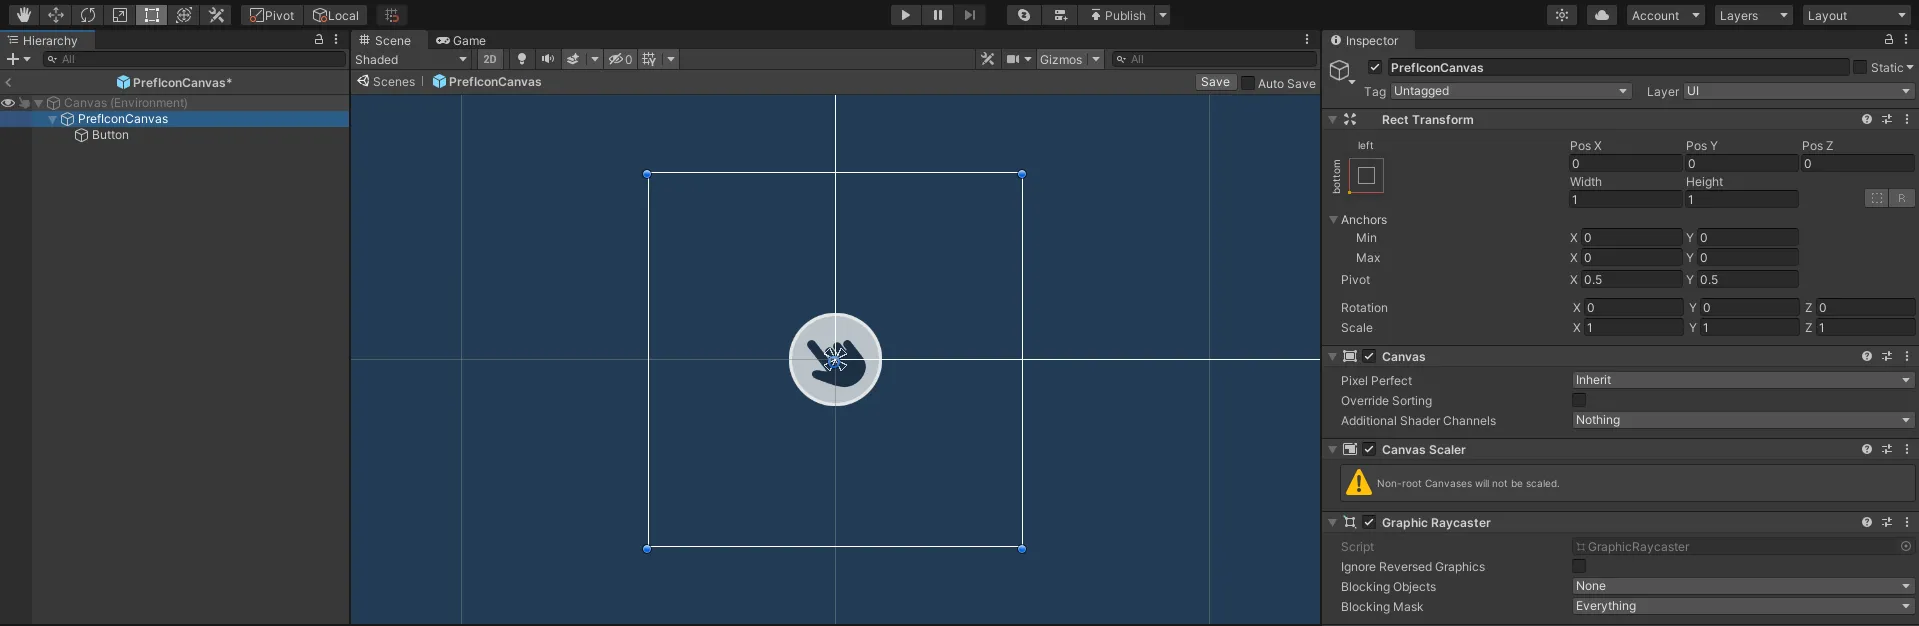
3) เมื่อการตั้งค่าเสร็จสิ้น ให้ทำให้เป็น Prefab และลบ PrefIconCanvas ที่เหลือในลำดับชั้นออก
ขั้นตอนที่ 4 : การเขียนสคริปต์
ขั้นตอนที่ 4 - 1 : InteractionIcon
1) สร้างโปรเจกต์ > สร้าง > ZEPETO > TypeScript และเปลี่ยนชื่อเป็น InteractionIcon.
2) เขียนสคริปต์ตัวอย่างตามด้านล่าง.
import { ZepetoScriptBehaviour } from 'ZEPETO.Script';
import { Camera, Canvas, Collider, GameObject, Transform, Object } from 'UnityEngine';
import { Button } from 'UnityEngine.UI';
import { UnityEvent } from 'UnityEngine.Events';
import { ZepetoPlayers } from 'ZEPETO.Character.Controller';

export default class InteractionIcon extends ZepetoScriptBehaviour {

    // ไอคอน
    @Header("[ไอคอน]")
    @SerializeField() private prefIconCanvas: GameObject;
    @SerializeField() private iconPosition: Transform;

    // อีเวนต์ Unity
    @Header("[อีเวนต์ Unity]")
    public OnClickEvent: UnityEvent;
    public OnTriggerEnterEvent: UnityEvent;
    public OnTriggerExitEvent: UnityEvent;

    private _button: Button;
    private _canvas: Canvas;
    private _cachedWorldCamera: Camera;
    private _isIconActive: boolean = false;
    private _isDoneFirstTrig: boolean = false;


    private Update() {
        if (this._isDoneFirstTrig && this._canvas?.gameObject.activeSelf) {
            this.UpdateIconRotation();
        }
    }

    private OnTriggerEnter(coll: Collider) {
        if (coll != ZepetoPlayers.instance.LocalPlayer?.zepetoPlayer?.character.GetComponent<Collider>()) {
            return;
        }

        this.ShowIcon();
        this.OnTriggerEnterEvent?.Invoke();
    }

    private OnTriggerExit(coll: Collider) {
        if (coll != ZepetoPlayers.instance.LocalPlayer?.zepetoPlayer?.character.GetComponent<Collider>()) {
            return;
        }

        this.HideIcon();
        this.OnTriggerExitEvent?.Invoke();
    }

    public ShowIcon(){
        if (!this._isDoneFirstTrig) {
            this.CreateIcon();
            this._isDoneFirstTrig = true;
        }
        else {
            this._canvas.gameObject.SetActive(true);
        }
        this._isIconActive = true;
    }

    public HideIcon() {
        this._canvas?.gameObject.SetActive(false);
        this._isIconActive = false;
    }

    private CreateIcon() {
        if (this._canvas === undefined) {
            const canvas = GameObject.Instantiate(this.prefIconCanvas, this.iconPosition) as GameObject;
            this._canvas = canvas.GetComponent<Canvas>();
            this._button = canvas.GetComponentInChildren<Button>();
            this._canvas.transform.position = this.iconPosition.position;
        }
        this._cachedWorldCamera = Object.FindObjectOfType<Camera>();
        this._canvas.worldCamera = this._cachedWorldCamera;

        this._button.onClick.AddListener(() => {
            this.OnClickIcon();
        });
    }

    private UpdateIconRotation() {
        this._canvas.transform.LookAt(this._cachedWorldCamera.transform);
    }

    private OnClickIcon() {
        this.OnClickEvent?.Invoke();
    }
}- ลำดับการทำงานของสคริปต์มีดังนี้:
- Update()
- เรียกใช้ฟังก์ชัน UpdateIconRotation() ที่กำหนดเองเพื่อหมุนผ้าใบไอคอนให้ตรงกับการหมุนของกล้อง.
- OnTriggerEnter(), OnTriggerExit()
- เมื่อคุณเข้าไปในพื้นที่ Collider และตรวจจับการกระตุ้น ให้เรียกใช้ฟังก์ชัน ShowIcon() ที่กำหนดเองเพื่อเปิดใช้งานไอคอน.
- เมื่อคุณออกจากพื้นที่ Collider ให้เรียกใช้ฟังก์ชัน HideIcon() ที่กำหนดเองเพื่อปิดการใช้งานไอคอน.
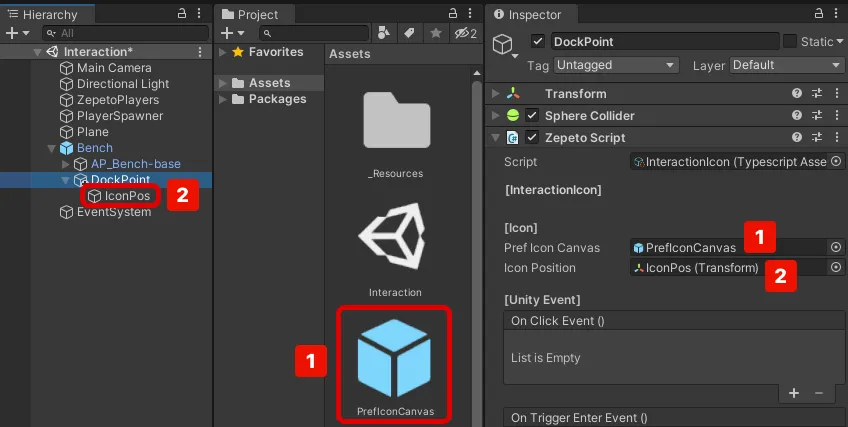
3) หลังจากสร้างสคริปต์เสร็จแล้ว ให้เพิ่มสคริปต์ไปยังวัตถุ DockPoint.
4) กำหนด Pref Icon Canvas, Icon Position จาก Inspector.
ขั้นตอนที่ 4 - 2 : GestureInteraction
1) สร้างโปรเจกต์ > สร้าง > ZEPETO > TypeScript และเปลี่ยนชื่อเป็น GestureInteraction.
2) เขียนสคริปต์ตัวอย่างตามด้านล่างนี้.
import { AnimationClip, Animator, HumanBodyBones, Physics, Transform, Vector3, WaitForEndOfFrame} from 'UnityEngine';
import { ZepetoScriptBehaviour } from 'ZEPETO.Script';
import { ZepetoPlayers, ZepetoCharacter } from "ZEPETO.Character.Controller";

import InteractionIcon from './InteractionIcon';

export default class GestureInteraction extends ZepetoScriptBehaviour {

    @SerializeField() private animationClip: AnimationClip;
    @SerializeField() private isSnapBone: boolean = true;
    @SerializeField() private bodyBone: HumanBodyBones;
    @SerializeField() private allowOverlap: boolean = false;

    private _interactionIcon: InteractionIcon;
    private _isFirst: boolean = true;
    private _localCharacter: ZepetoCharacter;
    private _outPosition: Vector3;
    private _playerGesturePosition: Vector3;

    private Start() {
        this._interactionIcon = this.transform.GetComponent<InteractionIcon>();
        ZepetoPlayers.instance.OnAddedLocalPlayer.AddListener(() => {
            this._localCharacter = ZepetoPlayers.instance.LocalPlayer.zepetoPlayer.character;
        });

        this._interactionIcon.OnClickEvent.AddListener(()=> {
            // เมื่อคลิกที่ไอคอนการโต้ตอบ
            this._interactionIcon.HideIcon();
            this.DoInteraction();
        });
    }

    private DoInteraction() {
        this._outPosition = this.transform.position;

        if (this.isSnapBone) {
            // ถ้าที่ว่างว่าง
            if (this.allowOverlap || this.FindOtherPlayerNum() < 1) {
                this._localCharacter.SetGesture(this.animationClip);
                this.StartCoroutine(this.SnapBone());
                this.StartCoroutine(this.WaitForExit());
            } else {
                // ที่นั่งเต็มแล้ว
                this._interactionIcon.ShowIcon();
            }
        } else {
            this._localCharacter.SetGesture(this.animationClip);
            this.StartCoroutine(this.WaitForExit());
        }
    }

    private *SnapBone() {
        const animator: Animator = this._localCharacter.ZepetoAnimator;
        const bone: Transform = animator.GetBoneTransform(this.bodyBone);

        let idx = 0;
        while(true) {
            const distance = Vector3.op_Subtraction(bone.position, this._localCharacter.transform.position);
            const newPos: Vector3 = Vector3.op_Subtraction(this.transform.position, distance);

            this._playerGesturePosition = newPos;
            this._localCharacter.transform.position = this._playerGesturePosition;
            this._localCharacter.transform.rotation = this.transform.rotation;
            yield new WaitForEndOfFrame();
            idx++;
            // ปรับตำแหน่งระหว่าง 5 เฟรมของอนิเมชัน
            if (idx > 5) {
                return;
            }
        }
    }

    // วิธีที่แน่นอนต้องผ่านโค้ดเซิร์ฟเวอร์,
    // แต่คำนวณโดยไคลเอนต์ท้องถิ่นเพื่อเพิ่มประสิทธิภาพเซิร์ฟเวอร์
    private FindOtherPlayerNum() {
        const hitInfos = Physics.OverlapSphere(this.transform.position, 0.1);

        let playerNum = 0;
        if (hitInfos.length > 0) {
            hitInfos.forEach((hitInfo) => {
                if (hitInfo.transform.GetComponent<ZepetoCharacter>()) {
                    playerNum ++;
                }
            });
        }
        return playerNum;
    }

    private *WaitForExit() {
        if (this._localCharacter) {
            while (true) {
                if (this._localCharacter.tryJump || this._localCharacter.tryMove) {
                    this._localCharacter.CancelGesture();

                    this.transform.position = this._outPosition;
                    this._interactionIcon.ShowIcon();
                    break;
                } else if(this.isSnapBone && this._playerGesturePosition != this._localCharacter.transform.position){
                    this._interactionIcon.ShowIcon();
                    break;
                }
                yield;
            }
        }
    }
}- ลำดับการทำงานของสคริปต์มีดังนี้:
- เริ่มต้น()
- เมื่อคลิกที่ไอคอน มันจะถูกปิดใช้งานและเรียกใช้ฟังก์ชัน DoInteraction() ที่กำหนดเอง
- DoInteraction()
- ถ้า isSnapBone ถูกเลือก
- ถ้าที่นั่งว่าง (allowOverlap ถูกเลือก หรือค่าที่ส่งคืนจากฟังก์ชัน FindOtherPlayerNum() น้อยกว่า 1)
- นำท่าทางที่กำหนดให้กับ animationClip มาใช้
- เริ่มต้น Coroutine SnapBone() และแนบ bodyBone ของตัวละคร ZEPETO ไปยัง targetTranform
- เริ่มต้น Coroutine WaitForExit()
- เมื่อตัวละคร ZEPETO กระโดดหรือเคลื่อนที่ หรือออกจากพื้นที่ collider ให้ยกเลิกท่าทางและเปิดใช้งานไอคอน
- เปิดใช้งานไอคอนเมื่อความจุที่นั่งเต็ม
- ถ้า isSnapBone ไม่ถูกเลือก
- นำท่าทางที่กำหนดให้กับ animationClip มาใช้
- เริ่มต้น Coroutine WaitForExit()
3) หลังจากสร้างสคริปต์เสร็จแล้ว ให้เพิ่มสคริปต์ไปยังวัตถุ DockPoint.
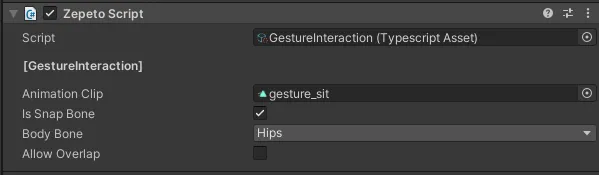
4) กำหนด Animation Clip, Is Snap Bone, Body Bone, และ Allow Overlap ใน inspector.
- กำหนด Animation Clip. นี่คือท่าทางที่ต้องทำเมื่อมีการโต้ตอบ.
- ตรวจสอบ Is SnapBone. ตรวจสอบให้แน่ใจว่าส่วนที่กำหนดให้กับ body bone ถูกวางใน DockPoint.
- ตั้งค่า Body Bone เป็น Hips. ตรวจสอบให้แน่ใจว่าสะโพกถูกวางใน DockPoint เพราะมันจะเป็นท่าทางนั่ง.
- Allow Overlap ช่วยให้คุณกำหนดได้ว่าหลายคนสามารถนั่งในที่นั่งเดียวกันได้หรือไม่.
ขั้นตอนที่ 5 : เล่น
ปุ่มจะปรากฏเมื่ออักขระ ZEPETO เข้าใกล้วัตถุ และจะหายไปเมื่อมันเคลื่อนออกไป.
หากท่าทางที่คุณตั้งไว้เล่นเมื่อเข้าใกล้และโต้ตอบกับปุ่ม นั่นคือความสำเร็จ.
นอกจากท่าทางแล้ว เหตุการณ์ต่างๆ สามารถนำไปใช้ได้หลังจากการโต้ตอบ.
ต่อไปนี้คือตัวอย่างการนำเหตุการณ์ไปใช้ที่สร้างรายการหลังจากการโต้ตอบ.
📘 ตัวอย่าง Zepeto World - ตัวอย่างการโต้ตอบบทที่ 3 https://github.com/naverz/zepeto-world-sample/tree/main/Assets/Chapter3