ZEPETO build it Template Guide
Summary | This template allows you to create maps as conveniently as build It. |
|---|---|
Difficulty | For Beginners |
Singleplay/Multiplay | Multiplay |
📘 ZEPETO build it Template Download https://studio.zepeto.me/console/download
- Zepeto character creation
- Multiplayer support
- Advertisement viewing
- Mannequin functionality
- Voice chat and modulation
- Quick chat
- Screenshot and screen recording
- Gesture animations
- NPC creation module
- Interactive objects
- Moving platform objects
- Official 3D assets in 19 themes
- UI image resources and prefabs
- Materials for decorating maps
- Sample sound resources
Follow the tutorial video to complete the basic setup.
- Install Unity to run the ZEPETO build it template.
- Extract the downloaded template project, select the extracted folder in Unity to open it.
- Double-click WorldScene to open it.
- Enable the Multiplayer Server at the top until it turns green, then click the arrow below to log in with your Zepeto account. Click Play to test.

- Press Play again to return to edit mode.
- To add a new scene, go to Menu > File > New Scene, select "Build It," then click Create
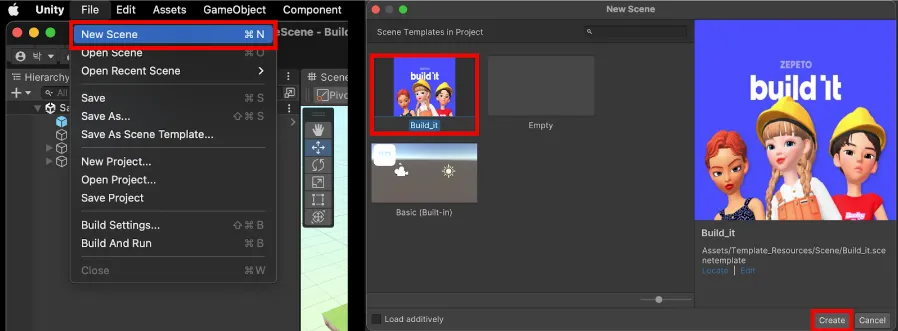
Follow the tutorial video to place various 3D objects and create your map.
- Select an object in the Build it Asset Browser on the left, then click on the map to place it.
- Right-click or press ESC to deselect the object.
- Use the search box to find objects by keyword in English. Click the X next to the search box to reset it.
- Adjust settings in Zepeto Scene Settings, such as background color, map brightness, and lighting color. The Reset button restores default settings.
- Top Color: Skybox gradient's top color
- Center Color: Skybox gradient's center color
- Bottom Color: Skybox gradient's bottom color
- Up Vector: Skybox gradient's position
- Exp: Skybox gradient blur amount
- Ambient Color: Scene's default brightness
- Default Light Rotation: Default lighting angle in the scene
- Light Intensity: Default lighting brightness

5. To adjust character control settings, select Manager in the Hierarchy tab on the left and adjust values in the Inspector on the right.
- Walk Speed: Walking speed of the Zepeto character (default: 2)
- Run Speed: Running speed of the Zepeto character (default: 5)
- Jump Power: Jumping power of the Zepeto character (default: 13)
- Enable Double Jump: Toggle double jump feature.
- Double Jump Power: Double jump power of the Zepeto character (default: 13)
- Fall Area Position: Height below which character resets position (default: -200)

The Build It template offers utility objects to create a vibrant world without coding.
Understand how to use functional objects by following the tutorial video, then apply them to your world to create a more engaging experience!
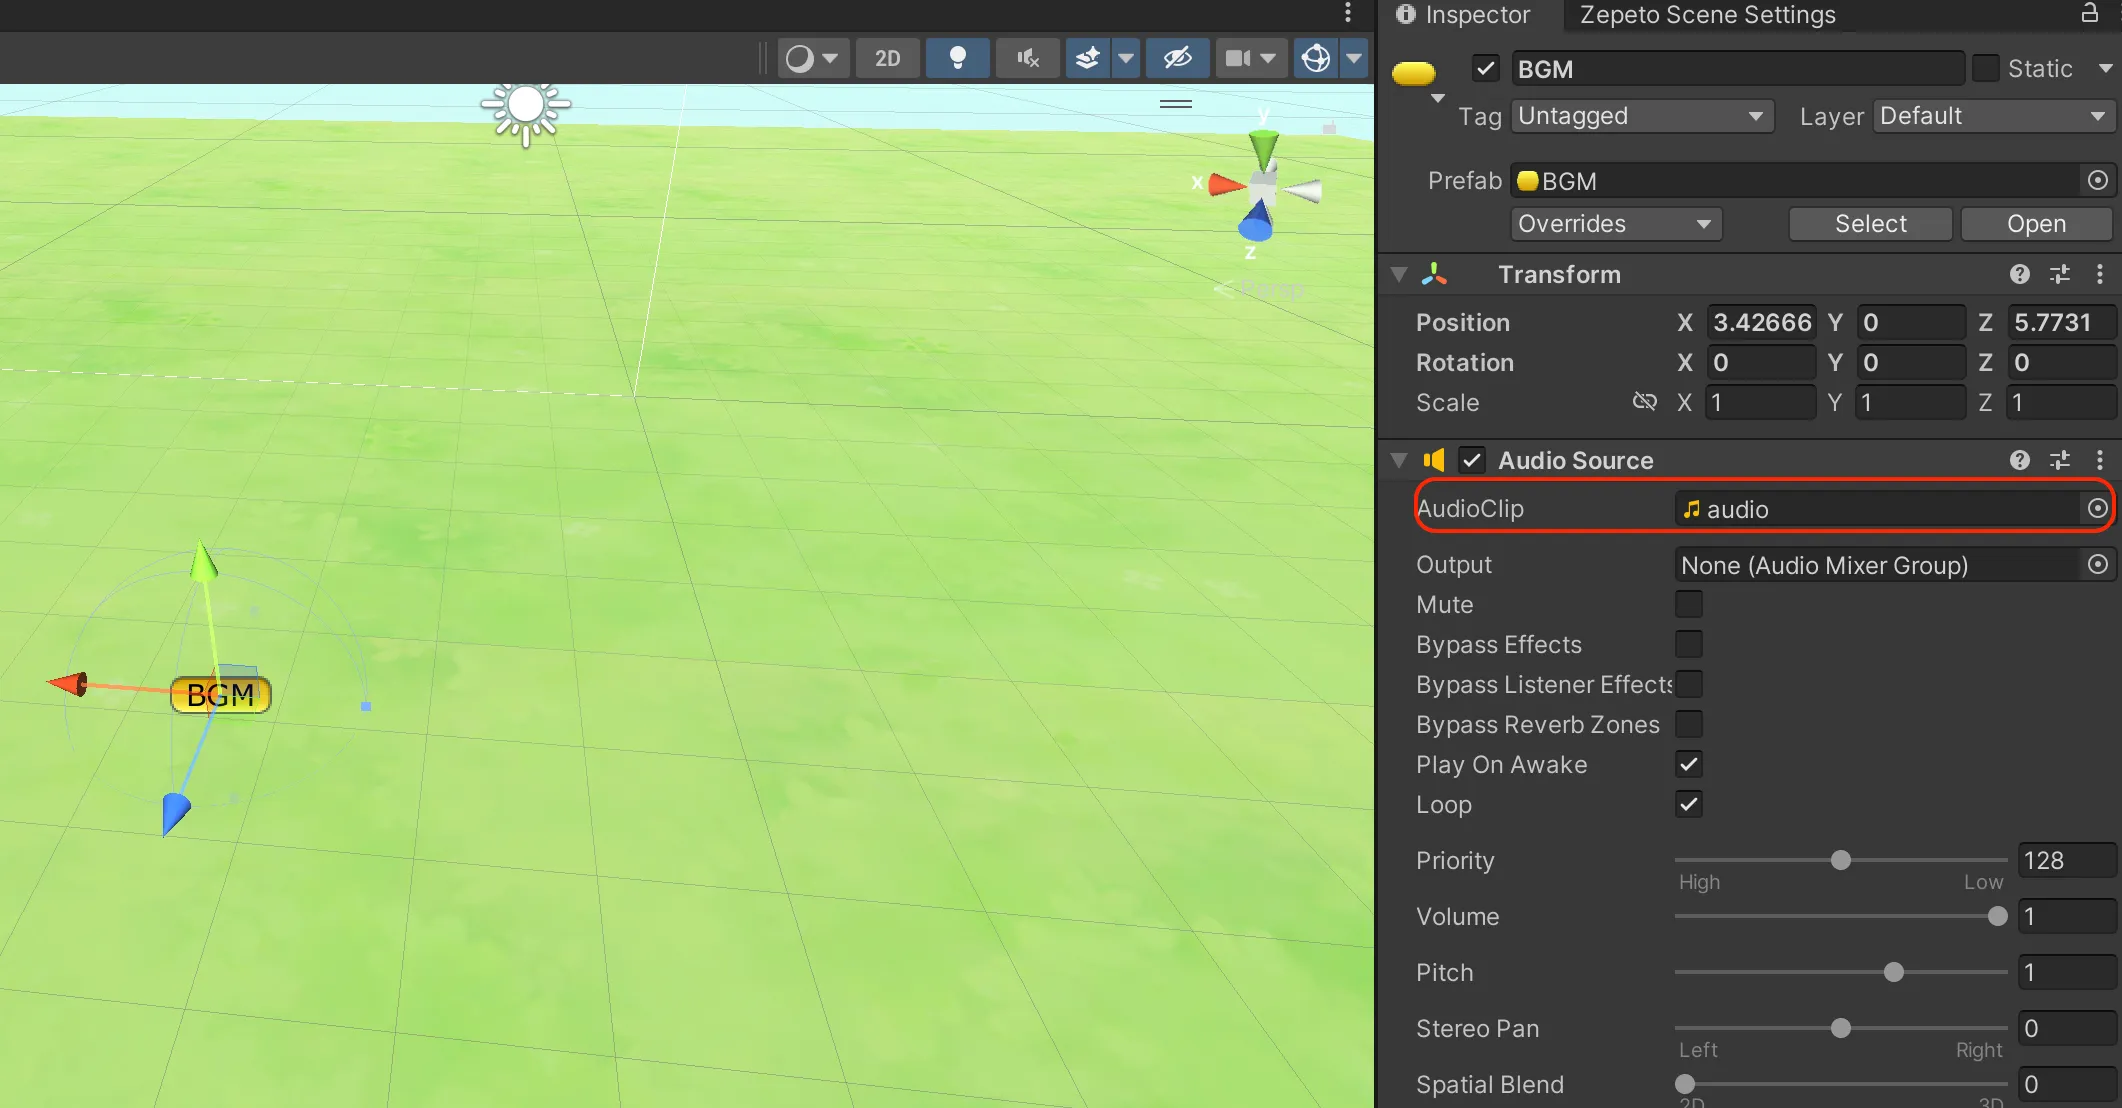
Place a BGM object in the scene to play background music (BGM). Only one BGM object should be in each scene.
- AudioClip: Assign an audio clip in the inspector (supports .mp3 or .wav formats). SFX Object.
An SFX object plays a specific sound when clicked. Place it in the scene and configure settings in the inspector.
- AudioClip: Assign an audio clip in the inspector (supports .mp3 or .wav formats).
- IconPos: Adjust the icon position for user interaction.

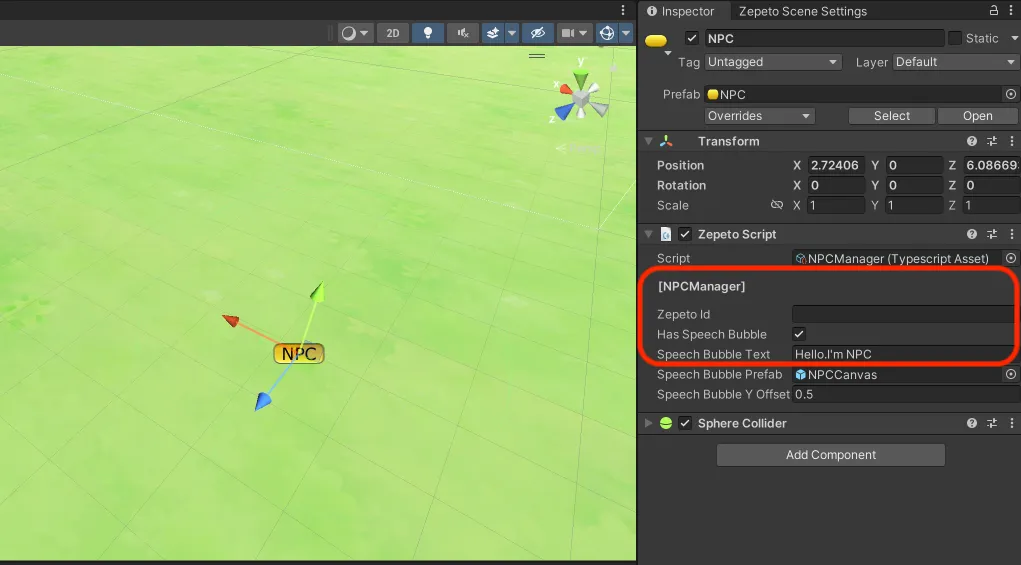
Create NPCs by entering a Zepeto ID.
NPCs only appear when Play mode is activated.
- Zepeto ID: Enter the account ID for the NPC.
- Has Speech Bubble: Shows a speech bubble when near the NPC.
- Speech Bubble Text: Set text for the NPC’s speech bubble.
Clicking an interactive object triggers specific character gestures.
- Interaction_bed: Plays a lying-down gesture.
- Interaction_chair: Plays a sitting gesture.
- Interaction_dance: Plays a dance gesture.
You can modify the interactive object to apply various forms:
- Change Animation Clip: Replace the animation file applied to the InteractionPoint child object's animation clip to make different gestures during interactions.
- Is Snap Bone: The character’s position is fixed based on a specific bone. For example, if the bone is set to Foot, the character’s foot remains at the InteractionPoint position while the animation plays. Disabling this allows the character to move apart from the object.
- Body Bone: When Is Snap Bone is enabled, set the bone to which the character will be anchored.
- Change Object Appearance: Remove the child object responsible for the appearance, and replace it with another object at the same location on the map to change the appearance.
- Change Interaction Icon Position: If you change the appearance of the object, adjust the position of the IconPos child object accordingly to align with the new design.

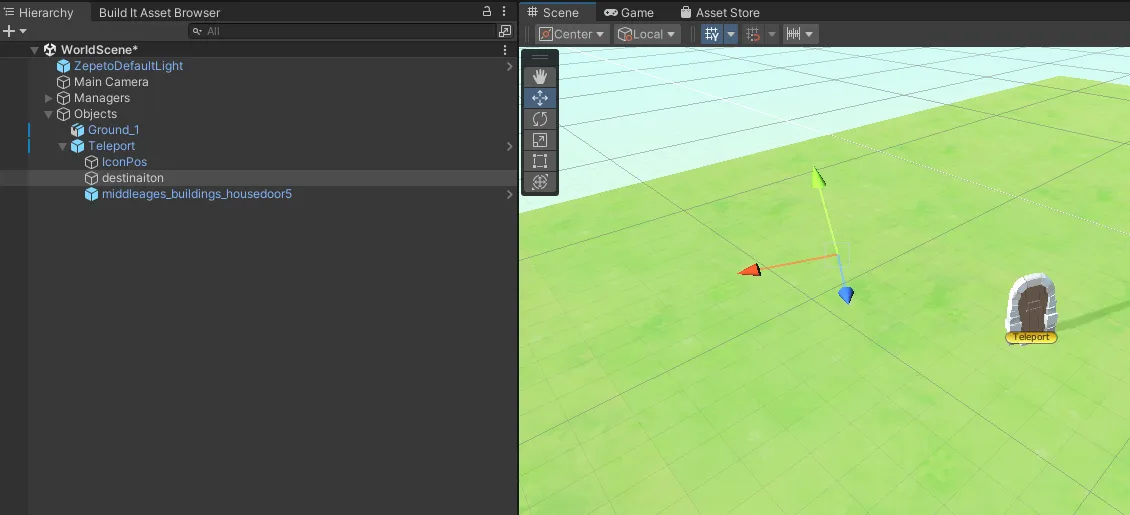
The teleport object instantly moves the user to a set destination upon clicking.
- Destination Point: Set the destination by moving the child destination object.
You can customize the appearance and interaction button position of the teleport object to match your unique design concept.
- Change Object Appearance: Remove the child object responsible for the appearance and replace it with another object at the same position on the map to update its look.
- Adjust Interaction Icon Position: If you change the object's appearance, update the position of the IconPos child object to align correctly with the new design.
Generates a random number and displays it in the Zepeto chat window upon clicking.
- Number Range: Set the minimum and maximum values in the Inspector.
You can customize the appearance and interaction button position of the roulette object to match your unique design concept.
- Change Object Appearance: Remove the child object responsible for the appearance and replace it with another object at the same position on the map to update its look.
- Adjust Interaction Icon Position: If you change the object's appearance, update the position of the IconPos child object to align correctly with the new design.
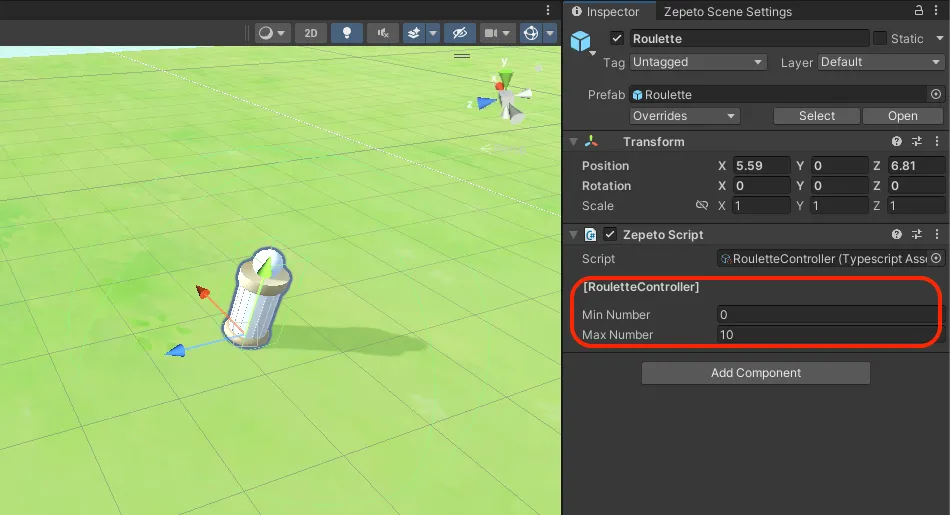
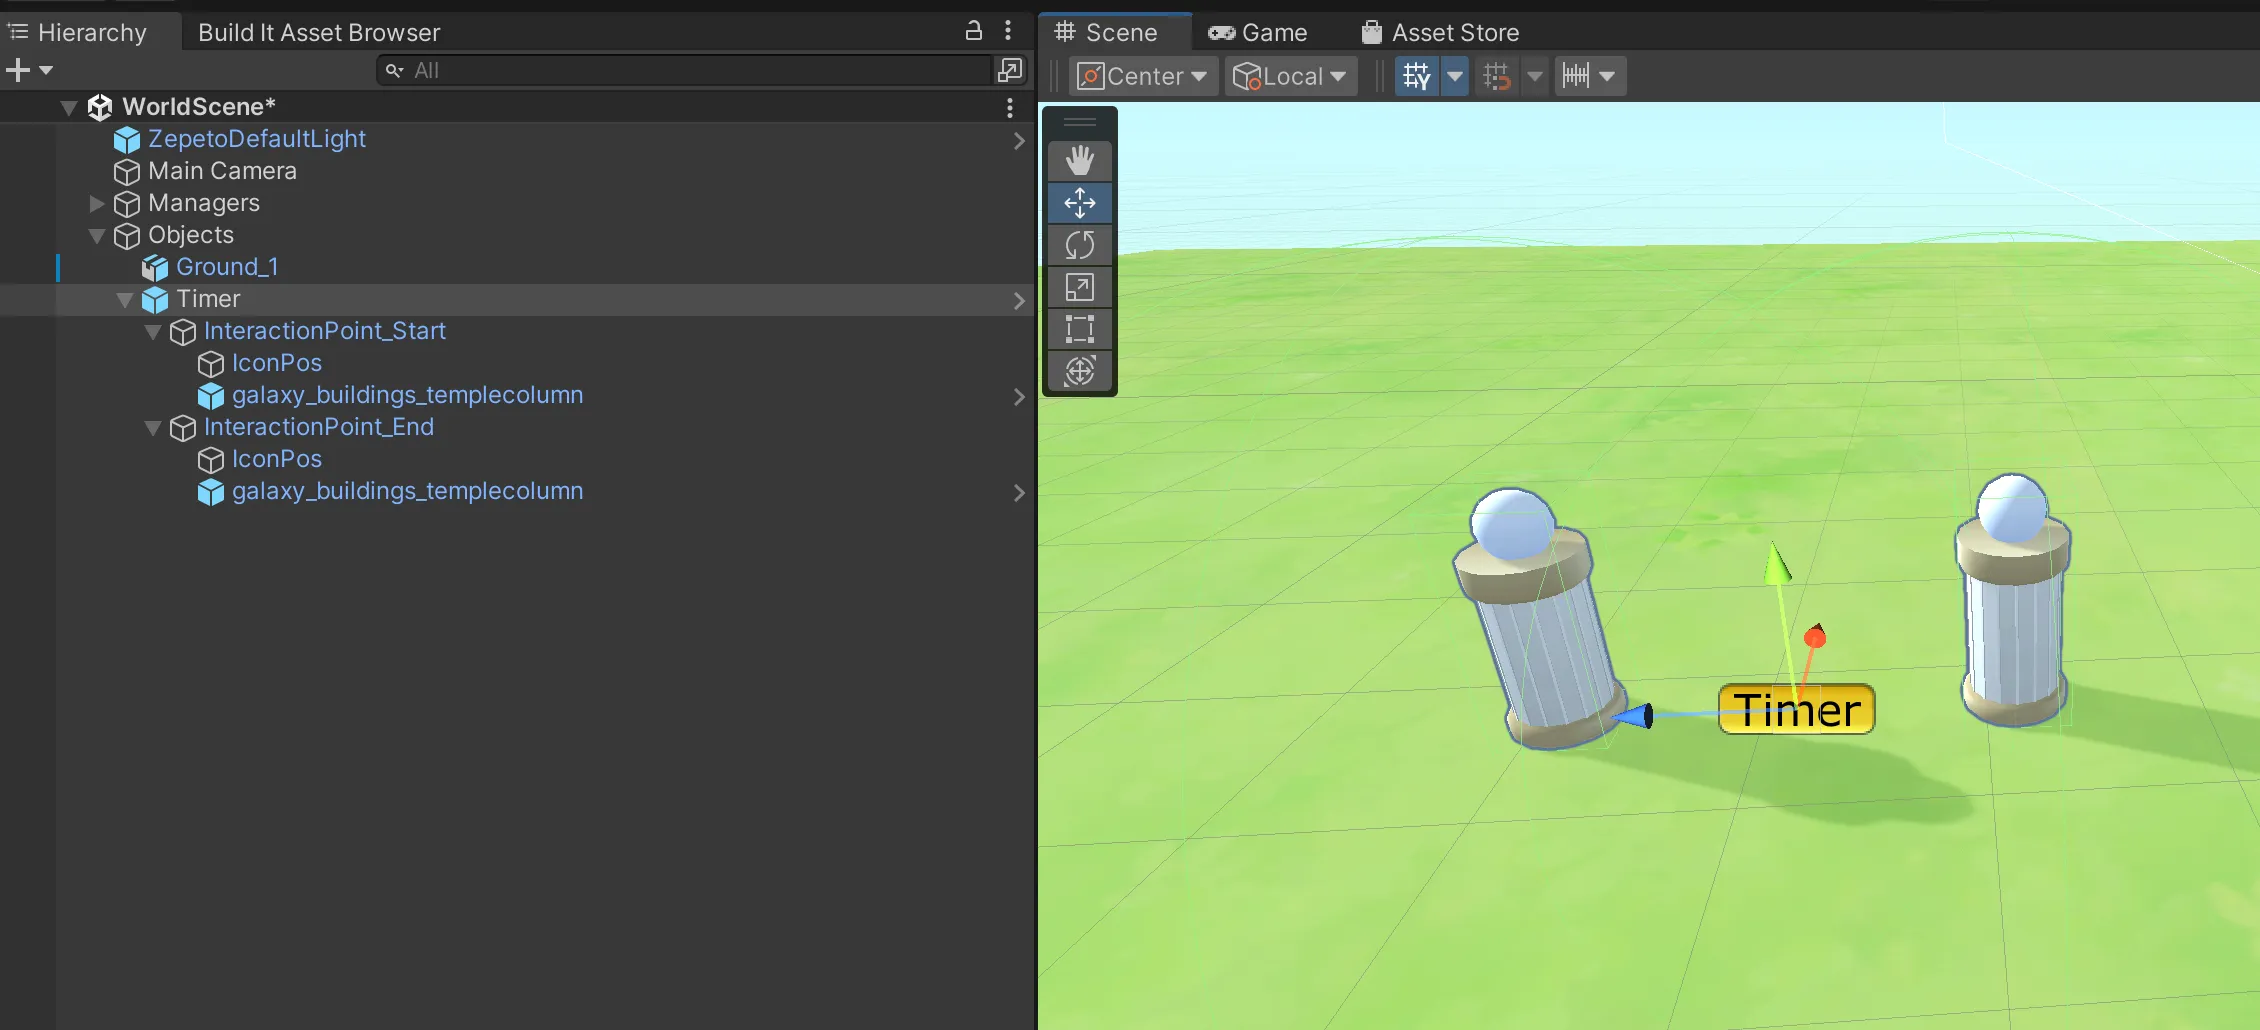
Displays a timer UI and begins timing upon clicking the "Start" object. Displays a success message after clicking the "Finish" object.
You can customize the appearance and interaction button position of the timer object to match your unique design concept.
- Change Object Appearance: Remove the child object responsible for the appearance and replace it with another object at the same position on the map to update its look.
- Adjust Interaction Icon Position: If you change the object's appearance, update the position of the IconPos child object to align correctly with the new design.
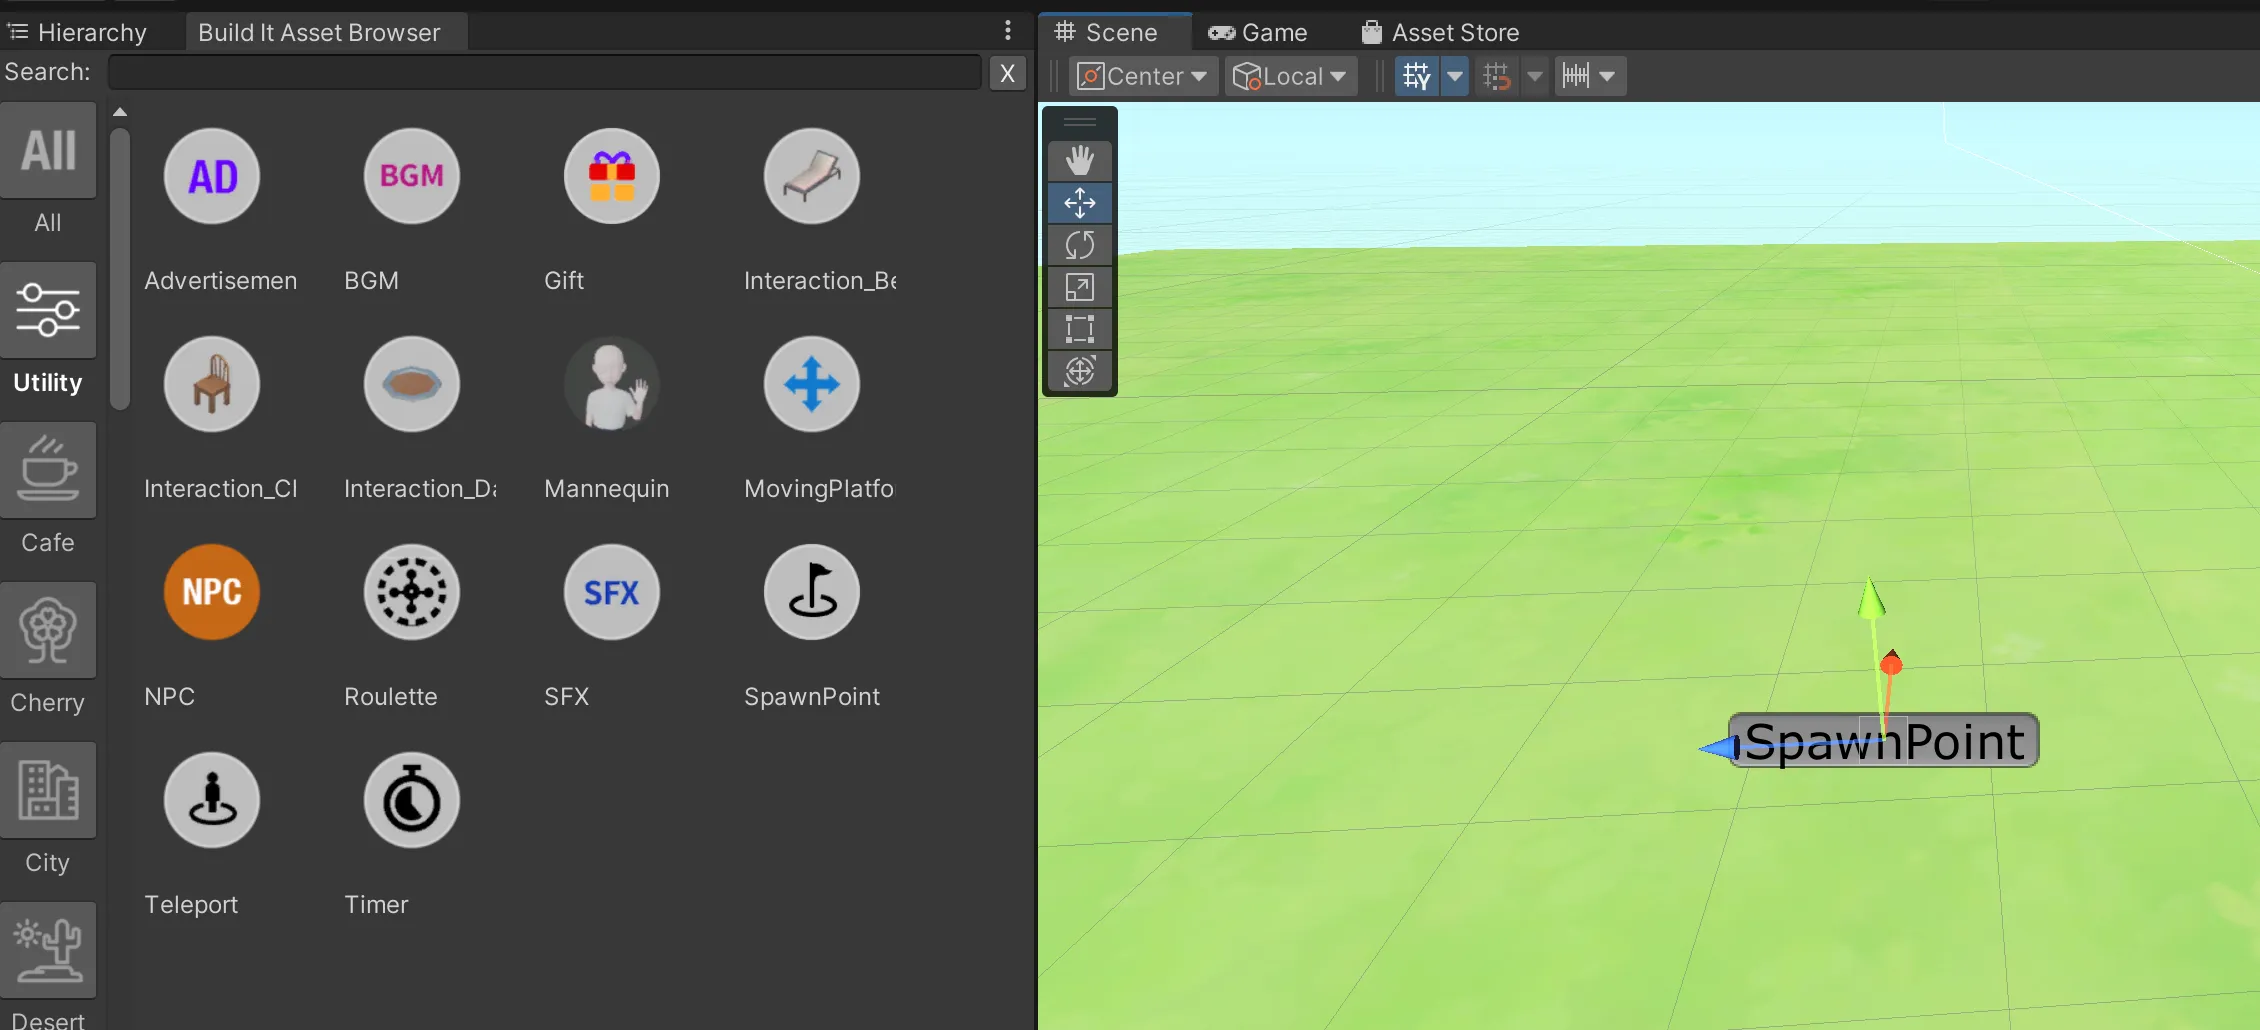
The Spawn Object sets the spawn point for the Zepeto character at the start of the world.
- If there is no Spawn Object in the scene, the ZEPETO character will spawn at the coordinates x=0, y=0, z=0.
- If multiple Spawn Objects are present, the ZEPETO character will randomly select one of them as its spawn location.
This is a moving platform often used in jumping maps, with multiplayer synchronization enabled. The character can board the platform, and you can easily configure its movement path and speed.
Automatic multiplayer synchronization ensures that all players in the room see the platform moving in the same way.
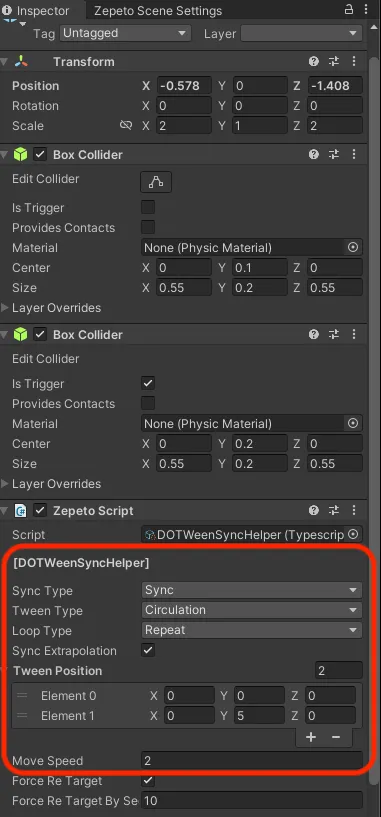
You can configure its properties in the child object, MovingPlatformManager.
- Sync Type : Synchronization setting property.
- Sync : Enables multiplayer synchronization.
- NoneSync : Disables synchronization.
- Tween Type : Defines how DOTween handles back-and-forth movement.
- Circulation : Moves in a circular loop (e.g., 1 -> 2 -> 3 -> 4 -> 1 -> 2 -> 3 -> 4).
- Linear : Moves back and forth in a linear path (e.g., 1 -> 2 -> 3 -> 4 -> 3 -> 2 -> 1).
- TeleportFirstPoint : When it reaches the end, it instantly teleports back to the start and repeats (e.g., 1 -> 2 -> 3 -> 4 -> 1 (teleport)).
- Loop Type : Defines the repetition behavior.
- Repeat : Loops continuously.
- JustOneWay : Runs only once in one direction.
- JustOneRoundTrip : Runs a single round trip.
- Sync Extrapolation : Calculates position to account for server latency.
- default : true
- Tween Position
- Input the localPosition coordinates where the platform should move. The platform follows the sequence of coordinates based on the Tween Type.
- At least two points are required for start and end positions.
- Move Speed : Sets the movement speed of the object.
Customizing the MovingPlatform Object Appearance
- Change Object Appearance: Remove the child object responsible for the appearance, and replace it with another object at the same location to create your unique design.
This popup window displays when users enter the world. When users click the button inside the popup, it automatically closes.
Use the popup window to introduce your world or promote your unique events!
- Important Notes
- The popup window is not placed on the ground; it appears within the UI screen area and can be viewed in the Game view.
Select the popup in the Hierarchy and adjust its properties in the Inspector. You can view these changes in Play Mode.
- Background Image: Drag a 2D sprite image here to change the background.
- Message: Edit the message text.
- Message Color: Adjust the color of the message text.
- Message Shadow: Toggle the shadow effect for the message text on or off.
- Button Title: Change the text on the button.

With the Build It template, you can monetize your world! Follow the tutorial video to add monetization elements.
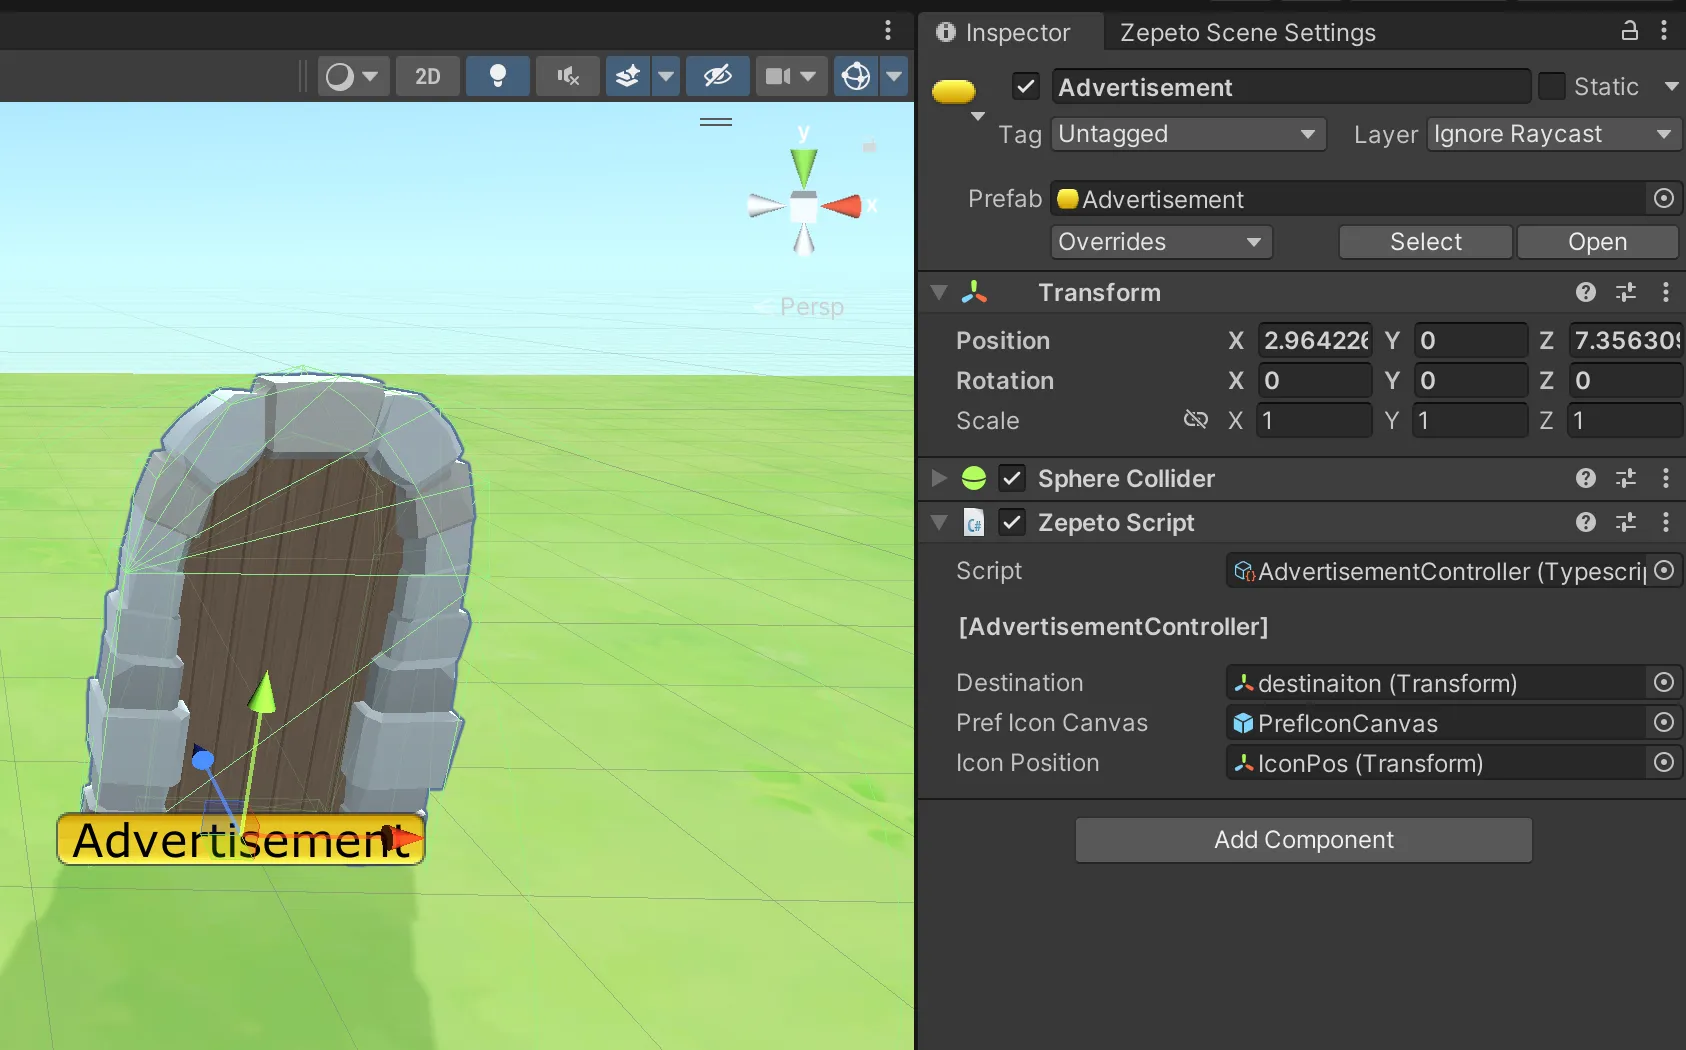
The advertisement feature is implemented as a teleport object for easy integration. The main functionality involves a script that performs specific actions after watching an ad. The Build It template utilizes this teleport design, so keep that in mind.
- Destination Point : Set the destination point by moving the child object destination to the desired location.
Customizing the Appearance and Interaction Button Position of the Advertisement Teleport Object.
- Change Object Appearance: Remove the child object responsible for the appearance, then replace it with another object at the same location to alter its look.
- Adjust Interaction Icon Position: If you modify the object's appearance, adjust the position of the IconPos child object to match the new design.
- If you're familiar with Zepeto scripting, open the AdvertisementController.ts file to customize various events triggered when the ad button is clicked. This allows for more personalized interaction and monetization strategies in your world.
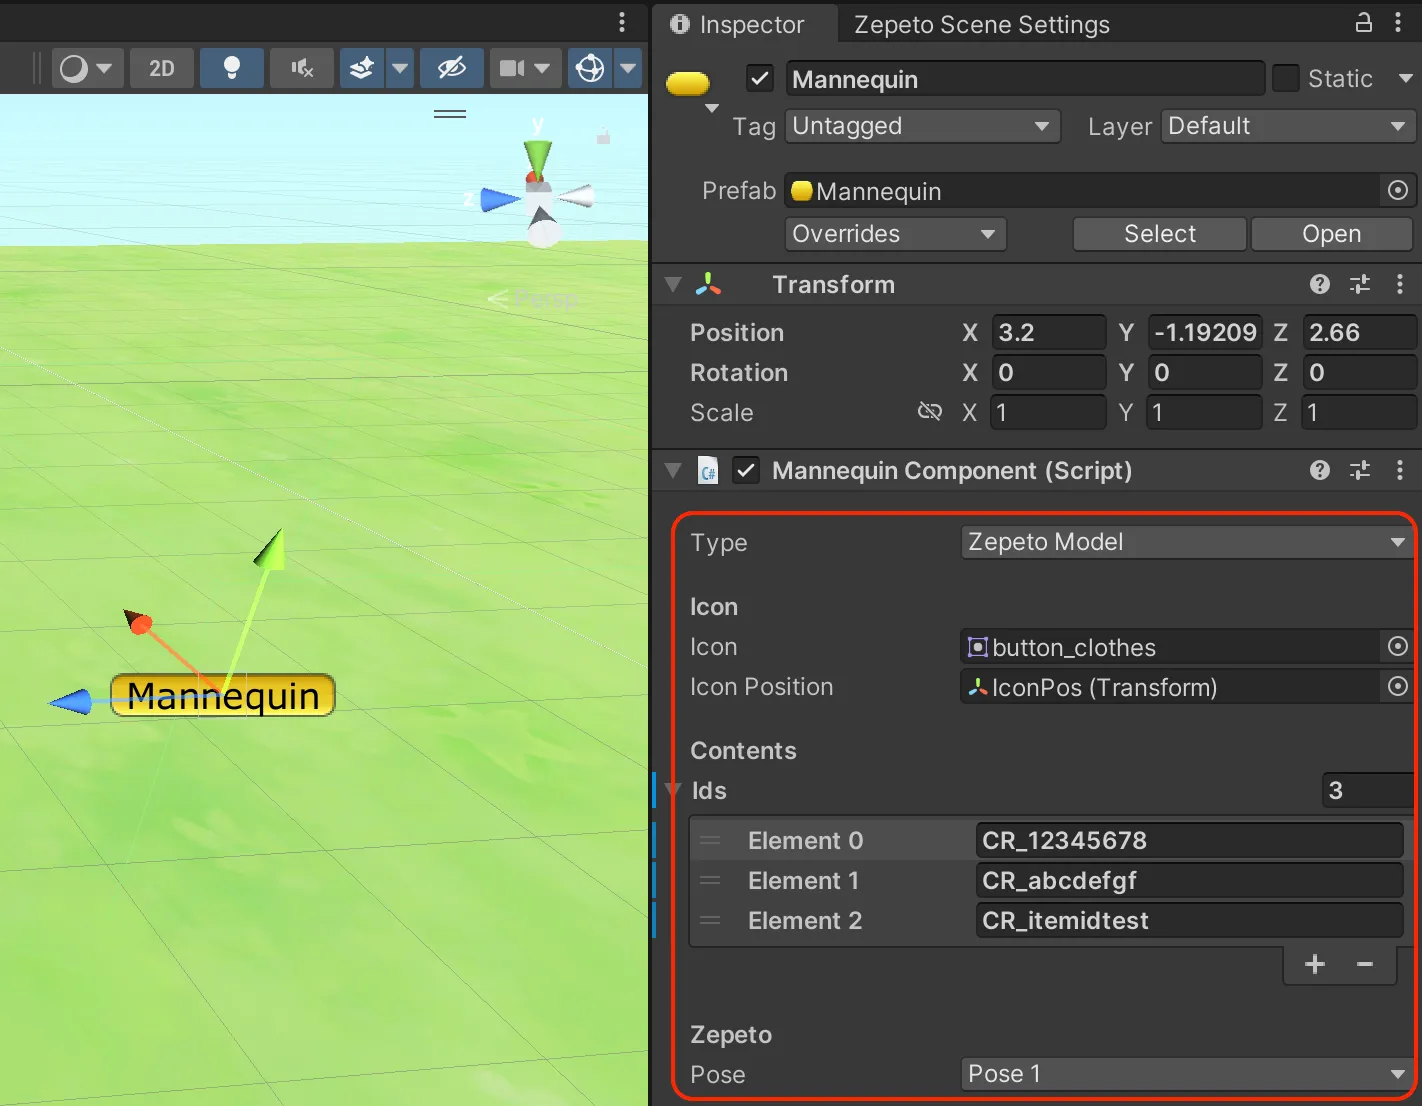
Assign your custom outfit Item ID to the mannequin object, allowing users who enter your world to purchase the displayed outfit.
The mannequin only appears in Play Mode.
- Type
- Simple: Displays only the interaction icon without a mannequin. You may want to add a custom child object for appearance.
- Zepeto Model: Shows the default mannequin wearing the outfit item.
- Zepeto Template: Enter a Zepeto ID to display that character model with the outfit.
- Pose: Adjust the mannequin’s pose.
- Ids: Enter the Item ID for the outfit you've created.
You can also allow users to gift outfits to other players in the world by setting an Item ID on the gift object.
The item owner can earn revenue through the gifting feature.
Note that the gifting function can only be tested on mobile devices.
- Item ID: Enter the ID of the item to be gifted.
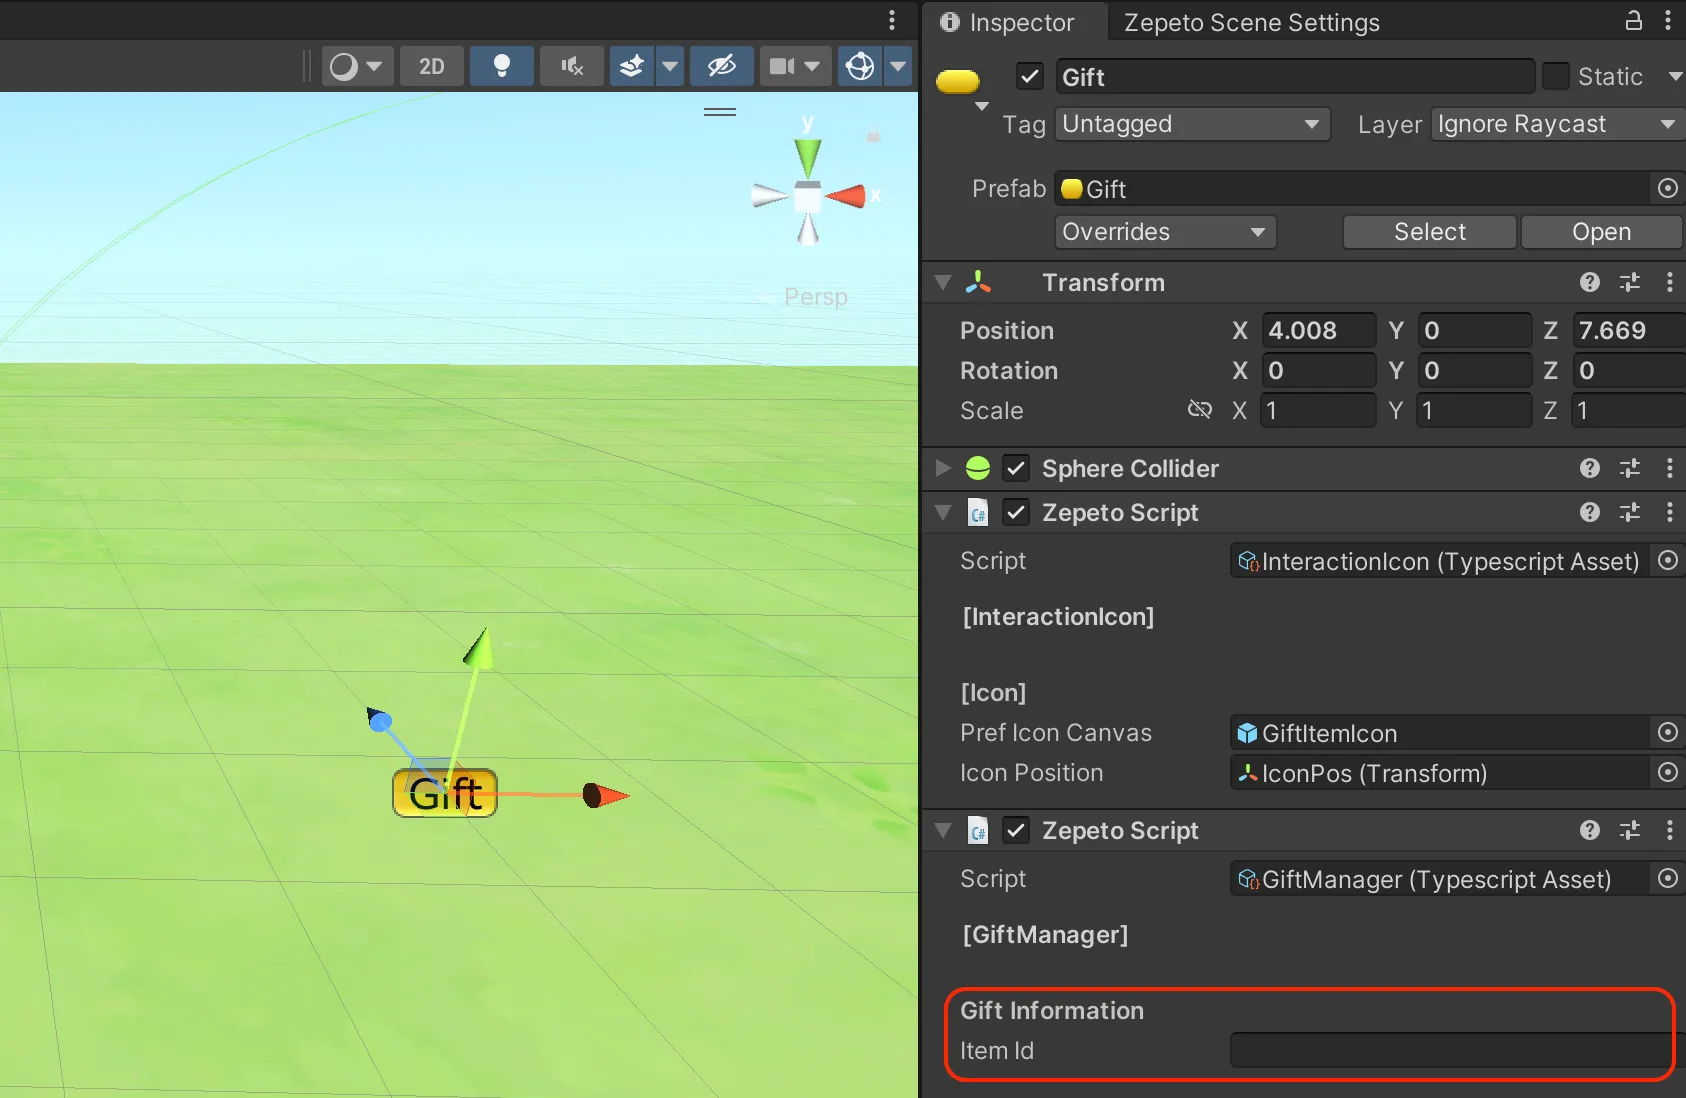
Customizing the Gift Object Appearance and Interaction Button Position.
- Change Object Appearance: Remove the child object responsible for appearance and replace it with another object at the same location to match your unique concept.
- Adjust Interaction Icon Position: If the object's appearance is changed, adjust the IconPos child object’s position to align with the new design.
- The intellectual property rights, including copyright, for this template are owned by “NAVER Z” and its affiliates. For more information, please refer to the following link. [ZEPETO World SDK License and terms]
- This template is provided for free use exclusively within ZEPETO World. Any usage of this template outside of the ZEPETO World platform is strictly prohibited.
- When submitting a world for review through this template, the review may be rejected if it is similar to a previously released world. Therefore, it is recommended to change resources such as backgrounds and objects within the scene.


