Créer et contrôler des PNJ
Learn how to create NPCs from ZEPETO Characters.
Apply the sample scripts provided for each feature to add the NPC of your choice to your World.
Créer un NPC
Créez un NPC à l'aide d'un identifiant ZEPETO.
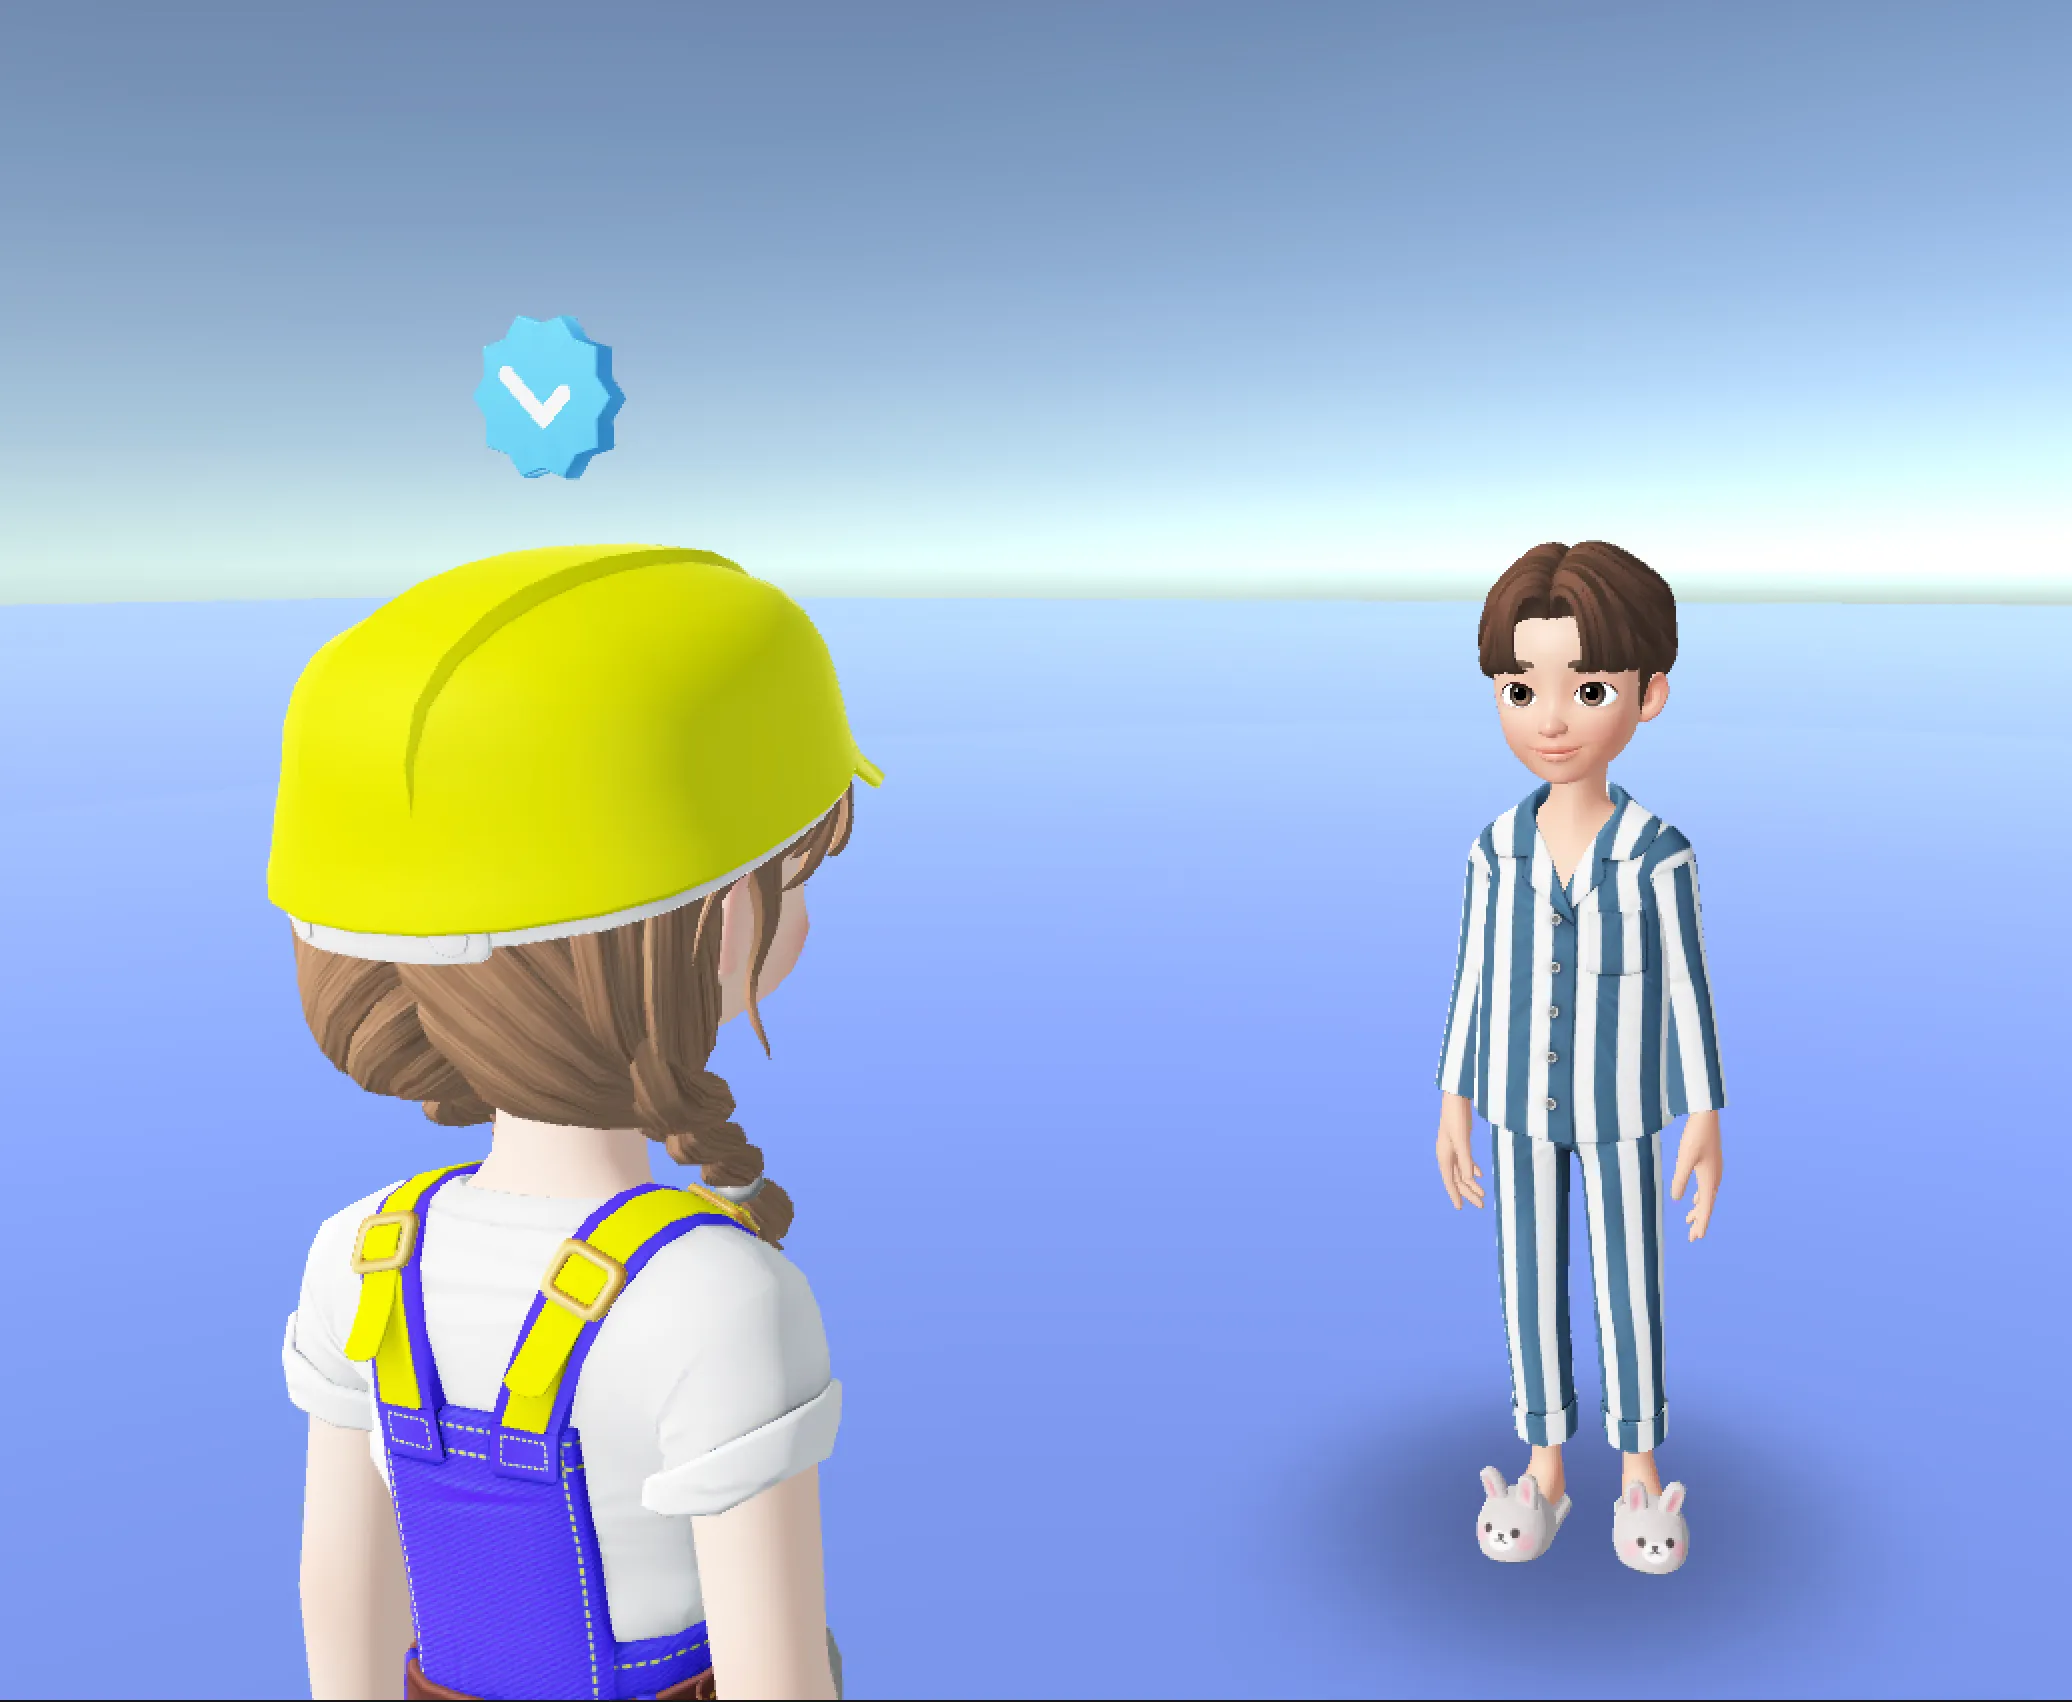
- L'apparence du NPC et les objets qu'il porte seront identiques à l'identifiant ZEPETO saisi.
- Il est recommandé de créer un personnage ZEPETO avec une apparence spécifique avant de créer un NPC.
Définition de l'objet de localisation où le NPC sera créé
- Implémentez par défaut le code de création de personnage ZEPETO dans votre Scène.
📘 Veuillez vous référer au guide suivant. [Créer un personnage ZEPETO]
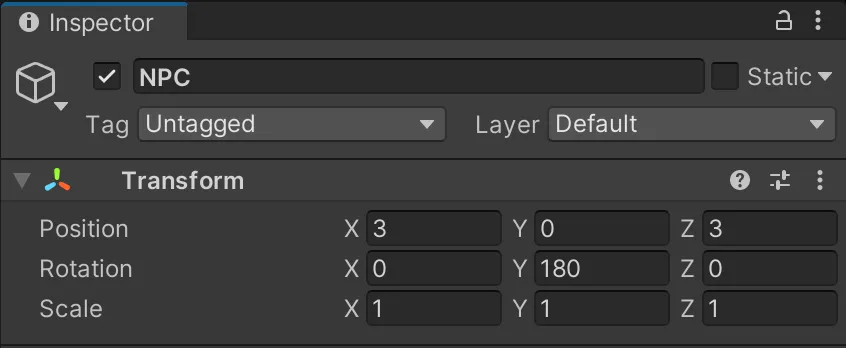
- Créer une hiérarchie > Créer un objet vide et le renommer NPC.
- Un objet pour stocker l'emplacement où le NPC sera créé.
- Définir la position, la rotation.
Écrire un script de création de NPC
1) Créez le projet > Create > ZEPETO > TypeScript et renommez-le en NPCCreator.
2) Ecrivez un exemple de script comme ci-dessous.
import { ZepetoScriptBehaviour } from 'ZEPETO.Script';
import { SpawnInfo, ZepetoCharacter, ZepetoCharacterCreator } from 'ZEPETO.Character.Controller';

export default class NPCCreator extends ZepetoScriptBehaviour {

    // ZEPETO ID of the NPC
    public zepetoId: string;
    // NPC character object
    private _npc: ZepetoCharacter;

    Start() {
        // Create a new instance of SpawnInfo and set its position and rotation based on the object's transform
        const spawnInfo = new SpawnInfo();
        spawnInfo.position = this.transform.position;
        spawnInfo.rotation = this.transform.rotation;

        // Use ZepetoCharacterCreator to create a new character by Zepeto ID and assign it to _npc variable
        ZepetoCharacterCreator.CreateByZepetoId(this.zepetoId, spawnInfo, (character: ZepetoCharacter) => {
            this._npc = character;
        })
    }

}
Le déroulement du script est le suivant :
- Start()
- Créer un NPC dans l'emplacement de l'objet NPC en utilisant la fonction ZepetoCharacterCreator.CreateByZepetoId() et le sauvegarder dans _npc.
3) Une fois que vous avez fini d'écrire le script, ajoutez-le à l'objet NPC.
4) Attribuer l'identifiant Zepeto dans l'inspecteur.
- Zepeto Id : L'ID ZEPETO du NPC.
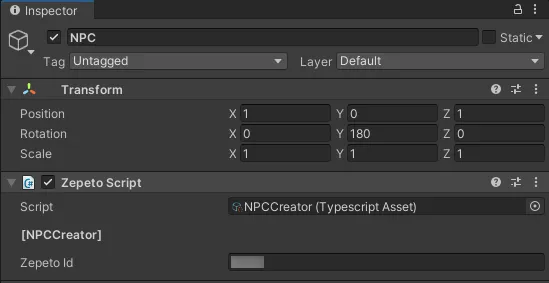
5) Appuyez sur le bouton de lecture pour exécuter et le NPC sera créé.
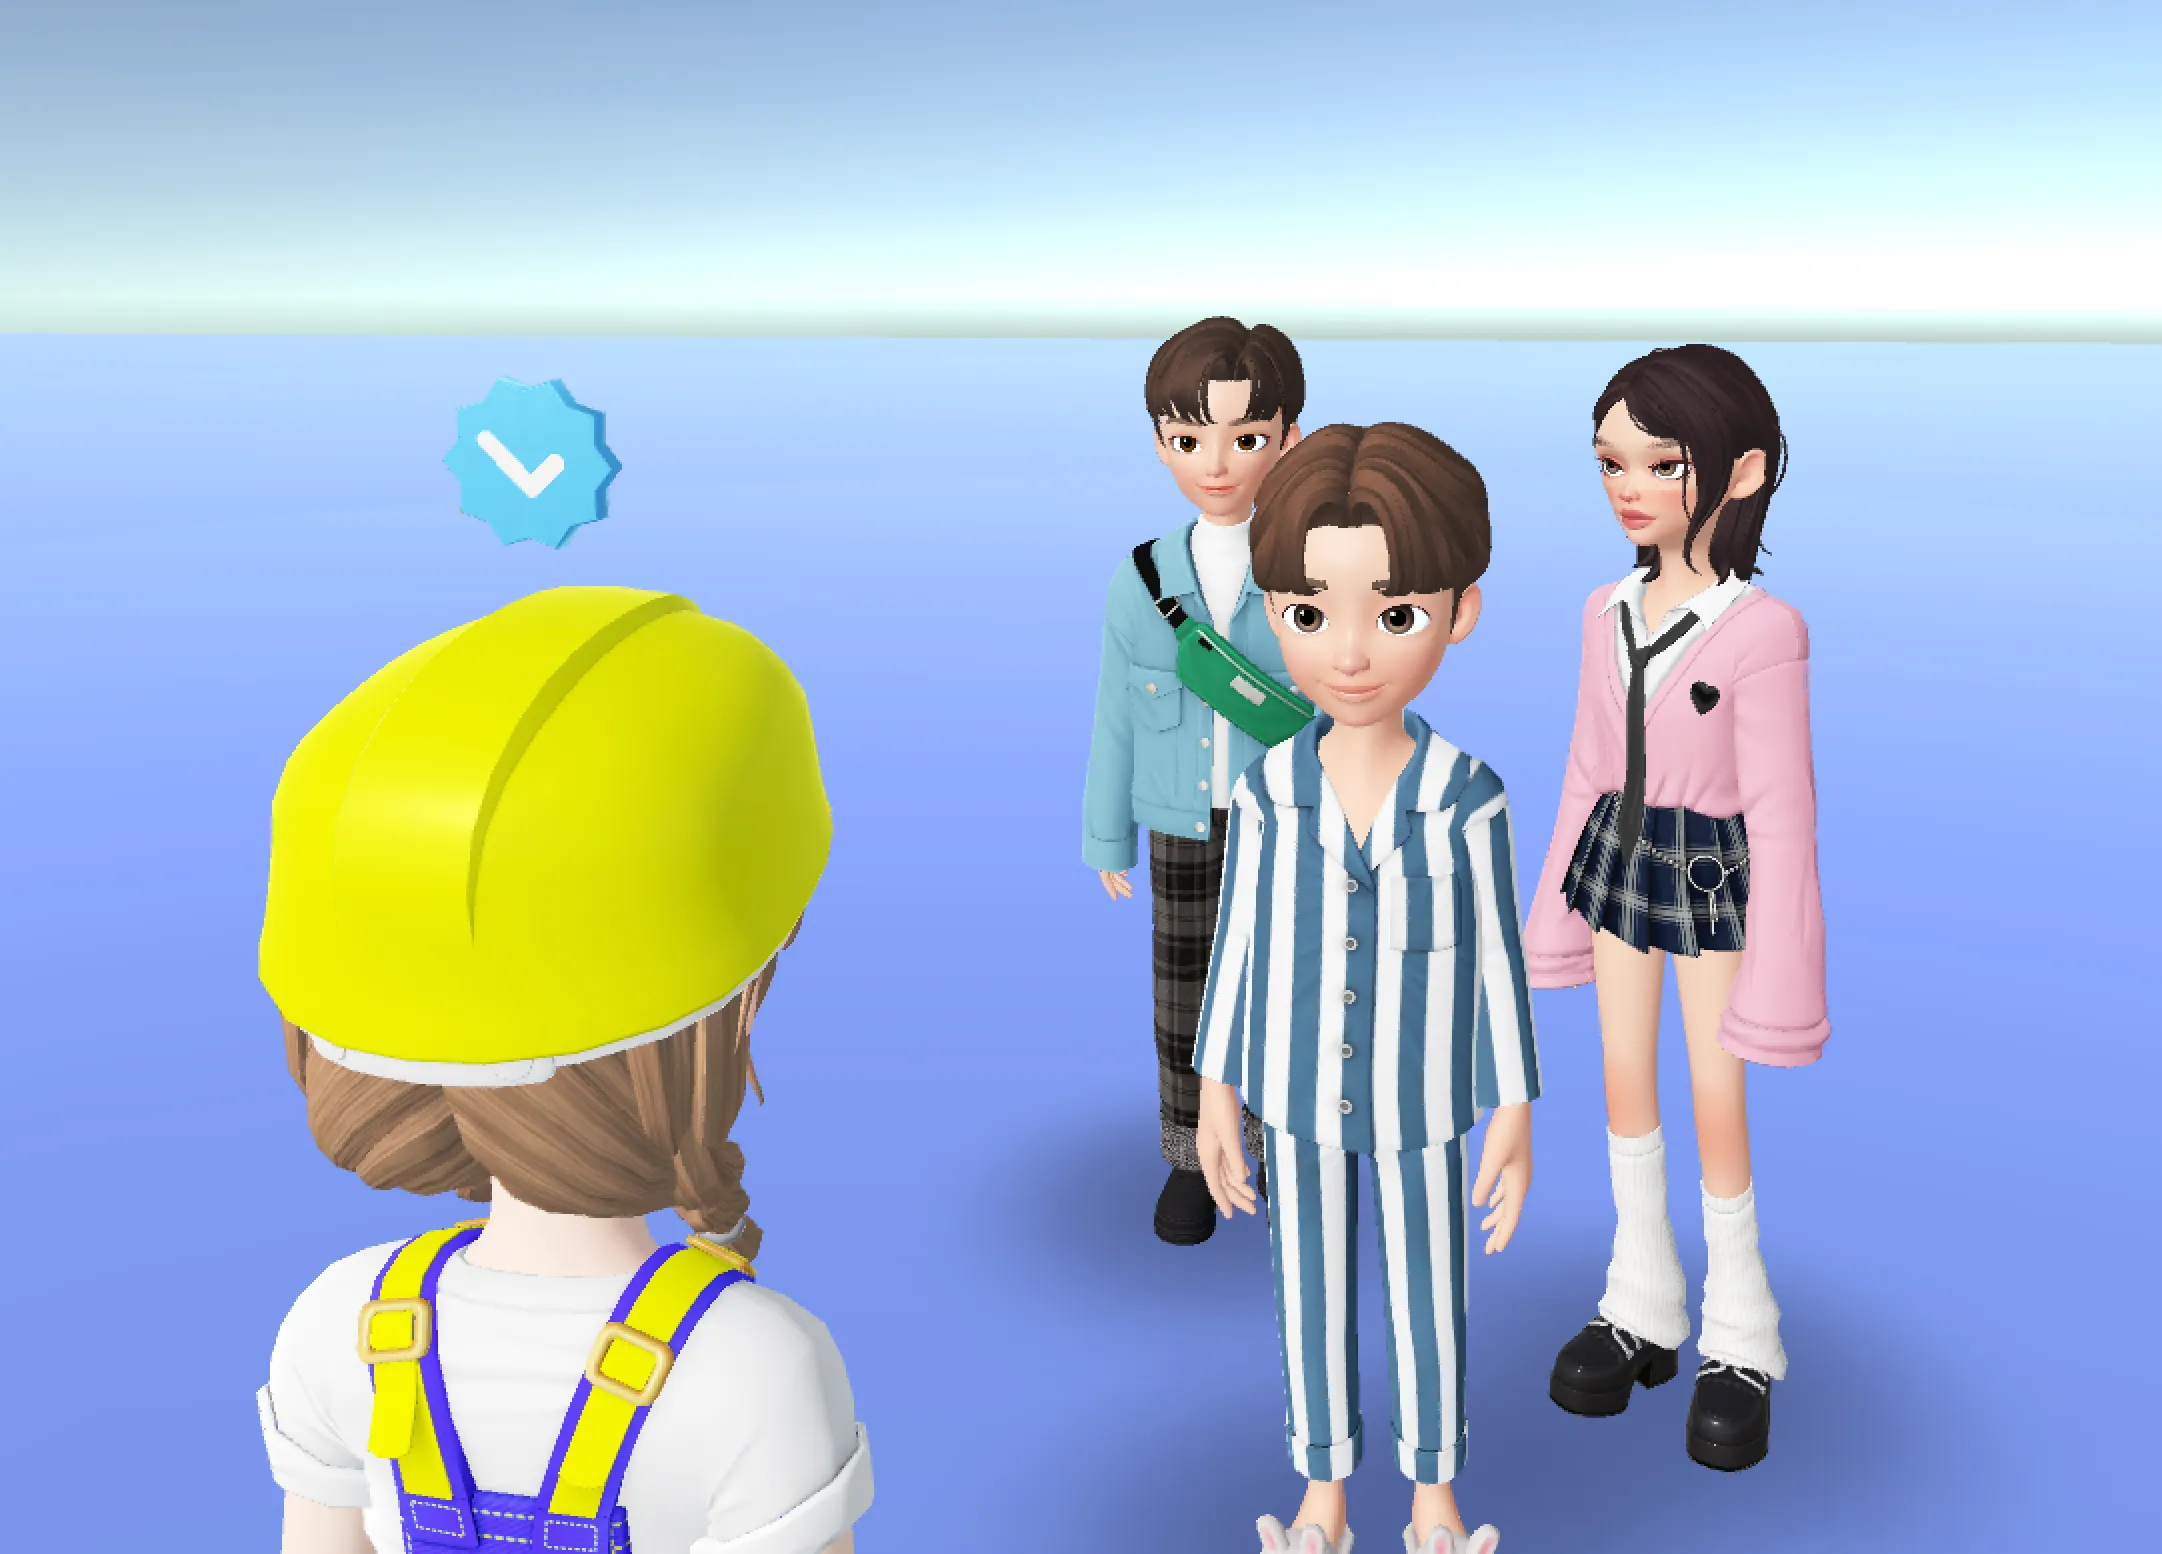
6) Ajoutez un objet de localisation de NPC de la même manière, et ajoutez un script de NPC pour créer facilement plusieurs NPC.
Étiquetage NPC
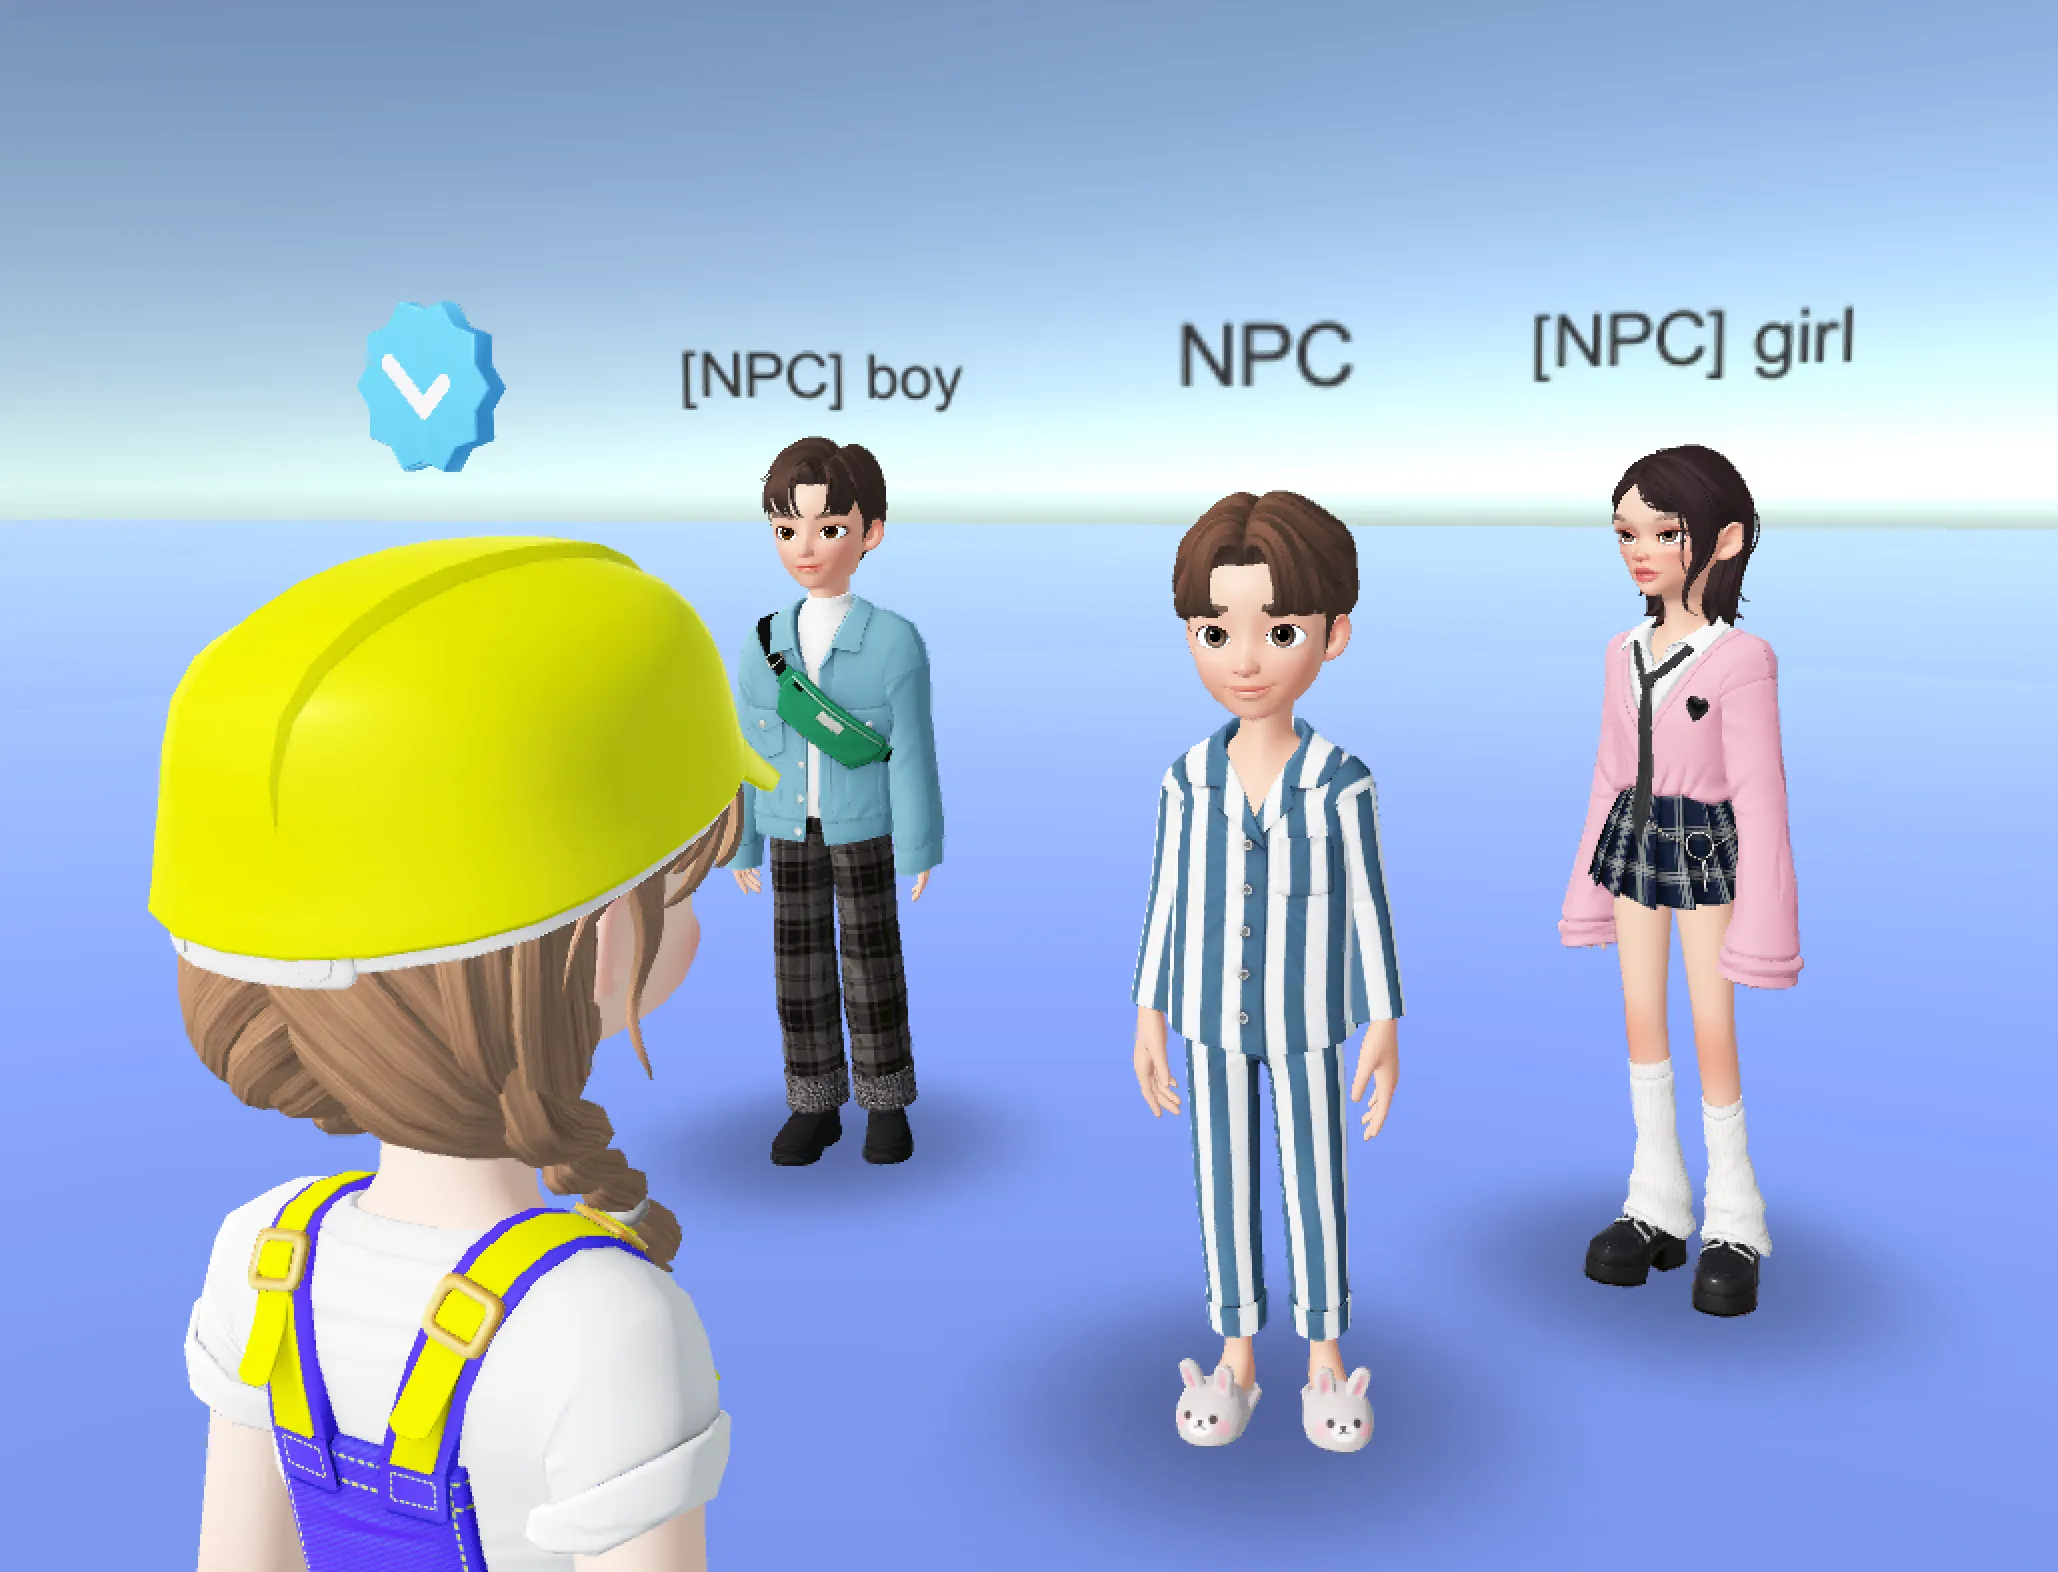
Vous pouvez apposer des étiquettes sur vos NPC pour les distinguer des joueurs.
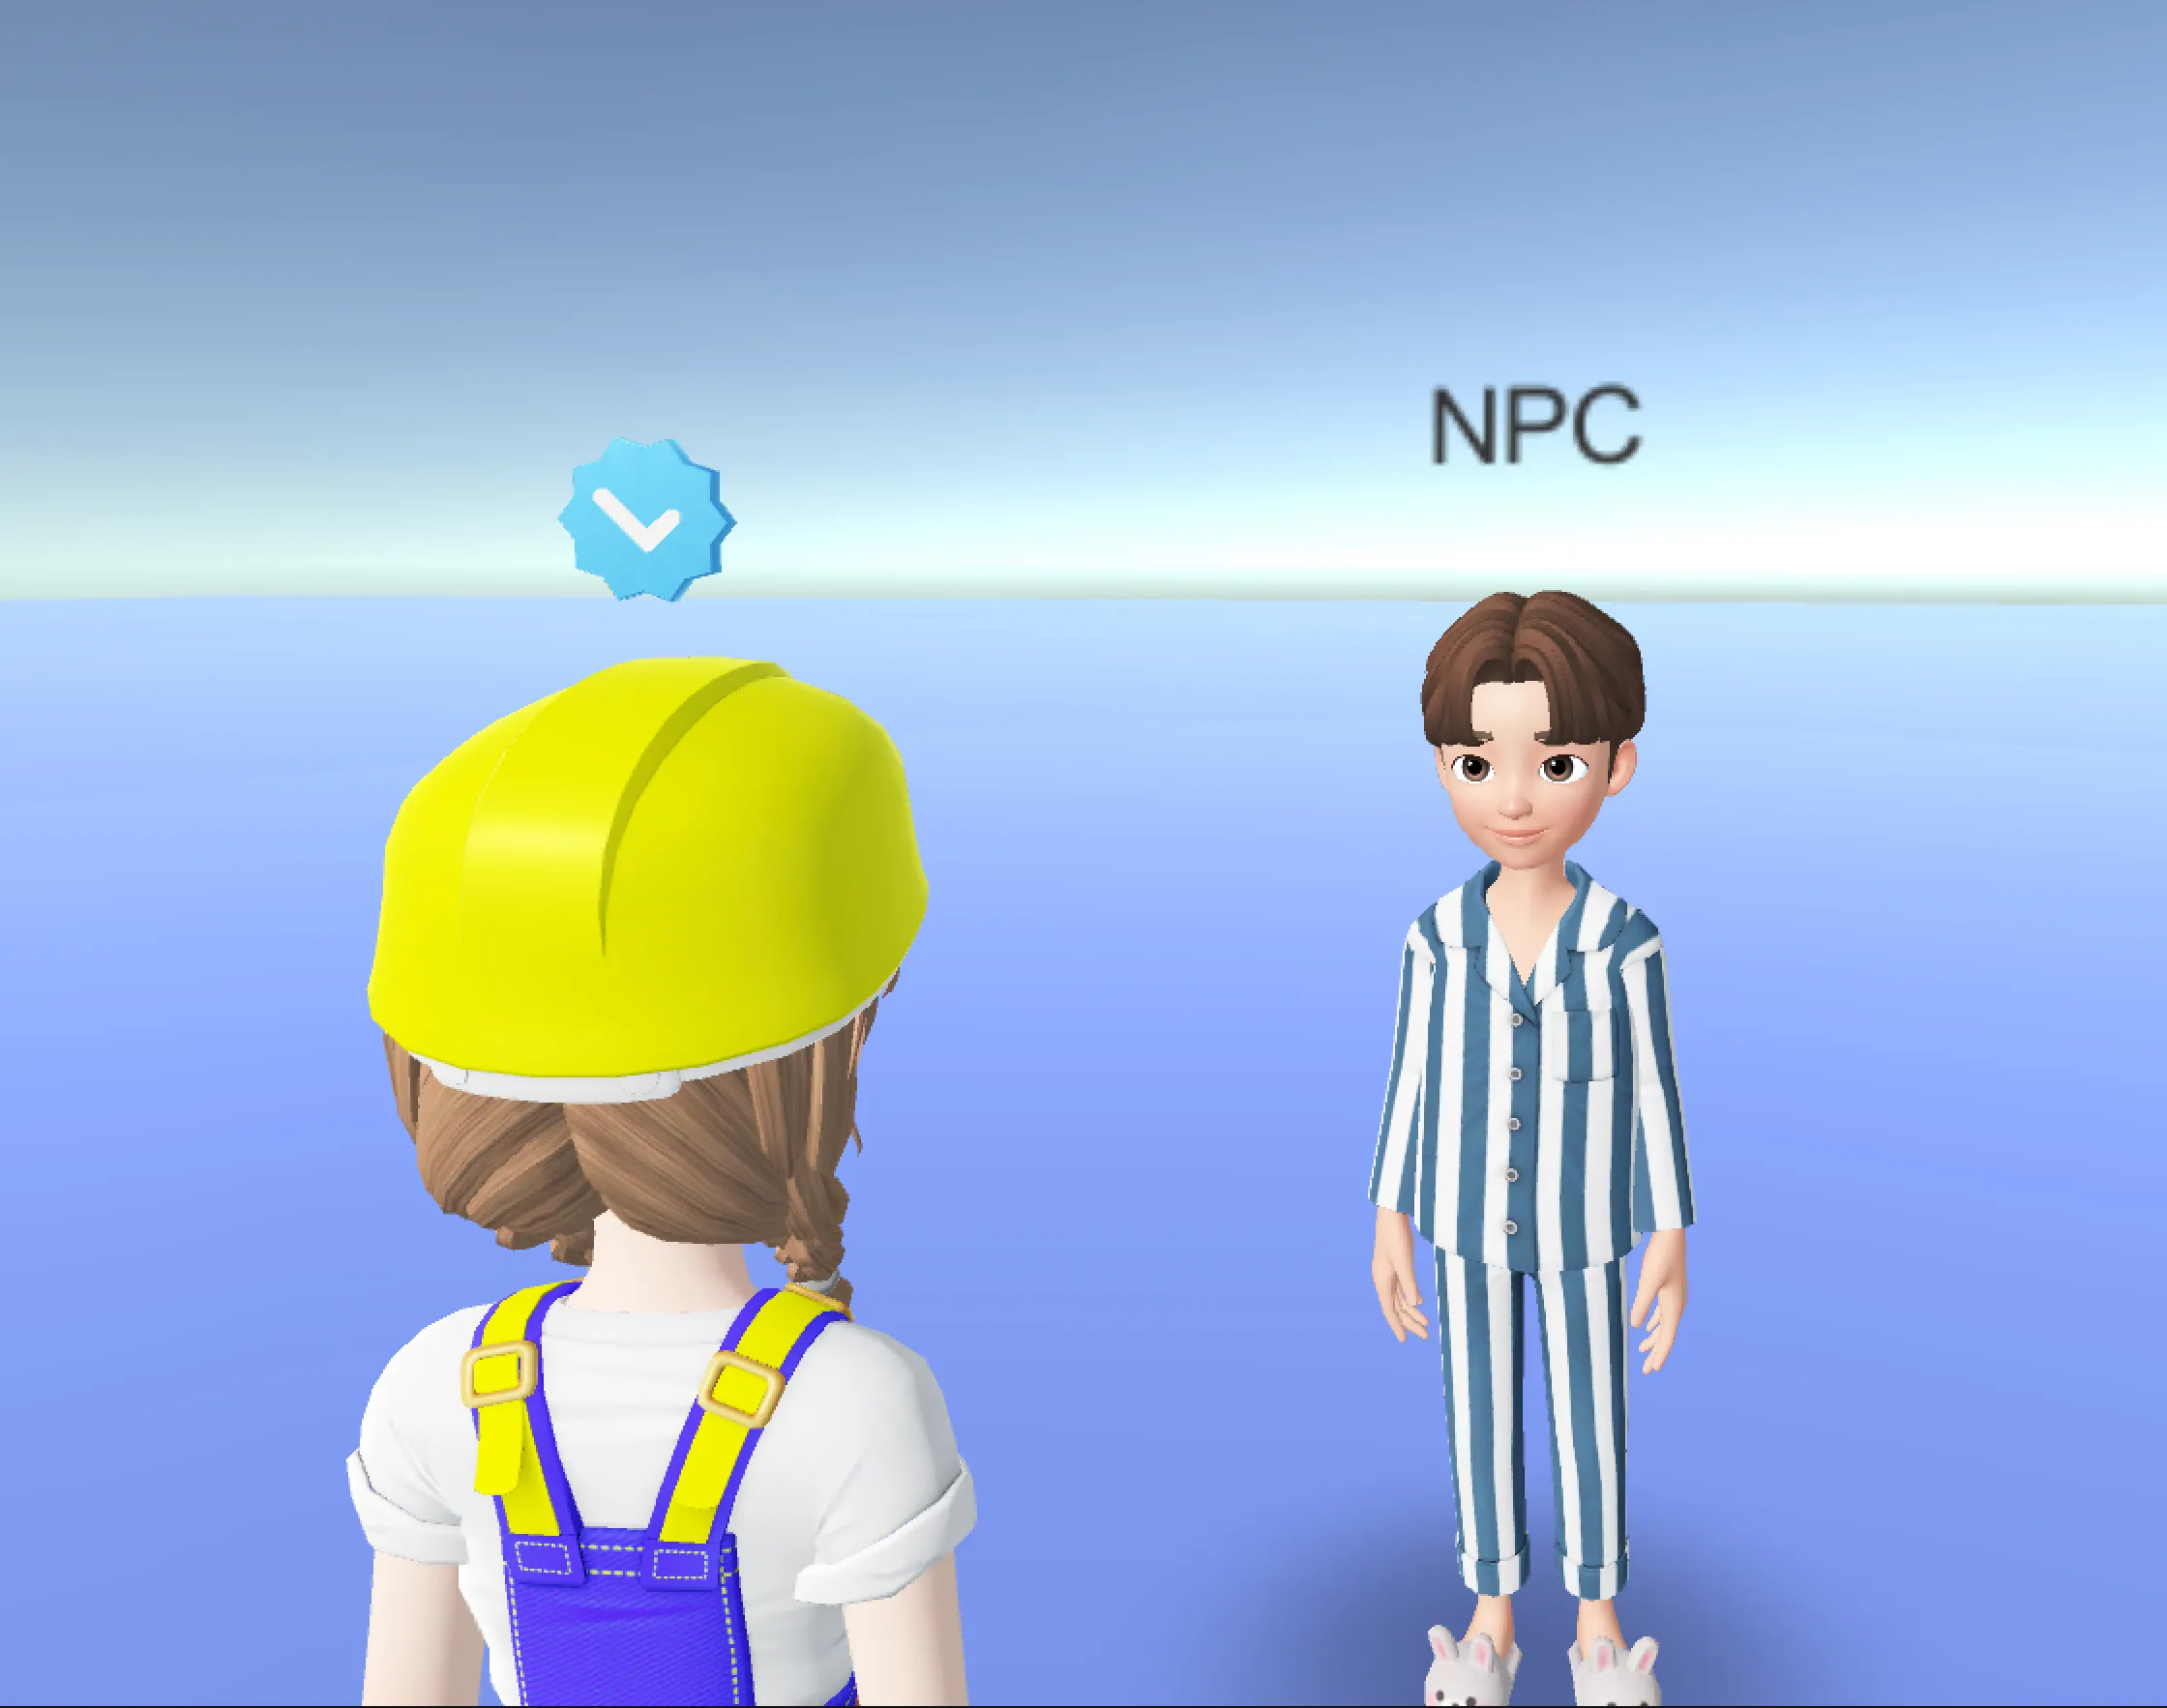
Pour créer le préfabriqué Name Tag Canvas
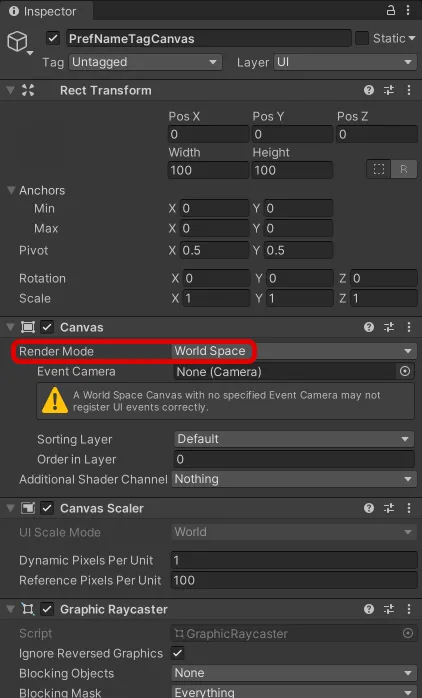
1) Créez un Hierachy > UI > Canvas et renommez-le PrefNameTagCanvas.
- Réglez le mode de rendu sur World Space.
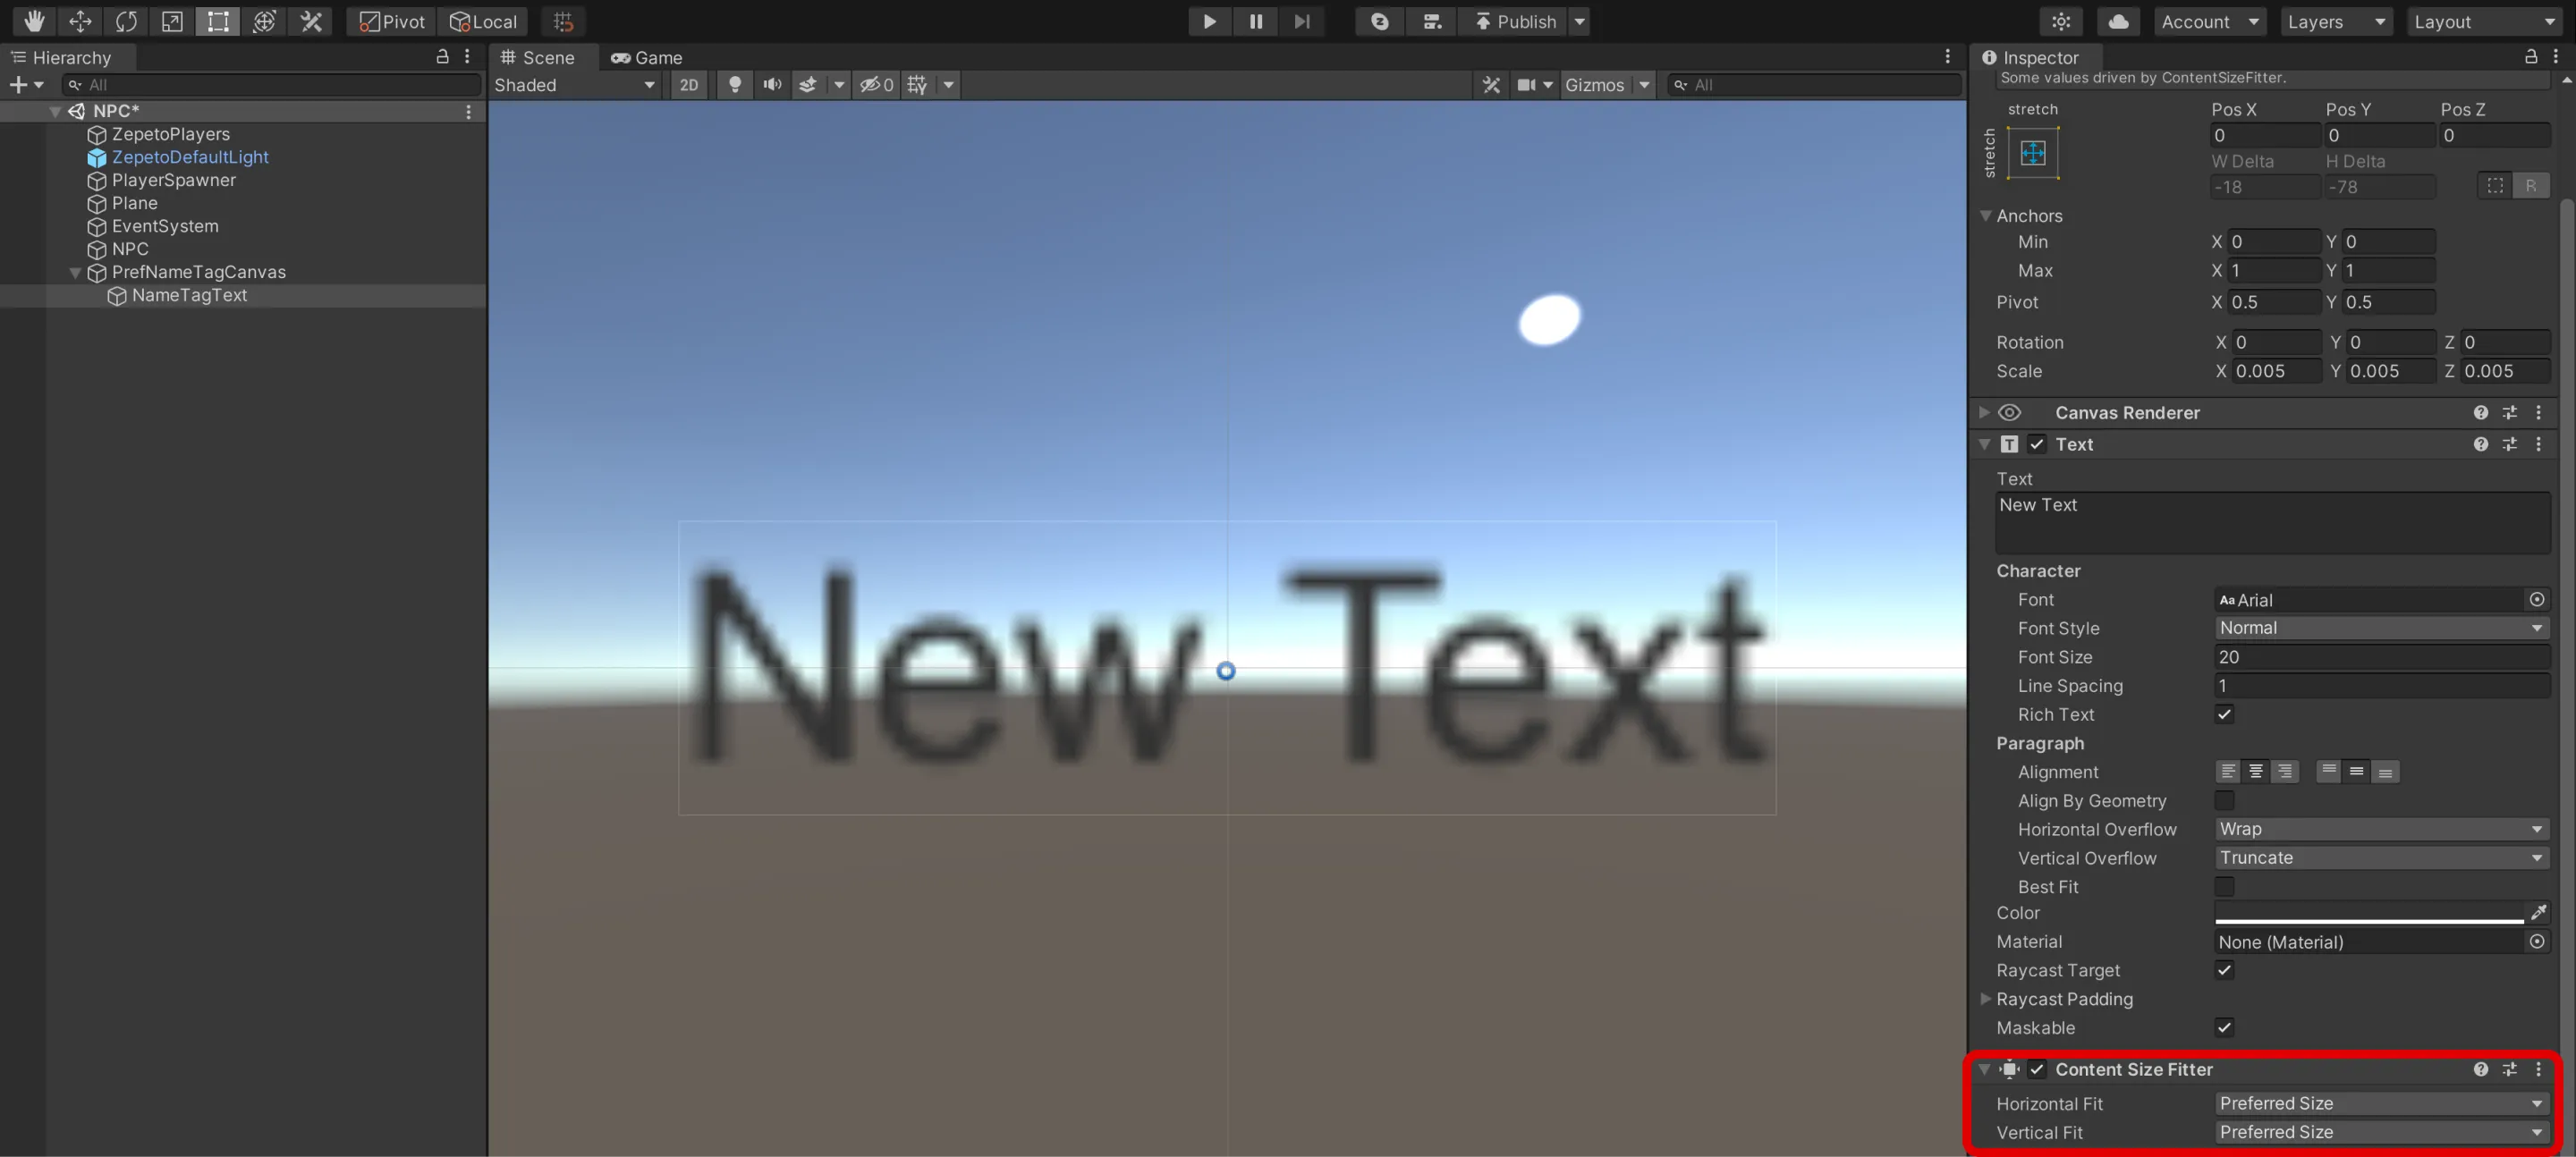
2) Créez Hierarchy> UI > Text comme enfant de PrefNameTagCanvas et renommez-le en NameTagText.
- Texte représentant le nom.
- Ajoutez un composant "Content Size Fitter" pour que le texte ait la bonne taille.
3) Une fois que vous avez terminé, faites-le glisser vers la fenêtre de projet pour en faire un Prefab, puis supprimez le PrefNameTagCanvas qui se trouve encore dans le surligneur.
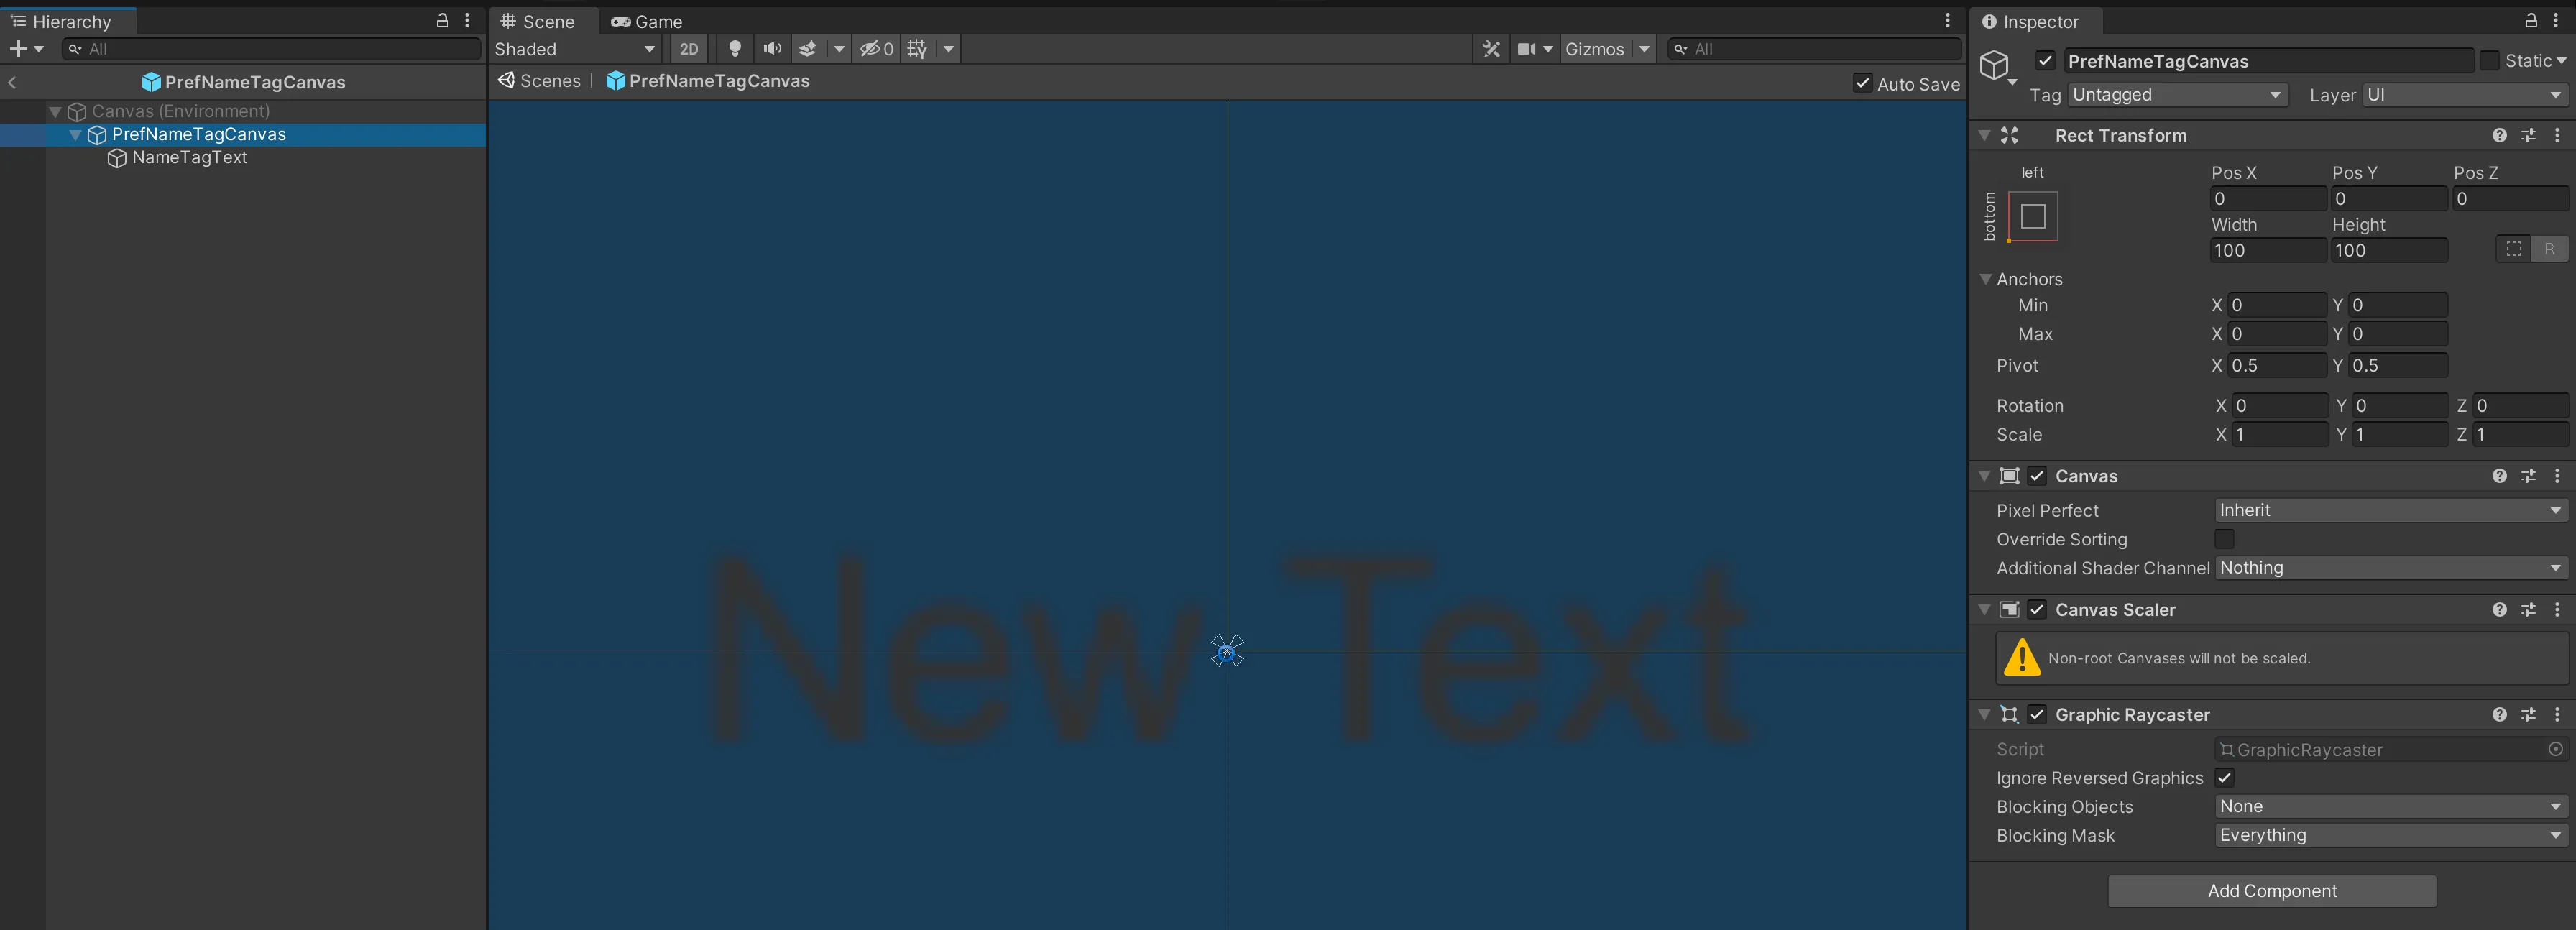
Création d'un script de balise de nom de PNJ
1) Créez un projet > Create > ZEPETO > TypeScript et renommez-le NPCCreatorWithNameTag.
2) Rédigez un exemple de script comme indiqué ci-dessous.
import { ZepetoScriptBehaviour } from 'ZEPETO.Script';
import { KnowSockets, SpawnInfo, ZepetoCharacter, ZepetoCharacterCreator } from 'ZEPETO.Character.Controller';
import { Canvas, Camera, Vector3, Object, GameObject } from 'UnityEngine';
import { Text } from 'UnityEngine.UI';

export default class NPCCreatorWithNameTag extends ZepetoScriptBehaviour {

    // ZEPETO ID of the NPC
    public zepetoId: string;
    // Name to be displayed in the name tag
    public nameTag: string;
    // Prefab of the name tag canvas game object
    public nameTagPrefab: GameObject;
    // Y-axis offset value of the name tag canvas game object
    public nameTagYOffset: number;

    // NPC character object
    private _npc: ZepetoCharacter;
    // Name tag canvas game object
    private _npcNameTagObject: GameObject;
    // Text inside the name tag canvas game object
    private _npcNameTagText: Text;
    // Name tag canvas
    private _canvas: Canvas;
    // World Camera
    private _cachedWorldCamera: Camera;

    Start() {
        // Create a new instance of SpawnInfo and set its position and rotation based on the object's transform
        const spawnInfo = new SpawnInfo();
        spawnInfo.position = this.transform.position;
        spawnInfo.rotation = this.transform.rotation;

        // Use ZepetoCharacterCreator to create a new character by ZEPETO ID and assign it to _npc variable
        ZepetoCharacterCreator.CreateByZepetoId(this.zepetoId, spawnInfo, (character: ZepetoCharacter) => {
            this._npc = character;

            // Set the name tag
            this.SetNameTag();
        })
    }

    // Set the name tag
    SetNameTag() {
        // Dynamically create the name tag canvas game object
        this._npcNameTagObject = Object.Instantiate(this.nameTagPrefab) as GameObject;

        // Set the parent of the name tag canvas game object transform to be the NPC transform.
        this._npcNameTagObject.transform.SetParent(this._npc.transform);

        // Set the position of the name tag canvas game object above the NPC's head
        this._npcNameTagObject.transform.position = Vector3.op_Addition(this._npc.GetSocket(KnowSockets.HEAD_UPPER).position, new Vector3(0, this.nameTagYOffset,0));

        // Set the text inside the name tag
        this._npcNameTagText = this._npcNameTagObject.GetComponentInChildren<Text>();
        this._npcNameTagText.text = this.nameTag;

        this._canvas = this._npcNameTagObject.GetComponent<Canvas>();
        this._cachedWorldCamera = Object.FindObjectOfType<Camera>();
        this._canvas.worldCamera = this._cachedWorldCamera;
    }

    private Update() {
        if (this._canvas != null) {
            this.UpdateCanvasRotation();
        }
    }

    // Update the rotation of the name tag canvas to face the camera
    private UpdateCanvasRotation() {
        this._canvas.transform.LookAt(this._cachedWorldCamera.transform);
        this._canvas.transform.Rotate(0, 180, 0);
    }

}
Le déroulement du script est le suivant :
- Start()
- Appeler la fonction personnalisée SetNameTag().
- SetNameTag()
- Génère dynamiquement un badge pour le NPC et ajuste la position du badge généré au-dessus de la tête du NPC.
- Définit le texte à l'intérieur de la balise de nom.
- Update()
- Appelez la fonction personnalisée UpdateCanvasRotation() pour faire pivoter le canevas en fonction de la caméra.
3) Lorsque vous avez terminé d'écrire le script, ajoutez-le à l'objet NPC.
4) Dans l'inspecteur, assignez les éléments Zepeto Id, Name Tag, Name Tag Prefab, et Name Tag Y Offset.
- Name Tag (étiquette de nom) : Le nom qui apparaîtra sur le badge du NPC.
- Préfabriqué pour badge : Le préfabriqué de la toile de l'étiquette de nom.
- Name Tag Y Offset : Une variable qui stocke la valeur de décalage de l'axe des y pour l'objet Name Tag Canvas. Lorsque vous placez le badge au-dessus de la tête du personnage, vous pouvez ajuster la distance entre le personnage et le badge.
5) appuyez sur le bouton de lecture pour l'exécuter, et le NPC avec l'étiquette de nom sera créé.
Contrôler le comportement des NPC
Vous pouvez contrôler les actions des NPC.
Sauts

Utilisez l'API de personnage ZEPETO pour faire sauter le NPC.
Vous pouvez utiliser l'API des caractères ZEPETO pour mettre en œuvre un plus grand nombre de comportements.
📘 Veuillez vous référer au guide suivant. [ZEPETO Character]
Création d'un script de saut de NPC
1) Allez dans Projet > Créer > ZEPETO > Créer TypeScript et renommez-le en NPCJump.
2) Rédigez un exemple de script comme indiqué ci-dessous.
import { ZepetoScriptBehaviour } from 'ZEPETO.Script';
import { SpawnInfo, ZepetoCharacter, ZepetoCharacterCreator } from 'ZEPETO.Character.Controller';
import { WaitForSeconds } from 'UnityEngine';

export default class NPCJump extends ZepetoScriptBehaviour {

    // ZEPETO ID of the NPC
    public zepetoId: string;
    // NPC character object
    private _npc: ZepetoCharacter;

    Start() {
        // Create a new instance of SpawnInfo and set its position and rotation based on the object's transform
        const spawnInfo = new SpawnInfo();
        spawnInfo.position = this.transform.position;
        spawnInfo.rotation = this.transform.rotation;

        // Use ZepetoCharacterCreator to create a new character by ZEPETO ID and assign it to _npc variable
        ZepetoCharacterCreator.CreateByZepetoId(this.zepetoId, spawnInfo, (character: ZepetoCharacter) => {
            this._npc = character;

            this.StartCoroutine(this.JumpCoroutine());
        });
    }

    *JumpCoroutine() {
        // Infinite loop to continuously
        while (true) {
            // Call the Jump() method of the ZepetoCharacter to make it jump
            this._npc.Jump();

            // Wait for 5 seconds
            yield new WaitForSeconds(5);
        }
    }
}
Le déroulement du script est le suivant :
- Start()
- Appeler la coroutine JumpCoroutine().
- JumpCoroutine()
- Appelez la méthode Jump() pour que le personnage NPC saute toutes les 5 secondes.
3) Une fois que vous avez fini d'écrire le script, ajoutez-le à l'objet NPC.
4) Appuyez sur le bouton Play et le NPC sautera.
Geste

Utilisez le contrôleur d'animation pour implémenter des gestes pour les NPC.
Vous pouvez utiliser le contrôleur d'animation pour mettre en œuvre une plus grande variété de comportements.
📘 Unity Animator Controller https://docs.unity3d.com/Manual/class-AnimatorController.html
Préparation du clip d'animation
- Utilisez le guide suivant pour préparer le clip d'animation gestuelle que votre NPC doit réaliser.
📘 Veuillez vous référer au guide suivant.
Création d'un animateur
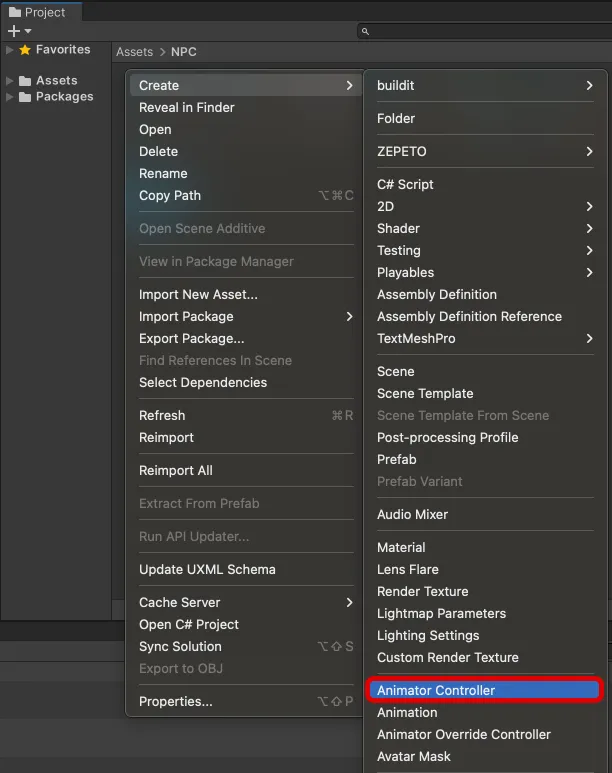
1) Project > Create > Create un contrôleur d'animateur et renommez-le en NPCAnimatorController.
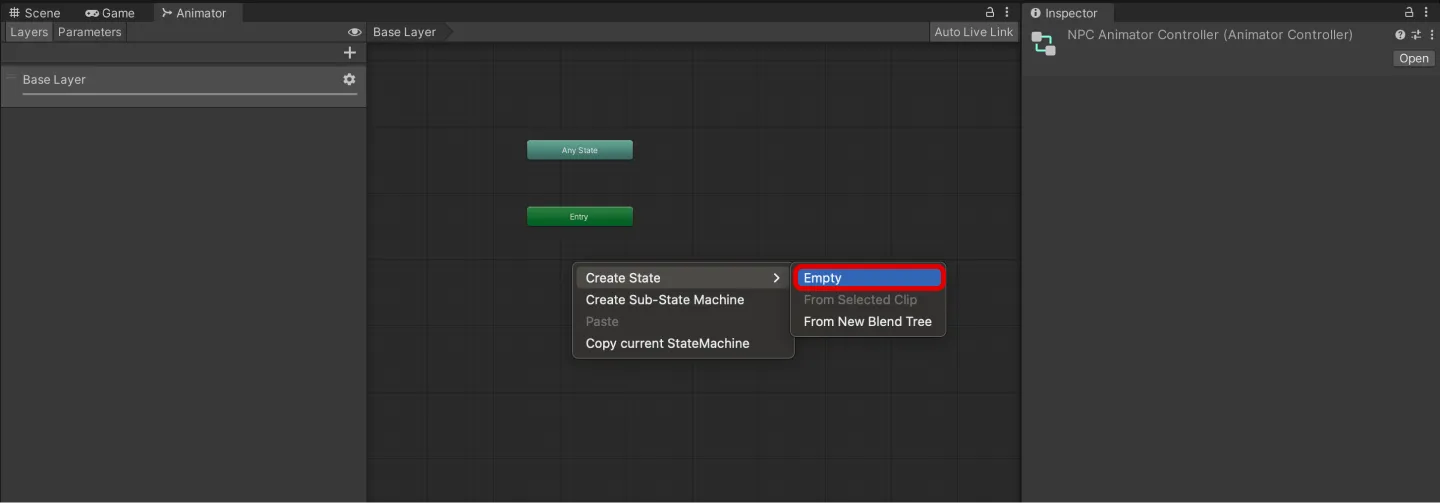
2) Sous l’onglet Animateur, Créer un State > Empty.
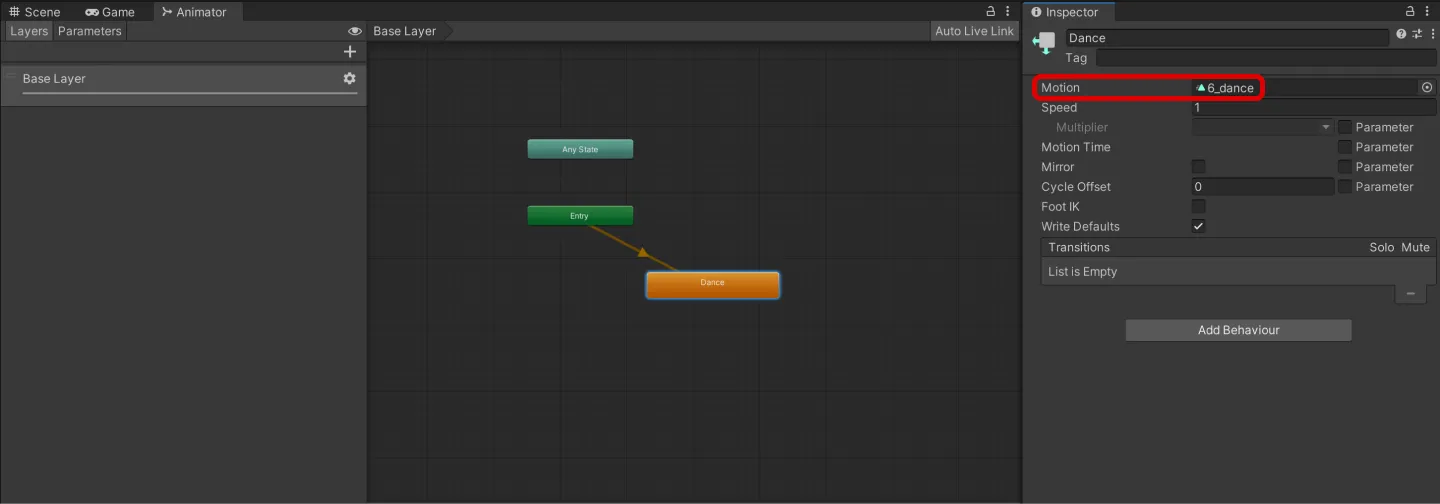
3) Dans l'inspecteur, renommez-le de manière appropriée et affectez le clip d'animation à Motion.
Création d'un script de gestes pour les NPC
1) Créez un projet > Create > ZEPETO > TypeScript et renommez-le NPCGesture.
2)Rédigez un exemple de script comme indiqué ci-dessous.
import { ZepetoScriptBehaviour } from 'ZEPETO.Script';
import { SpawnInfo, ZepetoCharacter, ZepetoCharacterCreator } from 'ZEPETO.Character.Controller';
import { Animator, RuntimeAnimatorController } from 'UnityEngine';

export default class NPCGesture extends ZepetoScriptBehaviour {

    // The ZEPETO ID of the NPC
    public zepetoId: string;
    // The Animator Controller of the NPC
    public npcAnimator: RuntimeAnimatorController;

    // NPC character object
    private _npc: ZepetoCharacter;

    Start() {

        // Create a new instance of SpawnInfo and set its position and rotation based on the object's transform
        const spawnInfo = new SpawnInfo();
        spawnInfo.position = this.transform.position;
        spawnInfo.rotation = this.transform.rotation;

        // Use ZepetoCharacterCreator to create a new character by ZEPETO ID and assign it to _npc variable
        ZepetoCharacterCreator.CreateByZepetoId(this.zepetoId, spawnInfo, (character: ZepetoCharacter) => {
            this._npc = character;

            // Get the Animator component from the NPC character and set its runtimeAnimatorController to npcAnimator
            this._npc.GetComponentInChildren<Animator>().runtimeAnimatorController = this.npcAnimator;
        });
    }
}
Le déroulement du script est le suivant :
- Start()
- Récupère le composant Animator de l'objet NPC et le place sur le contrôleur d'animation spécifié par la variable npcAnimator.
3) Une fois le script écrit, ajoutez-le à l'objet Location où le PNJ sera créé.
4) Dans l'inspecteur, assignez le Zepeto Id, Npc Animator.
- Npc Animator : Le contrôleur d'animation du NPC.
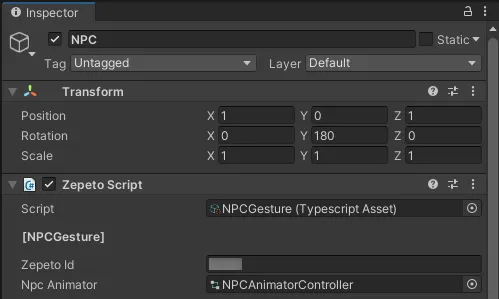
5) Appuyez sur le bouton "play" pour l'exécuter et vous verrez le NPC faire un geste.
6) Vous pouvez appliquer ce principe pour créer des NPC qui effectuent d'autres actions que des gestes et des sauts.
Bulles sur les NPC
You can create a Canvas above an NPC's head, display an image or text, and make it bubble.
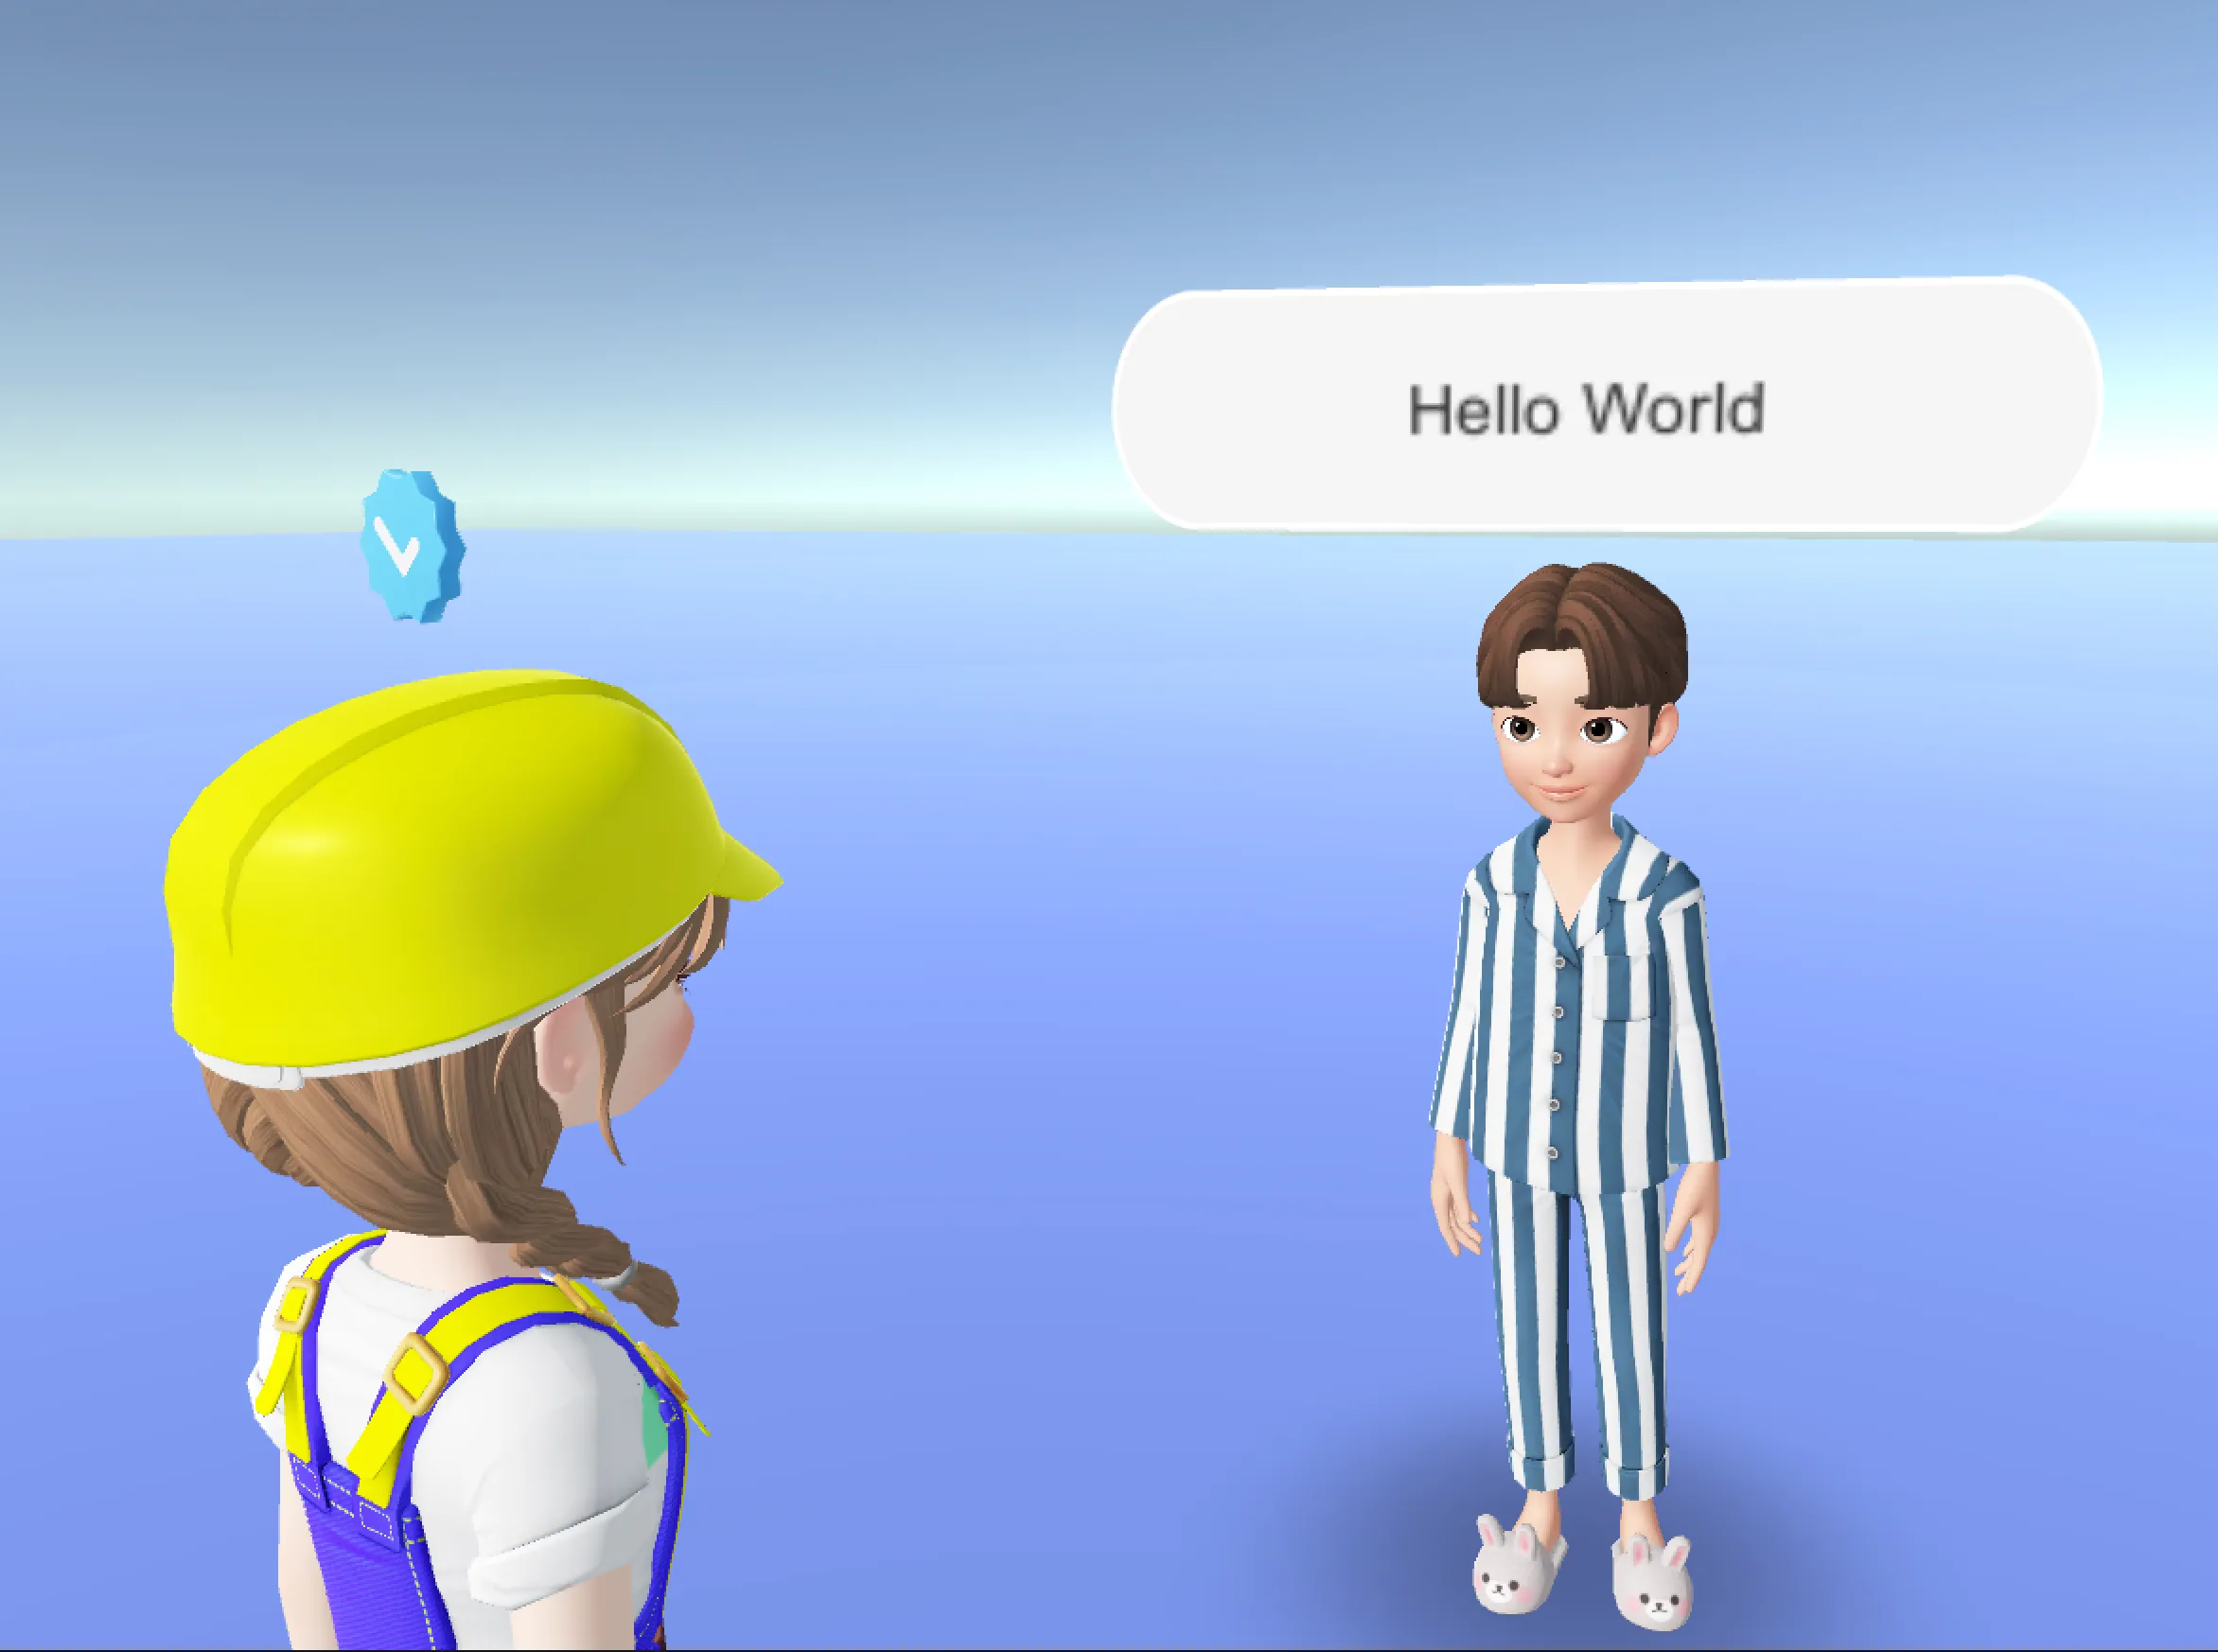
Création d'une bulle de dialogue préfabriquée
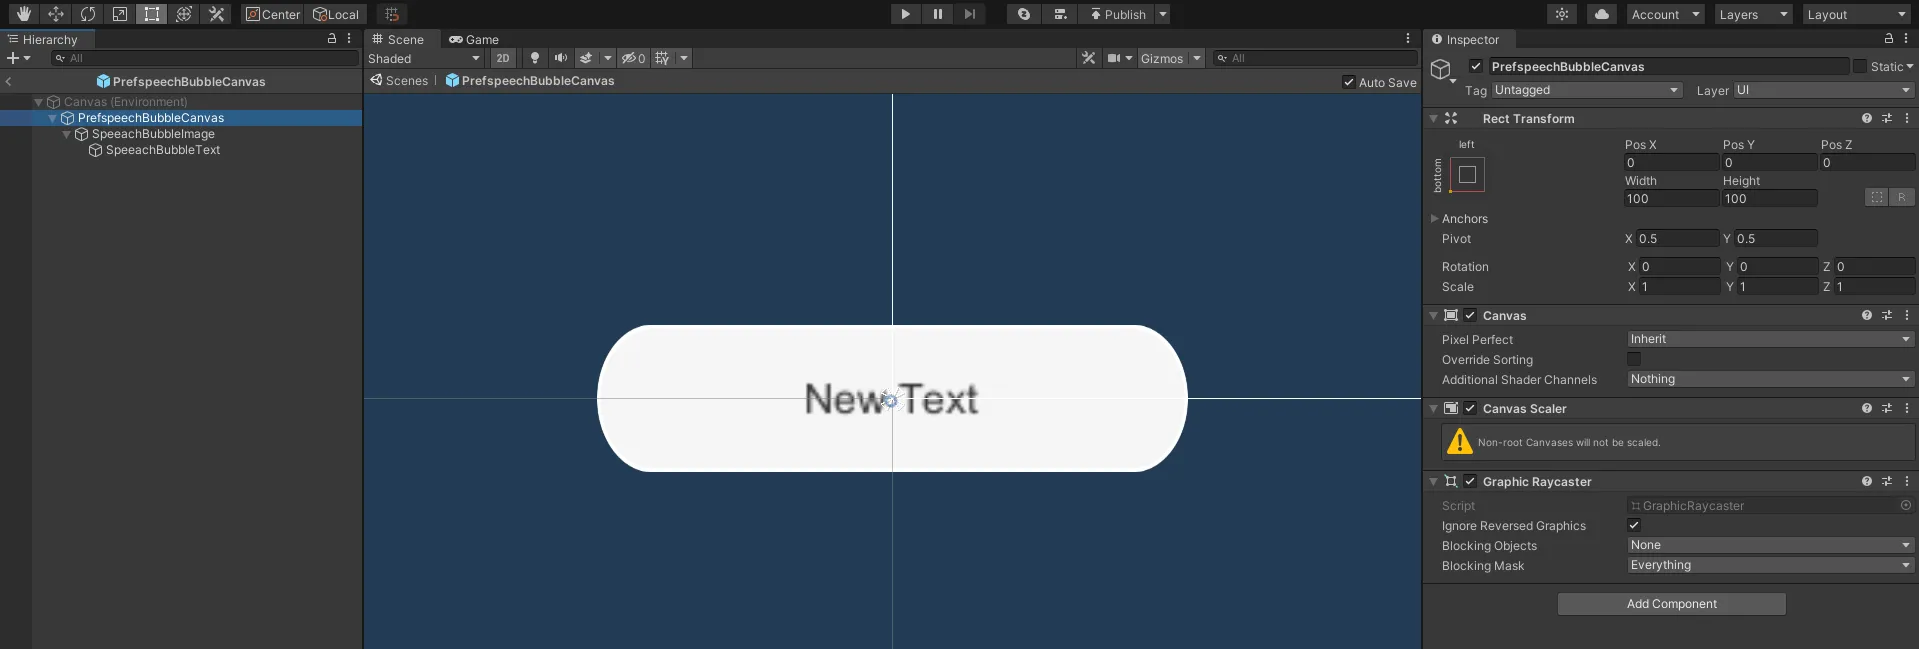
1) Créez un Hierarchy> UI > Canvas et renommez-le PrefSpeechBubbleCanvas.
- Réglez le mode de rendu sur World Space.
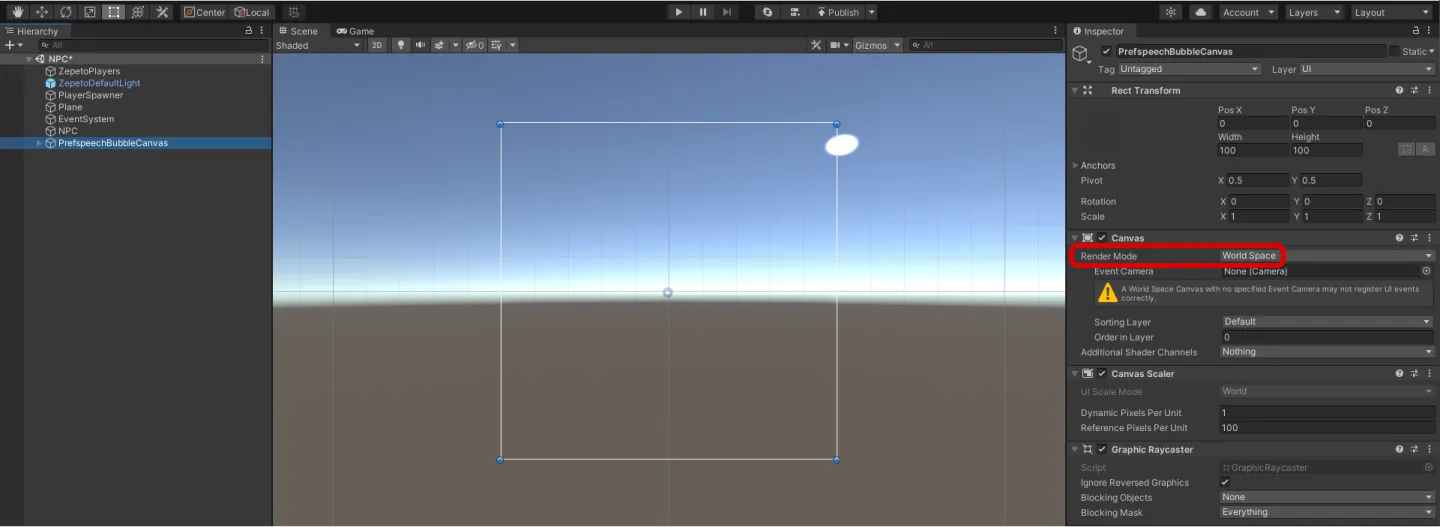
2) Créez un Hierarchy> UI > Image comme enfant de PrefSpeechBubbleCanvas et renommez-le SpeechBubbleImage.
- Il s'agit de l'image qui constituera l'arrière-plan de la bulle.
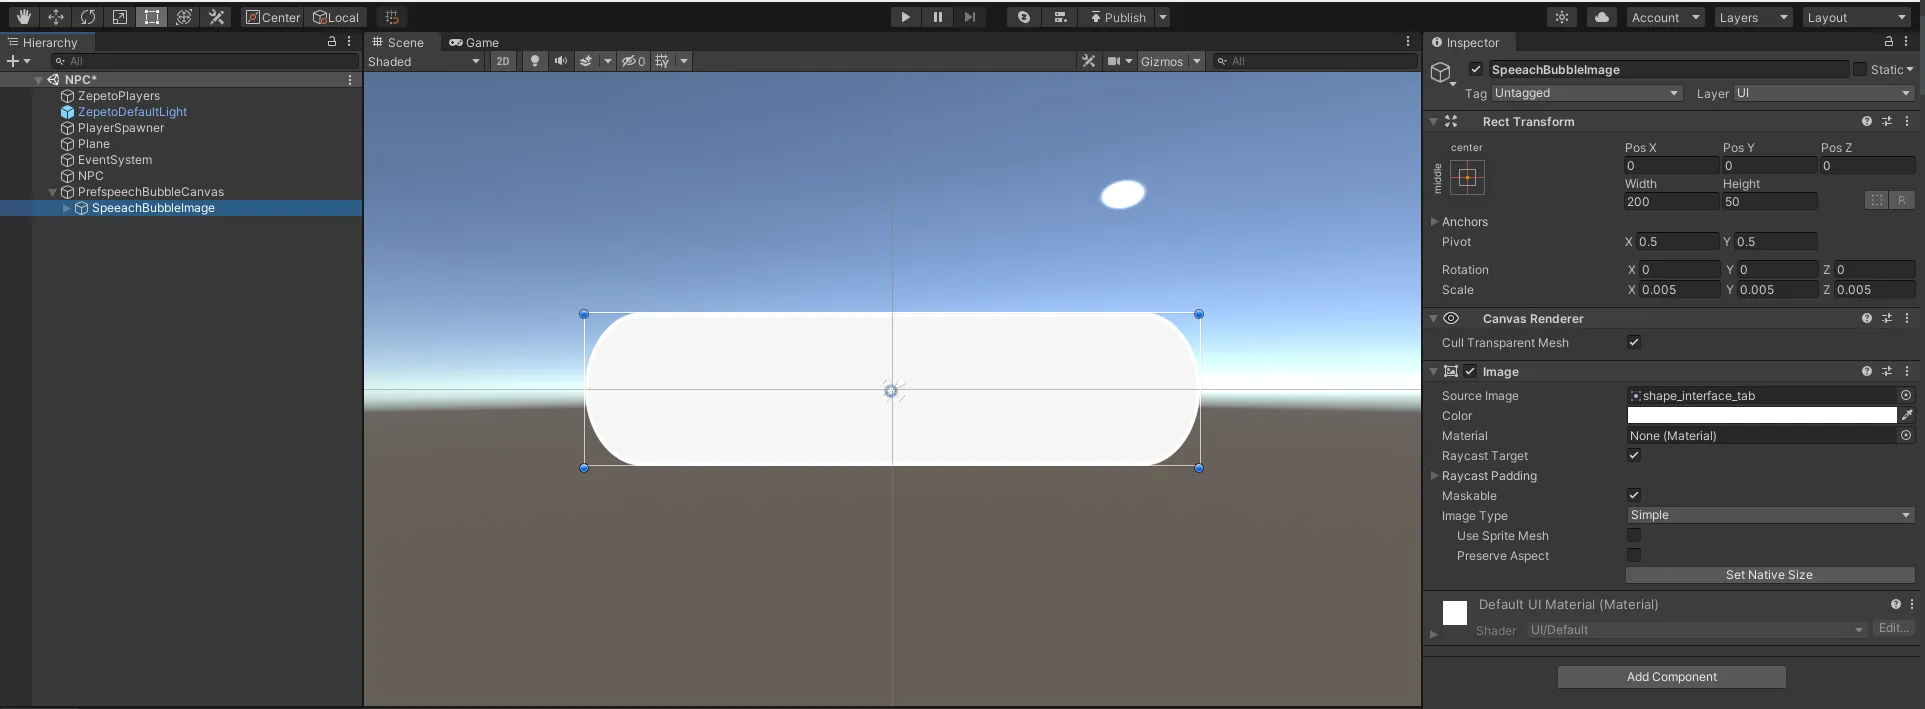
3) Créez Hierarchy> UI > Text comme enfant de SpeeachBubbleImage et renommez-le en SpeeachBubbleText.
- Il s'agit du texte à l'intérieur de la bulle.
- Ajoutez un composant "Content Size Fitter" pour que le texte ait la bonne taille.
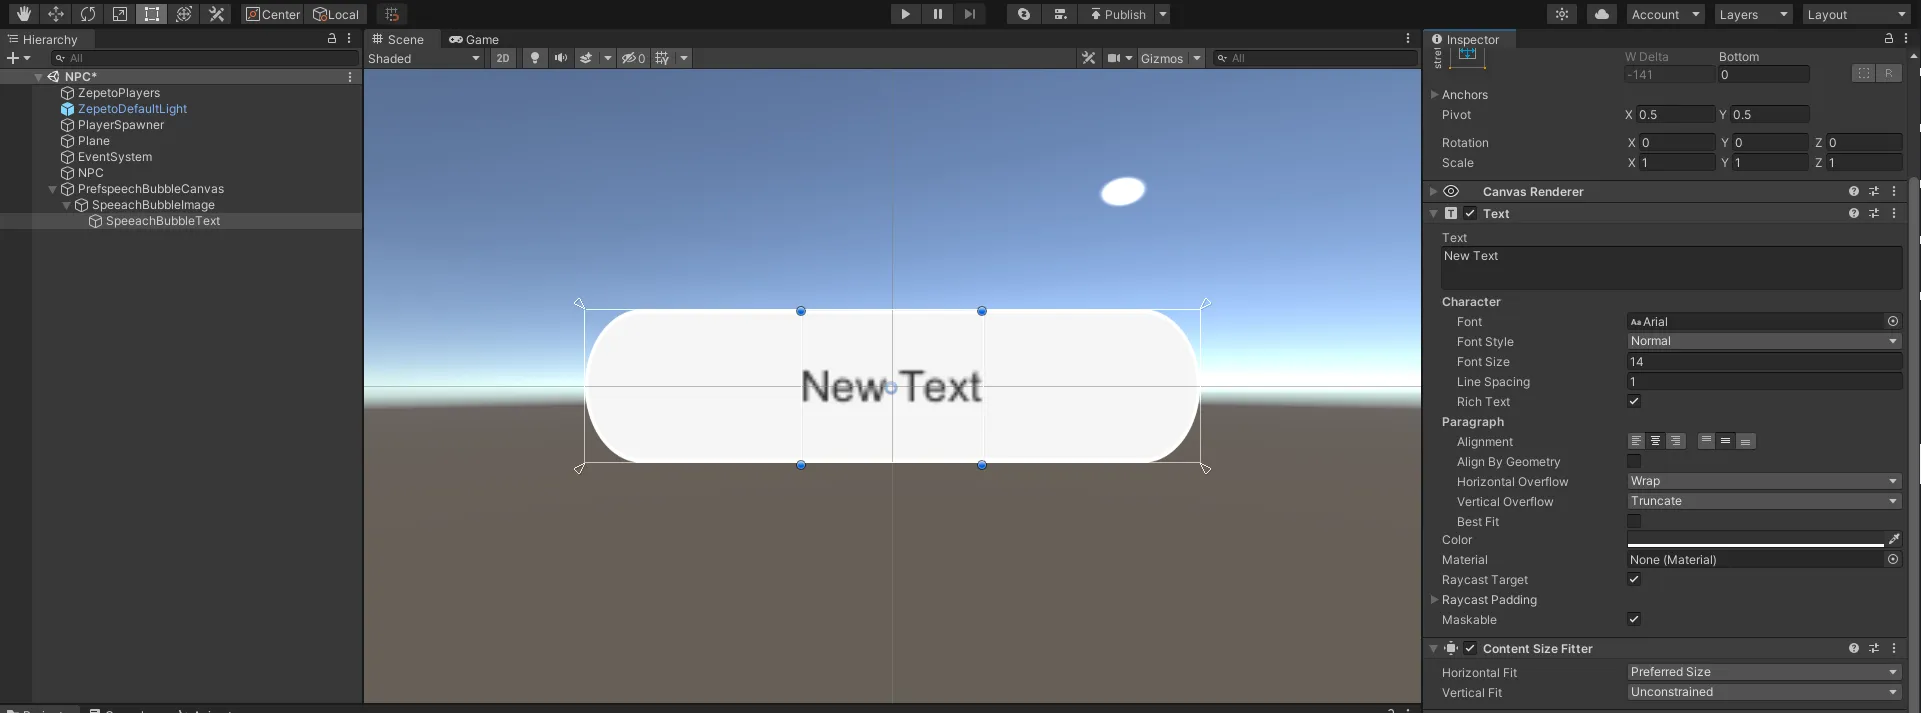
4) Une fois que vous avez terminé, faites-le glisser vers la fenêtre de projet pour en faire un Prefab, puis supprimez le PrefSpeechBubbleCanvas qui se trouve encore dans le Highlight.
Création d'un script de bulles de dialogue pour les NPC
1) Créez un projet > Create > ZEPETO > TypeScript et renommez-le NPCSpeechBubble.
2) Rédigez un exemple de script comme indiqué ci-dessous.
import { ZepetoScriptBehaviour } from 'ZEPETO.Script';
import { KnowSockets, SpawnInfo, ZepetoCharacter, ZepetoCharacterCreator } from 'ZEPETO.Character.Controller';
import { Canvas, Camera, Vector3, Object, GameObject } from 'UnityEngine';
import { Text } from 'UnityEngine.UI';

export default class NPCSpeechBubble extends ZepetoScriptBehaviour {

    // ZEPETO ID of the NPC
    public zepetoId: string;
    // Dialogue content to be displayed in the speech bubble
    public speechBubbleText: string;
    // Prefab of the speech bubble canvas game object
    public speechBubblePrefab: GameObject;
    // Y-axis offset value of the speech bubble canvas game object
    public speechBubbleYOffset: number;

    // NPC character object
    private _npc: ZepetoCharacter;
    // Speech bubble canvas game object
    private _speechBubbleObject: GameObject;
    // Text inside the speech bubble canvas game object
    private _speechBubbleText: Text;
    // Speech bubble canvas
    private _canvas: Canvas;
    // World Camera
    private _cachedWorldCamera: Camera;

    Start() {
        // Create a new instance of SpawnInfo and set its position and rotation based on the object's transform
        const spawnInfo = new SpawnInfo();
        spawnInfo.position = this.transform.position;
        spawnInfo.rotation = this.transform.rotation;

        // Use ZepetoCharacterCreator to create a new character by ZEPETO ID and assign it to _npc variable
        ZepetoCharacterCreator.CreateByZepetoId(this.zepetoId, spawnInfo, (character: ZepetoCharacter) => {
            this._npc = character;

            // Set the speech bubble
            this.SetBubble();
        })
    }

    // Set the speech bubble
    SetBubble() {
        // Dynamically create the speech bubble canvas game object
        this._speechBubbleObject = Object.Instantiate(this.speechBubblePrefab) as GameObject;

        // Set the parent of the  speech bubble canvas game object transform to be the NPC transform.
        this._speechBubbleObject.transform.SetParent(this._npc.transform);

        // Set the position of the speech bubble canvas game object above the NPC's head
        this._speechBubbleObject.transform.position = Vector3.op_Addition(this._npc.GetSocket(KnowSockets.HEAD_UPPER).position, new Vector3(0, this.speechBubbleYOffset,0));

        // Set the text inside the speech bubble
        this._speechBubbleText = this._speechBubbleObject.GetComponentInChildren<Text>();
        this.SetBubbleText(this.speechBubbleText);

        this._canvas = this._speechBubbleObject.GetComponent<Canvas>();
        this._cachedWorldCamera = Object.FindObjectOfType<Camera>();
        this._canvas.worldCamera = this._cachedWorldCamera;
    }

    // Open the speech bubble canvas and set the text
    SetBubbleText(bubbleText: string) {
        this._speechBubbleObject.SetActive(true);
        this._speechBubbleText.text = bubbleText;
    }

    private Update() {
        if (this._canvas != null) {
            this.UpdateCanvasRotation();
        }
    }

    // Update the rotation of the speech bubble canvas to face the camera
    private UpdateCanvasRotation() {
        this._canvas.transform.LookAt(this._cachedWorldCamera.transform);
        this._canvas.transform.Rotate(0, 180, 0);
    }

}
Le déroulement du script est le suivant :
- Start()
- Appeler la fonction personnalisée SetBubble().
- SetBubble()
- Créer un canevas de bulle de dialogue (speechBubblePrefab) et positionner la bulle créée au-dessus de la tête du PNJ.
- Appelez la fonction personnalisée SetBubbleText() pour définir le texte à l'intérieur de la bulle.
- SetBubbleText()
- Active le canevas de bulle de dialogue du PNJ (_speechBubbleObject).
- Affiche la chaîne donnée en paramètre (bubbleText) à l'intérieur de la bulle de dialogue.
- Update()
- Appelez la fonction personnalisée UpdateCanvasRotation() pour faire pivoter le canevas en fonction de la caméra.
3) Lorsque vous avez terminé d'écrire le script, ajoutez-le à l'objet Location où le NPC sera créé.
4) Dans l'inspecteur, attribuez l'identifiant Zepeto, le texte de la bulle, le préfabriqué de la bulle et le décalage Y de la bulle.
- Texte de la bulle de dialogue : Cette variable stocke le dialogue que le NPC dira dans la bulle. Dans notre exemple, nous stockons le dialogue suivant : "Hello World".
- Préfab. de la bulle de dialogue : Cette variable stocke le préfabriqué de l'objet de jeu Speech Bubble Canvas.
- Décalage Y de la bulle de dialogue : Cette variable stocke la valeur de décalage de l'axe des y pour le GameObject Speech Bubble Canvas. Cela vous permet d'ajuster la distance entre le personnage et la bulle de dialogue lorsque vous placez la bulle de dialogue au-dessus de la tête du personnage.
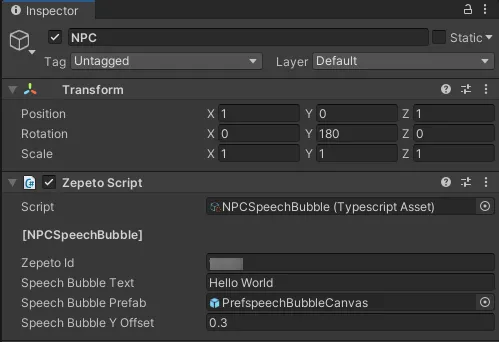
5) appuyez sur le bouton "play" pour l'exécuter, et vous verrez une bulle de dialogue flotter au-dessus de la tête du NPC.
Interagir avec le NPC
L'interaction avec les NPC permet de créer un contenu amusant.
Dans ce guide, nous allons utiliser un exemple pour implémenter une bulle de dialogue qui change lorsqu'un NPC est approché.

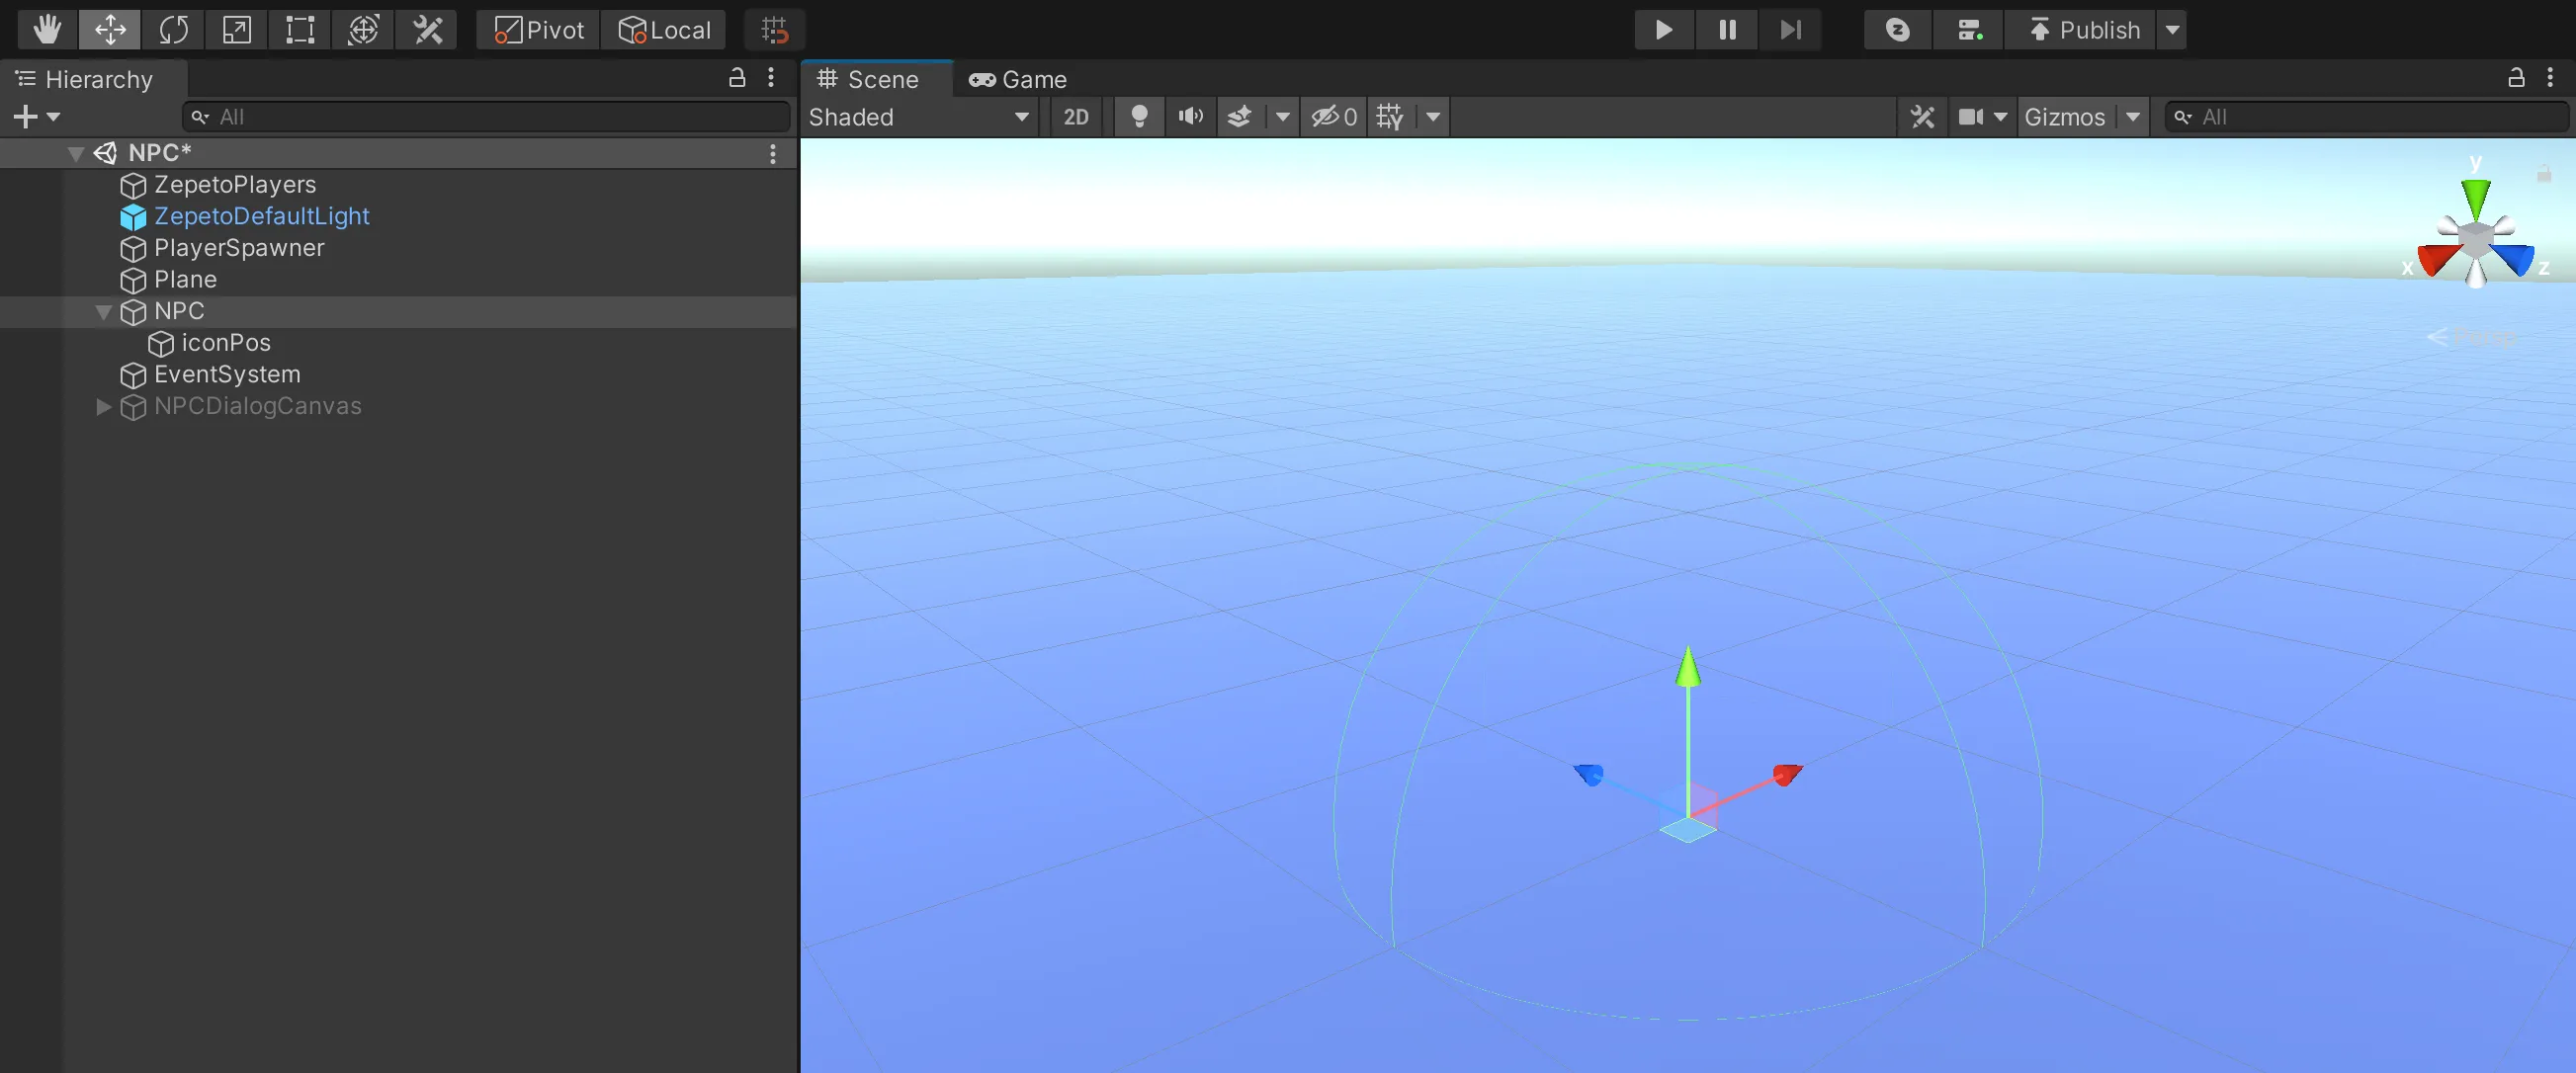
Mise en place du collisionneur
1) Ajoutez un composant Collider à votre objet pour interagir avec le NPC et vérifiez isTrigger.
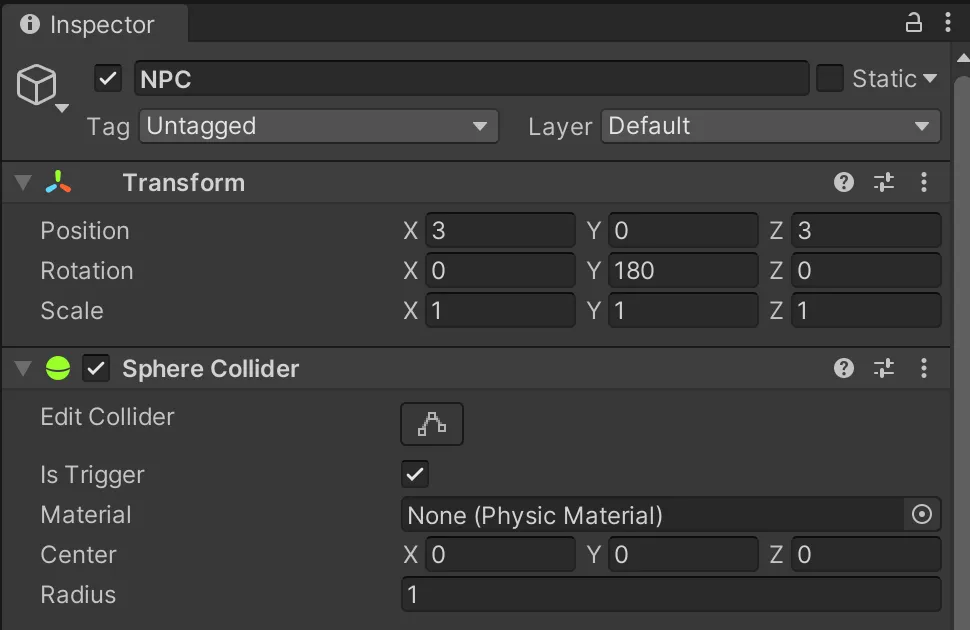
2) Redimensionner le collisionneur de manière à ce que le joueur puisse interagir avec le NPC.
Création d'un script d'interaction avec un NPC
1) Créez le projet > Create > ZEPETO > TypeScript et renommez-le en NPCInteraction.
2) Rédigez un exemple de script comme indiqué ci-dessous.
import { ZepetoScriptBehaviour } from 'ZEPETO.Script';
import { KnowSockets, SpawnInfo, ZepetoCharacter, ZepetoCharacterCreator, ZepetoPlayers } from 'ZEPETO.Character.Controller';
import { Canvas, Camera, Vector3, Object, GameObject, Collider } from 'UnityEngine';
import { Text } from 'UnityEngine.UI';

export default class NPCInteraction extends ZepetoScriptBehaviour {

    // ZEPETO ID of the NPC
    public zepetoId: string;
    // Dialogue content to be displayed in the speech bubble
    public speechBubbleText: string;

    public changedSpeechBubbleText: string;
    // Prefab of the speech bubble canvas game object
    public speechBubblePrefab: GameObject;
    // y-axis offset value of the speech bubble canvas game object
    public speechBubbleYOffset: number;

    // Local character object
    private _zepetoCharacter: ZepetoCharacter;
    // NPC character object
    private _npc: ZepetoCharacter;
    // Speech bubble canvas game object
    private _speechBubbleObject: GameObject;
    // Text inside the speech bubble canvas game object
    private _speechBubbleText: Text;
    // Speech bubble canvas
    private _canvas: Canvas;
    // World Camera
    private _cachedWorldCamera: Camera;

    Start() {
        // Create a new instance of SpawnInfo and set its position and rotation based on the object's transform
        const spawnInfo = new SpawnInfo();
        spawnInfo.position = this.transform.position;
        spawnInfo.rotation = this.transform.rotation;

        // Use ZepetoCharacterCreator to create a new character by ZEPETO ID and assign it to _npc variable
        ZepetoCharacterCreator.CreateByZepetoId(this.zepetoId, spawnInfo, (character: ZepetoCharacter) => {
            this._npc = character;

            // Set the speech bubble
            this.SetBubble();
        })

        ZepetoPlayers.instance.OnAddedLocalPlayer.AddListener(() => {
            this._zepetoCharacter = ZepetoPlayers.instance.LocalPlayer.zepetoPlayer.character;
        });
    }

    // Check if Player character enter collider
    OnTriggerEnter(collider: Collider) {
        if (this._zepetoCharacter == null || collider.gameObject != this._zepetoCharacter.gameObject) {
            return;
        }
        this.SetBubbleText(this.changedSpeechBubbleText);
    }

    OnTriggerExit(collider: Collider) {
        if (this._zepetoCharacter == null || collider.gameObject != this._zepetoCharacter.gameObject) {
            return;
        }
        this.SetBubbleText(this.speechBubbleText);
    }


    // Set the speech bubble
    SetBubble() {
        // Dynamically create the speech bubble canvas game object
        this._speechBubbleObject = Object.Instantiate(this.speechBubblePrefab) as GameObject;

        // Set the parent of the  speech bubble canvas game object transform to be the NPC transform.
        this._speechBubbleObject.transform.SetParent(this._npc.transform);

        // Set the position of the speech bubble canvas game object above the NPC's head
        this._speechBubbleObject.transform.position = Vector3.op_Addition(this._npc.GetSocket(KnowSockets.HEAD_UPPER).position, new Vector3(0, this.speechBubbleYOffset,0));

        // Set the text inside the speech bubble
        this._speechBubbleText = this._speechBubbleObject.GetComponentInChildren<Text>();
        this.SetBubbleText(this.speechBubbleText);

        this._canvas = this._speechBubbleObject.GetComponent<Canvas>();
        this._cachedWorldCamera = Object.FindObjectOfType<Camera>();
        this._canvas.worldCamera = this._cachedWorldCamera;
    }

    // Open the speech bubble canvas and set the text
    SetBubbleText(bubbleText: string) {
        this._speechBubbleObject.SetActive(true);
        this._speechBubbleText.text = bubbleText;
    }

    private Update() {
        if (this._canvas != null) {
            this.UpdateCanvasRotation();
        }
    }

    // Update the rotation of the speech bubble canvas to face the camera
    private UpdateCanvasRotation() {
        this._canvas.transform.LookAt(this._cachedWorldCamera.transform);
        this._canvas.transform.Rotate(0, 180, 0);
    }

}
Le déroulement du script est le suivant :
- OnTriggerEnter(), OnTriggerExit()
- Lorsque le déclencheur est détecté en entrant dans la zone de collision, appelez la fonction personnalisée SetBubbleText() pour définir le texte à l'intérieur de la bulle vocale sur changedSpeechBubbleText.
- Lorsqu'elle quitte la zone de collision, appelez la fonction personnalisée SetBubbleText() pour définir le texte à l'intérieur de la bulle en speechBubbleText.
3) Lorsque vous avez terminé d'écrire le script, ajoutez-le à l'objet Location où le NPC sera créé.
4) Dans l'inspecteur, attribuez l'identifiant Zepeto, le texte de la bulle, le préfabriqué de la bulle, le décalage Y de la bulle et la bulle modifiée.
- Texte de la bulle de dialogue : Cette variable stocke le dialogue que le NPC dira dans la bulle. Dans notre exemple, nous stockons le dialogue suivant : "Hello World".
- Préfab. de la bulle de dialogue : Cette variable stocke le préfabriqué de l'objet de jeu Speech Bubble Canvas.
- Décalage Y de la bulle de dialogue : Cette variable stocke la valeur de décalage de l'axe des y pour le GameObject Speech Bubble Canvas. Cela vous permet d'ajuster la distance entre le personnage et la bulle de dialogue lorsque vous placez la bulle de dialogue au-dessus de la tête du personnage.
- Changed Speech Bubble : Enregistre le dialogue qui sera affiché dans la bulle du NPC lorsque le joueur entrera dans la zone de collision du NPC.
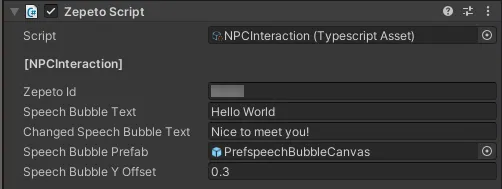
5) appuyer sur play pour exécuter, et lorsque le joueur s'approche du NPC, le texte dans la bulle change.
Appliquer l'interaction avec les NPC
Pour créer un format de dialogue, créez une interface utilisateur à l'aide d'un panneau.
Voici un exemple de dialogue simple composé de panneaux et de boutons.
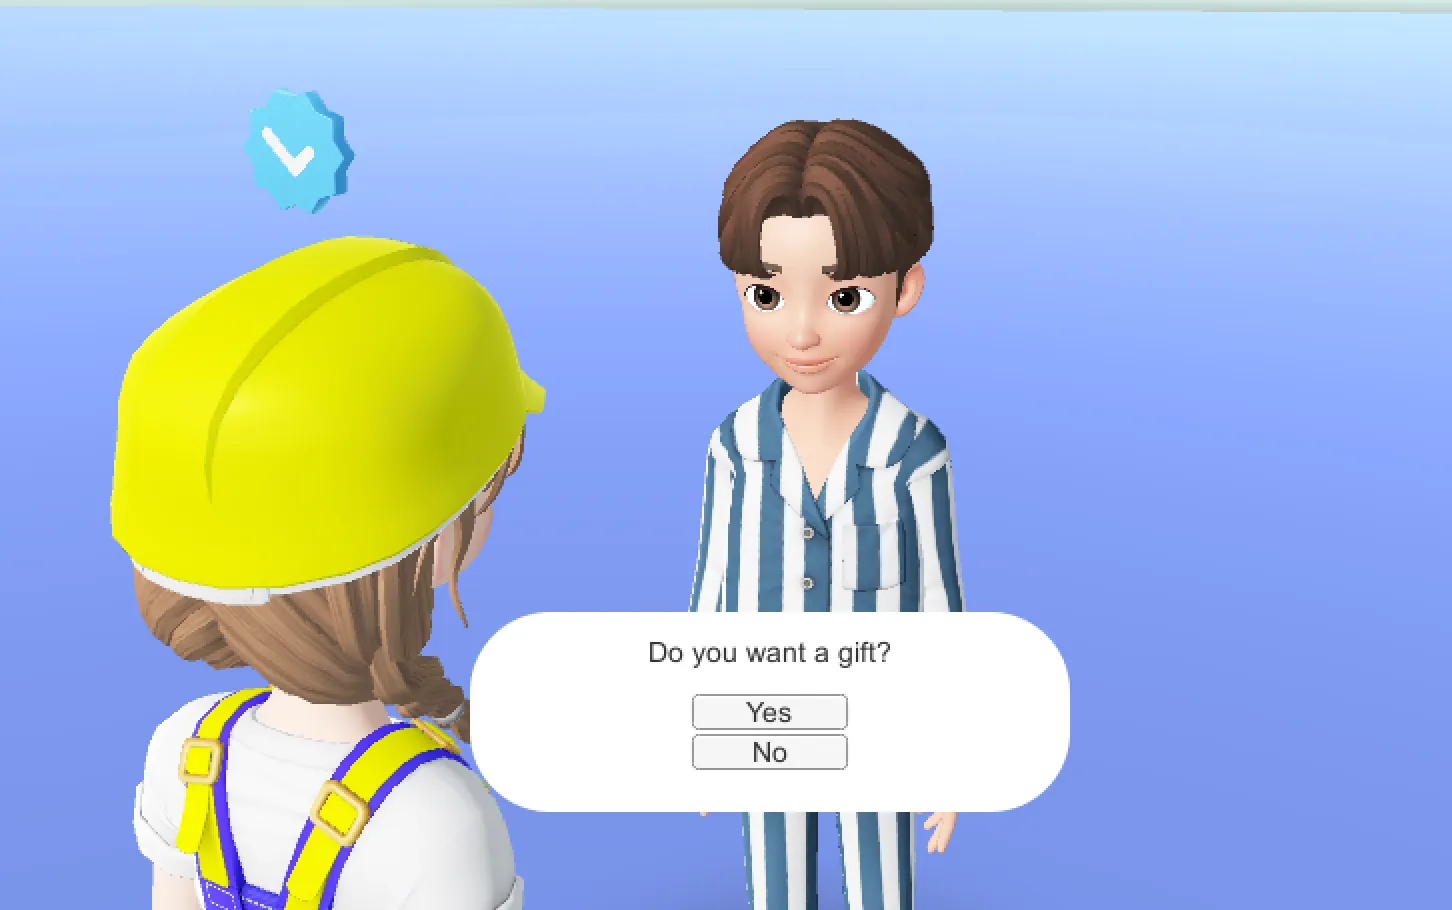
Il s'agit d'un exemple de script qui ouvre des dialogues lors de l'interaction avec les NPC et les traite lorsque chaque bouton est pressé.
Appliquez ce principe pour mettre en place un contenu intéressant.
import { GameObject, HumanBodyBones, Object, Collider } from 'UnityEngine';
import { ZepetoScriptBehaviour } from 'ZEPETO.Script';
import { Button } from 'UnityEngine.UI';
import { ZepetoCharacter, ZepetoPlayers } from "ZEPETO.Character.Controller";

export default class NPCDialogInteraction extends ZepetoScriptBehaviour {

    public npcDialogCanvas: GameObject;
    public yesButton: Button;
    public noButton: Button;

    private _zepetoCharacter: ZepetoCharacter;

    Start() {

        ZepetoPlayers.instance.OnAddedLocalPlayer.AddListener(()=>{
            this._zepetoCharacter = ZepetoPlayers.instance.LocalPlayer.zepetoPlayer.character;
        });

        // Dialog - Select Yes
        this.yesButton.onClick.AddListener(() => {
            console.log("yes")
            this.npcDialogCanvas.SetActive(false);
        });

        // Dialog - Select No
        this.noButton.onClick.AddListener(() => {
            console.log("no")
            this.npcDialogCanvas.SetActive(false);
        });

    }

    // Check if Player character enter collider
    OnTriggerEnter(collider: Collider) {
        if (this._zepetoCharacter == null || collider.gameObject != this._zepetoCharacter.gameObject) {
            return;
        }
        this.npcDialogCanvas.SetActive(true);
    }

    OnTriggerExit(collider: Collider) {
        if (this._zepetoCharacter == null || collider.gameObject != this._zepetoCharacter.gameObject) {
            return;
        }
        this.npcDialogCanvas.SetActive(false);
    }

}