You can change a local player’s outfit to the ones that you own.
ZEPETO.Character.Controller 1.11.3 or higher version must be installed.
Using the SetCostume API
Method
| API | Description |
|---|---|
| SetCostume($itemCode: string, $complete?: System.Action):void; | Enter the item code (item id) as the argument value to change the local player’s outfit. Receive a callback once the outfit change is complete. |
Local player costume change example
You can change the local player's costume using SetCostume().
Here is an example code that creates a local player when the scene starts, and changes the outfit with a specific item code when the local player is created.
- Add ZEPETO > Typescript and name the script ChangeLocalPlayerCostume.
Write a sample script as below.
import { SpawnInfo, ZepetoPlayers } from 'ZEPETO.Character.Controller';
import { ZepetoScriptBehaviour } from 'ZEPETO.Script';
import { WorldService } from 'ZEPETO.World';

export default class ChangeLocalPlayerCostume extends ZepetoScriptBehaviour {

    public itemCode: string;

    // When the scene starts, create a player with the provided user ID and change their costume.
    Start() {

        // Create a new player with the specified user ID.
        ZepetoPlayers.instance.CreatePlayerWithUserId(WorldService.userId, new SpawnInfo(), true);

        // Add a listener to the OnAddedLocalPlayer event, which triggers when the local player is added.
        ZepetoPlayers.instance.OnAddedLocalPlayer.AddListener(() => {

            // Call the ChangeCostume method with the provided item code to change the costume.
            this.ChangeCostume(this.itemCode);
        });
    }

    // Method to change the costume of the local player using the provided item code.
    ChangeCostume(itemCode: string) {

        // Use the LocalPlayer property to access the local player instance and set their costume using the provided item code.
        ZepetoPlayers.instance.LocalPlayer.SetCostume(itemCode, () => {
            // Once the costume change is complete, log a message indicating the successful change.
            console.log(`Set Costume Complete : ${itemCode}`);
        });
    }
}
script description
- This script changes the outfit of the local player according to the given item code.
- When the scene starts, create a player with the specified user ID and use the
CreatePlayerWithUserId()function. - An OnAddedLocalPlayer event listener is added so that when a local player is added, that event is triggered, and the
ChangeCostume()method is called to change the costume. - Access the local player instance through the LocalPlayer property and change the costumes using the provided item code. Once the costume change is complete, a
Set Costume Completemessage will be logged, indicating a successful change.
Please refer to the mannequin guide on how to check the item id. [ZEPETO Mannequin]
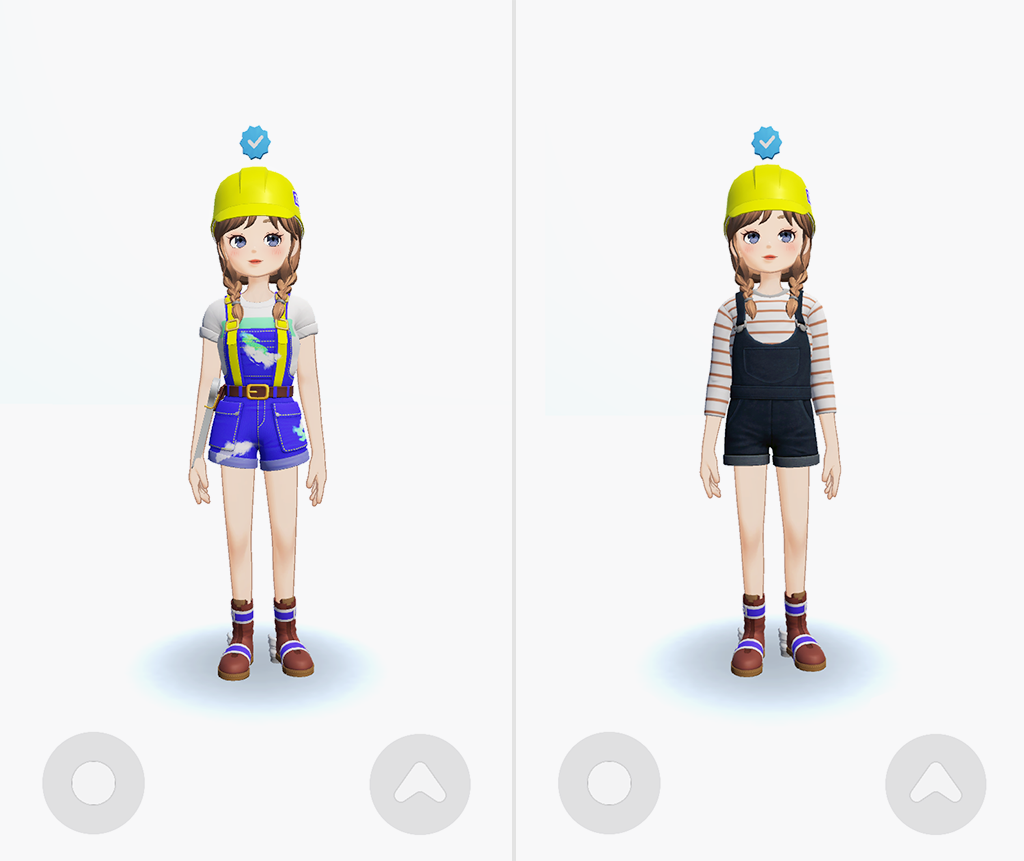
- If you press the [▶︎(play)] button to run it, you can see that the local player is created and changed with the costume based on entered item code.

Before the costume change (left), after the costume change (right)
Caution
- If the item is a fixed-term product, it will be worn after checking whether it has expired. For items that have expired, an error log called
Expired itemis called.- If the item is a Zem paid product, it will be worn after checking whether it is owned by a local player. For items not owned, an error log called
Has Not ItemCodeis called.
Example of Loading an Item List and Changing Clothes.
You can retrieve the list of clothing items by utilizing GetMyItemListAsync(), which provides information about the items owned by the user.
The following example demonstrates how to display the outfits owned by a local player on the screen and enable them to select and change outfits.
STEP 1. Create a clothing list UI
First, create a UI list resource where the thumbnail and name of the clothing list will be displayed. Resources that need to be crafted include:
STEP 1-1. Create Item Prefab
After loading the list of clothes the local player has, we create a list of items in the UI. The Item Prefab serves as a source for each item list being created.
As the Item Prefab is created, the thumbnail and item name are displayed in the UI.
The item Prefab contains the following elements.
- Button_thumbnail object: This is an object where the Raw Image component and Button component are registered to display the thumbnail image of the item.
- Text_name object: A Text component object in which the item name will be displayed.

STEP 1-2. Setting up Canvas
Canvas is the UI screen displayed when Item Prefab is created. It is recommended to create a Scroll View inside this Canvas so that a large list of items can be retrieved.
The Scroll View object inside the Canvas is set as follows.
- The Scroll View object is set to allow only vertical scrolling.
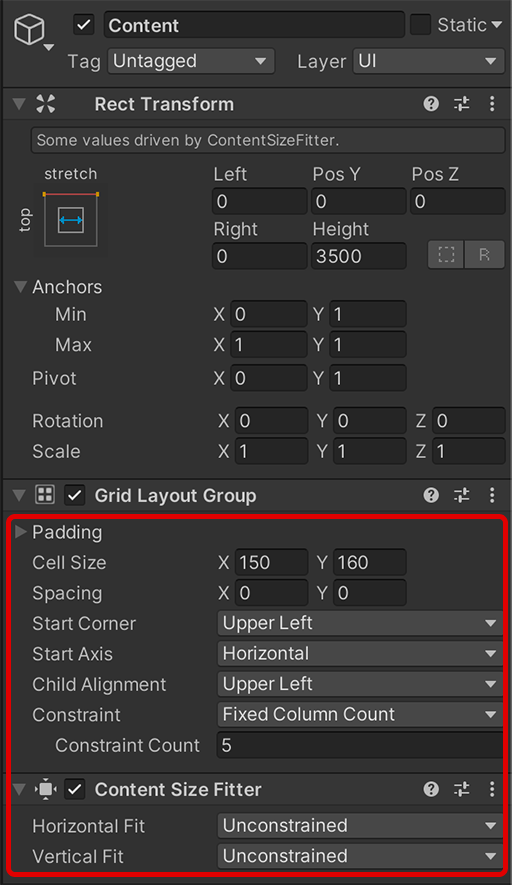
- The Content object sets up the following components:
- Grid Layout Group:
- CellSize : x: 150, Y: 150
- Constraint : Fixed Column Count
- Constrait Count : 5
- Grid Layout Group:

STEP 2. Script to load item list and change outfit
STEP 2-1. Write a script
- Add ZEPETO > Typescript and rename the script to MyItemList.
- Write a sample script as below.
import { ZepetoScriptBehaviour } from 'ZEPETO.Script';
import { ShopService, ItemKeyword } from 'ZEPETO.Module.Shop';
import { ZepetoPropertyFlag } from 'Zepeto';
import { GameObject, Object, RectTransform, Texture2D, Transform, WaitUntil } from 'UnityEngine';
import { Button, LayoutRebuilder, RawImage, Text } from 'UnityEngine.UI';
import { SpawnInfo, ZepetoPlayers } from 'ZEPETO.Character.Controller';
import { WorldService } from 'ZEPETO.World';
import { Item } from 'ZEPETO.Module.Content';

export default class CheckMyItemList extends ZepetoScriptBehaviour {

    public itemPrefab: GameObject;
    public itemCanvas: Transform;

    // When the scene starts, create a player with the provided user ID and begin fetching and displaying the items.
    Start() {
        // Create a new player with the specified user ID.
        ZepetoPlayers.instance.CreatePlayerWithUserId(WorldService.userId, new SpawnInfo(), true);

        // Add a listener to the OnAddedLocalPlayer event, which triggers when the local player is added.
        ZepetoPlayers.instance.OnAddedLocalPlayer.AddListener(() => {
            // Start the CoGetMyItem coroutine to fetch and display the items.
            this.StartCoroutine(this.CoGetMyItem());
        });
    }

    // Coroutine to fetch and display the items.
    *CoGetMyItem() {
        // Request the item list with the "all" keyword and no filters.
        var requestItemList = ShopService.GetMyContentItemListAsync(ItemKeyword.all, null);

        // Wait until the request is complete.
        yield new WaitUntil(() => requestItemList.keepWaiting == false);

        if (requestItemList.responseData.isSuccess) {
            let contentItems: Item[] = requestItemList.responseData.items;

            console.log(contentItems.length);

            for (let i = 0; i < contentItems.length; ++i) {
                const property: ZepetoPropertyFlag = contentItems[i].property;

                // Request the thumbnail texture for the item.
                var textureReq = contentItems[i].GetThumbnailAsync();
                yield new WaitUntil(() => textureReq.keepWaiting == false);
                let thumbnailTexture: Texture2D = textureReq.responseData.texture;

                // Instantiate an item prefab and set its properties.
                const item = Object.Instantiate(this.itemPrefab, this.itemCanvas) as GameObject;
                item.GetComponentInChildren<RawImage>().texture = thumbnailTexture;
                item.GetComponentInChildren<Text>().text = contentItems[i].id;

                // Add a click listener to the item button to change the costume when clicked.
                item.GetComponentInChildren<Button>().onClick.AddListener(() => {
                    this.SetItemButton(contentItems[i].id);
                });
            }
        }

        // Force layout rebuild to ensure proper UI element positioning.
        const rect = this.itemCanvas.gameObject.GetComponent<RectTransform>();
        LayoutRebuilder.ForceRebuildLayoutImmediate(rect);
    }

    // Method to change the local player's costume based on the provided item code.
    SetItemButton(itemCode: string) {
        // Use the ZepetoPlayers.instance.LocalPlayer property to access the local player instance and change their costume.
        ZepetoPlayers.instance.LocalPlayer.SetCostume(itemCode, () => {
            // Once the costume change is complete, log a message indicating the successful change.
            console.log(`Set Costume Complete : ${itemCode}`);
        });
    }

}
script description
- In the Start method, a new player is created using
ZepetoPlayers.instance.CreatePlayerWithUserId()and theCoGetMyItem()coroutine is executed when the local player is added. - The
CoGetMyItem()coroutine usesShopService.GetMyContentItemListAsync()to retrieve the list of items owned by the player.- Request a list of all items in all categories via ItemKeyword.all. Wait until the request is complete using
yield new WaitUntil(() => requestItemList.keepWaiting == false). - If the request is successful
requestItemList.responseData.isSuccess, iterates through the list ofcontentItemsand retrieves each item's thumbnail image usingGetThumbnailAsync(). - Create a UI element for each item using the provided itemPrefab, and set the thumbnail image and ID. A button for each item is created, and set to call
SetItemButton()with the ID of the item as an argument.
- Request a list of all items in all categories via ItemKeyword.all. Wait until the request is complete using
- The
SetItemButton()method is called when the button associated with an item is clicked.- Apply the selected item as the player's character costume using
ZepetoPlayers.instance.LocalPlayer.SetCostume(). - When the costume is successfully changed, a log message saying
Set Costume Completeis displayed along with the item code.
- Apply the selected item as the player's character costume using
Tips
- Please refer to the following guide on how to check the item information of the user through
ShopService.GetMyContentItemListAsync(). [Retrieve User's Owned Item Information]- When searching for items owned by the user, you can search by category using ItemKeyword and display them in a list on the UI.
Caution
The list of clothes retrieved through
ShopService.GetMyContentItemListAsync()contains expired time-limited products. SoExpired itemerror log can be called.
STEP 2-2. Setting the MyItemList inspector
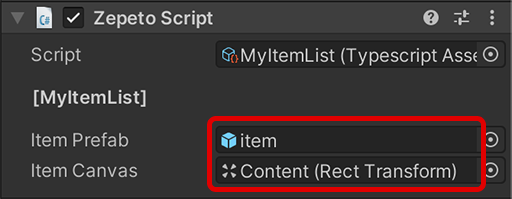
Register the itemPrefab created in step 1 in the Item Prefab of the component to which MyItemList is applied, and register the Canvas in the itemCanvas.

STEP 3. Run
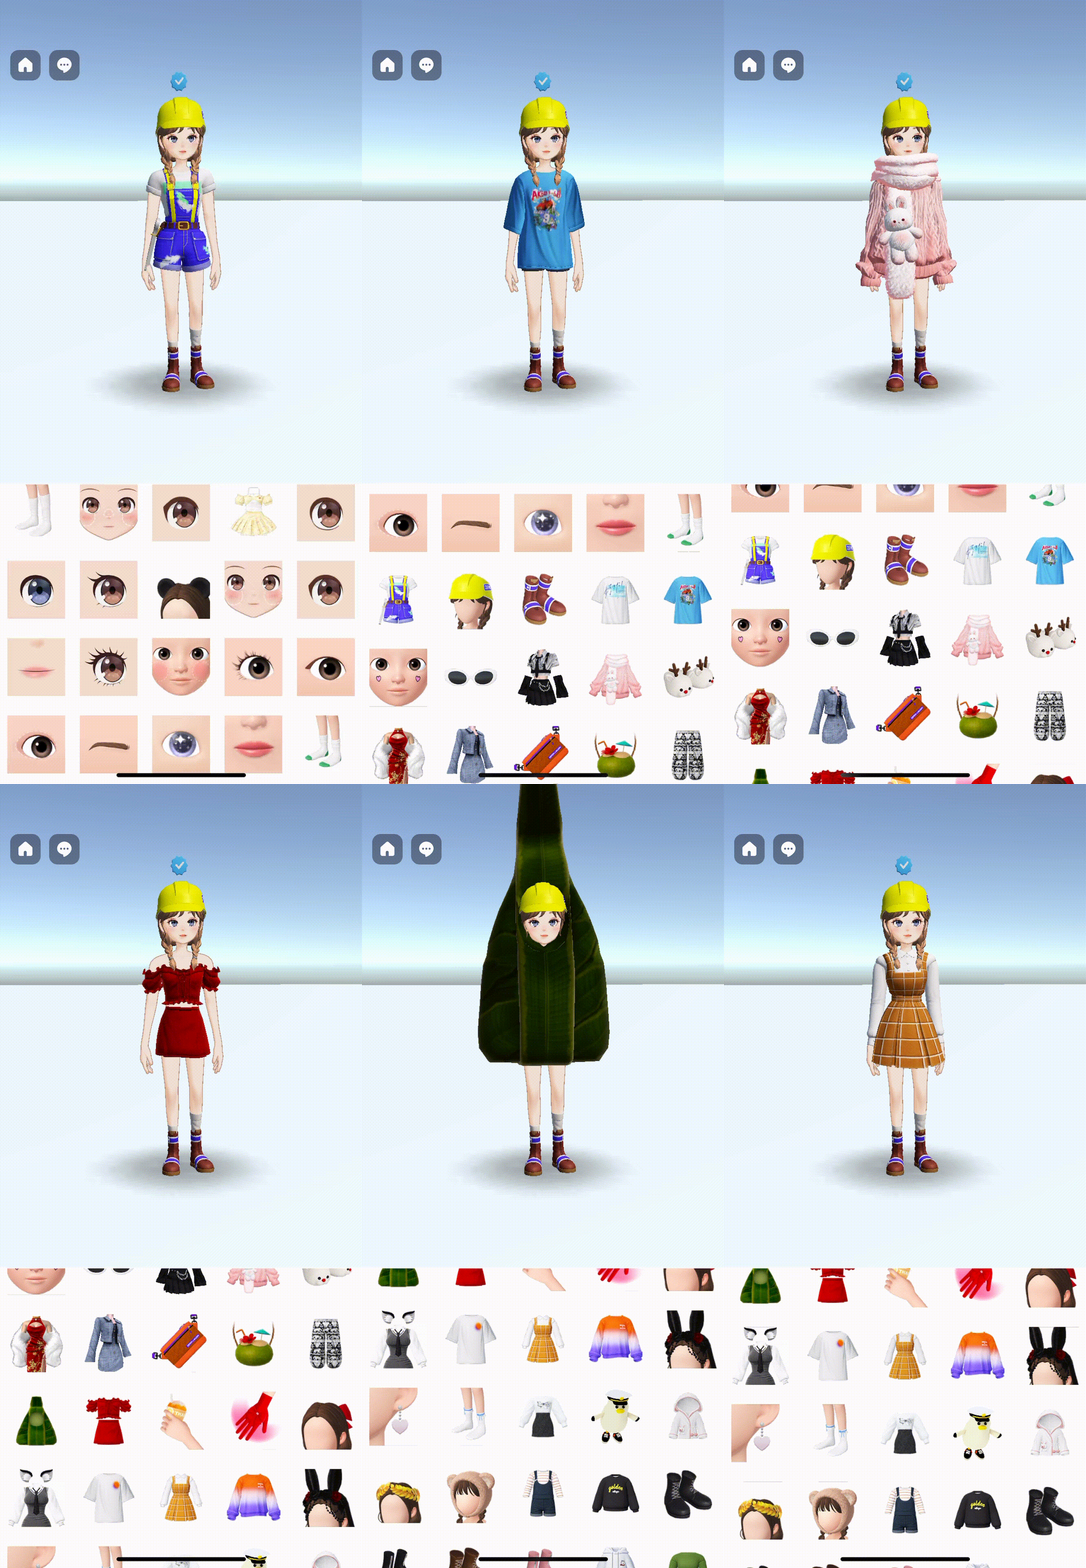
If you press the Play button to run it, the canvas UI will display a list of items owned by the local player, and you can see that the item changes to the corresponding outfit when selected.

Caution
- This costume wearing API only applies to local players and does not currently support multiplayer synchronization.
- Costume multiplayer synchronization will be available in the future.
